Le Tutoriel de Android TextClock
1. Android TextClock
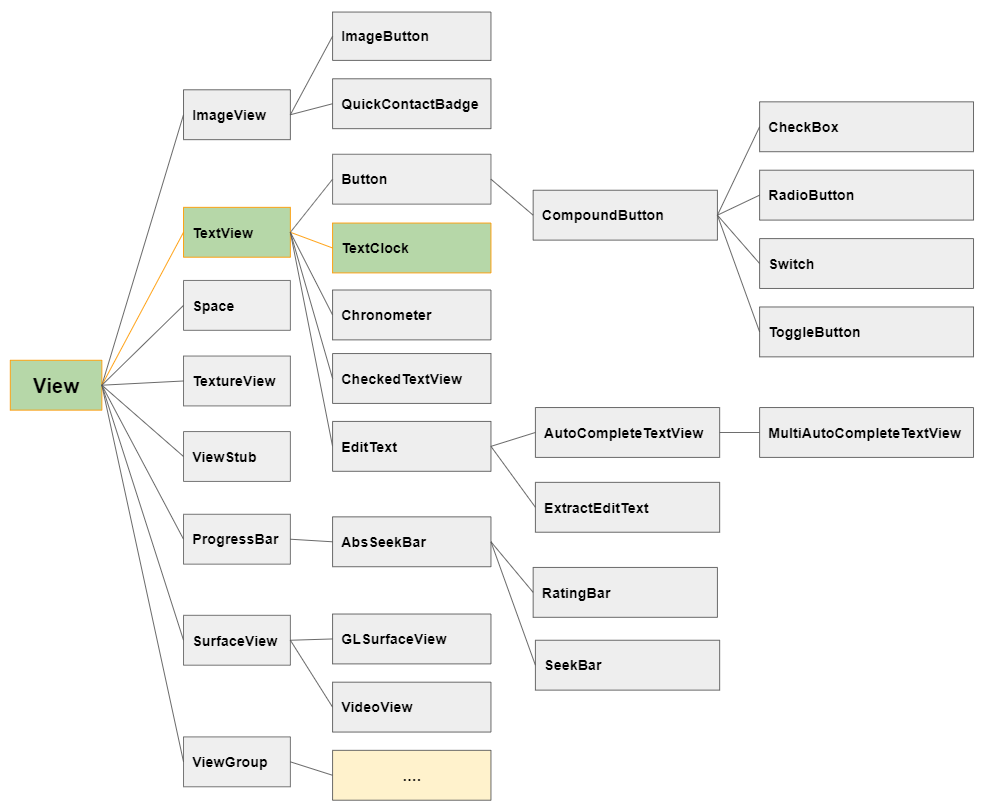
Sous Android, TextClock est une sous-classe de TextView. Il est utilisé pour afficher la date et l'heure (time) actuelles du système.
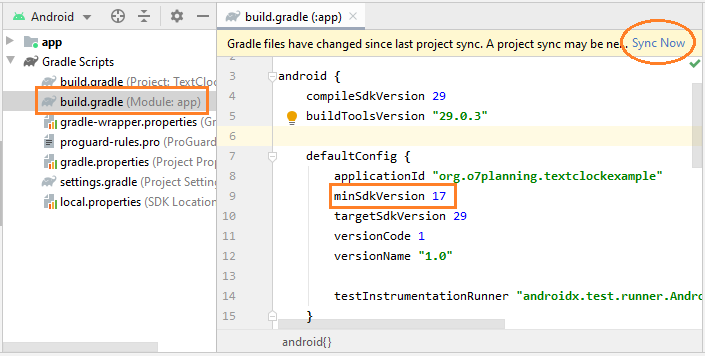
TextClock nécessite API Level 17 (Android 4.2) ou plus récent. Donc, si vous souhaitez utiliser TextClock dans votre projet, vous devez modifier la valeur de minSdkVersion dans le fichier build.gradle (Module: app), assurez-vous qu'il est supérieur ou égal à 17.
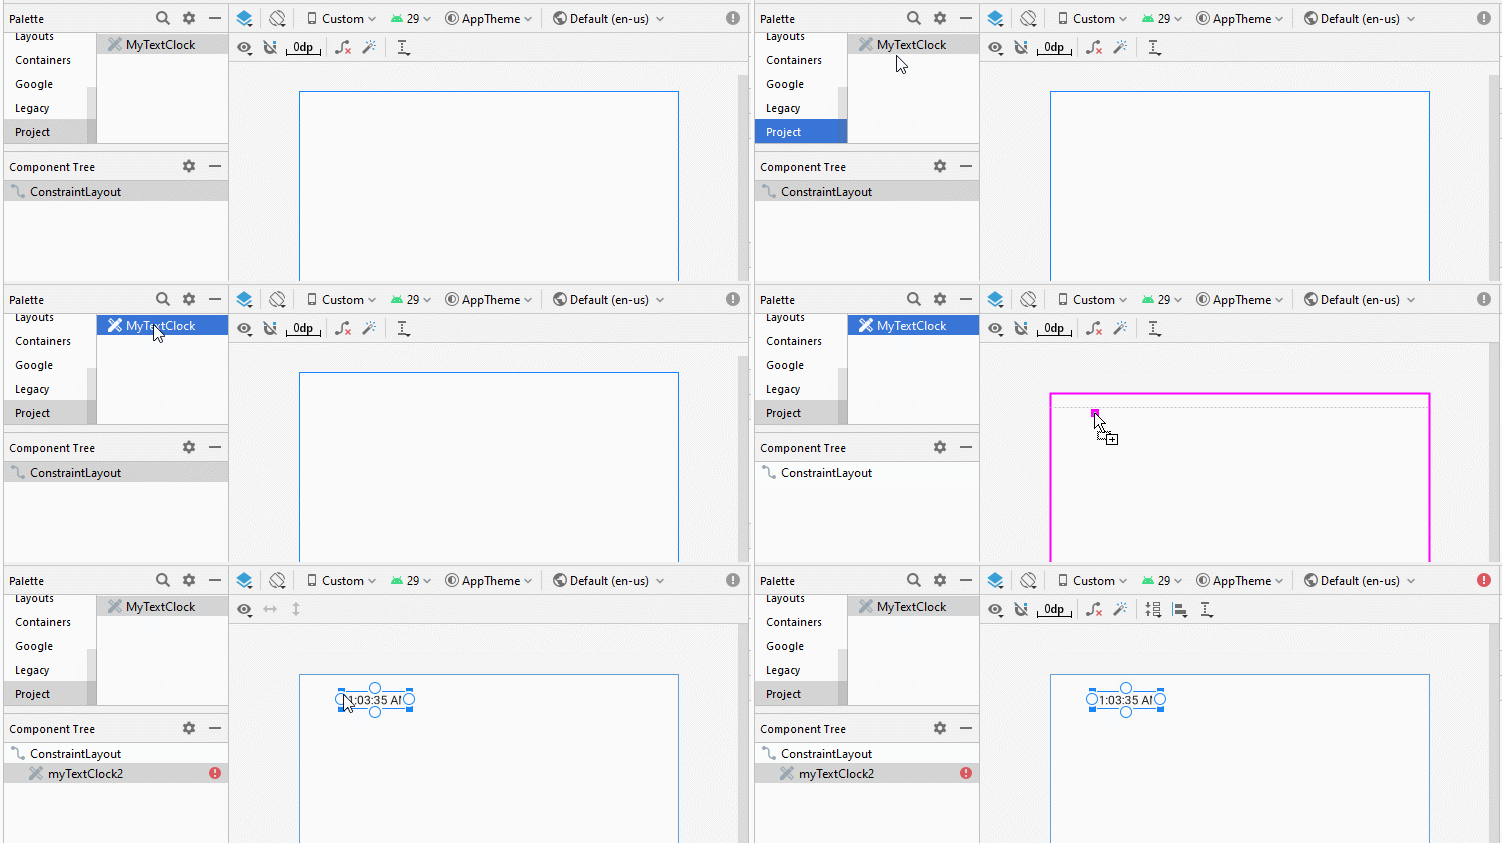
TextClock n'est pas disponible dans la Palette des fenêtres de conception, probablement parce qu'il ne s'agit pas d'un composant courant. Vous devez donc utiliser le code XML suivant pour l'ajouter à l'interface.
<!--
     IMPORTANT NOTE:
     You may get "Exception raised during rendering" error on design screen.
-->
<TextClock
    android:id="@+id/textClock"
    android:layout_width="wrap_content"
    android:layout_height="wrap_content"
    android:format12Hour="hh:mm:ss a" />
Remarque: Vous pouvez recevoir un message d'erreur lorsque vous essayez de concevoir l'interface en présence de TextClock. Ce problème a été confirmé sur Android Studio 3.x, 4.0. Quelques personnes ont soumis à Google des rapports à leur intention:
Exception raised during rendering.

java.lang.NullPointerException
    at android.content.ContentResolver.registerContentObserver(ContentResolver.java:2263)
    at android.widget.TextClock.registerObserver(TextClock.java:626)
    at android.widget.TextClock.onAttachedToWindow(TextClock.java:545)
    at android.view.View.dispatchAttachedToWindow(View.java:19575)
    at android.view.ViewGroup.dispatchAttachedToWindow(ViewGroup.java:3437)
    at android.view.ViewGroup.dispatchAttachedToWindow(ViewGroup.java:3437)
    at android.view.ViewGroup.dispatchAttachedToWindow(ViewGroup.java:3437)
    at android.view.ViewGroup.dispatchAttachedToWindow(ViewGroup.java:3437)
    at android.view.AttachInfo_Accessor.setAttachInfo(AttachInfo_Accessor.java:42)
    at com.android.layoutlib.bridge.impl.RenderSessionImpl.inflate(RenderSessionImpl.java:335)
    at com.android.layoutlib.bridge.Bridge.createSession(Bridge.java:396)
    at com.android.tools.idea.layoutlib.LayoutLibrary.createSession(LayoutLibrary.java:209)
    at com.android.tools.idea.rendering.RenderTask.createRenderSession(RenderTask.java:608)
    at com.android.tools.idea.rendering.RenderTask.lambda$inflate$6(RenderTask.java:734)
    at java.util.concurrent.CompletableFuture$AsyncSupply.run(CompletableFuture.java:1590)
    at java.util.concurrent.ThreadPoolExecutor.runWorker(ThreadPoolExecutor.java:1149)
    at java.util.concurrent.ThreadPoolExecutor$Worker.run(ThreadPoolExecutor.java:624)
    at java.lang.Thread.run(Thread.java:748)
Quoi qu'il en soit, j'ai résolu ce problème en créant une sous-classe de TextClock et en l'utilisant (voir plus dans l'exemple).
TextClock a deux modes d'affichage de l'heure:
- 12Hour Mode (Mode 12 heures)
- 24Hour Mode (Mode 24 heures)
Tout d'abord, l'objet TextClock appellera la méthode is24HourModeEnabled() pour vérifier si le périphérique de l'utilisateur utilise le mode 24 heures? Remarque: les utilisateurs peuvent passer du mode 12 heures au mode 24 heures et vice versa dans la section Settings de l'appareil.
Il y a 2 possibilités:
1 - Si l'appareil de l'utilisateur est en mode 24 heures.
- TextClock affichera l'heure au format de la valeur renvoyée par getFormat24Hour(), si elle n'est pas null.
- Sinon, il affichera l'heure au format de la valeur renvoyée par getFormat12Hour(), si elle n'est pas null.
- Sinon, il affichera l'heure au format par défaut, tel que "h:mm a".
2 - Si l'appareil de l'utilisateur est en mode 12 heures.
- TextClock affichera l'heure au format de la valeur renvoyée par getFormat12Hour(), si elle n'est pas null.
- Sinon, il affichera l'heure au format de la valeur renvoyée par getFormat24Hour(), si elle n'est pas null.
- Sinon, il affichera l'heure au format par défaut, tel que "h:mm a".
2. L'Exemple de TextClock
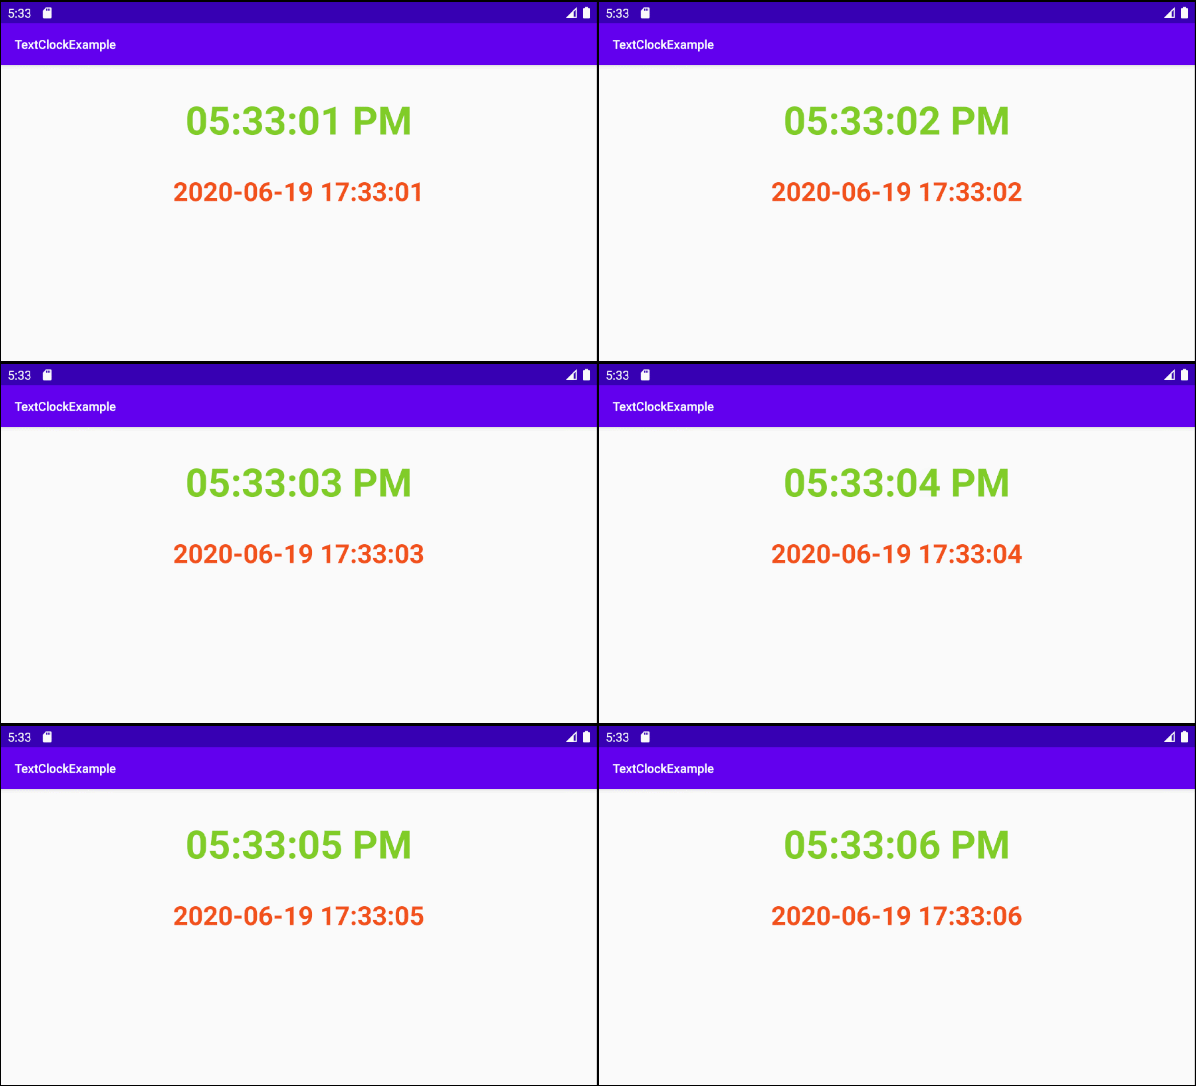
OK, sur Android Studio, créez un nouveau projet:
- File > New > New Project > Empty Activity
- Name: TextClockExample
- Package name: org.o7planning.textclockexample
- Language: Java
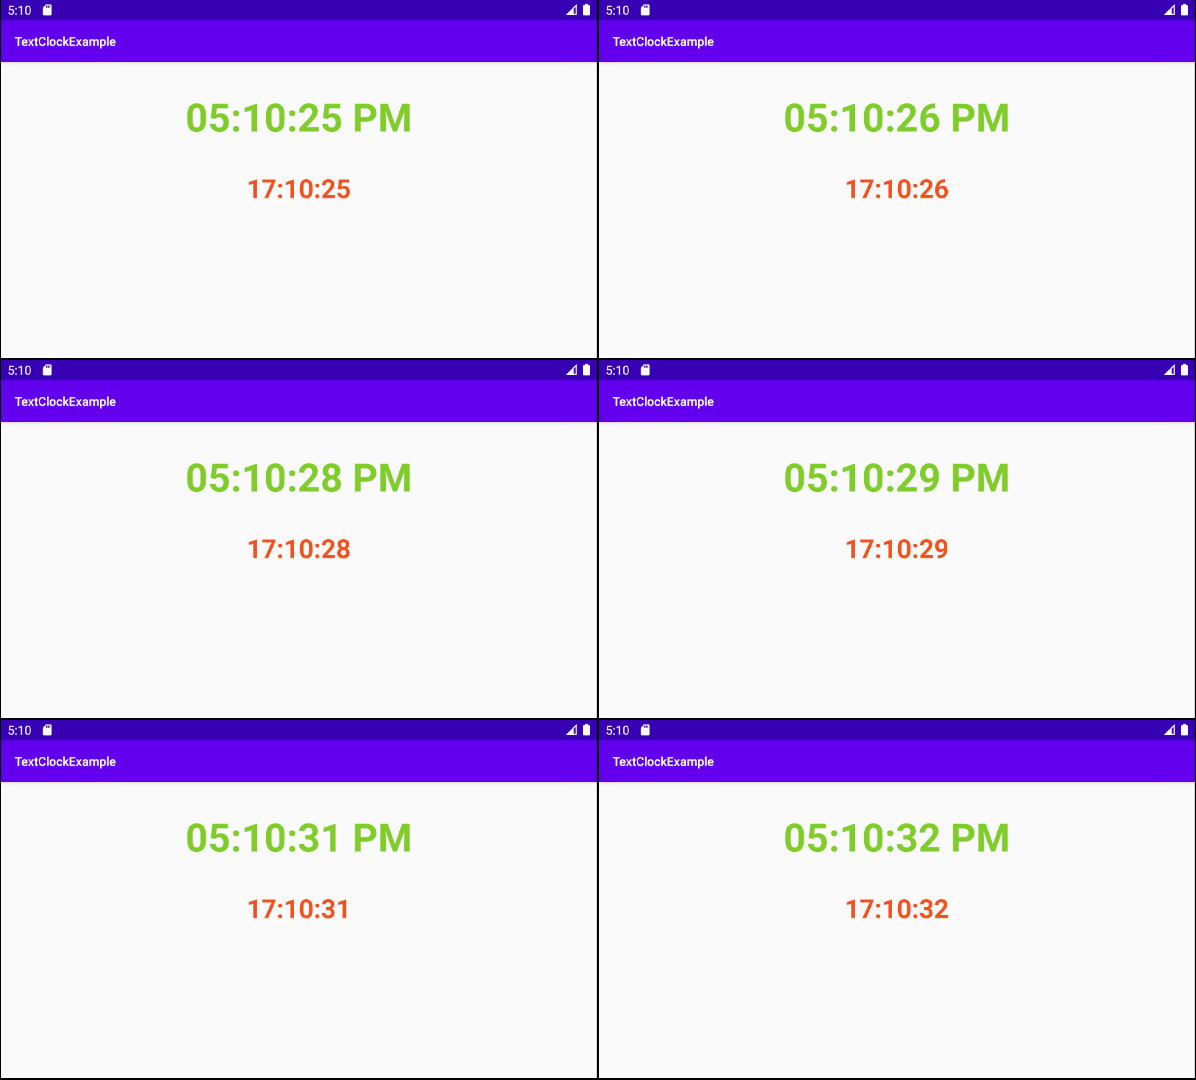
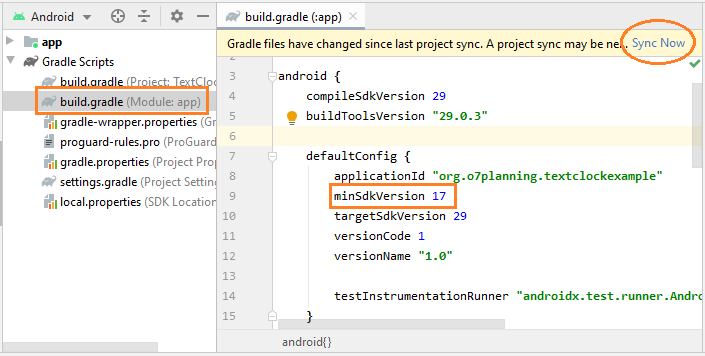
TextClock yêu cầu API Level 17 (Android 4.2) ou plus récent. Donc, si vous souhaitez utiliser TextClock dans votre projet, vous devez modifier la valeur de minSdkVersion dans le fichier build.gradle (Module: app), assurez-vous qu'il est supérieur ou égal à 17.
Comme mentionné ci-dessus, vous pouvez recevoir un message d'erreur lorsque vous essayez de concevoir l'interface en présence de TextClock. Il est possible que ce problème soit résolu par Google dans les versions plus récentes d'Android Studio. Mais pour l'instant, pour surmonter ce problème, nous créons la classe MyTextClock qui s'étend de TextClock et nous l'utilisons.
MyTextClock.java
package org.o7planning.textclockexample;

import android.content.Context;
import android.os.Build;
import android.util.AttributeSet;
import android.widget.TextClock;

import androidx.annotation.RequiresApi;

public class MyTextClock extends TextClock {

    public MyTextClock(Context context) {
        super(context);
        //
        this.setDesigningText();
    }

    public MyTextClock(Context context, AttributeSet attrs) {
        super(context, attrs);
        //
        this.setDesigningText();
    }

    public MyTextClock(Context context, AttributeSet attrs, int defStyleAttr) {
        super(context, attrs, defStyleAttr);
        //
        this.setDesigningText();
    }

    @RequiresApi(api = Build.VERSION_CODES.LOLLIPOP)
    public MyTextClock(Context context, AttributeSet attrs, int defStyleAttr, int defStyleRes) {
        super(context, attrs, defStyleAttr, defStyleRes);
        //
        this.setDesigningText();
    }

    private void setDesigningText() {
        // The default text is displayed when designing the interface.
        this.setText("11:30:00");
    }

    //
    // Fix error: Exception raised during rendering.
    //
    // java.lang.NullPointerException
    //    at android.content.ContentResolver.registerContentObserver(ContentResolver.java:2263)
    //    at android.widget.TextClock.registerObserver(TextClock.java:626)
    //    at android.widget.TextClock.onAttachedToWindow(TextClock.java:545)
    //    at android.view.View.dispatchAttachedToWindow(View.java:19575)
    //    at android.view.ViewGroup.dispatchAttachedToWindow(ViewGroup.java:3437)
    //    at android.view.ViewGroup.dispatchAttachedToWindow(ViewGroup.java:3437)
    //    at android.view.ViewGroup.dispatchAttachedToWindow(ViewGroup.java:3437)
    //    at android.view.ViewGroup.dispatchAttachedToWindow(ViewGroup.java:3437)
    //    at android.view.AttachInfo_Accessor.setAttachInfo(AttachInfo_Accessor.java:42)
    //    at com.android.layoutlib.bridge.impl.RenderSessionImpl.inflate(RenderSessionImpl.java:335)
    //    at com.android.layoutlib.bridge.Bridge.createSession(Bridge.java:396)
    //    at com.android.tools.idea.layoutlib.LayoutLibrary.createSession(LayoutLibrary.java:209)
    //    at com.android.tools.idea.rendering.RenderTask.createRenderSession(RenderTask.java:608)
    //    at com.android.tools.idea.rendering.RenderTask.lambda$inflate$6(RenderTask.java:734)
    //    at java.util.concurrent.CompletableFuture$AsyncSupply.run(CompletableFuture.java:1590)
    //    at java.util.concurrent.ThreadPoolExecutor.runWorker(ThreadPoolExecutor.java:1149)
    //    at java.util.concurrent.ThreadPoolExecutor$Worker.run(ThreadPoolExecutor.java:624)
    //    at java.lang.Thread.run(Thread.java:748)
    @Override
    protected void onAttachedToWindow() {
        try {
            super.onAttachedToWindow();
        } catch(Exception e)  {
        }
    }

}
Conception d'interface de l'application:
Note: You need to Re-Build project, and then you will see MyTextClock appear on the Palette of design window.
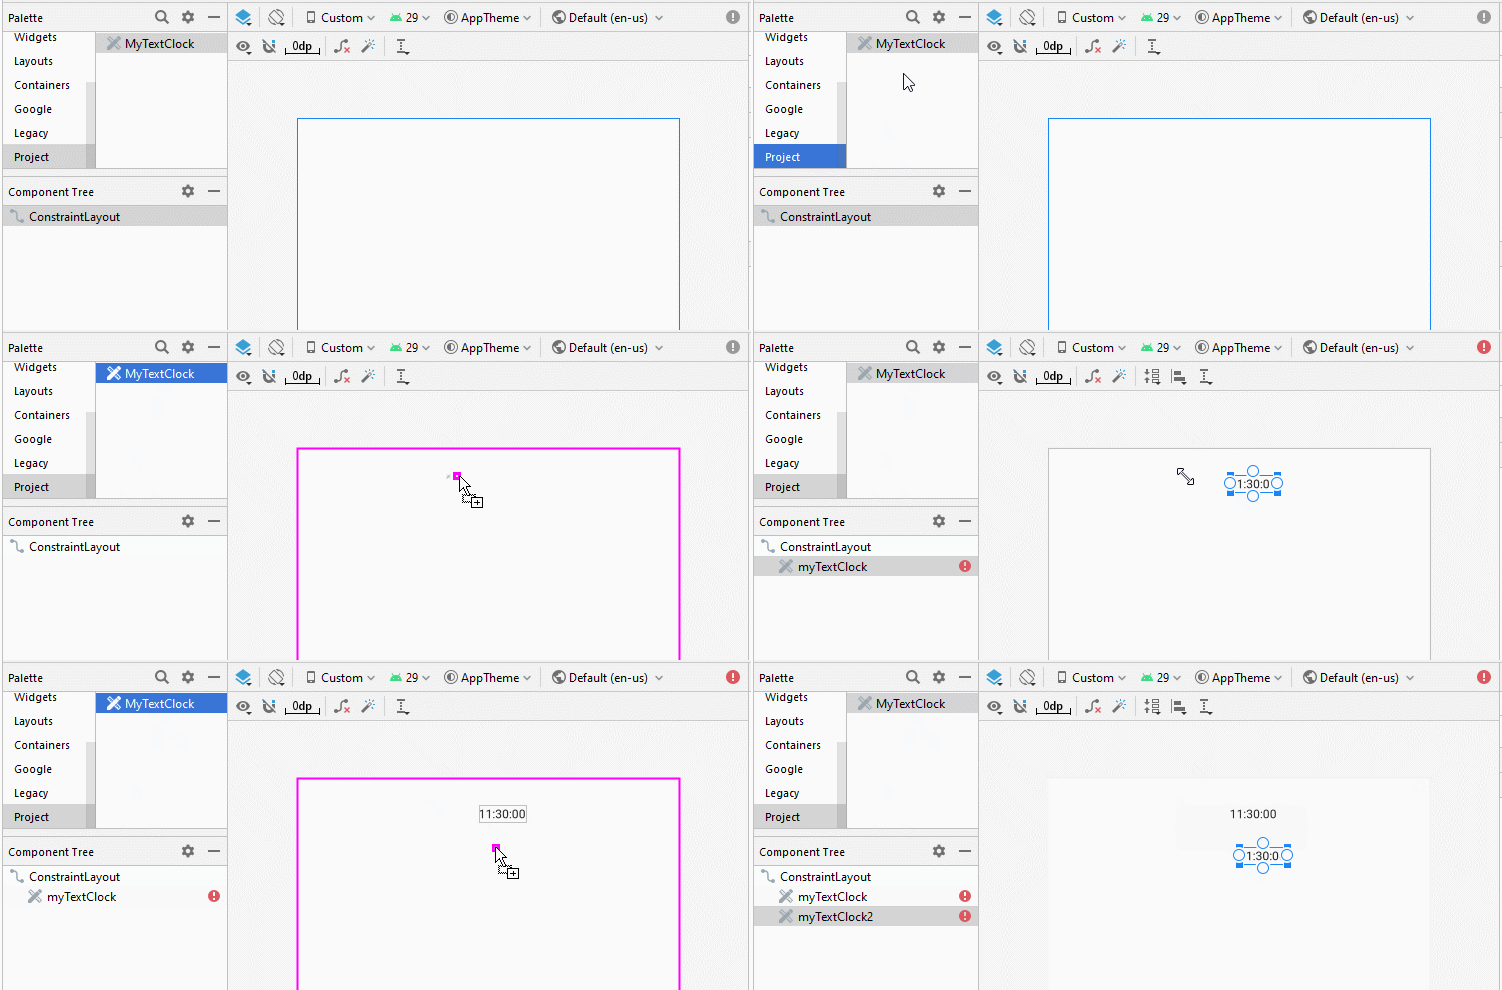
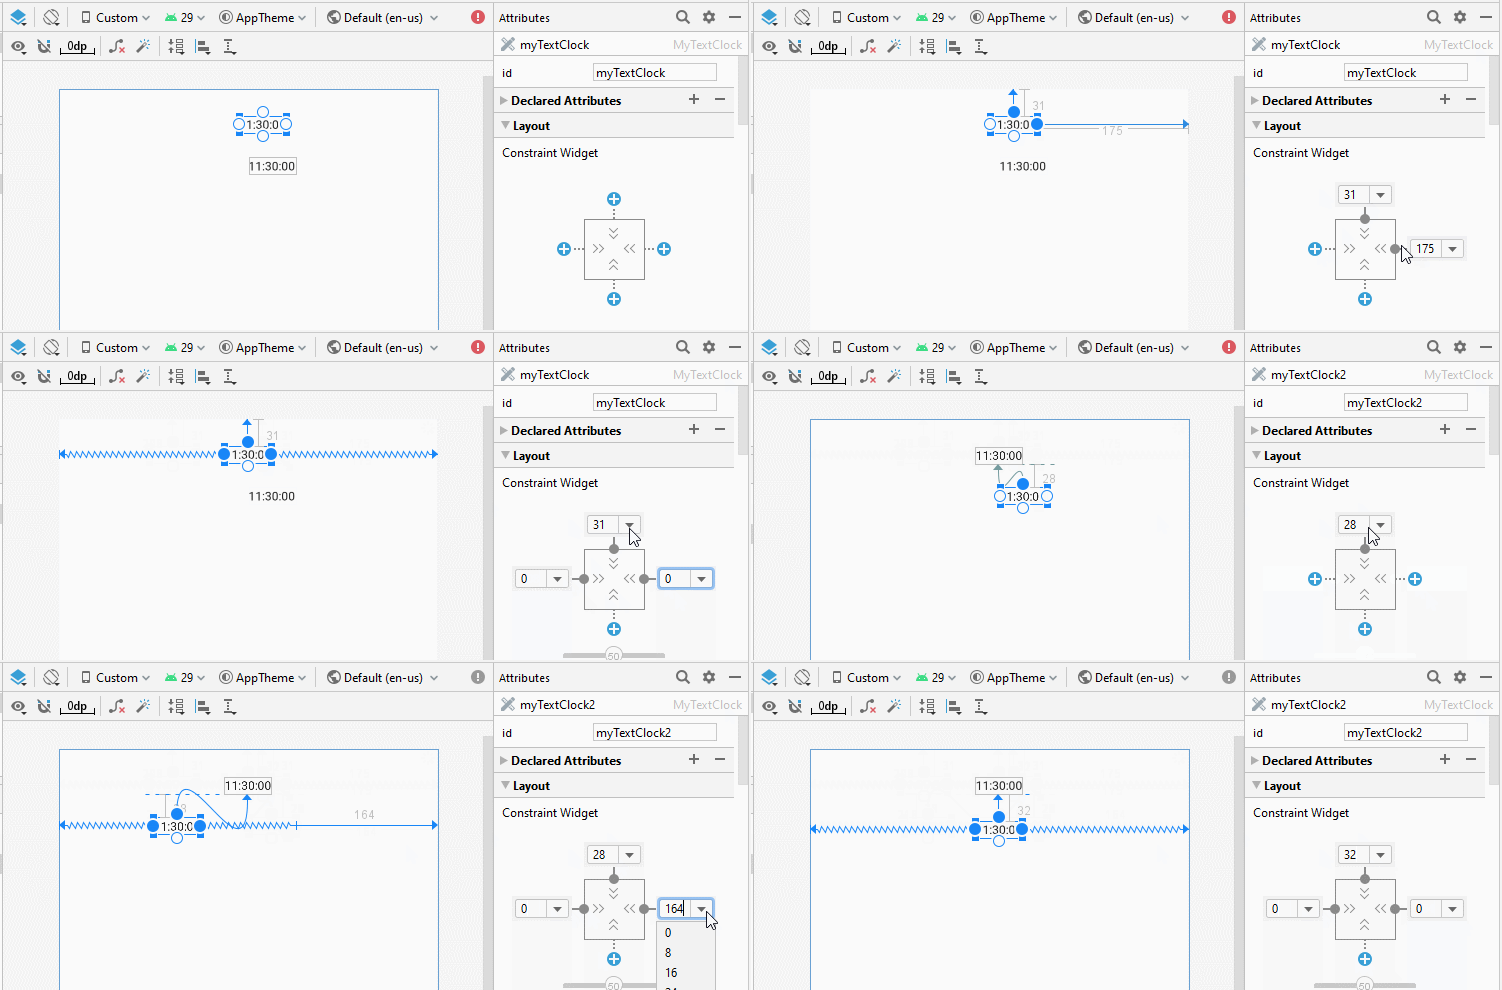
Définissez textSize, textStyle, textColor, format12Hour, format24Hour pour TextClock.
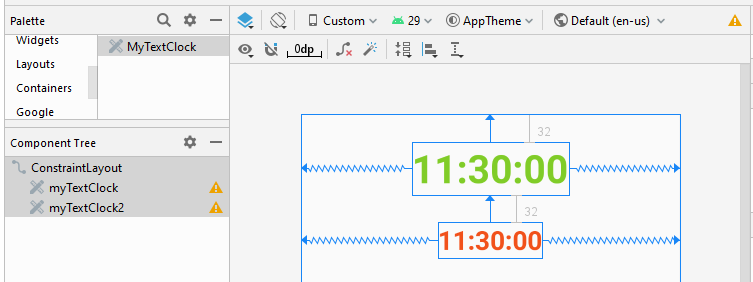
activity_main.xml
<?xml version="1.0" encoding="utf-8"?>
<androidx.constraintlayout.widget.ConstraintLayout
    xmlns:android="http://schemas.android.com/apk/res/android"
    xmlns:app="http://schemas.android.com/apk/res-auto"
    xmlns:tools="http://schemas.android.com/tools"
    android:layout_width="match_parent"
    android:layout_height="match_parent"
    tools:context=".MainActivity">

    <!-- 12 Hour Mode -->
    <org.o7planning.textclockexample.MyTextClock
        android:id="@+id/myTextClock"
        android:layout_width="wrap_content"
        android:layout_height="wrap_content"
        android:layout_marginTop="32dp"
        android:format12Hour="hh:mm:ss a"
        android:format24Hour="@null"
        android:textColor="#80CC28"
        android:textSize="45dp"
        android:textStyle="bold"
        app:layout_constraintEnd_toEndOf="parent"
        app:layout_constraintStart_toStartOf="parent"
        app:layout_constraintTop_toTopOf="parent" />

    <!-- 24 Hour Mode -->
    <org.o7planning.textclockexample.MyTextClock
        android:id="@+id/myTextClock2"
        android:layout_width="wrap_content"
        android:layout_height="wrap_content"
        android:layout_marginTop="32dp"
        android:format12Hour="@null"
        android:format24Hour="yyyy-MM-dd HH:mm:ss"
        android:textColor="#F1511B"
        android:textSize="30dp"
        android:textStyle="bold"
        app:layout_constraintEnd_toEndOf="parent"
        app:layout_constraintStart_toStartOf="parent"
        app:layout_constraintTop_toBottomOf="@+id/myTextClock" />
</androidx.constraintlayout.widget.ConstraintLayout>
MainActivity.java
package org.o7planning.textclockexample;

import androidx.appcompat.app.AppCompatActivity;

import android.os.Bundle;
import android.widget.TextClock;

public class MainActivity extends AppCompatActivity {

    private TextClock textClock;
    private TextClock textClock2;

    @Override
    protected void onCreate(Bundle savedInstanceState) {
        super.onCreate(savedInstanceState);
        setContentView(R.layout.activity_main);

        this.textClock = (TextClock) this.findViewById(R.id.myTextClock);
        this.textClock2 = (TextClock) this.findViewById(R.id.myTextClock2);

        // Disable 24 Hour mode (To use 12 Hour mode).
        // (Make sure getFormat12Hour() is not null).
        this.textClock.setFormat24Hour(null);

        // Disable 12 Hour mode (To use 24 Hour mode).
        // (Make sure getFormat24Hour() is not null).
        this.textClock2.setFormat12Hour(null);
    }
}
Tutoriels de programmation Android
- Configurer Android Emulator en Android Studio
- Le Tutoriel de Android ToggleButton
- Créer un File Finder Dialog simple dans Android
- Le Tutoriel de Android TimePickerDialog
- Le Tutoriel de Android DatePickerDialog
- De quoi avez-vous besoin pour démarrer avec Android?
- Installer Android Studio sur Windows
- Installer Intel® HAXM pour Android Studio
- Le Tutoriel de Android AsyncTask
- Le Tutoriel de Android AsyncTaskLoader
- Tutoriel Android pour débutant - Exemples de base
- Comment connaître le numéro de téléphone d'Android Emulator et le changer?
- Le Tutoriel de Android TextInputLayout
- Le Tutoriel de Android CardView
- Le Tutoriel de Android ViewPager2
- Obtenir un numéro de téléphone dans Android à l'aide de TelephonyManager
- Le Tutoriel de Android Phone Call
- Le Tutoriel de Android Wifi Scanning
- Le Tutoriel de programmation de jeux Android 2D pour débutant
- Le Tutoriel de Android DialogFragment
- Le Tutoriel de Android CharacterPickerDialog
- Le Tutoriel Android pour débutant - Hello Android
- Utiliser Android Device File Explorer
- Activer USB Debugging sur un appareil Android
- Le Tutoriel de Android UI Layouts
- Le Tutoriel de Android SMS
- Le Tutoriel de Android et SQLite Database
- Le Tutoriel de Google Maps Android API
- Le Tutoriel de texte pour parler dans Android
- Le Tutoriel de Android Space
- Le Tutoriel de Android Toast
- Créer un Android Toast personnalisé
- Le Tutoriel de Android SnackBar
- Le Tutoriel de Android TextView
- Le Tutoriel de Android TextClock
- Le Tutoriel de Android EditText
- Le Tutoriel de Android TextWatcher
- Formater le numéro de carte de crédit avec Android TextWatcher
- Le Tutoriel de Android Clipboard
- Créer un File Chooser simple dans Android
- Le Tutoriel de Android AutoCompleteTextView et MultiAutoCompleteTextView
- Le Tutoriel de Android ImageView
- Le Tutoriel de Android ImageSwitcher
- Le Tutoriel de Android ScrollView et HorizontalScrollView
- Le Tutoriel de Android WebView
- Le Tutoriel de Android SeekBar
- Le Tutoriel de Android Dialog
- Le Tutoriel de Android AlertDialog
- Tutoriel Android RatingBar
- Le Tutoriel de Android ProgressBar
- Le Tutoriel de Android Spinner
- Le Tutoriel de Android Button
- Le Tutoriel de Android Switch
- Le Tutoriel de Android ImageButton
- Le Tutoriel de Android FloatingActionButton
- Le Tutoriel de Android CheckBox
- Le Tutoriel de Android RadioGroup et RadioButton
- Le Tutoriel de Android Chip et ChipGroup
- Utilisation des Image assets et des Icon assets d'Android Studio
- Configuration de la Carte SD pour Android Emulator
- Exemple ChipGroup et Chip Entry
- Comment ajouter des bibliothèques externes à Android Project dans Android Studio?
- Comment désactiver les autorisations déjà accordées à l'application Android?
- Comment supprimer des applications de Android Emulator?
- Le Tutoriel de Android LinearLayout
- Le Tutoriel de Android TableLayout
- Le Tutoriel de Android FrameLayout
- Le Tutoriel de Android QuickContactBadge
- Le Tutoriel de Android StackView
- Le Tutoriel de Android Camera
- Le Tutoriel de Android MediaPlayer
- Le Tutoriel de Android VideoView
- Jouer des effets sonores dans Android avec SoundPool
- Le Tutoriel de Android Networking
- Analyser JSON dans Android
- Le Tutoriel de Android SharedPreferences
- Le Tutorial de stockage interne Android (Internal Storage)
- Le Tutoriel de Android External Storage
- Le Tutoriel de Android Intents
- Exemple d'une Android Intent explicite, appelant une autre Intent
- Exemple de Android Intent implicite, ouvrez une URL, envoyez un email
- Le Tutoriel de Android Service
- Le Tutoriel Android Notifications
- Le Tutoriel de Android DatePicker
- Le Tutoriel de Android TimePicker
- Le Tutoriel de Android Chronometer
- Le Tutoriel de Android OptionMenu
- Le Tutoriel de Android ContextMenu
- Le Tutoriel de Android PopupMenu
- Le Tutoriel de Android Fragment
- Le Tutoriel de Android ListView
- Android ListView avec Checkbox en utilisant ArrayAdapter
- Le Tutoriel de Android GridView
Show More