Le Tutoriel de Android DialogFragment
1. Android DialogFragment
Android DialogFragment est un fragment contenant une Dialog (boîte de dialogue). Il contrôle la fonction de la Dialog, par exemple, il détermine quand masquer, afficher ou fermer cette Dialog. Il faut interagir avec la Dialog via les méthodes DialogFragment plutôt que des interactions directes.
Vous pouvez poser la question suivante: "Pourquoi a-t-on besoin de DialogFragment quand on a déjà Dialog?". La réponse est que DialogFragment est créé pour combler les lacunes de Dialog.
TODO
Il est facile d'obtenir un DialogFragment. Il suffit des deux étapes suivantes:
D'abord, il faut écrire une classe de YourDialogFragment élargie à partir de la classe DialogFragment. En plus, remplacer (override) la méthode onCreateDialog(Bundle) qui renvoie une Dialog (YourDialog). Par conséquent, YourDialogFragment joue le rôle d'un contenant de YourDialog.
Android DialogFragment Javadocs:
2. Exemple de DialogFragment
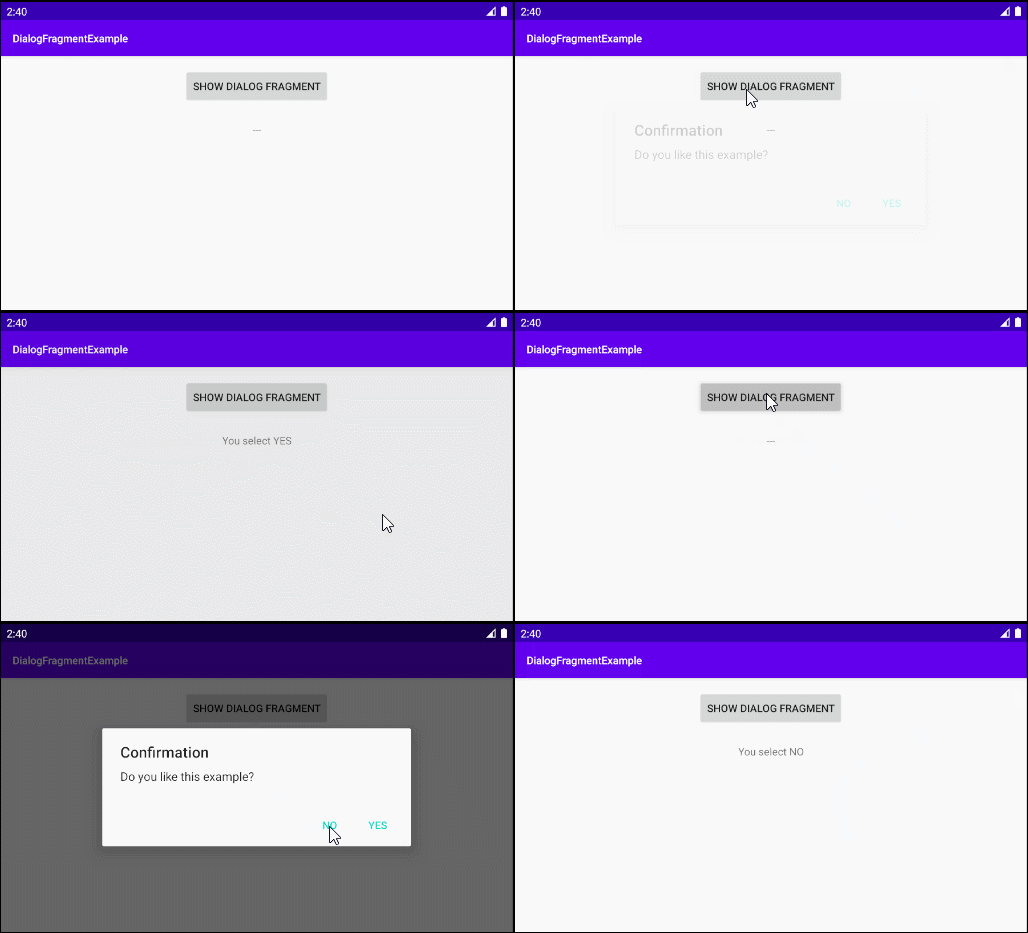
Dans cet exemple, on crée une classe YesNoDialogFragment élargie à partir de la classe DialogFragment. Cette classe contient un objet d'AlertDialog avec 2 buttons, YES/NO.

Cet exemple montre comment créer et afficher YesNoDialogFragment à partir d'une Activity. Vous pouvez également créer et afficher YesNoDialogFragment à partir d'un autre Fragment avec un petit changement dans le code.
OK, dans Android Studio, créer un nouveau projet:
- File > New > New Project > Empty Activity
- Name: DialogFragmentExample
- Package name: org.o7planning.dialogfragmentexample
- Language: Java
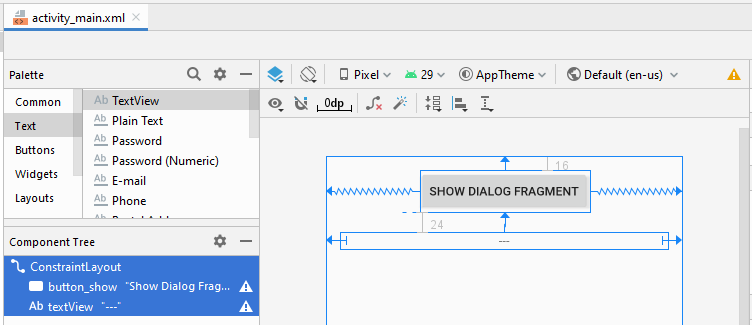
Ci-dessous l'interface de l'application:

activity_main.xml
<?xml version="1.0" encoding="utf-8"?>
<androidx.constraintlayout.widget.ConstraintLayout
    xmlns:android="http://schemas.android.com/apk/res/android"
    xmlns:app="http://schemas.android.com/apk/res-auto"
    xmlns:tools="http://schemas.android.com/tools"
    android:layout_width="match_parent"
    android:layout_height="match_parent"
    tools:context=".MainActivity">

    <Button
        android:id="@+id/button_show"
        android:layout_width="wrap_content"
        android:layout_height="wrap_content"
        android:layout_marginTop="16dp"
        android:text="Show Dialog Fragment"
        app:layout_constraintEnd_toEndOf="parent"
        app:layout_constraintStart_toStartOf="parent"
        app:layout_constraintTop_toTopOf="parent" />

    <TextView
        android:id="@+id/textView"
        android:layout_width="0dp"
        android:layout_height="wrap_content"
        android:layout_marginStart="16dp"
        android:layout_marginLeft="16dp"
        android:layout_marginTop="24dp"
        android:layout_marginEnd="16dp"
        android:layout_marginRight="16dp"
        android:gravity="center"
        android:text="---"
        app:layout_constraintEnd_toEndOf="parent"
        app:layout_constraintStart_toStartOf="parent"
        app:layout_constraintTop_toBottomOf="@+id/button_show" />
</androidx.constraintlayout.widget.ConstraintLayout>
YesNoDialogFragment.java
package org.o7planning.dialogfragmentexample;

import android.app.Activity;
import android.app.Dialog;
import android.content.DialogInterface;
import android.content.Intent;
import android.os.Bundle;

import androidx.annotation.Nullable;
import androidx.appcompat.app.AlertDialog;
import androidx.fragment.app.DialogFragment;

public class YesNoDialogFragment extends DialogFragment {

    public static final String ARG_TITLE = "YesNoDialog.Title";
    public static final String ARG_MESSAGE = "YesNoDialog.Message";

    private YesNoDialogFragmentListener listener;

    public interface YesNoDialogFragmentListener {
        /**
         *
         * @param resultCode - Activity.RESULT_OK, Activity.RESULT_CANCEL
         * @param data
         */
         public void onYesNoResultDialog(int resultCode, @Nullable Intent data);
    }

    public YesNoDialogFragment() {

    }

    public void setOnYesNoDialogFragmentListener(YesNoDialogFragmentListener listener) {
        this.listener = listener;
    }

    @Override
    public Dialog onCreateDialog(Bundle savedInstanceState) {
        Bundle args = getArguments();
        String title = args.getString(ARG_TITLE);
        String message = args.getString(ARG_MESSAGE);

        return new AlertDialog.Builder(getActivity())
                .setTitle(title)
                .setMessage(message)
                .setPositiveButton("Yes", new DialogInterface.OnClickListener() {
                    @Override
                    public void onClick(DialogInterface dialog, int which) {
                        buttonOkClick();
                    }
                })
                .setNegativeButton("No", new DialogInterface.OnClickListener() {
                    @Override
                    public void onClick(DialogInterface dialog, int which) {
                        buttonNoClick();
                    }
                })
                .create();
    }

    private void buttonOkClick() {
        int resultCode = Activity.RESULT_OK;

        Bundle bundle = new Bundle();
        bundle.putString("key1", "Value 1");
        bundle.putString("key2", "Value 2");
        Intent data  = new Intent().putExtras(bundle);

        // Open this DialogFragment from an Activity.
        if(this.listener != null)  {
            this.listener.onYesNoResultDialog(Activity.RESULT_OK, data);
        }
        // Open this DialogFragment from another Fragment.
        else {
            // Send result to your TargetFragment.
            // See (Your) TargetFragment.onActivityResult()
            getTargetFragment().onActivityResult(getTargetRequestCode(), resultCode, data);
        }
    }

    private void buttonNoClick() {
        int resultCode = Activity.RESULT_CANCELED;
        Intent data  = null;

         // Open this DialogFragment from an Activity.
        if(this.listener != null)  {
            this.listener.onYesNoResultDialog(resultCode, data);
        }
        // Open this DialogFragment from another Fragment.
        else {
            // Send result to your TargetFragment.
            // See (Your) TargetFragment.onActivityResult()
            getTargetFragment().onActivityResult(getTargetRequestCode(), resultCode, data);
        }
    }

}
MainActivity.java
package org.o7planning.dialogfragmentexample;

import androidx.annotation.Nullable;
import androidx.appcompat.app.AppCompatActivity;
import androidx.fragment.app.DialogFragment;
import androidx.fragment.app.Fragment;
import androidx.fragment.app.FragmentManager;

import android.app.Activity;
import android.content.Intent;
import android.os.Bundle;
import android.view.View;
import android.widget.Button;
import android.widget.TextView;

public class MainActivity extends AppCompatActivity
        implements YesNoDialogFragment.YesNoDialogFragmentListener {

    private Button buttonShow;
    private TextView textView;

    @Override
    protected void onCreate(Bundle savedInstanceState) {
        super.onCreate(savedInstanceState);
        setContentView(R.layout.activity_main);

        this.buttonShow = (Button) this.findViewById(R.id.button_show);
        this.textView = (TextView) this.findViewById(R.id.textView);

        this.buttonShow.setOnClickListener(new View.OnClickListener() {
            @Override
            public void onClick(View v) {
                buttonShowClicked();
            }
        });
    }

    // User click on "Show Dialog" button.
    private void buttonShowClicked()  {
        this.textView.setText("---");

        // Create YesNoDialogFragment
        DialogFragment dialogFragment = new YesNoDialogFragment();

        // Arguments:
        Bundle args = new Bundle();
        args.putString(YesNoDialogFragment.ARG_TITLE, "Confirmation");
        args.putString(YesNoDialogFragment.ARG_MESSAGE, "Do you like this example?");
        dialogFragment.setArguments(args);

        FragmentManager fragmentManager = this.getSupportFragmentManager();

        // Show:
        dialogFragment.show(fragmentManager, "Dialog");
    }

    @Override
    public void onAttachFragment(Fragment fragment) {
        if (fragment instanceof YesNoDialogFragment) {
            YesNoDialogFragment yesNoDialogFragment = (YesNoDialogFragment) fragment;
            yesNoDialogFragment.setOnYesNoDialogFragmentListener(this);
        }
    }

    // Implement method of YesNoDialogFragment.YesNoDialogFragmentListener
    @Override
    public void onYesNoResultDialog(int resultCode, @Nullable Intent data) {
        if(resultCode == Activity.RESULT_OK) {
            String value1 = data.getStringExtra("key1"); // ...
            this.textView.setText("You select YES");
        } else if(resultCode == Activity.RESULT_CANCELED) {
            this.textView.setText("You select NO");
        } else {
            this.textView.setText("You don't select");
        }
    }

}
Ci-dessous le code pour créer et afficher YesNoDialogFragment à partir d'un autre Fragment.
ExampleFragment.java
package org.o7planning.dialogfragmentexample;

import android.app.Activity;
import android.content.Intent;
import android.os.Bundle;

import androidx.annotation.Nullable;
import androidx.fragment.app.DialogFragment;
import androidx.fragment.app.Fragment;
import androidx.fragment.app.FragmentManager;

import android.view.LayoutInflater;
import android.view.View;
import android.view.ViewGroup;
import android.widget.Toast;

public class ExampleFragment extends Fragment {

    private static final int REQUEST_CODE_YESNO_DIALOG_FRAGMENT = 1000;

    public ExampleFragment() {
    }

    @Override
    public void onCreate(Bundle savedInstanceState) {
        super.onCreate(savedInstanceState);
    }

    @Override
    public View onCreateView(LayoutInflater inflater, ViewGroup container,
                             Bundle savedInstanceState) {
        // Inflate the layout for this fragment
        return inflater.inflate(R.layout.fragment_example, container, false);
    }

    // Call this method to show YesNoDialogFragment
    private void showYesNoDialogFragment() {
        // Create YesNoDialogFragment
        DialogFragment dialogFragment = new YesNoDialogFragment();

        // Arguments:
        Bundle args = new Bundle();
        args.putString(YesNoDialogFragment.ARG_TITLE, "Confirmation");
        args.putString(YesNoDialogFragment.ARG_MESSAGE, "Do you like this example?");
        dialogFragment.setArguments(args);

        // YesNoDialogFragment will return results for targetFragment.
        // So, Need to Override onActivityResult() method, to get results.
        Fragment targetFragment = this;

        // IMPORTANT!!
        dialogFragment.setTargetFragment(targetFragment, REQUEST_CODE_YESNO_DIALOG_FRAGMENT);

        FragmentManager fragmentManager = this.getFragmentManager();
        // Show:
        dialogFragment.show(fragmentManager, "Dialog");
    }

    // Results are returned by YesNoDialogFragment.
    @Override
    public void onActivityResult(int requestCode, int resultCode, @Nullable Intent data) {
        super.onActivityResult(requestCode, resultCode, data);

        if(requestCode == REQUEST_CODE_YESNO_DIALOG_FRAGMENT) {
            if(resultCode == Activity.RESULT_OK) {
                Toast.makeText(this.getContext(), "You select YES", Toast.LENGTH_LONG).show();
            } else if(resultCode == Activity.RESULT_CANCELED) {
                Toast.makeText(this.getContext(), "You select NO", Toast.LENGTH_LONG).show();
            }
        }
    }
}
Tutoriels de programmation Android
- Configurer Android Emulator en Android Studio
- Le Tutoriel de Android ToggleButton
- Créer un File Finder Dialog simple dans Android
- Le Tutoriel de Android TimePickerDialog
- Le Tutoriel de Android DatePickerDialog
- De quoi avez-vous besoin pour démarrer avec Android?
- Installer Android Studio sur Windows
- Installer Intel® HAXM pour Android Studio
- Le Tutoriel de Android AsyncTask
- Le Tutoriel de Android AsyncTaskLoader
- Tutoriel Android pour débutant - Exemples de base
- Comment connaître le numéro de téléphone d'Android Emulator et le changer?
- Le Tutoriel de Android TextInputLayout
- Le Tutoriel de Android CardView
- Le Tutoriel de Android ViewPager2
- Obtenir un numéro de téléphone dans Android à l'aide de TelephonyManager
- Le Tutoriel de Android Phone Call
- Le Tutoriel de Android Wifi Scanning
- Le Tutoriel de programmation de jeux Android 2D pour débutant
- Le Tutoriel de Android DialogFragment
- Le Tutoriel de Android CharacterPickerDialog
- Le Tutoriel Android pour débutant - Hello Android
- Utiliser Android Device File Explorer
- Activer USB Debugging sur un appareil Android
- Le Tutoriel de Android UI Layouts
- Le Tutoriel de Android SMS
- Le Tutoriel de Android et SQLite Database
- Le Tutoriel de Google Maps Android API
- Le Tutoriel de texte pour parler dans Android
- Le Tutoriel de Android Space
- Le Tutoriel de Android Toast
- Créer un Android Toast personnalisé
- Le Tutoriel de Android SnackBar
- Le Tutoriel de Android TextView
- Le Tutoriel de Android TextClock
- Le Tutoriel de Android EditText
- Le Tutoriel de Android TextWatcher
- Formater le numéro de carte de crédit avec Android TextWatcher
- Le Tutoriel de Android Clipboard
- Créer un File Chooser simple dans Android
- Le Tutoriel de Android AutoCompleteTextView et MultiAutoCompleteTextView
- Le Tutoriel de Android ImageView
- Le Tutoriel de Android ImageSwitcher
- Le Tutoriel de Android ScrollView et HorizontalScrollView
- Le Tutoriel de Android WebView
- Le Tutoriel de Android SeekBar
- Le Tutoriel de Android Dialog
- Le Tutoriel de Android AlertDialog
- Tutoriel Android RatingBar
- Le Tutoriel de Android ProgressBar
- Le Tutoriel de Android Spinner
- Le Tutoriel de Android Button
- Le Tutoriel de Android Switch
- Le Tutoriel de Android ImageButton
- Le Tutoriel de Android FloatingActionButton
- Le Tutoriel de Android CheckBox
- Le Tutoriel de Android RadioGroup et RadioButton
- Le Tutoriel de Android Chip et ChipGroup
- Utilisation des Image assets et des Icon assets d'Android Studio
- Configuration de la Carte SD pour Android Emulator
- Exemple ChipGroup et Chip Entry
- Comment ajouter des bibliothèques externes à Android Project dans Android Studio?
- Comment désactiver les autorisations déjà accordées à l'application Android?
- Comment supprimer des applications de Android Emulator?
- Le Tutoriel de Android LinearLayout
- Le Tutoriel de Android TableLayout
- Le Tutoriel de Android FrameLayout
- Le Tutoriel de Android QuickContactBadge
- Le Tutoriel de Android StackView
- Le Tutoriel de Android Camera
- Le Tutoriel de Android MediaPlayer
- Le Tutoriel de Android VideoView
- Jouer des effets sonores dans Android avec SoundPool
- Le Tutoriel de Android Networking
- Analyser JSON dans Android
- Le Tutoriel de Android SharedPreferences
- Le Tutorial de stockage interne Android (Internal Storage)
- Le Tutoriel de Android External Storage
- Le Tutoriel de Android Intents
- Exemple d'une Android Intent explicite, appelant une autre Intent
- Exemple de Android Intent implicite, ouvrez une URL, envoyez un email
- Le Tutoriel de Android Service
- Le Tutoriel Android Notifications
- Le Tutoriel de Android DatePicker
- Le Tutoriel de Android TimePicker
- Le Tutoriel de Android Chronometer
- Le Tutoriel de Android OptionMenu
- Le Tutoriel de Android ContextMenu
- Le Tutoriel de Android PopupMenu
- Le Tutoriel de Android Fragment
- Le Tutoriel de Android ListView
- Android ListView avec Checkbox en utilisant ArrayAdapter
- Le Tutoriel de Android GridView
Show More