Le Tutoriel de Android FrameLayout
1. Android FrameLayout
FrameLayout est une disposition (layout) simple, elle peut contenir une ou plusieurs View enfants et elles peuvent se chevaucher (overlap). Vous devez utiliser l'attribut android:layout_gravity pour View enfant pour les localiser.
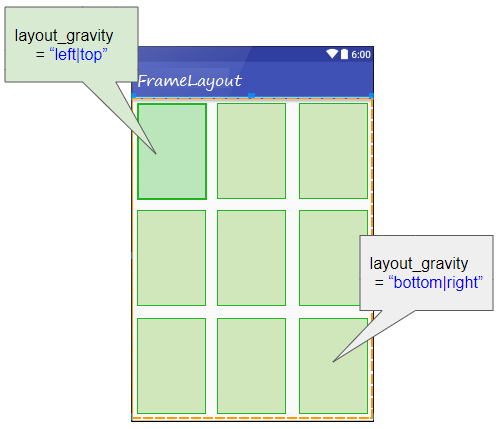
Plus précisément, FrameLayout a 9 zones de gravité (gravity) comme l'illustration ci-dessous. Remarque: Ce sont des zones imaginaires, cela ne signifie pas que la surface de FrameLayout est divisée en 9 parties.
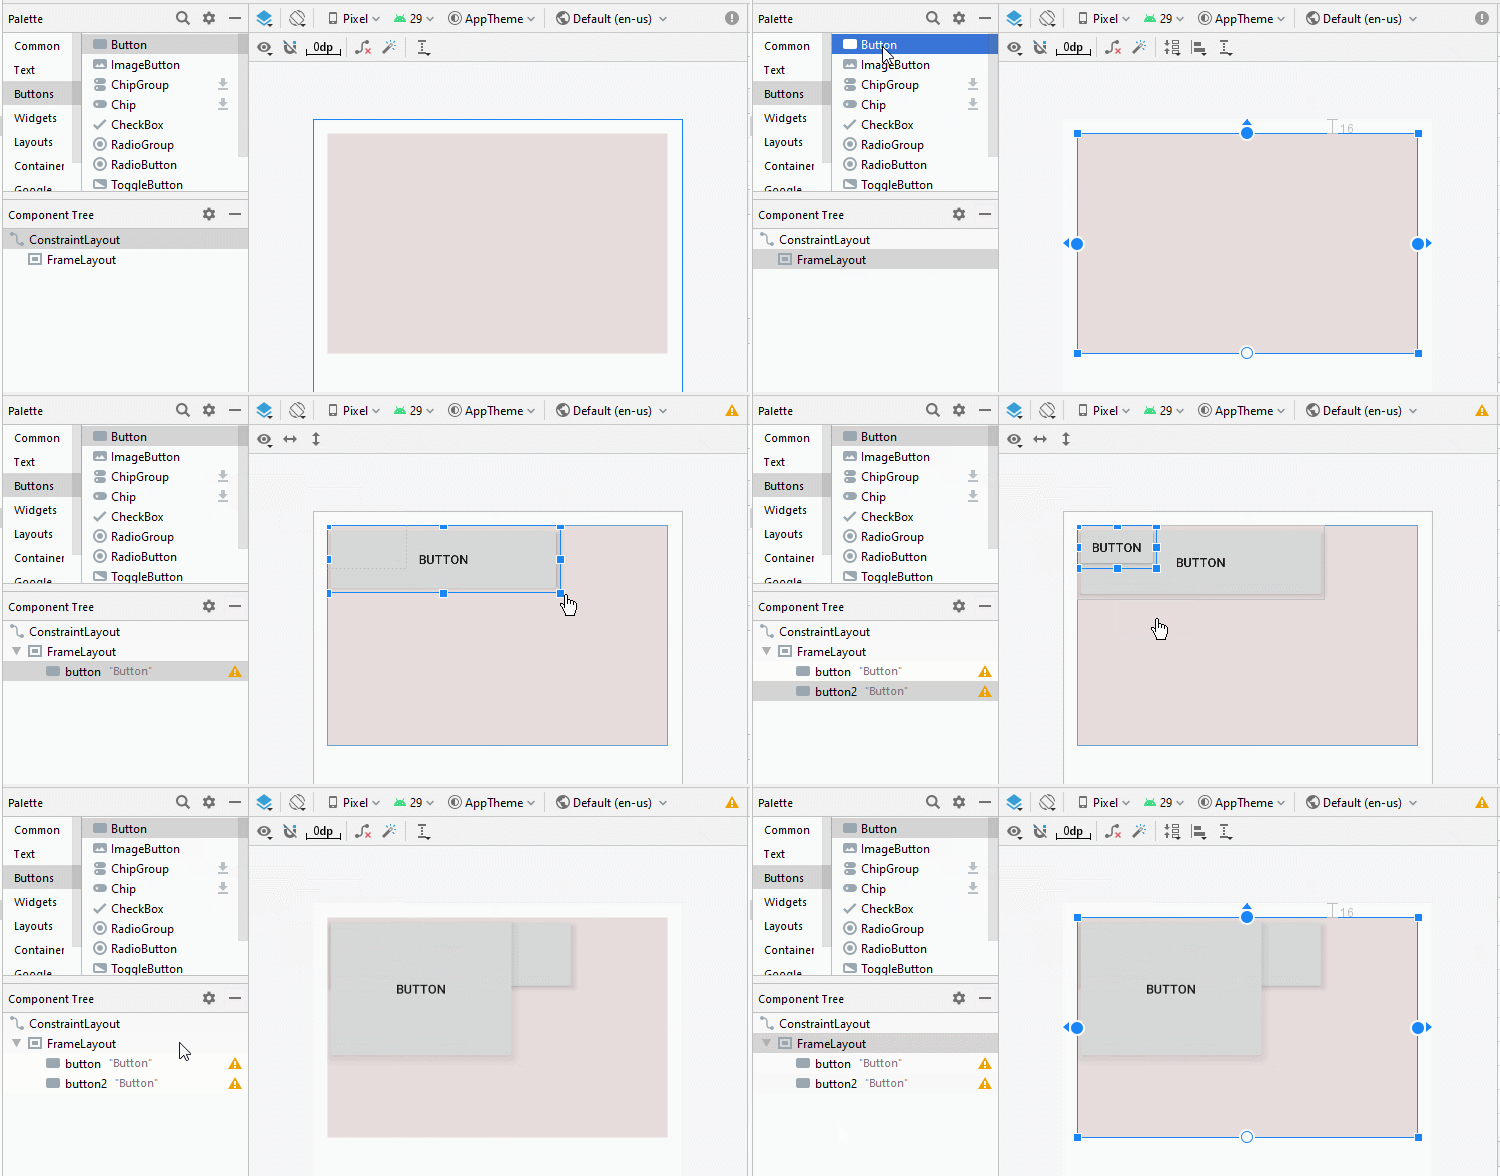
Lorsqu'une View est ajoutée à FrameLayout, elle est par défaut située dans la zone de gravité "left|top". Prenons un exemple, j'ai ajouté 2 Button à un FrameLayout, par défaut, ils seront dans la zone de gravité "left|top" et vous les verrez se chevaucher.
Utilisez l'attribut android:layout_gravity du button pour ajuster sa position.
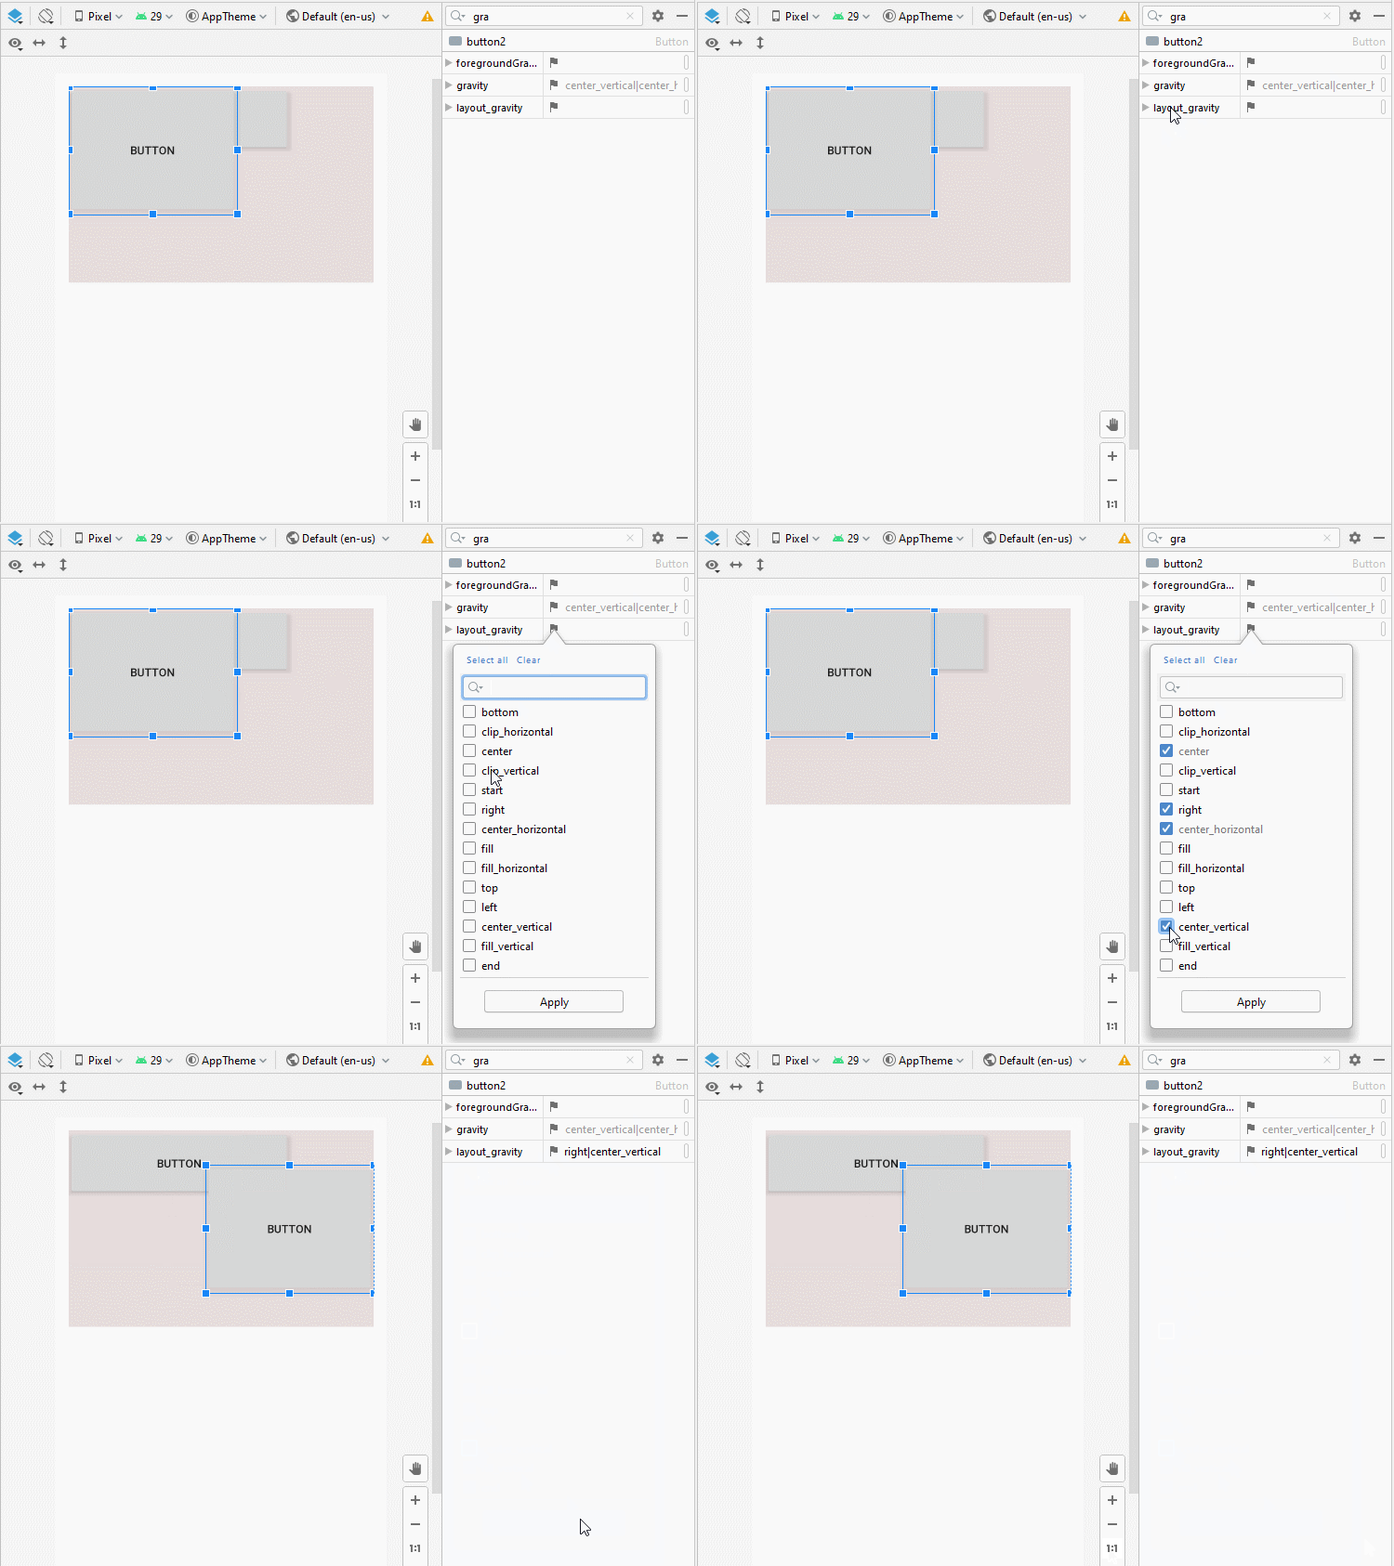
La valeur de android:layout_gravity est une combinaison de l'une des valeurs suivantes:
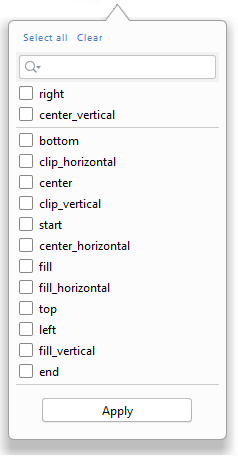
Constant in Java | Value | Description |
Gravity.LEFT | left | |
Gravity.CENTER_HORIZONTAL | center_horizontal | |
Gravity.RIGHT | right | |
Gravity.TOP | top | |
Gravity.CENTER_VERTICAL | center_vertical | |
Gravity.BOTTOM | bottom | |
Gravity.START | start | |
Gravity.END | end | |
Gravity.CENTER | center | |
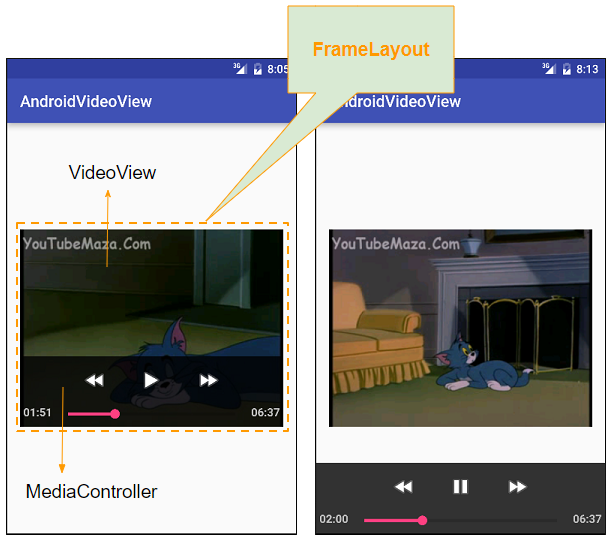
Vous trouverez ci-dessous une illustration du placement d'une VideoView et d'un MediaController dans un FrameLayout, cela économise de l'espace d'application et apporte une bonne expérience utilisateur.
2. L'example de FrameLayout
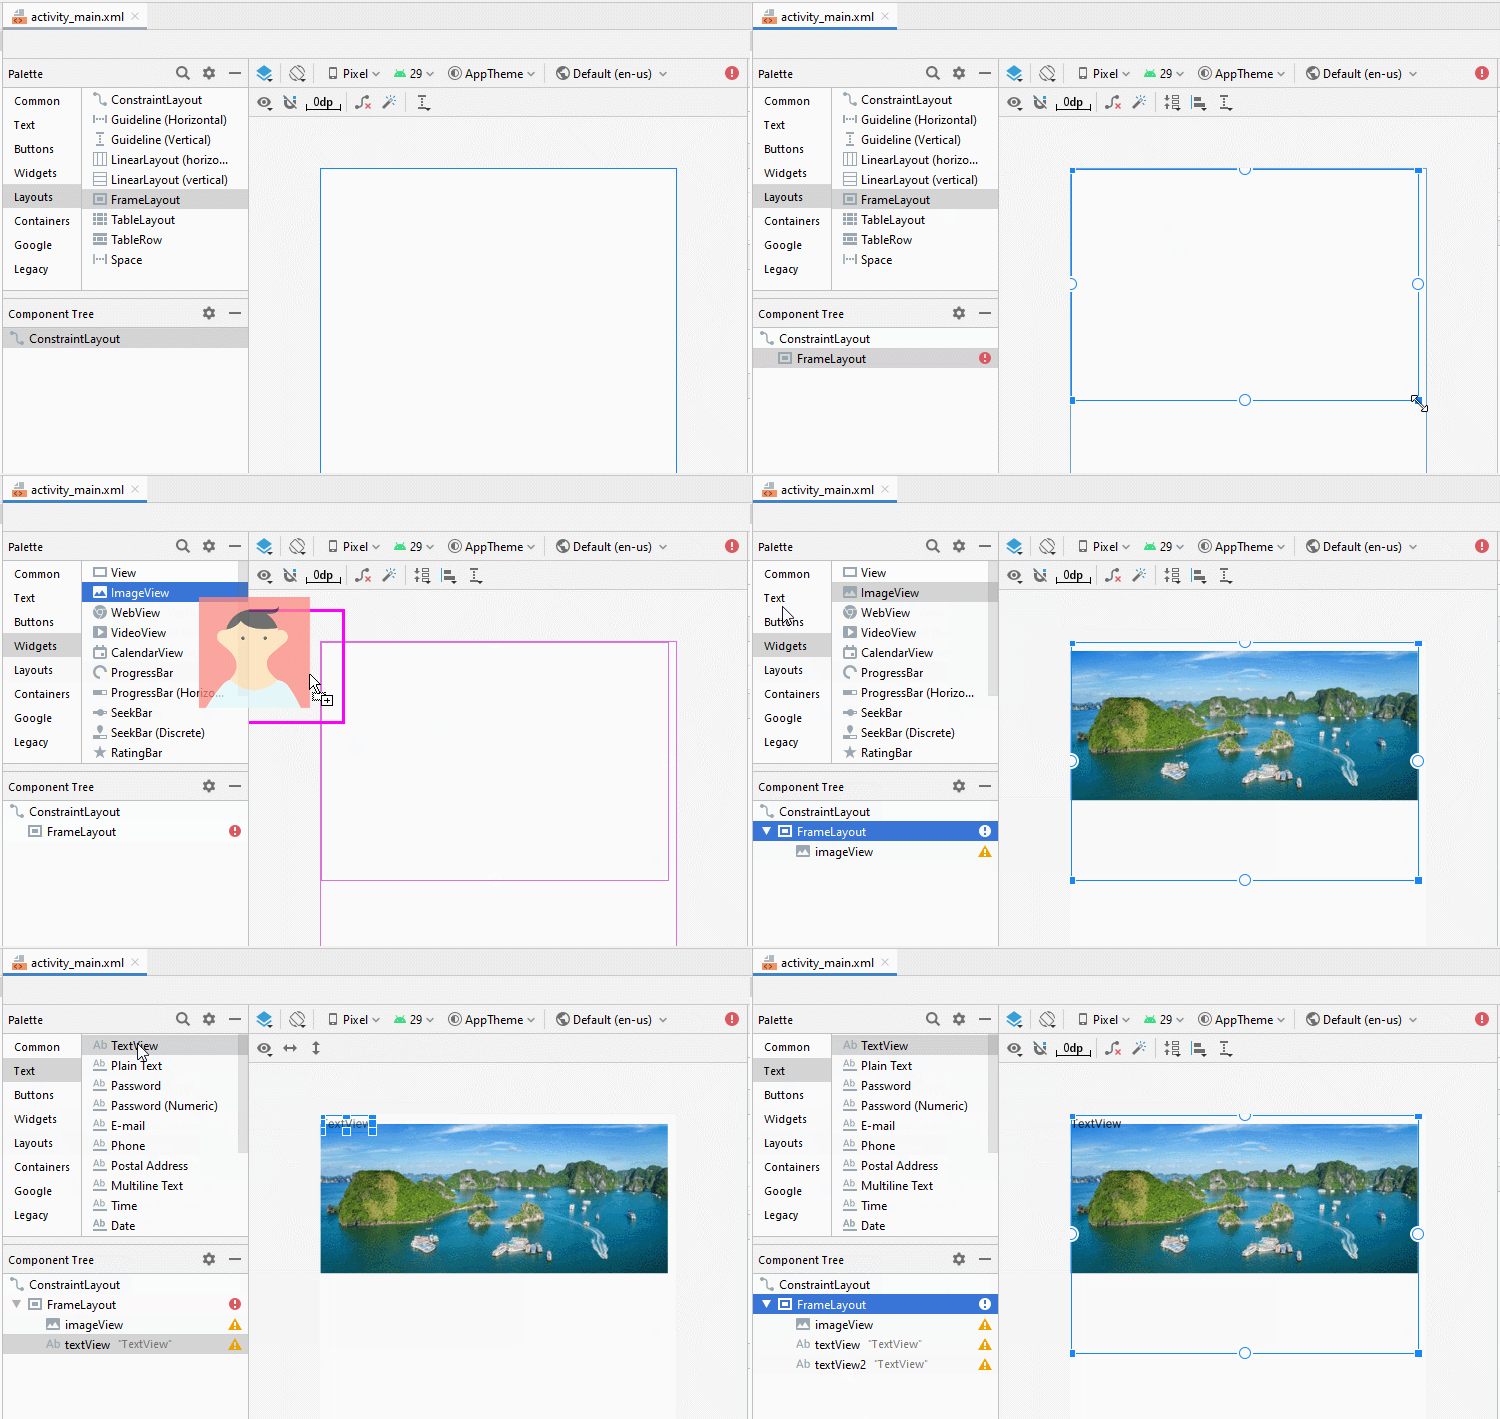
Dans cet exemple, je vais placer une ImageView et 2 TextView dans un FrameLayout, puis les positionner via android:layout_gravity.
Exemple d'aperçu:
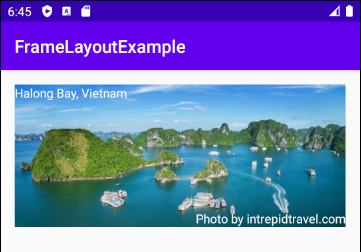
Show in Portraint screen
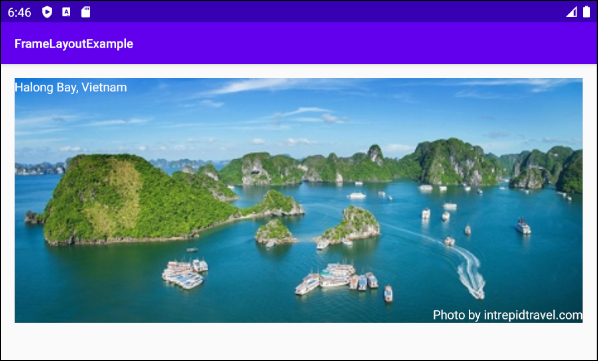
Show in Landscape screen
OK, Sur Android Studio, créez un nouveau projet:
- File > New > New Project > Empty Activity
- Name: FrameLayoutExample
- Package name: org.o7planning.framelayoutexample
- Language: Java
Préparez un file image:

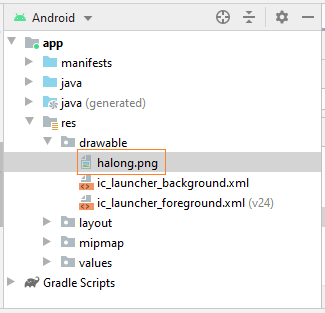
halong.png
Copy file image ci-dessus dans le dossier "drawable" du project:
Conception d'interface de l'application:
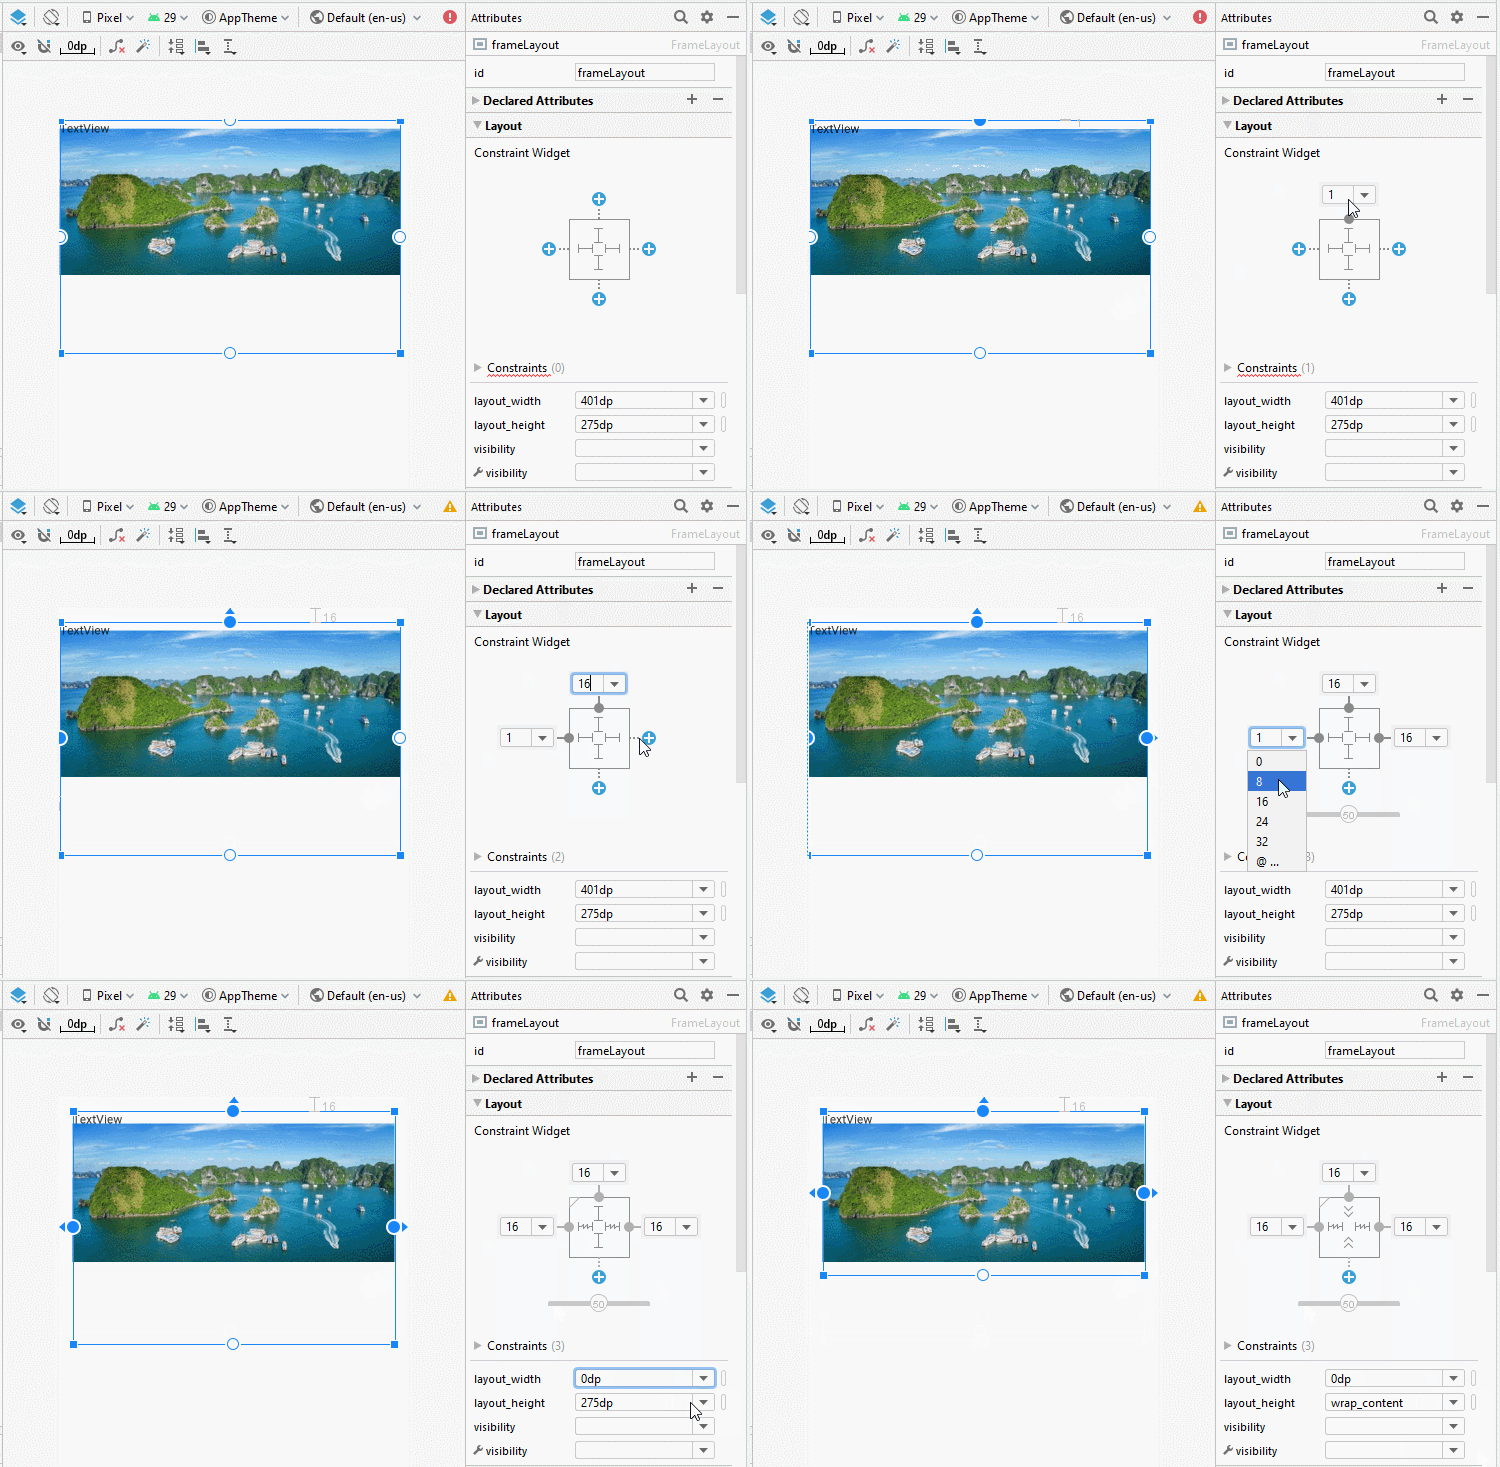
Définition des contraintes sur FrameLayout:
Définissez des propriétés importantes pour ImageView pour vous assurer qu'il remplit FrameLayout.
* imageView *
<ImageView
    android:id="@+id/imageView"
    android:layout_width="match_parent"
    android:layout_height="wrap_content"
    android:adjustViewBounds="true"
    android:scaleType="fitXY"
    app:srcCompat="@drawable/halong" />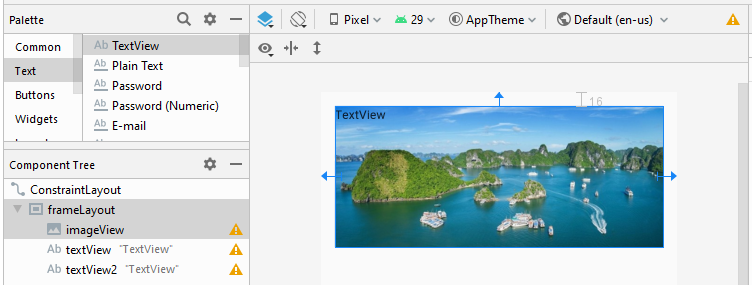
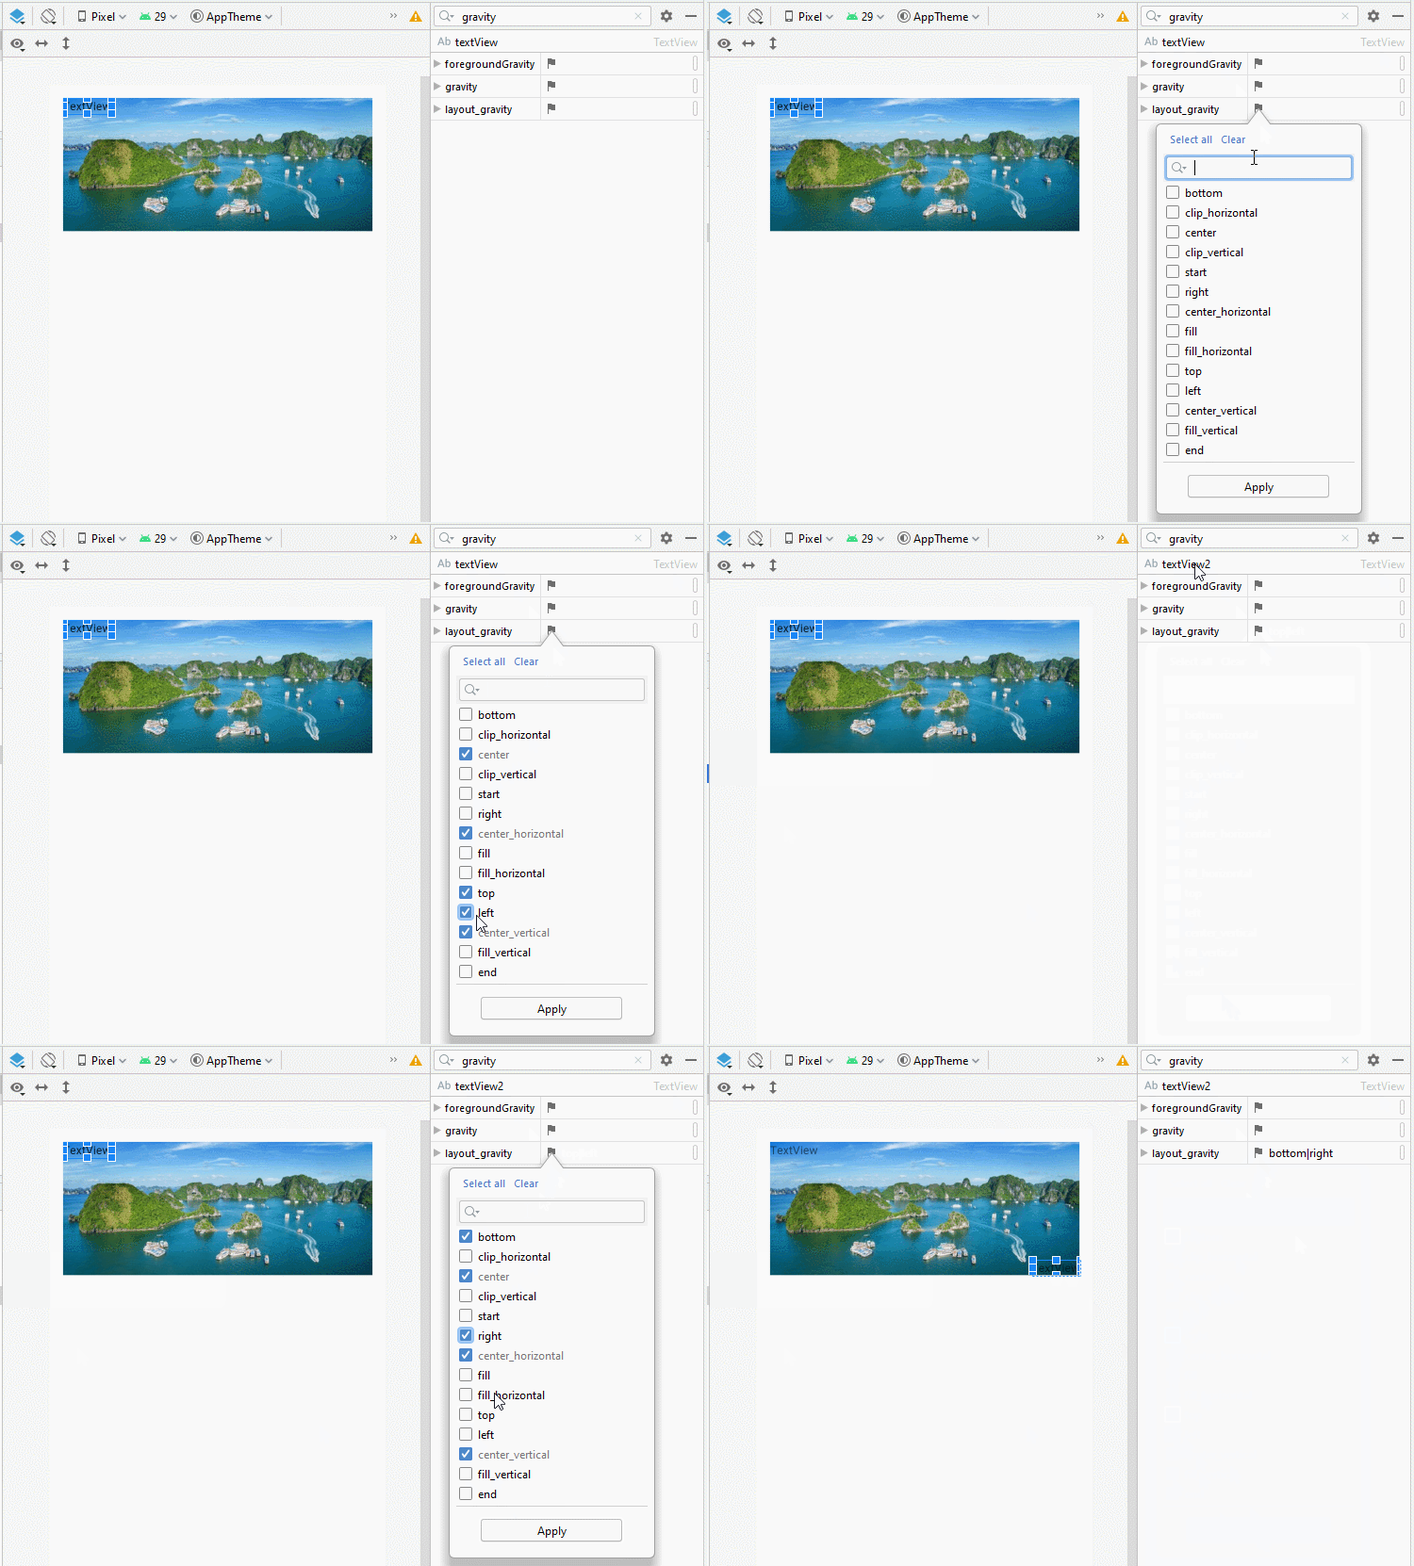
Définissez l'attribut android:layout_gravity pour TextView:
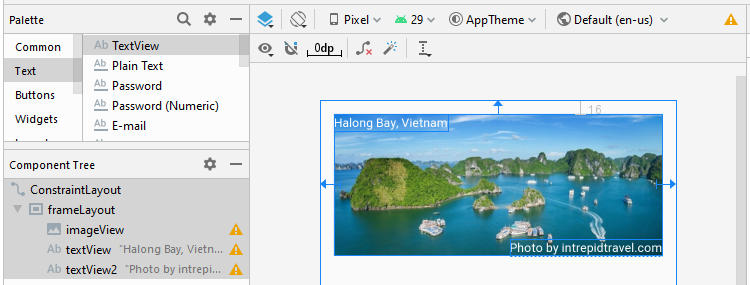
Définissez text, textColor pour TextView:
activity_main.xml
<?xml version="1.0" encoding="utf-8"?>
<androidx.constraintlayout.widget.ConstraintLayout
    xmlns:android="http://schemas.android.com/apk/res/android"
    xmlns:app="http://schemas.android.com/apk/res-auto"
    xmlns:tools="http://schemas.android.com/tools"
    android:layout_width="match_parent"
    android:layout_height="match_parent"
    tools:context=".MainActivity">

    <FrameLayout
        android:id="@+id/frameLayout"
        android:layout_width="0dp"
        android:layout_height="wrap_content"
        android:layout_marginStart="16dp"
        android:layout_marginLeft="16dp"
        android:layout_marginTop="16dp"
        android:layout_marginEnd="16dp"
        android:layout_marginRight="16dp"
        app:layout_constraintEnd_toEndOf="parent"
        app:layout_constraintStart_toStartOf="parent"
        app:layout_constraintTop_toTopOf="parent">

        <ImageView
            android:id="@+id/imageView"
            android:layout_width="match_parent"
            android:layout_height="wrap_content"
            android:adjustViewBounds="true"
            android:scaleType="fitXY"
            app:srcCompat="@drawable/halong" />

        <TextView
            android:id="@+id/textView"
            android:layout_width="wrap_content"
            android:layout_height="wrap_content"
            android:layout_gravity="top|left"
            android:text="Halong Bay, Vietnam"
            android:textColor="#FFFFFF" />

        <TextView
            android:id="@+id/textView2"
            android:layout_width="wrap_content"
            android:layout_height="wrap_content"
            android:layout_gravity="bottom|right"
            android:text="Photo by intrepidtravel.com"
            android:textColor="#FFFFFF" />

    </FrameLayout>
</androidx.constraintlayout.widget.ConstraintLayout>
MainActivity.java
package org.o7planning.framelayoutexample;

import androidx.appcompat.app.AppCompatActivity;

import android.os.Bundle;
import android.view.Gravity;

public class MainActivity extends AppCompatActivity {

    @Override
    protected void onCreate(Bundle savedInstanceState) {
        super.onCreate(savedInstanceState);
        setContentView(R.layout.activity_main);
    }
}
Tutoriels de programmation Android
- Configurer Android Emulator en Android Studio
- Le Tutoriel de Android ToggleButton
- Créer un File Finder Dialog simple dans Android
- Le Tutoriel de Android TimePickerDialog
- Le Tutoriel de Android DatePickerDialog
- De quoi avez-vous besoin pour démarrer avec Android?
- Installer Android Studio sur Windows
- Installer Intel® HAXM pour Android Studio
- Le Tutoriel de Android AsyncTask
- Le Tutoriel de Android AsyncTaskLoader
- Tutoriel Android pour débutant - Exemples de base
- Comment connaître le numéro de téléphone d'Android Emulator et le changer?
- Le Tutoriel de Android TextInputLayout
- Le Tutoriel de Android CardView
- Le Tutoriel de Android ViewPager2
- Obtenir un numéro de téléphone dans Android à l'aide de TelephonyManager
- Le Tutoriel de Android Phone Call
- Le Tutoriel de Android Wifi Scanning
- Le Tutoriel de programmation de jeux Android 2D pour débutant
- Le Tutoriel de Android DialogFragment
- Le Tutoriel de Android CharacterPickerDialog
- Le Tutoriel Android pour débutant - Hello Android
- Utiliser Android Device File Explorer
- Activer USB Debugging sur un appareil Android
- Le Tutoriel de Android UI Layouts
- Le Tutoriel de Android SMS
- Le Tutoriel de Android et SQLite Database
- Le Tutoriel de Google Maps Android API
- Le Tutoriel de texte pour parler dans Android
- Le Tutoriel de Android Space
- Le Tutoriel de Android Toast
- Créer un Android Toast personnalisé
- Le Tutoriel de Android SnackBar
- Le Tutoriel de Android TextView
- Le Tutoriel de Android TextClock
- Le Tutoriel de Android EditText
- Le Tutoriel de Android TextWatcher
- Formater le numéro de carte de crédit avec Android TextWatcher
- Le Tutoriel de Android Clipboard
- Créer un File Chooser simple dans Android
- Le Tutoriel de Android AutoCompleteTextView et MultiAutoCompleteTextView
- Le Tutoriel de Android ImageView
- Le Tutoriel de Android ImageSwitcher
- Le Tutoriel de Android ScrollView et HorizontalScrollView
- Le Tutoriel de Android WebView
- Le Tutoriel de Android SeekBar
- Le Tutoriel de Android Dialog
- Le Tutoriel de Android AlertDialog
- Tutoriel Android RatingBar
- Le Tutoriel de Android ProgressBar
- Le Tutoriel de Android Spinner
- Le Tutoriel de Android Button
- Le Tutoriel de Android Switch
- Le Tutoriel de Android ImageButton
- Le Tutoriel de Android FloatingActionButton
- Le Tutoriel de Android CheckBox
- Le Tutoriel de Android RadioGroup et RadioButton
- Le Tutoriel de Android Chip et ChipGroup
- Utilisation des Image assets et des Icon assets d'Android Studio
- Configuration de la Carte SD pour Android Emulator
- Exemple ChipGroup et Chip Entry
- Comment ajouter des bibliothèques externes à Android Project dans Android Studio?
- Comment désactiver les autorisations déjà accordées à l'application Android?
- Comment supprimer des applications de Android Emulator?
- Le Tutoriel de Android LinearLayout
- Le Tutoriel de Android TableLayout
- Le Tutoriel de Android FrameLayout
- Le Tutoriel de Android QuickContactBadge
- Le Tutoriel de Android StackView
- Le Tutoriel de Android Camera
- Le Tutoriel de Android MediaPlayer
- Le Tutoriel de Android VideoView
- Jouer des effets sonores dans Android avec SoundPool
- Le Tutoriel de Android Networking
- Analyser JSON dans Android
- Le Tutoriel de Android SharedPreferences
- Le Tutorial de stockage interne Android (Internal Storage)
- Le Tutoriel de Android External Storage
- Le Tutoriel de Android Intents
- Exemple d'une Android Intent explicite, appelant une autre Intent
- Exemple de Android Intent implicite, ouvrez une URL, envoyez un email
- Le Tutoriel de Android Service
- Le Tutoriel Android Notifications
- Le Tutoriel de Android DatePicker
- Le Tutoriel de Android TimePicker
- Le Tutoriel de Android Chronometer
- Le Tutoriel de Android OptionMenu
- Le Tutoriel de Android ContextMenu
- Le Tutoriel de Android PopupMenu
- Le Tutoriel de Android Fragment
- Le Tutoriel de Android ListView
- Android ListView avec Checkbox en utilisant ArrayAdapter
- Le Tutoriel de Android GridView
Show More