Le Tutoriel de Android EditText
1. Android EditText
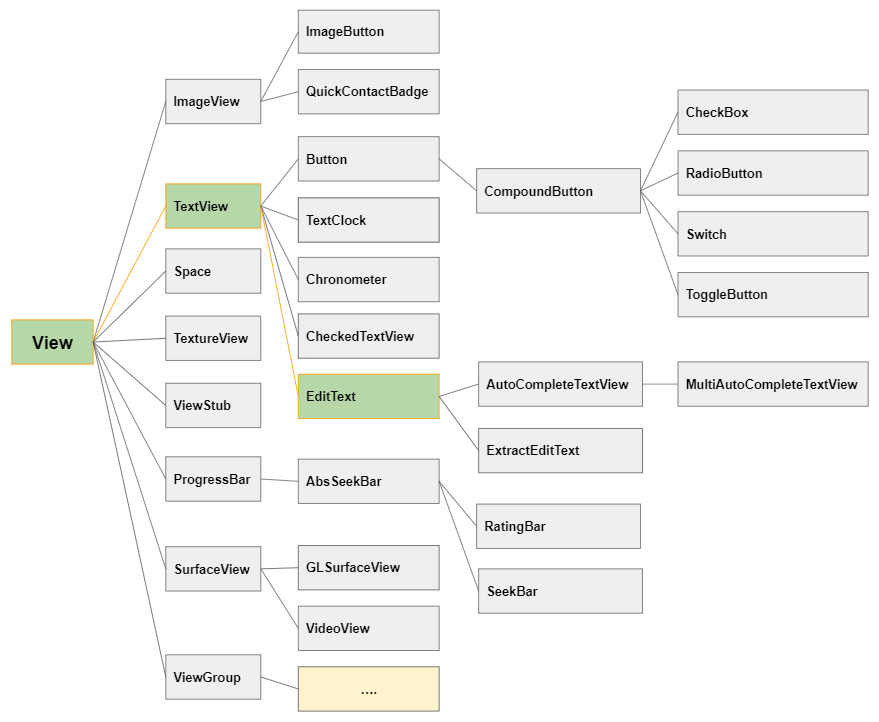
Sous Android, EditText est une sous-classe de TextView qui hérite donc de toutes les fonctions d'un TextView. De plus, cet outil dispose de nouvelles fonctionnalités permettant à l'utilisateur de saisir ou de modifier le texte à des fins diverses. Par conséquent, il est nécessaire de spécificier un type de donnée qui peut accepter via l'attribut android:inputType.
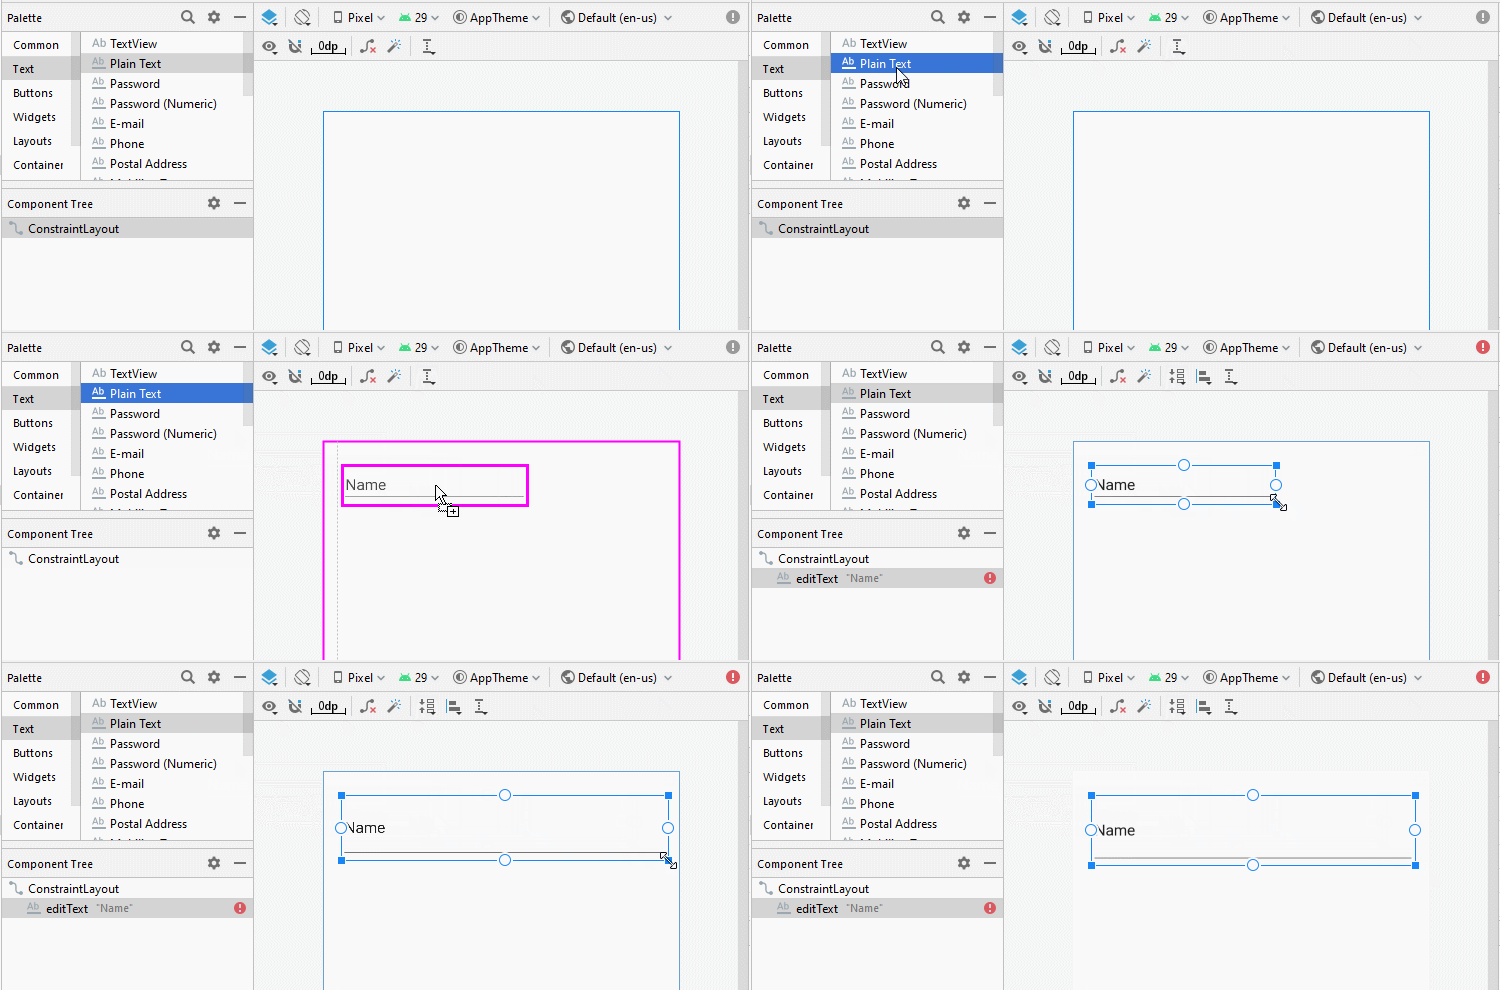
<EditText
     android:id="@+id/txtSub"
     android:layout_width="match_parent"
     android:layout_height="wrap_content"
     android:hint="Subject"
     android:inputType="text"
     ... />
EditText editText = (EditText) this.findViewById(R.id.editText1);
// Set Text:
editText.setText("New Text");
// Get Text
String text = editText.getText().toString();Créer un EditText par le code Java:
public class MainActivity extends AppCompatActivity {

    @Override
    protected void onCreate(Bundle savedInstanceState) {
        super.onCreate(savedInstanceState);
        setContentView(R.layout.activity_main);

        LinearLayout linearLayout =  (LinearLayout) findViewById(R.id.linearlayout);

        // Create a EditText
        EditText editText = new EditText(this);
        editText.setHint("Subject");
        linearLayout.addView(editText);

        // Set Text
        editText.setText("Some Text");

        // Get Text
        String text = editText.getText().toString();
    }

}
2. android:inputType
L'attribut android:inputType spécifie le type de donnée que EditText peut accepter. En même temps, il suggère à Android d'aider l'utilisateur lors de la saisie de données, comme par exemple l'affichage d'un clavier virtuel correspondant au type de données de EditText. Cependant, comme cela ne peut pas garantir que l'utilisateur saisira le type de données correct, il est nécessaire d'ajouter certaines manipulations supplémentaires.
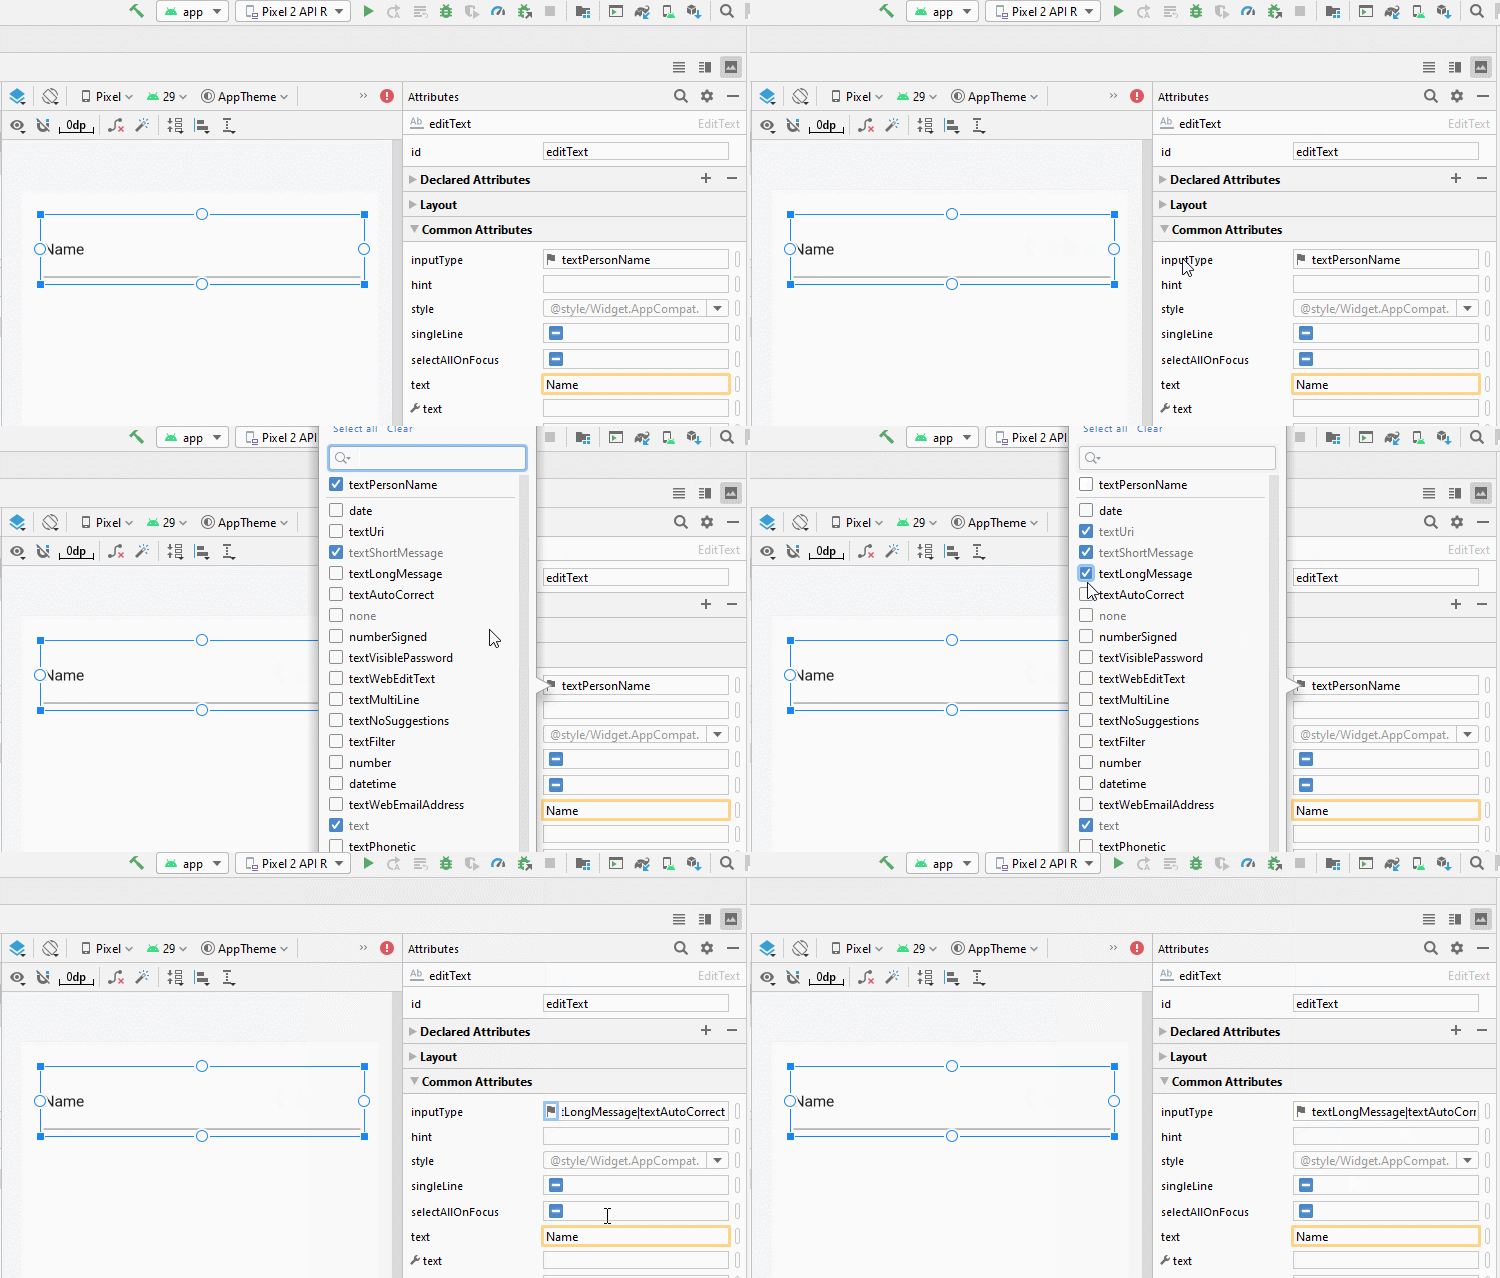
Quelques valeurs courrantes de android:inputType:
textUri | Allow to enter a URI. |
textEmailAddress | Allow to enter an Email address. |
textPersonName | Allow to enter the name of a person |
textPassword | Allow to enter a password, users only see the asterisk characters (*) (or similar). |
textVisiblePassword | Allow enter a password, and the user can read its contents. |
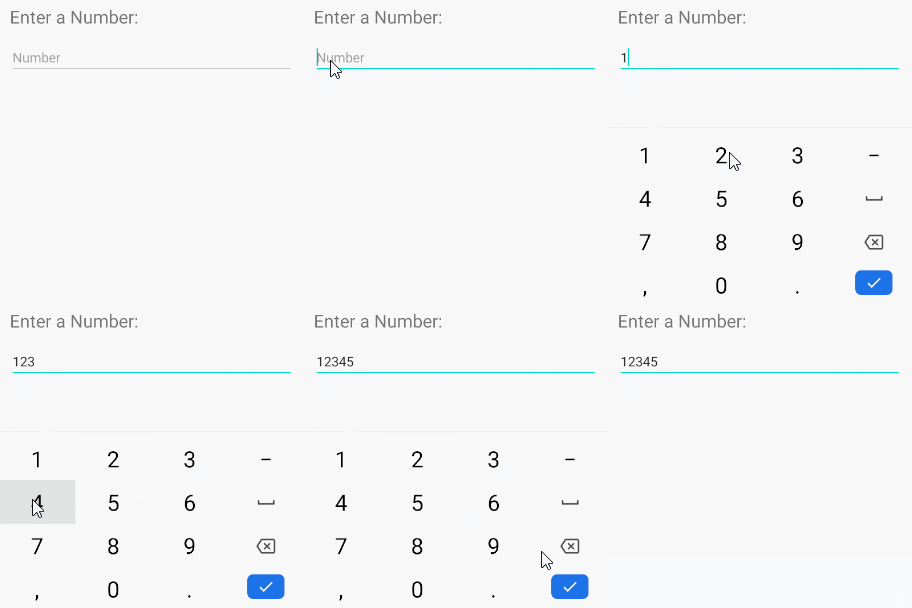
number | For entering numeric data. |
phone | For entering a phone number |
date | For entering a date |
time | For entering a time |
textMultiLine | Allows entering text data on multiple lines. |
Vous pouvez combiner plusieurs valeurs séparées par (|) pour en créer une nouvelle pour android:inputType.
<EditText
  android:inputType="textCapSentences|textMultiLine"
/>
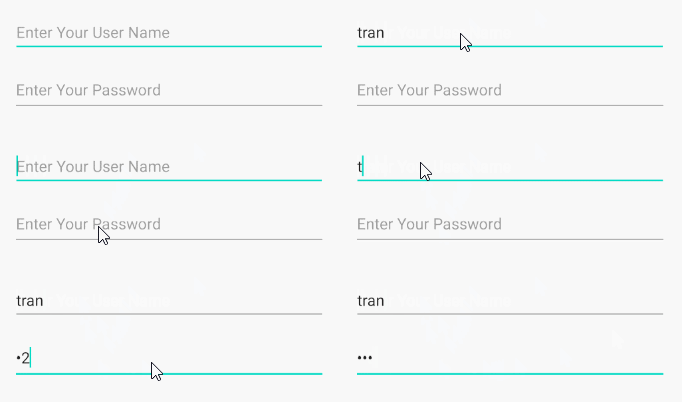
android:inputType="textPassword"
Possibilité de saisir un mot de passe, l'utilisateur ne voit que des astérisques (*) (ou similaire).
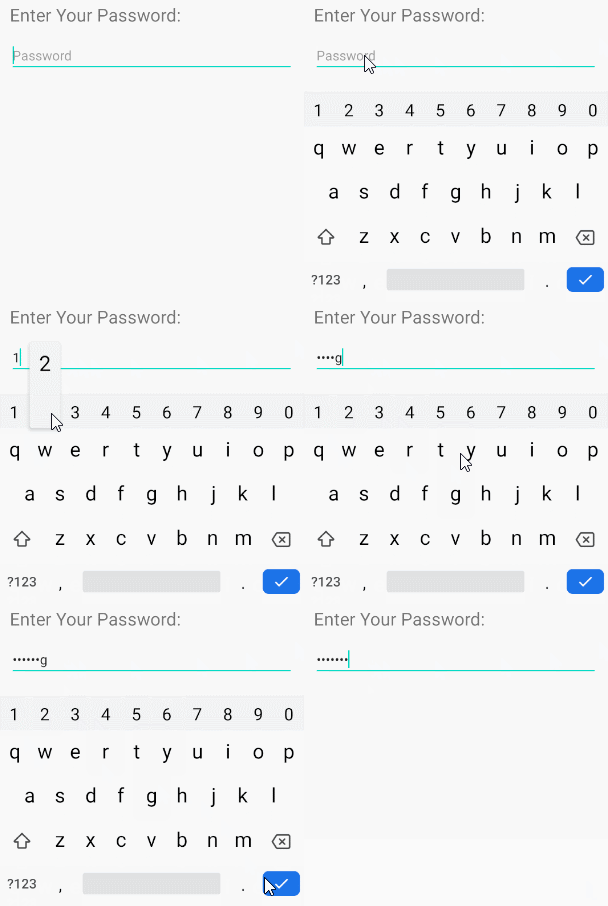
<!-- A Text Password -->
<EditText
    android:id="@+id/editText_password"
    android:hint="Password"
    android:inputType="textPassword" ...
/>
android:inputType="numberPassword"
Possibilité de saisir un mot de passe contenant uniquement des caractères numériques.
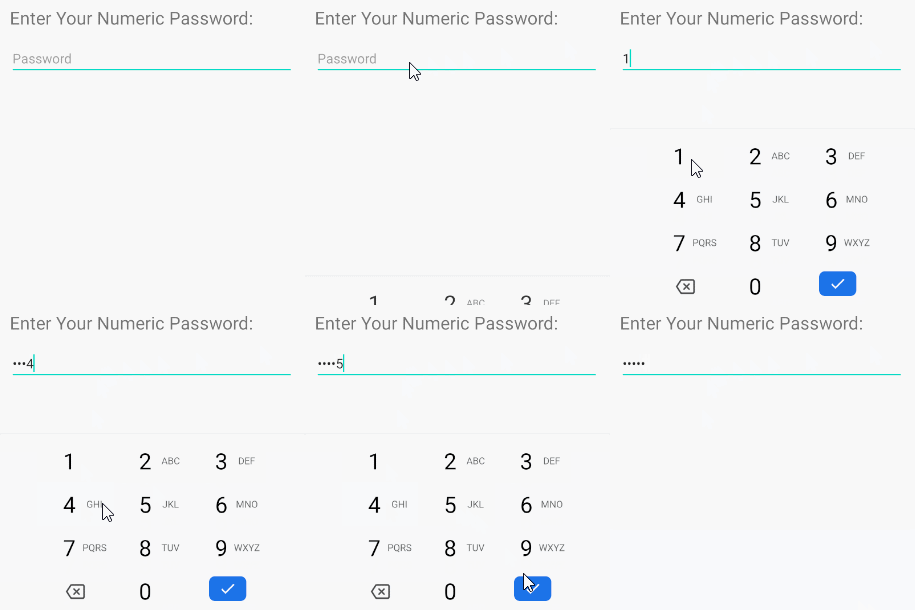
<!-- A Numeric Password -->
<EditText
    android:id="@+id/editText_password"
    android:hint="Numeric Password"
    android:inputType="numberPassword"  ...
/>
android:inputType="textVisiblePassword"
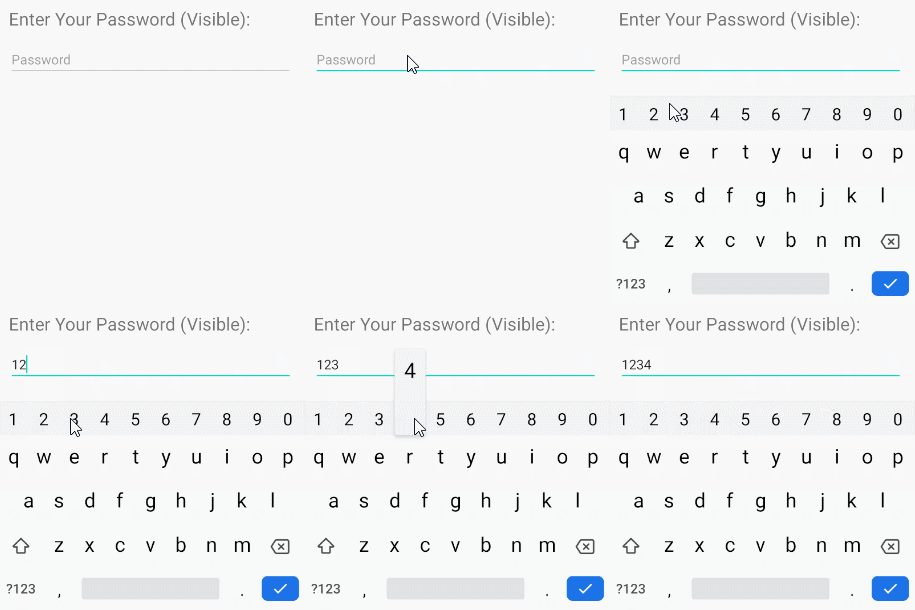
android:inputType="text"
EditText accepte tous les types de données en texte brut (plain text).
android:inputType=" textMultiLine"
L'attribut android:inputType="textMultiLine" permet à EditText d'afficher le texte sur plusieurs lignes. Avec cet attribut, il est nécessaire de le combiner avec l'attribut android.gravity="left|top" pour définir le texte affiché dans le coin supérieur gauche.
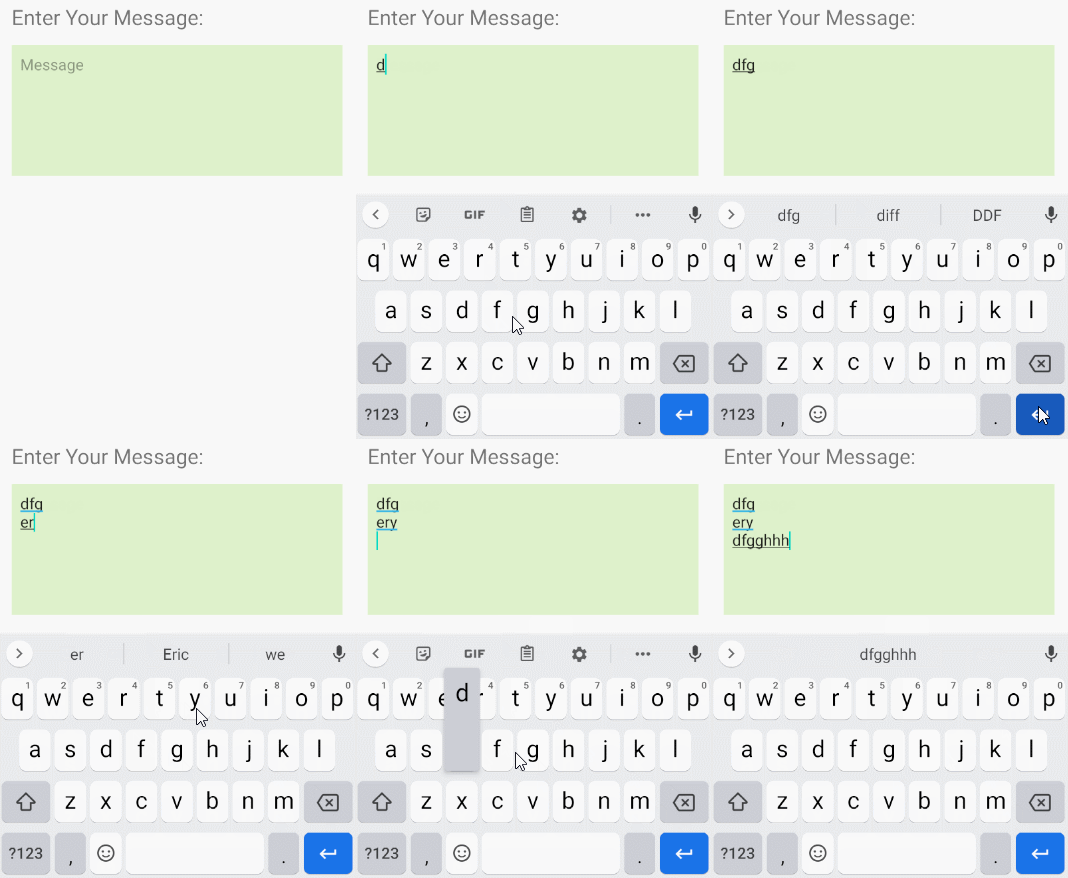
<EditText
    android:id="@+id/editText_test1"
    android:background="#F1FDDC"
    android:gravity="top|left"
    android:inputType="textMultiLine|text"
    android:padding="10dp"
    android:text="0123456789" ... />
android:inputType="number"
Possibilité de saisir les données numériques et d'utiliser le clavier virtuel pour les entrées de données numériques.
android:inputType="textEmailAddress"
Ce clavier virtuel est plus simple pour saisir un email que le clavier virtuel normal car il supprime les caractères non-valides pour une adresse mail.
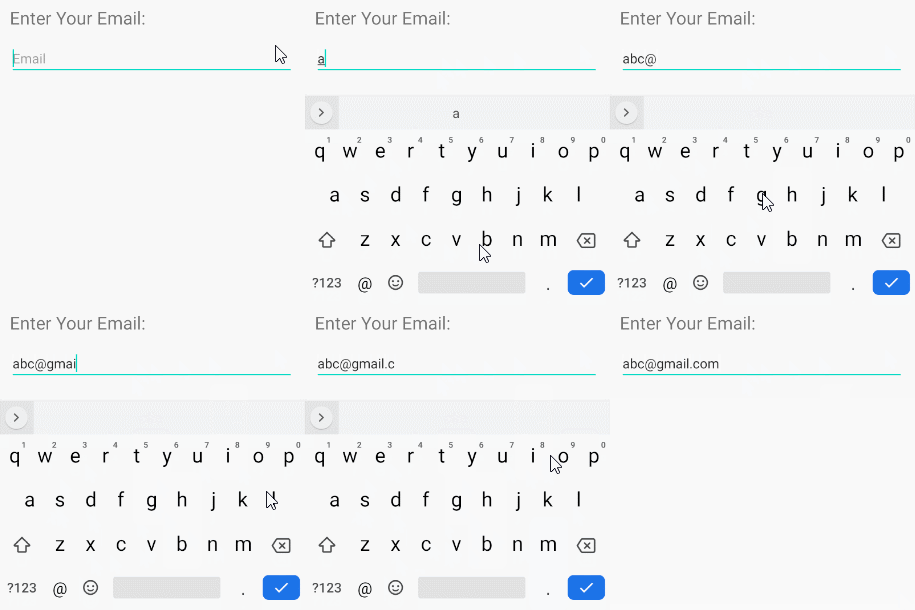
<EditText
    android:id="@+id/editText_email"
    android:hint="Email"
    android:inputType="textEmailAddress"
    ...
/>
Le code Java vérifie si l'email saisi par l'utilisateur est valide ou pas:
public boolean isEmailValid(CharSequence email) {
    return android.util.Patterns.EMAIL_ADDRESS.matcher(email).matches();
}
android:inputType="date"
L'objectif étant de saisir les données de Date, le clavier virtuel a une disposition adaptée à ce type de données.
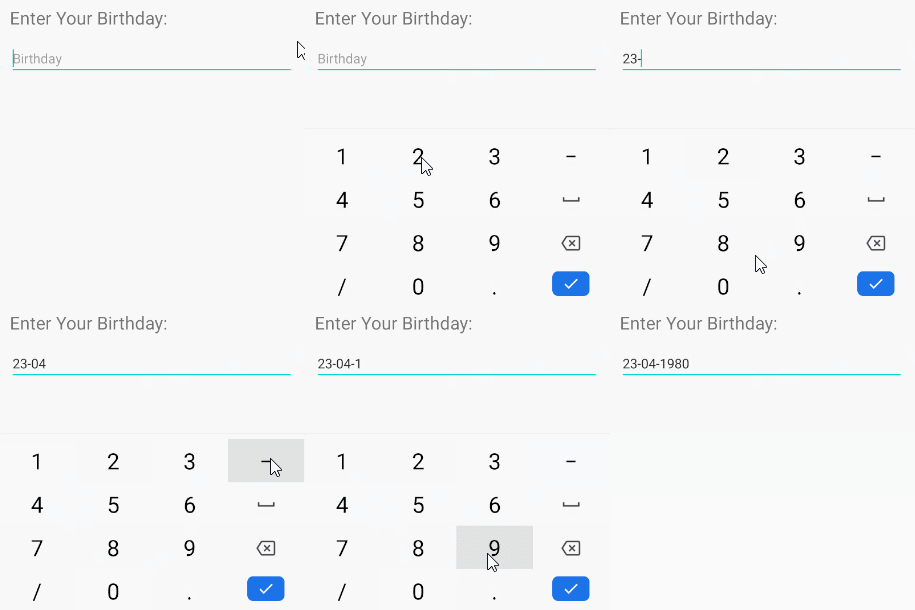
<EditText
    android:id="@+id/editText_birthday"
    android:hint="dd-MM-yyyy"
    android:inputType="date"
    ...
/>
Remarque: Avec android:inputType="date", l'utilisateur peut toujours saisir des données de Date qui ne correspondent pas à votre suggestion (hint). Par conséquent, afin de s'assurer que l'utilisateur saisit des données correspondant au format de Date spécificié, par exemple "dd-MM-yyyy", il faut combiner EditText et TextWatcher.
3. EditText Attributes
En général, la plupart des attributs de EditText sont hérités de TextView:
android:gravity | It is used to specify how to align the text like left, right, center, top, etc. |
android:text | It is used to set the text. |
android:hint | It is used to display the hint text when text is empty |
android:textColor | It is used to change the color of the text. |
android:textColorHint | It is used to change the text color of hint text. |
android:textSize | It is used to specify the size of the text. |
android:textStyle | It is used to change the style (bold, italic, bolditalic) of text. |
android:background | It is used to set the background color for edit text control |
android:ems | It is used to make the textview be exactly this many ems wide. |
android:width | It makes the TextView be exactly this many pixels wide. |
android:height | It makes the TextView be exactly this many pixels tall. |
android:maxWidth | It is used to make the TextView be at most this many pixels wide. |
android:minWidth | It is used to make the TextView be at least this many pixels wide. |
android:textAllCaps | It is used to present the text in all CAPS |
android:typeface | It is used to specify the Typeface (normal, sans, serif, monospace) for the text. |
android:textColorHighlight | It is used to change the color of text selection highlight. |
android:inputType | It is used to specify the type of text being placed in text fields. |
android:fontFamily | It is used to specify the fontFamily for the text. |
android:editable | If we set false, EditText won't allow us to enter or modify the text |
android:textColorHint
L'attribut android:hint est utilisé pour afficher un texte d'indication pour l'utilisateur quand le texte de EditText est vide.
android:textColorHighlight
Définir la couleur d'arrière-plan du sous-texte sélectionné.

<EditText
    android:id="@+id/editText"
    android:inputType="text"
    android:text="I am an EditText"
    android:textColorHighlight="#24AC55" ... />
android: android:maxLength
Spécificier le nombre maximum de caractères du texte.
android:editable
Cet attribut n'est plus utilisé dans EditText. Si vous ne voulez pas que l'utilisateur modifie le contenu de EditText, prenez l'une des solutions ci-dessous:
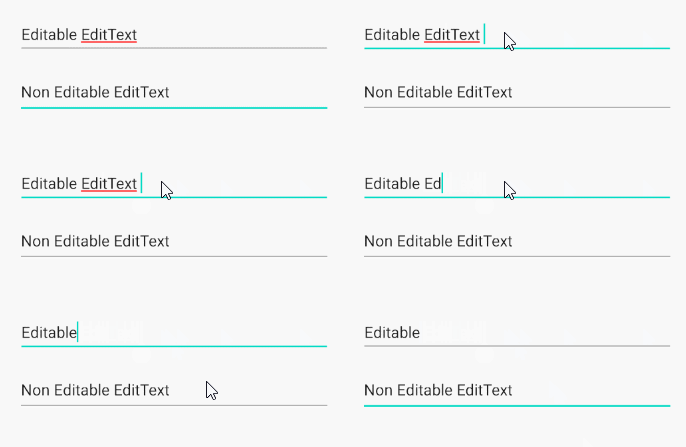
Solution 1:
<EditText
    android:id="@+id/myEditText"
    android:layout_width="match_parent"
    android:layout_height="wrap_content"
    android:hint="Hint"
    android:focusable="false"
    android:clickable="false"
    android:cursorVisible="false"
    />
Vous pouvez obtenir le même résultat avec le code Java:
EditText editText = findViewById(R.id.myEditText);
editText.setFocusable(false);
editText.setClickable(false);
editText.setCursorVisible(false);
Solution 2:
EditText editText = (EditText) findViewById(R.id.editText);
editText.setKeyListener(null);
Solution 3:
private void setNonEditable(EditText editText) {
    // Need to disable displaying Virtual Keyboard.
    editText.setInputType(InputType.TYPE_NULL);

    // editText.setTextIsSelectable(false); // ?
    editText.setOnKeyListener(new View.OnKeyListener() {
        @Override
        public boolean onKey(View v, int keyCode, KeyEvent event) {
            // Blocks input from hardware keyboards.
            return true;
        }
    });
}
4. EditText Methods
En plus des méthodes héritées de TextView, EditText dispose également de ses propres méthodes:
- void selectAll()
- void setSelection(int start, int stop) .
- void setSelection(int index)
- void extendSelection(int index)
selectAll()
Sélectionner le texte entier.
setSelection(int start, int stop)
Sélectionner un sous-texte de start à stop. L'indice commence à partir de 0, 1, 2 et plus.
setSelection(int index)
Déplacer le curseur sur la position de l'indice de "index".
extendSelection(int index)
Sélectionner un sous-texte de la position actuelle du curseur à celle de l'indice de "index".
Remarque: Vous pouvez consulter un exemple sur l'utilisation des méthodes à la fin de l'article.
5. Ví dụ EditText
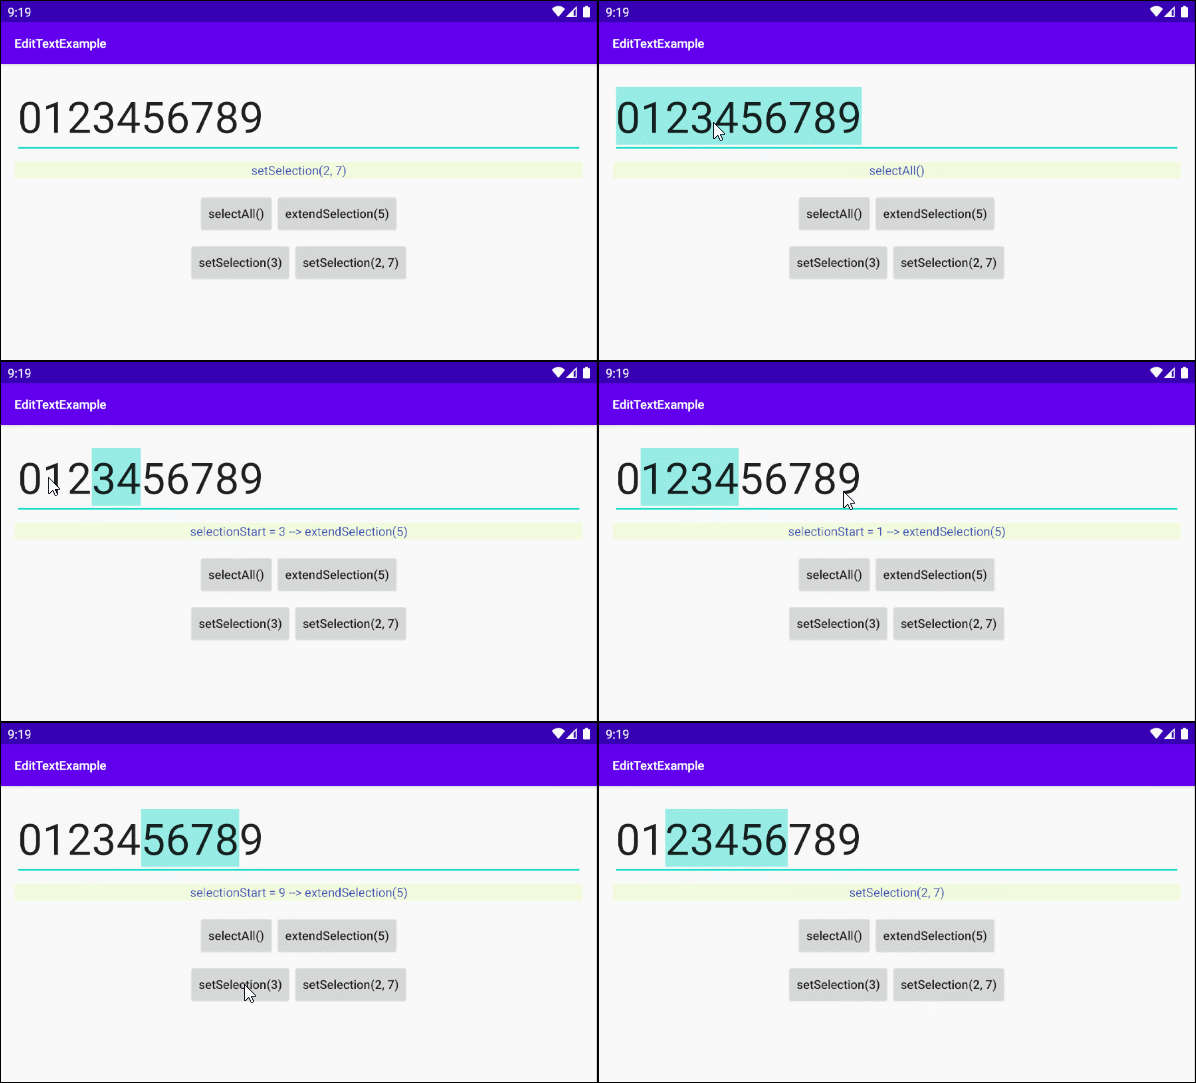
Dans cet exemple, je vous montrerai comment utiliser les méthodes selectAll(), extendSelection(), setSelection() de EditText. Ci-dessous son image d'aperçu:
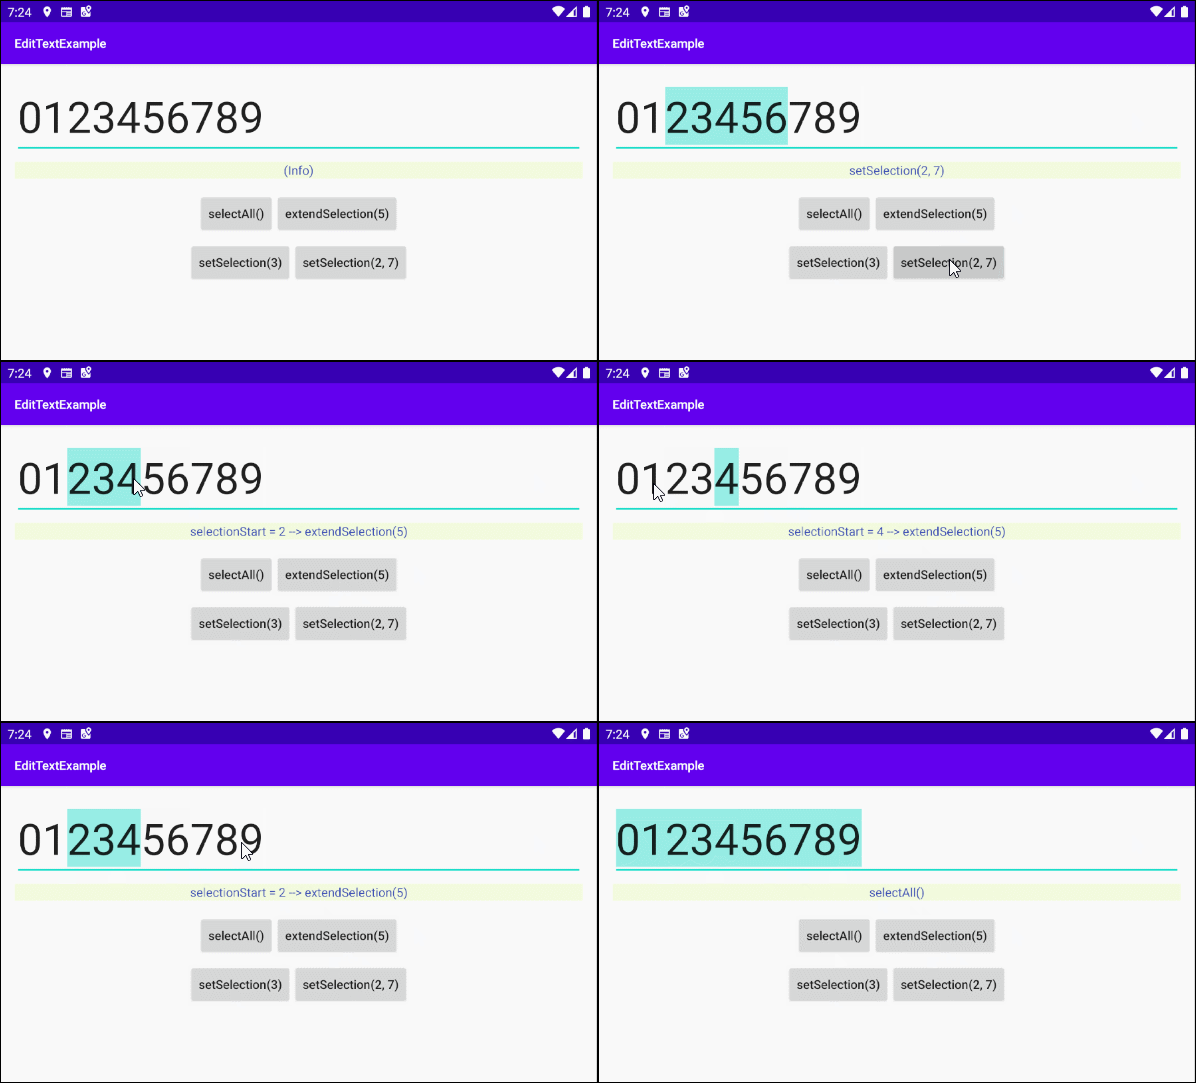
L'interface de l'application:
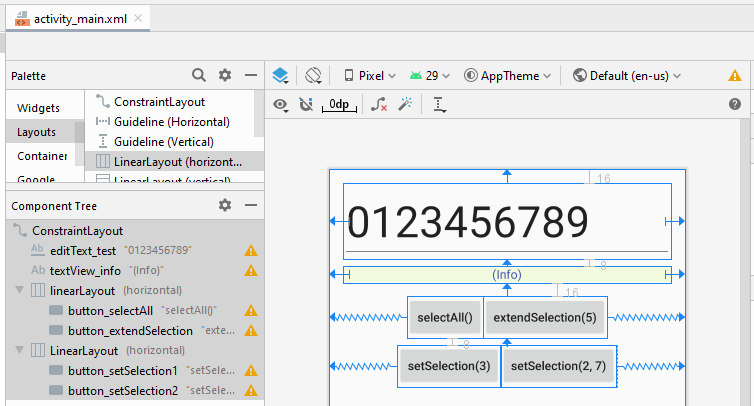
activity_main.xml
<?xml version="1.0" encoding="utf-8"?>
<androidx.constraintlayout.widget.ConstraintLayout
    xmlns:android="http://schemas.android.com/apk/res/android"
    xmlns:app="http://schemas.android.com/apk/res-auto"
    xmlns:tools="http://schemas.android.com/tools"
    android:layout_width="match_parent"
    android:layout_height="match_parent"
    tools:context=".MainActivity">

    <EditText
        android:id="@+id/editText_test"
        android:layout_width="0dp"
        android:layout_height="wrap_content"
        android:layout_marginStart="16dp"
        android:layout_marginLeft="16dp"
        android:layout_marginTop="16dp"
        android:layout_marginEnd="16dp"
        android:layout_marginRight="16dp"
        android:ems="10"
        android:inputType="text"
        android:text="0123456789"
        android:textSize="50sp"
        app:layout_constraintEnd_toEndOf="parent"
        app:layout_constraintStart_toStartOf="parent"
        app:layout_constraintTop_toTopOf="parent" />

    <TextView
        android:id="@+id/textView_info"
        android:layout_width="0dp"
        android:layout_height="wrap_content"
        android:layout_marginStart="16dp"
        android:layout_marginLeft="16dp"
        android:layout_marginTop="8dp"
        android:layout_marginEnd="16dp"
        android:layout_marginRight="16dp"
        android:background="#F3FBDE"
        android:gravity="center_horizontal"
        android:text="(Info)"
        android:textColor="#3F51B5"
        app:layout_constraintEnd_toEndOf="parent"
        app:layout_constraintStart_toStartOf="parent"
        app:layout_constraintTop_toBottomOf="@+id/editText_test" />

    <LinearLayout
        android:id="@+id/linearLayout"
        android:layout_width="wrap_content"
        android:layout_height="wrap_content"
        android:layout_marginTop="16dp"
        android:orientation="horizontal"
        app:layout_constraintEnd_toEndOf="parent"
        app:layout_constraintStart_toStartOf="parent"
        app:layout_constraintTop_toBottomOf="@+id/textView_info">

        <Button
            android:id="@+id/button_selectAll"
            android:layout_width="wrap_content"
            android:layout_height="wrap_content"
            android:text="selectAll()"
            android:textAllCaps="false" />

        <Button
            android:id="@+id/button_extendSelection"
            android:layout_width="wrap_content"
            android:layout_height="wrap_content"
            android:text="extendSelection(5)"
            android:textAllCaps="false" />
    </LinearLayout>

    <LinearLayout
        android:layout_width="wrap_content"
        android:layout_height="wrap_content"
        android:layout_marginTop="8dp"
        android:orientation="horizontal"
        app:layout_constraintEnd_toEndOf="parent"
        app:layout_constraintStart_toStartOf="parent"
        app:layout_constraintTop_toBottomOf="@+id/linearLayout">

        <Button
            android:id="@+id/button_setSelection1"
            android:layout_width="wrap_content"
            android:layout_height="wrap_content"
            android:text="setSelection(3)"
            android:textAllCaps="false" />

        <Button
            android:id="@+id/button_setSelection2"
            android:layout_width="wrap_content"
            android:layout_height="wrap_content"
            android:text="setSelection(2, 7)"
            android:textAllCaps="false" />
    </LinearLayout>

</androidx.constraintlayout.widget.ConstraintLayout>
MainActivity.java
package com.example.edittextexample;

import androidx.appcompat.app.AppCompatActivity;

import android.os.Bundle;
import android.text.TextWatcher;
import android.view.View;
import android.widget.Button;
import android.widget.EditText;
import android.widget.TextView;

public class MainActivity extends AppCompatActivity {

    private EditText editTextTest;
    private TextView textViewInfo;

    private Button button_selectAll;
    private Button button_setSelection1;
    private Button button_setSelection2;
    private Button button_extendSelection;

    @Override
    protected void onCreate(Bundle savedInstanceState) {
        super.onCreate(savedInstanceState);
        setContentView(R.layout.activity_main);

        this.editTextTest = (EditText) this.findViewById(R.id.editText_test);
        this.textViewInfo = (TextView) this.findViewById(R.id.textView_info);

        this.button_selectAll = (Button) this.findViewById(R.id.button_selectAll);
        this.button_setSelection1 = (Button) this.findViewById(R.id.button_setSelection1);
        this.button_setSelection2 = (Button) this.findViewById(R.id.button_setSelection2);
        this.button_extendSelection = (Button) this.findViewById(R.id.button_extendSelection);

        // Focus
        this.editTextTest.requestFocus();

        this.button_selectAll.setOnClickListener(new View.OnClickListener() {
            @Override
            public void onClick(View v) {
                selectAllHandler();
            }
        });

        this.button_setSelection1.setOnClickListener(new View.OnClickListener() {
            @Override
            public void onClick(View v) {
                setSelection1Handler();
            }
        });

        this.button_setSelection2.setOnClickListener(new View.OnClickListener() {
            @Override
            public void onClick(View v) {
                setSelection2Handler();
            }
        });

        this.button_extendSelection.setOnClickListener(new View.OnClickListener() {
            @Override
            public void onClick(View v) {
                extendSelectionHandler();
            }
        });
    }

    // Usage of: editText.selectALl()
    private void selectAllHandler() {
        this.editTextTest.selectAll();
        this.textViewInfo.setText("selectAll()");
    }

    // Usage of: editText.setSelection(int index)
    private void setSelection1Handler() {
        this.editTextTest.setSelection(3);
        this.textViewInfo.setText("setSelection(3)");
    }

    // Usage of: editText.setSelection(int start, int stop)
    private void setSelection2Handler() {
        this.editTextTest.setSelection(2, 7);
        this.textViewInfo.setText("setSelection(2, 7)");
    }

    // Usage of: editText.extendSelection(int index)
    private void extendSelectionHandler() {
        this.editTextTest.extendSelection(5);

        int selectionStart = this.editTextTest.getSelectionStart();
        this.textViewInfo.setText("selectionStart = " + selectionStart+ " --> extendSelection(5)");
    }

}Tutoriels de programmation Android
- Configurer Android Emulator en Android Studio
- Le Tutoriel de Android ToggleButton
- Créer un File Finder Dialog simple dans Android
- Le Tutoriel de Android TimePickerDialog
- Le Tutoriel de Android DatePickerDialog
- De quoi avez-vous besoin pour démarrer avec Android?
- Installer Android Studio sur Windows
- Installer Intel® HAXM pour Android Studio
- Le Tutoriel de Android AsyncTask
- Le Tutoriel de Android AsyncTaskLoader
- Tutoriel Android pour débutant - Exemples de base
- Comment connaître le numéro de téléphone d'Android Emulator et le changer?
- Le Tutoriel de Android TextInputLayout
- Le Tutoriel de Android CardView
- Le Tutoriel de Android ViewPager2
- Obtenir un numéro de téléphone dans Android à l'aide de TelephonyManager
- Le Tutoriel de Android Phone Call
- Le Tutoriel de Android Wifi Scanning
- Le Tutoriel de programmation de jeux Android 2D pour débutant
- Le Tutoriel de Android DialogFragment
- Le Tutoriel de Android CharacterPickerDialog
- Le Tutoriel Android pour débutant - Hello Android
- Utiliser Android Device File Explorer
- Activer USB Debugging sur un appareil Android
- Le Tutoriel de Android UI Layouts
- Le Tutoriel de Android SMS
- Le Tutoriel de Android et SQLite Database
- Le Tutoriel de Google Maps Android API
- Le Tutoriel de texte pour parler dans Android
- Le Tutoriel de Android Space
- Le Tutoriel de Android Toast
- Créer un Android Toast personnalisé
- Le Tutoriel de Android SnackBar
- Le Tutoriel de Android TextView
- Le Tutoriel de Android TextClock
- Le Tutoriel de Android EditText
- Le Tutoriel de Android TextWatcher
- Formater le numéro de carte de crédit avec Android TextWatcher
- Le Tutoriel de Android Clipboard
- Créer un File Chooser simple dans Android
- Le Tutoriel de Android AutoCompleteTextView et MultiAutoCompleteTextView
- Le Tutoriel de Android ImageView
- Le Tutoriel de Android ImageSwitcher
- Le Tutoriel de Android ScrollView et HorizontalScrollView
- Le Tutoriel de Android WebView
- Le Tutoriel de Android SeekBar
- Le Tutoriel de Android Dialog
- Le Tutoriel de Android AlertDialog
- Tutoriel Android RatingBar
- Le Tutoriel de Android ProgressBar
- Le Tutoriel de Android Spinner
- Le Tutoriel de Android Button
- Le Tutoriel de Android Switch
- Le Tutoriel de Android ImageButton
- Le Tutoriel de Android FloatingActionButton
- Le Tutoriel de Android CheckBox
- Le Tutoriel de Android RadioGroup et RadioButton
- Le Tutoriel de Android Chip et ChipGroup
- Utilisation des Image assets et des Icon assets d'Android Studio
- Configuration de la Carte SD pour Android Emulator
- Exemple ChipGroup et Chip Entry
- Comment ajouter des bibliothèques externes à Android Project dans Android Studio?
- Comment désactiver les autorisations déjà accordées à l'application Android?
- Comment supprimer des applications de Android Emulator?
- Le Tutoriel de Android LinearLayout
- Le Tutoriel de Android TableLayout
- Le Tutoriel de Android FrameLayout
- Le Tutoriel de Android QuickContactBadge
- Le Tutoriel de Android StackView
- Le Tutoriel de Android Camera
- Le Tutoriel de Android MediaPlayer
- Le Tutoriel de Android VideoView
- Jouer des effets sonores dans Android avec SoundPool
- Le Tutoriel de Android Networking
- Analyser JSON dans Android
- Le Tutoriel de Android SharedPreferences
- Le Tutorial de stockage interne Android (Internal Storage)
- Le Tutoriel de Android External Storage
- Le Tutoriel de Android Intents
- Exemple d'une Android Intent explicite, appelant une autre Intent
- Exemple de Android Intent implicite, ouvrez une URL, envoyez un email
- Le Tutoriel de Android Service
- Le Tutoriel Android Notifications
- Le Tutoriel de Android DatePicker
- Le Tutoriel de Android TimePicker
- Le Tutoriel de Android Chronometer
- Le Tutoriel de Android OptionMenu
- Le Tutoriel de Android ContextMenu
- Le Tutoriel de Android PopupMenu
- Le Tutoriel de Android Fragment
- Le Tutoriel de Android ListView
- Android ListView avec Checkbox en utilisant ArrayAdapter
- Le Tutoriel de Android GridView
Show More

