Le Tutoriel de Android TextInputLayout
1. Android TextInputLayout
TextInputLayout est un composant d'interface qui contient et soutient visuellement un champ de saisie de texte (Text Input Field). Quand EditText est en cours d'utilisation, assurez-vous que son android:background est @null pour que TextInputLayout puisse définir un arrière-plan approprié.

Le texte d'indication apparaît automatiquement quand l'utilisateur focus sur EditText.

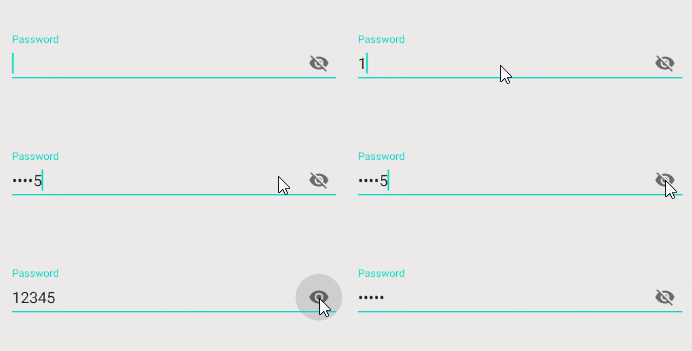
Un champ de Mot de passe avec une ImageView à droite permet d'afficher le mot de passe.
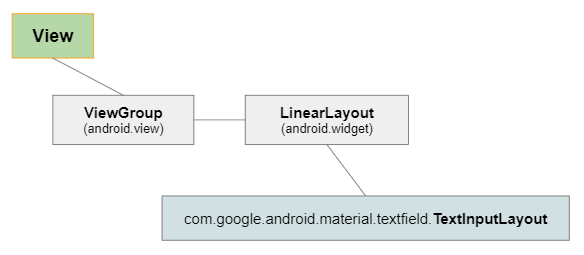
TextInputLayout est une sous-classe de LinearLayout, qui est capable de classer les sous View dans une ligne ou une colonne. Quand l'une de ses sous View est un champ de saisie de text comme par exemple EditText, les autres sous View agissent comme des soutiens visuels.
Remarque: Vous pouvez également imbriquer plusieurs TextInputLayout afin d'obtenir un composant d'interface plus complexe.
Library:
TextInputLayout n'est pas disponible dans la bibliothèque standard d'Android. Par conséquent, pour pouvoir l'utiliser, il faut l'installer dans votre projet à partir de Palette de la fenêtre de conception ou remplir cette bibliothèque manuellement.
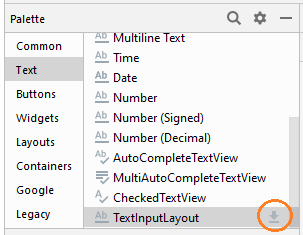
Après avoir installé cette bibliothèque à partir de Palette, elle sera déclarée dans le fichier build.gradle (Module: app):
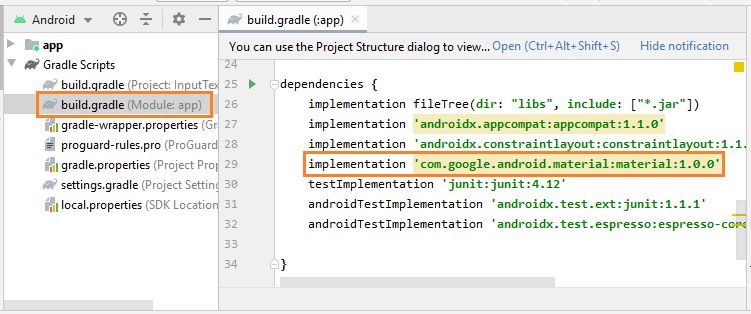
implementation 'com.google.android.material:material:1.0.0'2. Floating Hint
Le texte d'indication (Hint text), qui apparaît automatiquement quand l'utilisateur focus sur un EditText, constitue une fonction de soutien de base de TextInputLayout, celle que vous pouvez utiliser sans avoir besoin d'ajouter un code Java supplémentaire.
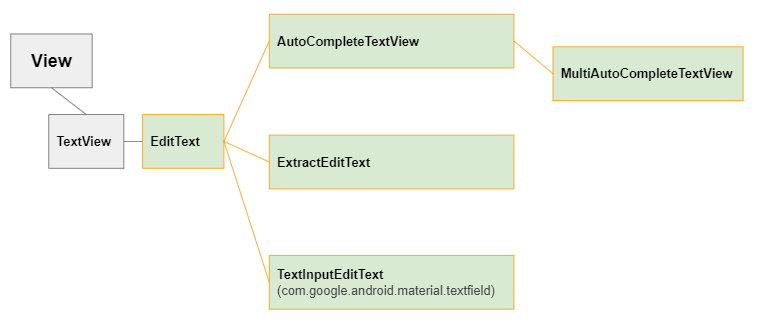
Glisser un TextInputLayout dans l'interface. Par défaut, il contient une sous View nommée TextInputEditText, un descendant de EditText.
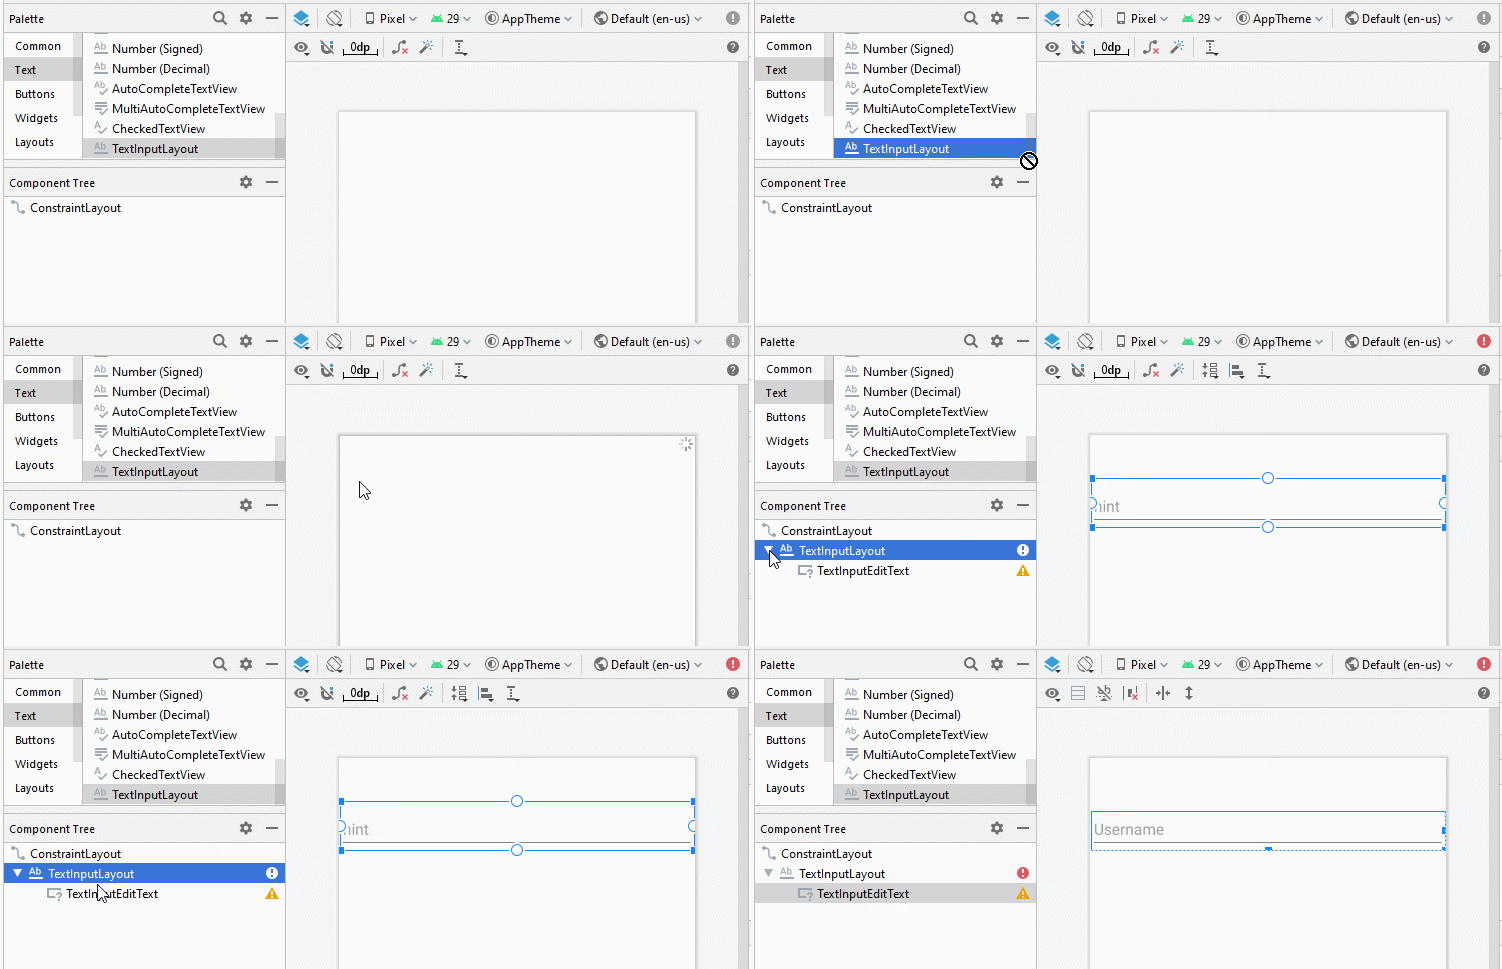
<com.google.android.material.textfield.TextInputLayout
    android:id="@+id/textInputLayout"
    android:layout_width="0dp"
    android:layout_height="wrap_content"
    android:layout_marginStart="16dp"
    android:layout_marginLeft="16dp"
    android:layout_marginTop="50dp"
    android:layout_marginEnd="16dp"
    android:layout_marginRight="16dp"
    app:layout_constraintEnd_toEndOf="parent"
    app:layout_constraintStart_toStartOf="parent"
    app:layout_constraintTop_toTopOf="parent">

    <com.google.android.material.textfield.TextInputEditText
        android:layout_width="match_parent"
        android:layout_height="wrap_content"
        android:hint="Username" />

</com.google.android.material.textfield.TextInputLayout>
Voici le résultat:
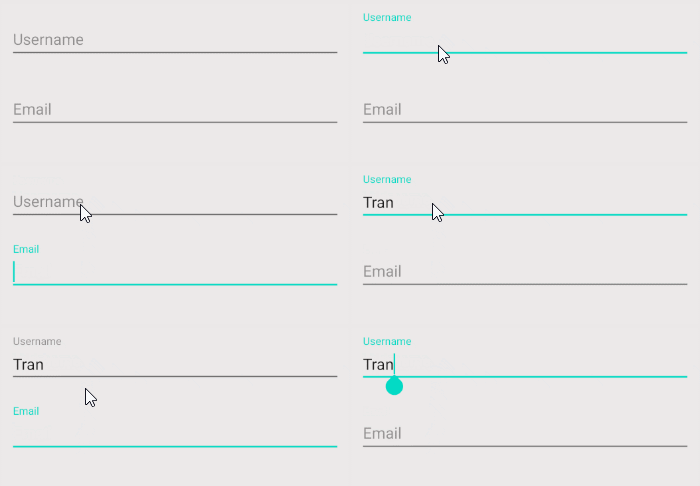
Ci-dessous certains attributs relatifs à "Floating Hint":
- app:hintEnabled (Default true)
- app:hintAnimationEnabled (Default true)
- app:hintTextAppearance
app:hintEnabled
L'attribut app:hintEnabled est utilisé pour enable/disable (activer/désactiver) la fonction "Floating Hint" de TextInputLayout. Sa valeur par défaut est true.
app:hintAnimationEnabled
L'attribut app:hintAnimationEnabled spécifie avec ou sans animation quand le texte d'indication (Hint text) apparaît. Sa valeur par défaut est true.
app:hintTextAppearance
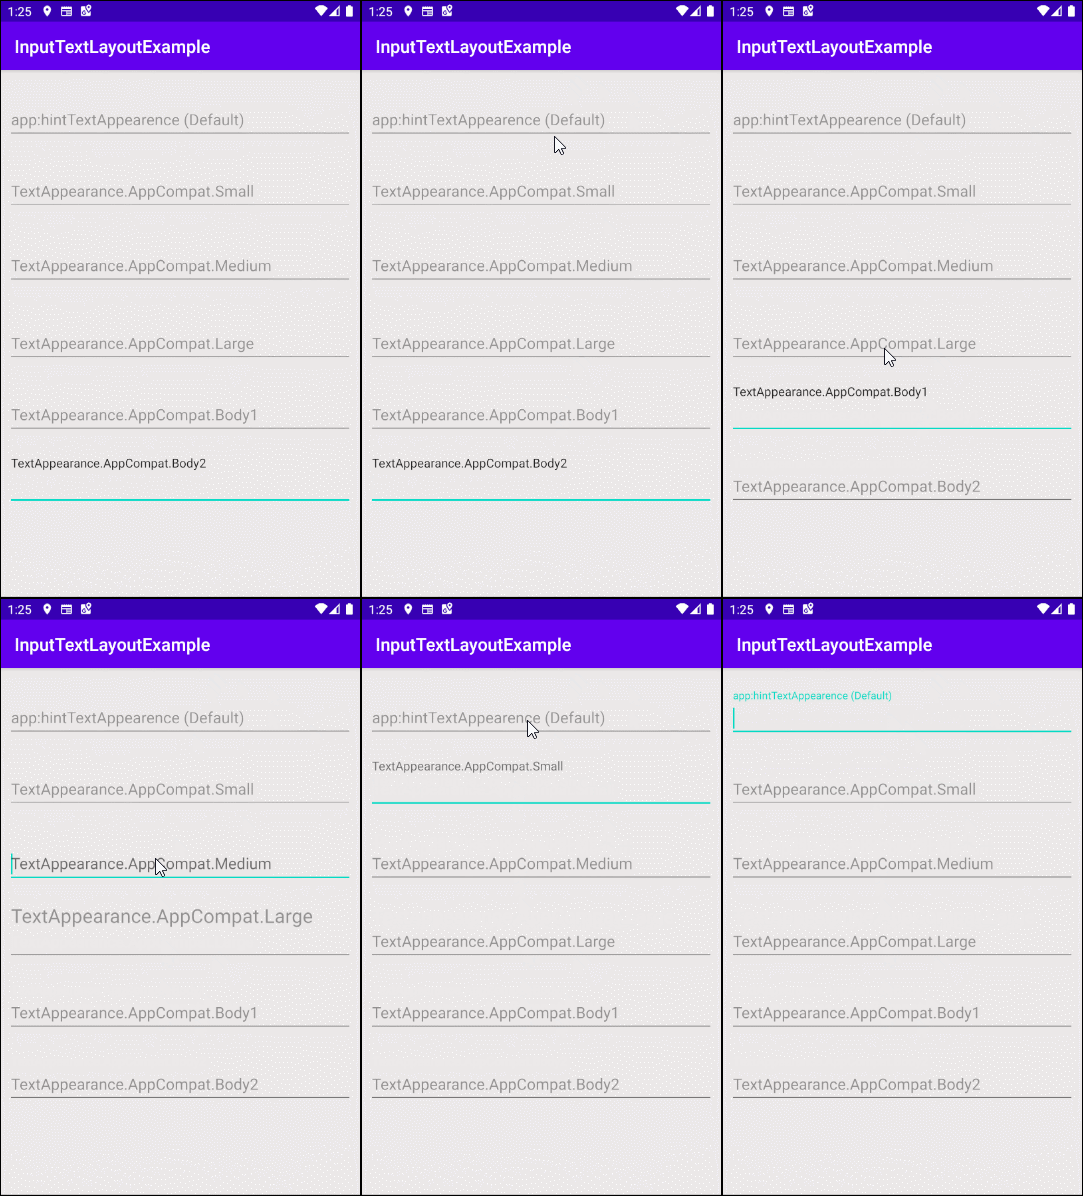
Définir la couleur, la taille, le style, etc, au texte d'indication (Hint text).
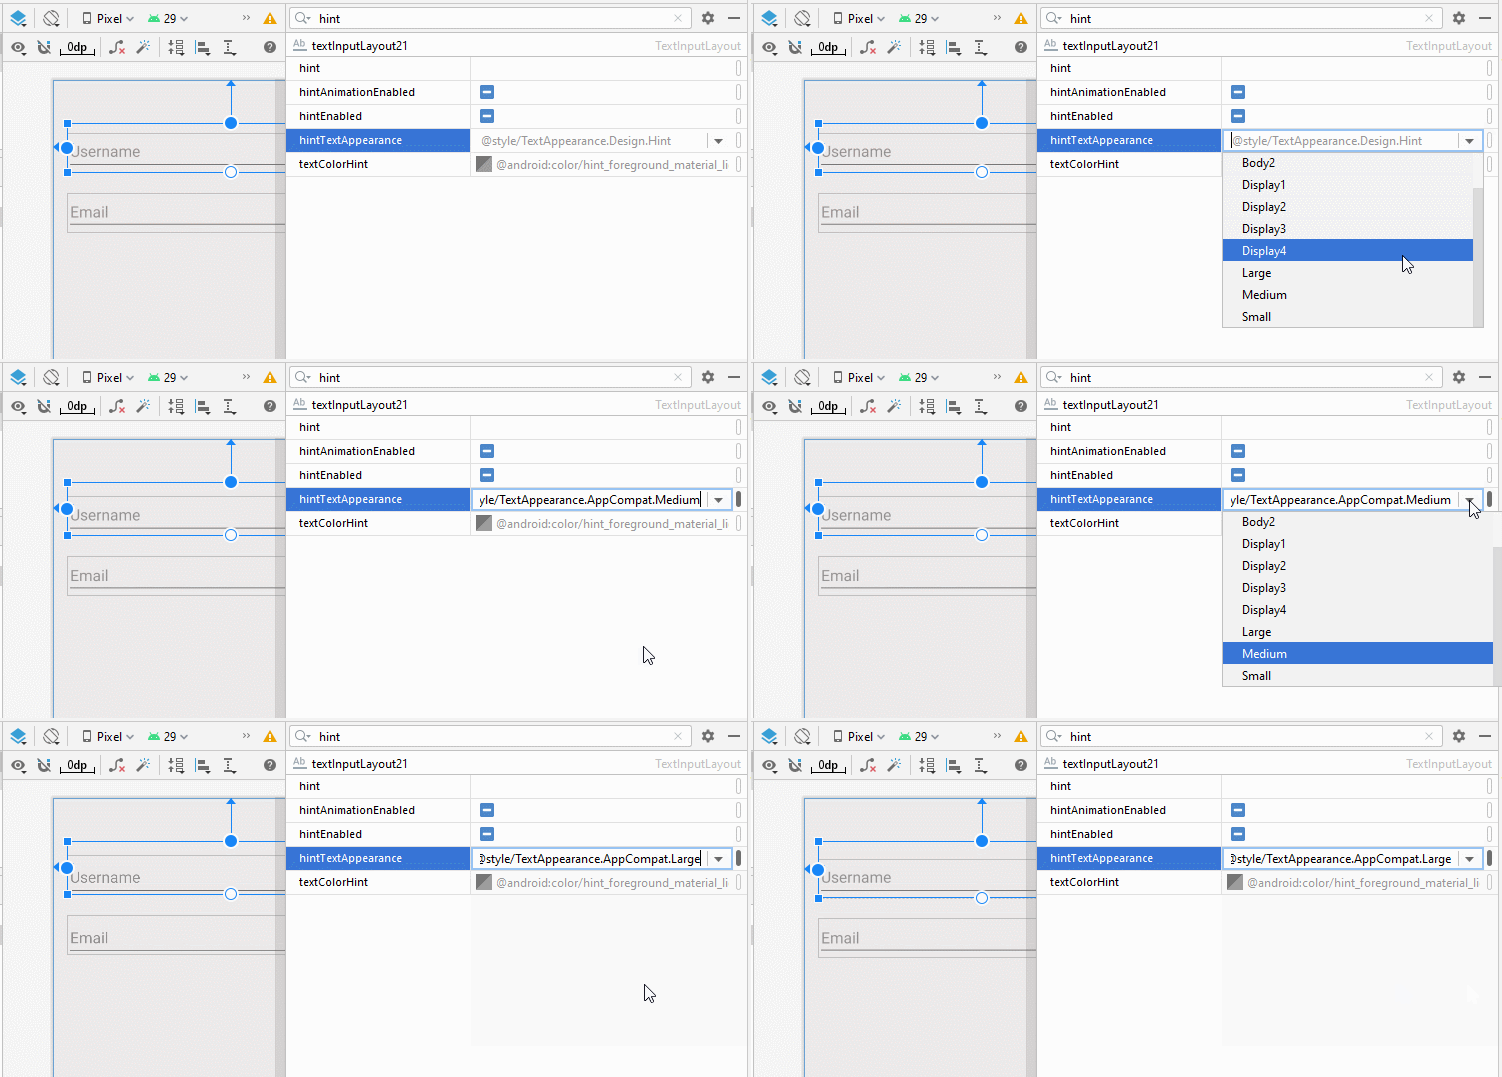
- app:hintTextAppearance="@style/TextAppearance.AppCompat.Large"
- app:hintTextAppearance="@style/TextAppearance.AppCompat.Medium"
- app:hintTextAppearance="@style/TextAppearance.AppCompat.Small"
- app:hintTextAppearance="@style/TextAppearance.AppCompat.Body1"
- app:hintTextAppearance="@style/TextAppearance.AppCompat.Body2"
- app:hintTextAppearance="@style/TextAppearance.AppCompat.Display1"
- app:hintTextAppearance="@style/TextAppearance.AppCompat.Display2"
- app:hintTextAppearance="@style/TextAppearance.AppCompat.Display3"
- app:hintTextAppearance="@style/TextAppearance.AppCompat.Display4"
- ...
3. Character Counting
TextInputLayout soutient aussi la fonction de comptage de caractères. Il s'agit de l'une des fonctionnalités très souvent utilisées dans différentes applications.

Glisser un TextInputLayout dans l'interface. Par défaut, il contient un TextInputEditText:
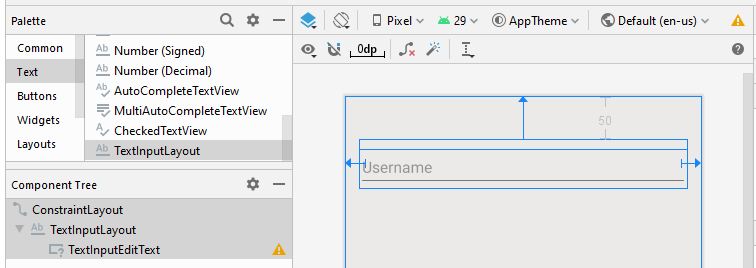
Ensuite: Définir les valeurs pour certains autres attributs de TextInputLayout.
- app:counterEnabled = "true"
- app:counterMaxLength: Il s'agit d'un attribut facultatif susceptible de spécifier le nombre maximum de caractères dans les textes. Cette valeur est utilisée pour les rapports. L'utilisateur peut toujours saisir un texte avec un plus grand nombre de caractères.

<?xml version="1.0" encoding="utf-8"?>
<androidx.constraintlayout.widget.ConstraintLayout
    xmlns:android="http://schemas.android.com/apk/res/android"
    xmlns:app="http://schemas.android.com/apk/res-auto"
    xmlns:tools="http://schemas.android.com/tools"
    android:layout_width="match_parent"
    android:layout_height="match_parent"
    android:background="#ECE9E9"
    tools:context=".MainActivity">

    <com.google.android.material.textfield.TextInputLayout
        android:id="@+id/textInputLayout21"
        app:counterEnabled="true"
        app:counterMaxLength="10"
        android:layout_width="0dp"
        android:layout_height="wrap_content"
        android:layout_marginStart="16dp"
        android:layout_marginLeft="16dp"
        android:layout_marginTop="50dp"
        android:layout_marginEnd="16dp"
        android:layout_marginRight="16dp"
        app:layout_constraintEnd_toEndOf="parent"
        app:layout_constraintStart_toStartOf="parent"
        app:layout_constraintTop_toTopOf="parent">

        <com.google.android.material.textfield.TextInputEditText
            android:layout_width="match_parent"
            android:layout_height="wrap_content"
            android:hint="Username" />

    </com.google.android.material.textfield.TextInputLayout>

</androidx.constraintlayout.widget.ConstraintLayout>
Voici le résultat que vous pouvez obtenir:

Remarque: Utiliser l'attribut android:maxLength pour Input Field (EditText,..) pour limiter le nombre de caractères du texte qui est garanti.
4. Password Visibility Toggle
Glisser TextInputLayout dans l'interface. Par défaut, il dispose déjà TextInputEditText comme sous View. Par la suite, définir l'attribut android:inputType = "textPassword" pour TextInputEditText.
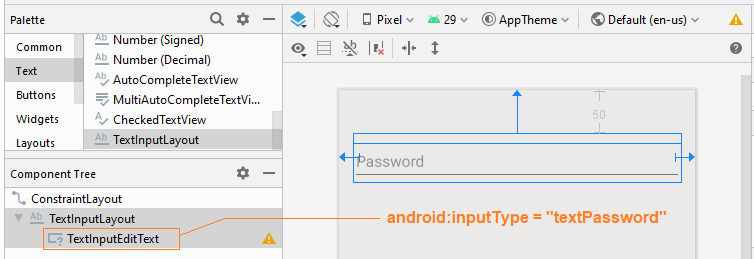
Définir les valeurs pour les attributs suivants:
- app:passwordToggleEnabled
- app:passwordToggleDrawable
- app:passwordToggleContentDescription
- app:passwordToggleTint
- app:passwordToggleTintMode

app:passwordEnabled
L'attribut app:passwordEnabled="true" est nécessaire pour activer la fonction afficher/masquer le mot de passe pour TextInputLayout, alors que les autres attributs mentionnés ci-dessus ne demeurent que facultatifs.

<?xml version="1.0" encoding="utf-8"?>
<androidx.constraintlayout.widget.ConstraintLayout
    xmlns:android="http://schemas.android.com/apk/res/android"
    xmlns:app="http://schemas.android.com/apk/res-auto"
    xmlns:tools="http://schemas.android.com/tools"
    android:layout_width="match_parent"
    android:layout_height="match_parent"
    android:background="#ECE9E9"
    tools:context=".MainActivity">

    <com.google.android.material.textfield.TextInputLayout
        android:layout_width="0dp"
        android:layout_height="wrap_content"
        android:layout_marginStart="16dp"
        android:layout_marginLeft="16dp"
        android:layout_marginTop="50dp"
        android:layout_marginEnd="16dp"
        android:layout_marginRight="16dp"
        app:layout_constraintEnd_toEndOf="parent"
        app:layout_constraintStart_toStartOf="parent"
        app:layout_constraintTop_toTopOf="parent"
        app:passwordToggleEnabled="true">

        <com.google.android.material.textfield.TextInputEditText
            android:layout_width="match_parent"
            android:layout_height="wrap_content"
            android:hint="Password"
            android:inputType="textPassword" />
    </com.google.android.material.textfield.TextInputLayout>

</androidx.constraintlayout.widget.ConstraintLayout>
5. Floating Label Error
L'une des autres fonctions de TextInputLayout est d'afficher une Label notifiant l'erreur à l'utilisateur. Néanmoins, afin d'utiliser cette fonction, il est nécessaire d'ajouter un code Java supplémentaire pour contrôler la fonction afficher/masquer de Label.
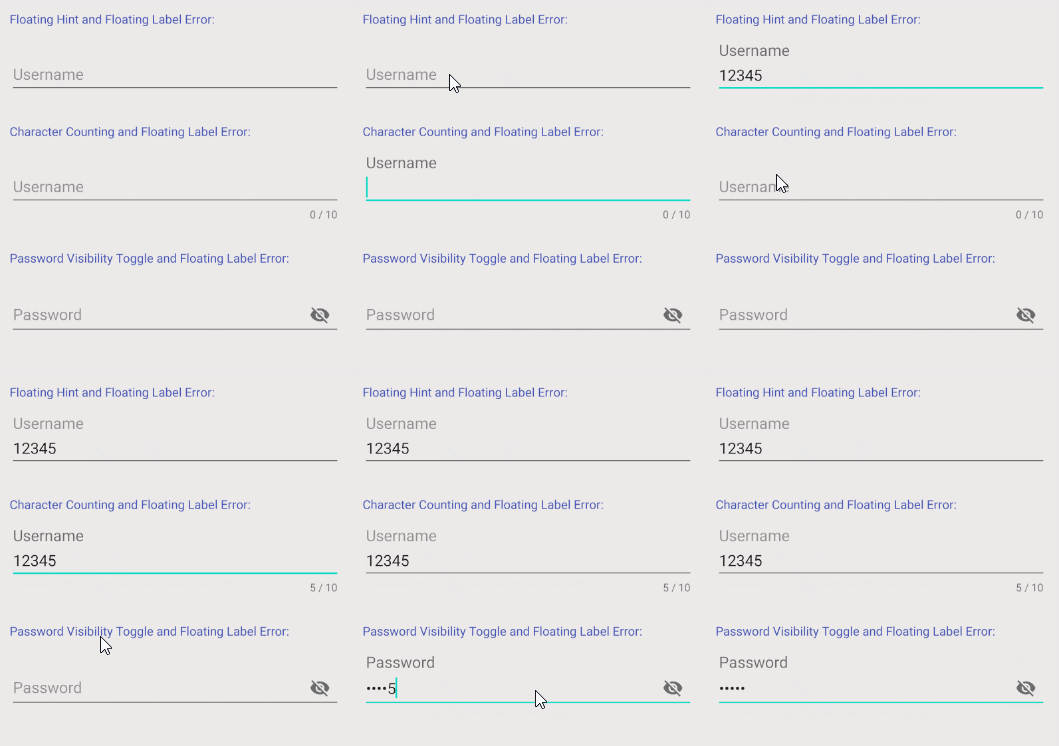
OK, ce-dessous un exemple tout simple:
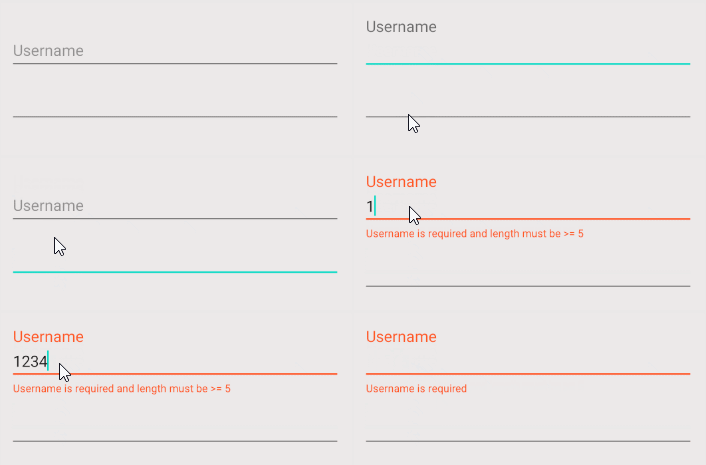
L'interface de l'exemple:
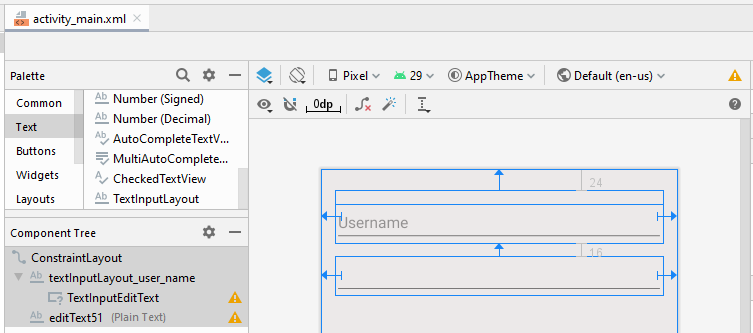
activity_main.xml
<?xml version="1.0" encoding="utf-8"?>
<androidx.constraintlayout.widget.ConstraintLayout
    xmlns:android="http://schemas.android.com/apk/res/android"
    xmlns:app="http://schemas.android.com/apk/res-auto"
    xmlns:tools="http://schemas.android.com/tools"
    android:layout_width="match_parent"
    android:layout_height="match_parent"
    android:background="#ECE9E9"
    tools:context=".MainActivity">

    <com.google.android.material.textfield.TextInputLayout
        android:id="@+id/textInputLayout_user_name"
        android:layout_width="0dp"
        android:layout_height="wrap_content"
        android:layout_marginStart="16dp"
        android:layout_marginLeft="16dp"
        android:layout_marginTop="24dp"
        android:layout_marginEnd="16dp"
        android:layout_marginRight="16dp"
        app:hintTextAppearance="@style/TextAppearance.AppCompat.Medium"
        app:layout_constraintEnd_toEndOf="parent"
        app:layout_constraintStart_toStartOf="parent"
        app:layout_constraintTop_toTopOf="parent">

        <com.google.android.material.textfield.TextInputEditText
            android:layout_width="match_parent"
            android:layout_height="wrap_content"
            android:hint="Username" />
    </com.google.android.material.textfield.TextInputLayout>

    <EditText
        android:id="@+id/editText51"
        android:layout_width="0dp"
        android:layout_height="wrap_content"
        android:layout_marginStart="16dp"
        android:layout_marginLeft="16dp"
        android:layout_marginTop="16dp"
        android:layout_marginEnd="16dp"
        android:layout_marginRight="16dp"
        android:ems="10"
        android:inputType="textPersonName"
        app:layout_constraintEnd_toEndOf="parent"
        app:layout_constraintStart_toStartOf="parent"
        app:layout_constraintTop_toBottomOf="@+id/textInputLayout_user_name" />

</androidx.constraintlayout.widget.ConstraintLayout>
MainActivity.java
package com.example.inputtextlayoutexample;

import android.os.Bundle;
import android.text.Editable;
import android.text.TextWatcher;

import androidx.appcompat.app.AppCompatActivity;

import com.google.android.material.textfield.TextInputLayout;

public class MainActivity extends AppCompatActivity {

    @Override
    protected void onCreate(Bundle savedInstanceState) {
        super.onCreate(savedInstanceState);
        setContentView(R.layout.activity_main);

        this.setupFloatingLabelError();
    }

    private void setupFloatingLabelError() {
        final TextInputLayout textInputLayoutUserName = (TextInputLayout) findViewById(R.id.textInputLayout_user_name);

        textInputLayoutUserName.getEditText().addTextChangedListener(new TextWatcher() {
            // ...
            @Override
            public void onTextChanged(CharSequence text, int start, int count, int after) {
                if (text.length() == 0 ) {
                    textInputLayoutUserName.setError("Username is required");
                    textInputLayoutUserName.setErrorEnabled(true);
                } else if (text.length() < 5 ) {
                    textInputLayoutUserName.setError("Username is required and length must be >= 5");
                    textInputLayoutUserName.setErrorEnabled(true);
                } else {
                    textInputLayoutUserName.setErrorEnabled(false);
                }
            }
            @Override
            public void beforeTextChanged(CharSequence s, int start, int count,
                                          int after) {
            }

            @Override
            public void afterTextChanged(Editable s) {

            }
        });
    }
}6. TextInputLayout Styles
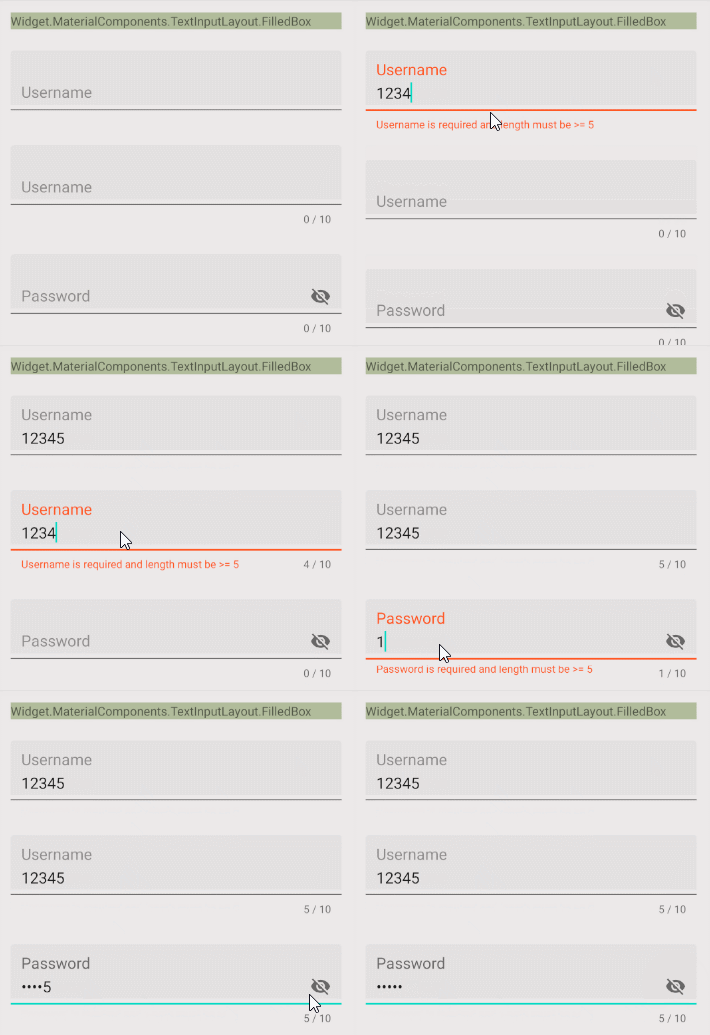
L'attribut style constitue une option de TextInputLayout permettant de définir le style pour TextInputLayout. Il y a quelques styles intégrés dans la bibliothèque d'Android à votre disposition.
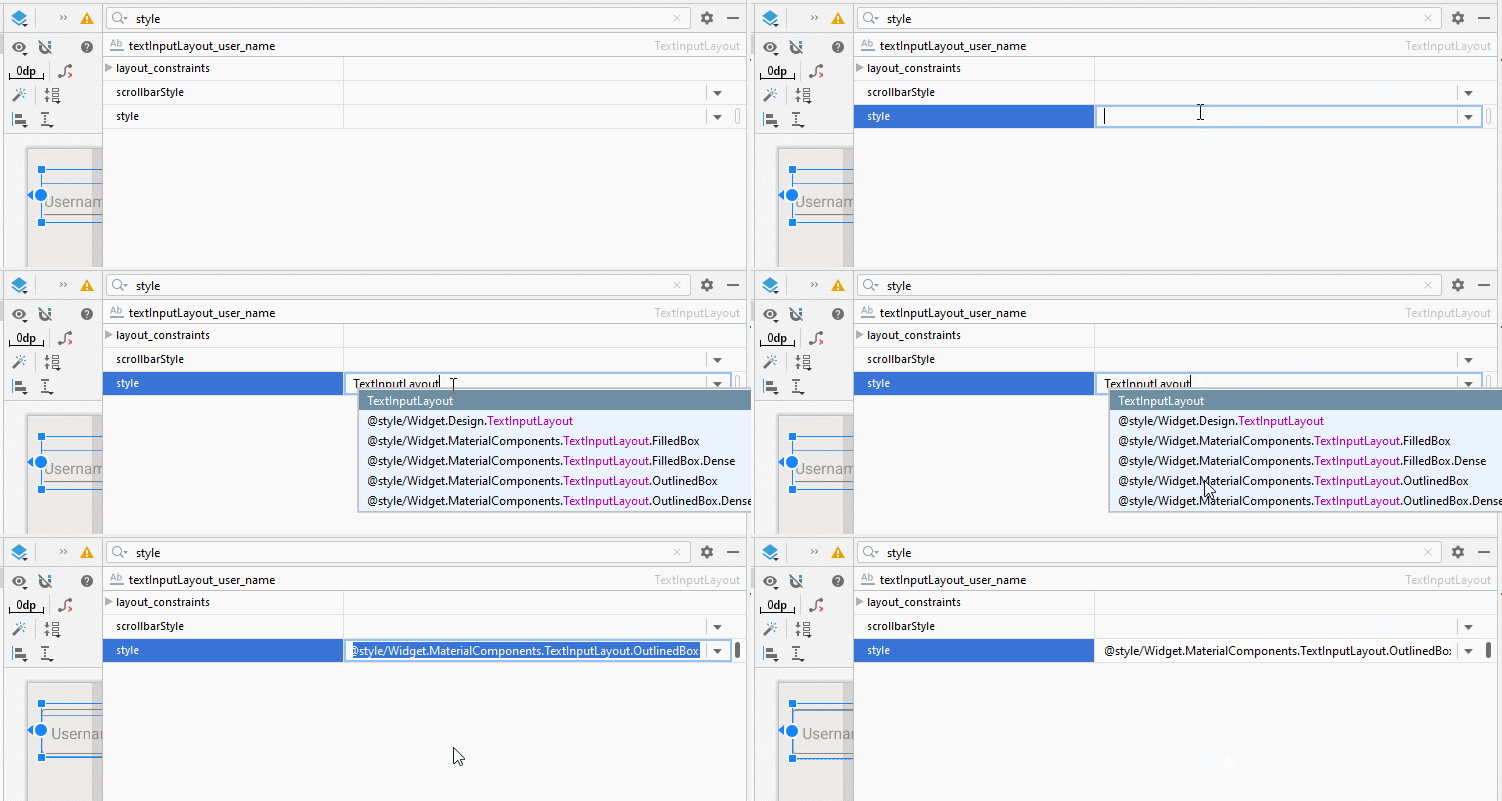
- style="@style/Widget.Design.TextInputLayout"
- style="@style/Widget.MaterialComponents.TextInputLayout.FilledBox"
- style="@style/Widget.MaterialComponents.TextInputLayout.FilledBox.Dense"
- style="@style/Widget.MaterialComponents.TextInputLayout.OutlinedBox"
- style="@style/Widget.MaterialComponents.TextInputLayout.OutlinedBox.Dense"
- ...
style="@style/Widget.MaterialComponents.TextInputLayout.OutlinedBox"
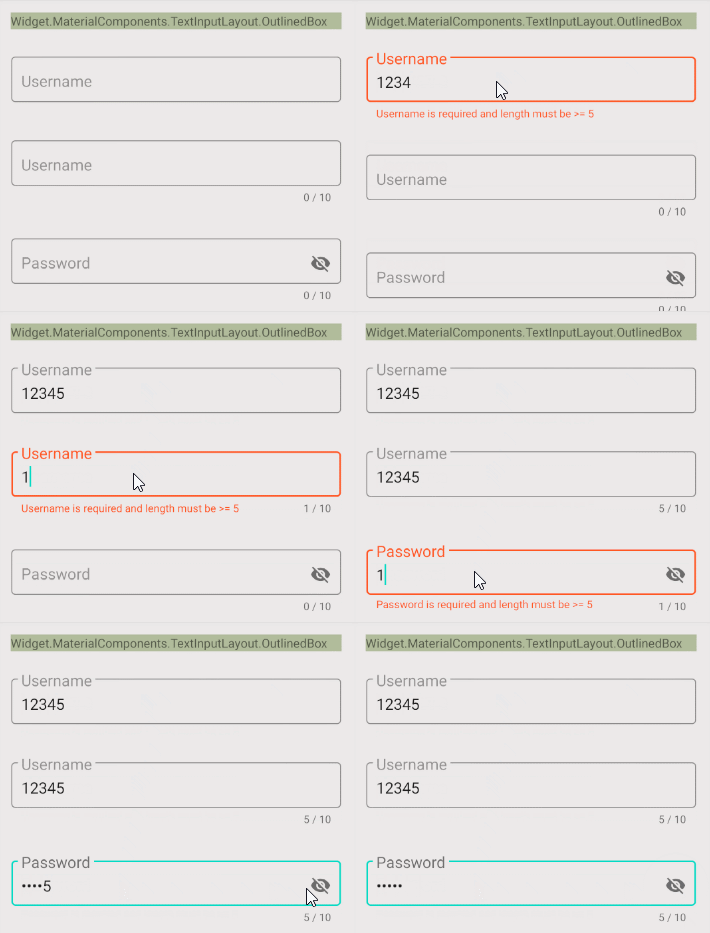
style="@style/Widget.MaterialComponents.TextInputLayout.FilledBox"
Tutoriels de programmation Android
- Configurer Android Emulator en Android Studio
- Le Tutoriel de Android ToggleButton
- Créer un File Finder Dialog simple dans Android
- Le Tutoriel de Android TimePickerDialog
- Le Tutoriel de Android DatePickerDialog
- De quoi avez-vous besoin pour démarrer avec Android?
- Installer Android Studio sur Windows
- Installer Intel® HAXM pour Android Studio
- Le Tutoriel de Android AsyncTask
- Le Tutoriel de Android AsyncTaskLoader
- Tutoriel Android pour débutant - Exemples de base
- Comment connaître le numéro de téléphone d'Android Emulator et le changer?
- Le Tutoriel de Android TextInputLayout
- Le Tutoriel de Android CardView
- Le Tutoriel de Android ViewPager2
- Obtenir un numéro de téléphone dans Android à l'aide de TelephonyManager
- Le Tutoriel de Android Phone Call
- Le Tutoriel de Android Wifi Scanning
- Le Tutoriel de programmation de jeux Android 2D pour débutant
- Le Tutoriel de Android DialogFragment
- Le Tutoriel de Android CharacterPickerDialog
- Le Tutoriel Android pour débutant - Hello Android
- Utiliser Android Device File Explorer
- Activer USB Debugging sur un appareil Android
- Le Tutoriel de Android UI Layouts
- Le Tutoriel de Android SMS
- Le Tutoriel de Android et SQLite Database
- Le Tutoriel de Google Maps Android API
- Le Tutoriel de texte pour parler dans Android
- Le Tutoriel de Android Space
- Le Tutoriel de Android Toast
- Créer un Android Toast personnalisé
- Le Tutoriel de Android SnackBar
- Le Tutoriel de Android TextView
- Le Tutoriel de Android TextClock
- Le Tutoriel de Android EditText
- Le Tutoriel de Android TextWatcher
- Formater le numéro de carte de crédit avec Android TextWatcher
- Le Tutoriel de Android Clipboard
- Créer un File Chooser simple dans Android
- Le Tutoriel de Android AutoCompleteTextView et MultiAutoCompleteTextView
- Le Tutoriel de Android ImageView
- Le Tutoriel de Android ImageSwitcher
- Le Tutoriel de Android ScrollView et HorizontalScrollView
- Le Tutoriel de Android WebView
- Le Tutoriel de Android SeekBar
- Le Tutoriel de Android Dialog
- Le Tutoriel de Android AlertDialog
- Tutoriel Android RatingBar
- Le Tutoriel de Android ProgressBar
- Le Tutoriel de Android Spinner
- Le Tutoriel de Android Button
- Le Tutoriel de Android Switch
- Le Tutoriel de Android ImageButton
- Le Tutoriel de Android FloatingActionButton
- Le Tutoriel de Android CheckBox
- Le Tutoriel de Android RadioGroup et RadioButton
- Le Tutoriel de Android Chip et ChipGroup
- Utilisation des Image assets et des Icon assets d'Android Studio
- Configuration de la Carte SD pour Android Emulator
- Exemple ChipGroup et Chip Entry
- Comment ajouter des bibliothèques externes à Android Project dans Android Studio?
- Comment désactiver les autorisations déjà accordées à l'application Android?
- Comment supprimer des applications de Android Emulator?
- Le Tutoriel de Android LinearLayout
- Le Tutoriel de Android TableLayout
- Le Tutoriel de Android FrameLayout
- Le Tutoriel de Android QuickContactBadge
- Le Tutoriel de Android StackView
- Le Tutoriel de Android Camera
- Le Tutoriel de Android MediaPlayer
- Le Tutoriel de Android VideoView
- Jouer des effets sonores dans Android avec SoundPool
- Le Tutoriel de Android Networking
- Analyser JSON dans Android
- Le Tutoriel de Android SharedPreferences
- Le Tutorial de stockage interne Android (Internal Storage)
- Le Tutoriel de Android External Storage
- Le Tutoriel de Android Intents
- Exemple d'une Android Intent explicite, appelant une autre Intent
- Exemple de Android Intent implicite, ouvrez une URL, envoyez un email
- Le Tutoriel de Android Service
- Le Tutoriel Android Notifications
- Le Tutoriel de Android DatePicker
- Le Tutoriel de Android TimePicker
- Le Tutoriel de Android Chronometer
- Le Tutoriel de Android OptionMenu
- Le Tutoriel de Android ContextMenu
- Le Tutoriel de Android PopupMenu
- Le Tutoriel de Android Fragment
- Le Tutoriel de Android ListView
- Android ListView avec Checkbox en utilisant ArrayAdapter
- Le Tutoriel de Android GridView
Show More