Tutoriel Android pour débutant - Exemples de base
1. La présentation
Le document est basé sur:
Android Studio 3.6.1
Vous consultez la série de tutoriels de programmation Android, c'est le deuxième tutoriel, dans ce document je vous guiderai pas à pas pour construire une application Android, les connaissances de base qui seront couvertes comprennent:
- Appelez Activity d'une autre Activity.
- Gestion des événements de base.
- Créez une interface de base et travaillez avec des sources de données.
Avant de commencer avec ce document, assurez-vous d'avoir correctement exécuté l'exemple "Hello Android" et de comprendre la structure d'un projet Android. Vous pouvez le voir sur:
2. Créez un projet Android
Si vous travaillez avec un projet Android sur Android Studio, fermez ce projet, nous créerons un autre nouveau projet.
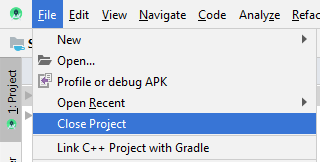
Sur Android Studio, sélectionnez:
- File/Close Project
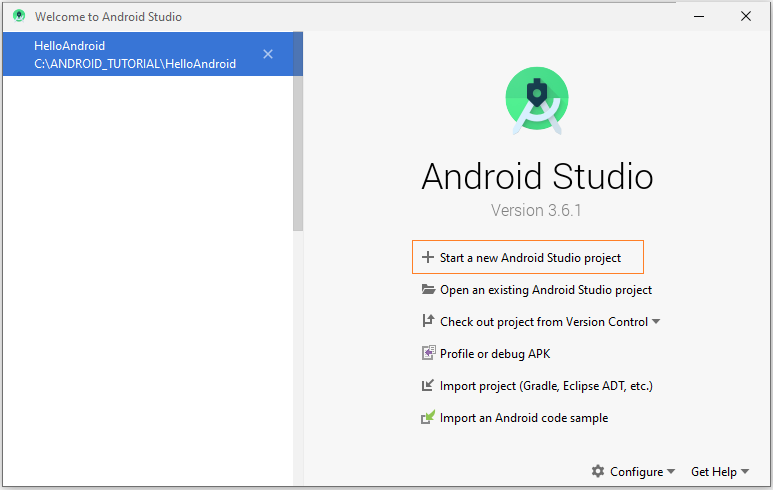
Créez un nouveau project:
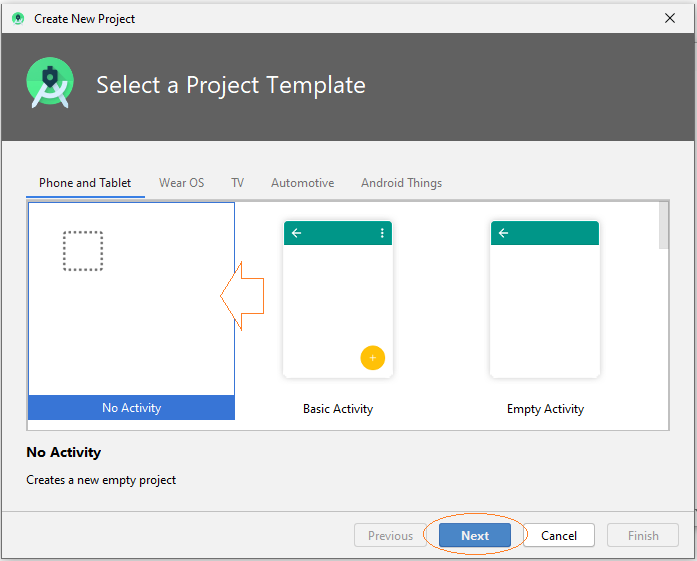
Ensuite, Wizard l\vous demandera si vous souhaitez créer une Activity, sélectionnez "Add No Activity", wizard ne créera qu'un projet vide, à l'exclusion de toute Activity.
Entrez:
- Name: AndroidBasic2
- Package name: org.o7planning.androidbasic2
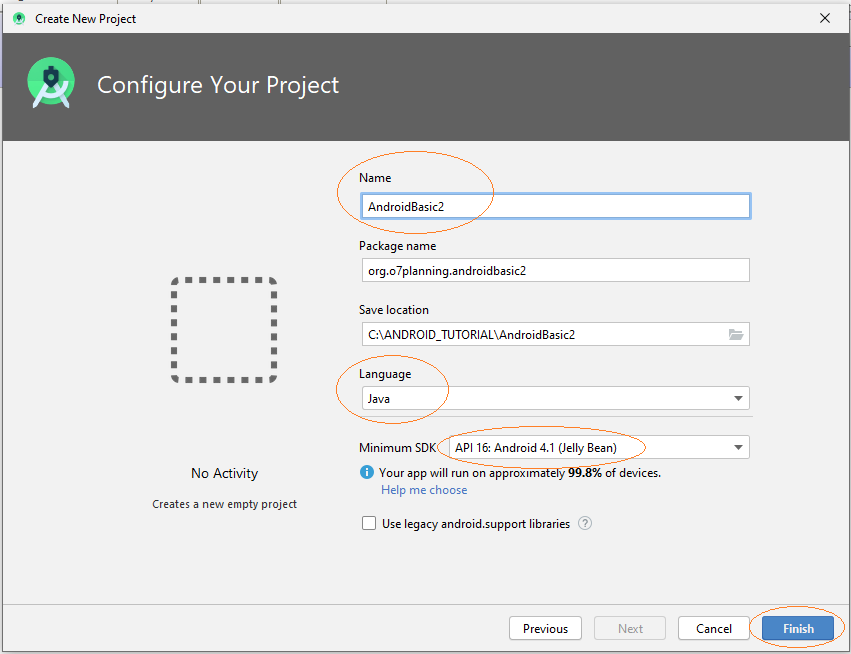
L'application que vous créez sera utilisée pour Phone et Tablet.
Remarque: API 16, Android 4.1 est actuellement utilisé sur la plupart des appareils de Phone et Table (environ 94%).
Votre projet a été créé.
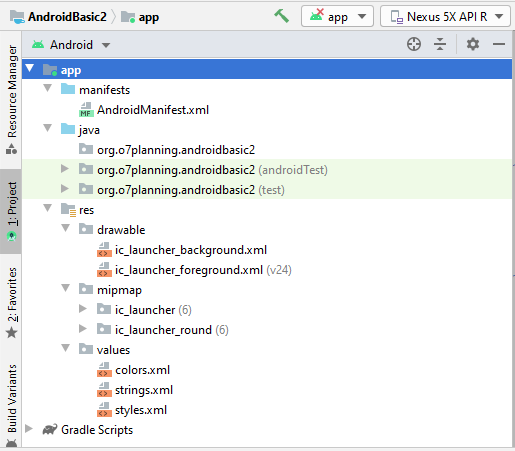
3. Créez une MainActivity et des sous-activités
Nous allons créer une Activity principale (MainActivity), cette Activity sera appelée lors de l'exécution de l'application. Sur MainActivity, il y aura des boutons pour appeler d'autres Activity .
Sur Android Studio, sélectionnez:
- File/New/Activity/Empty Activity
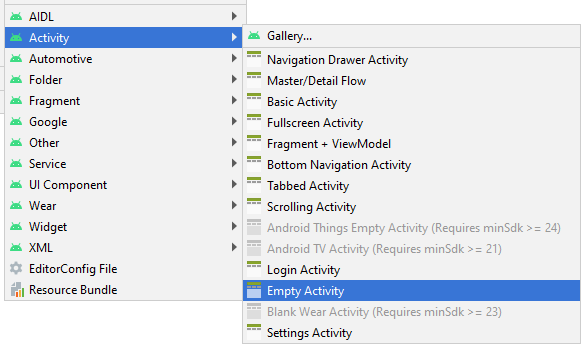
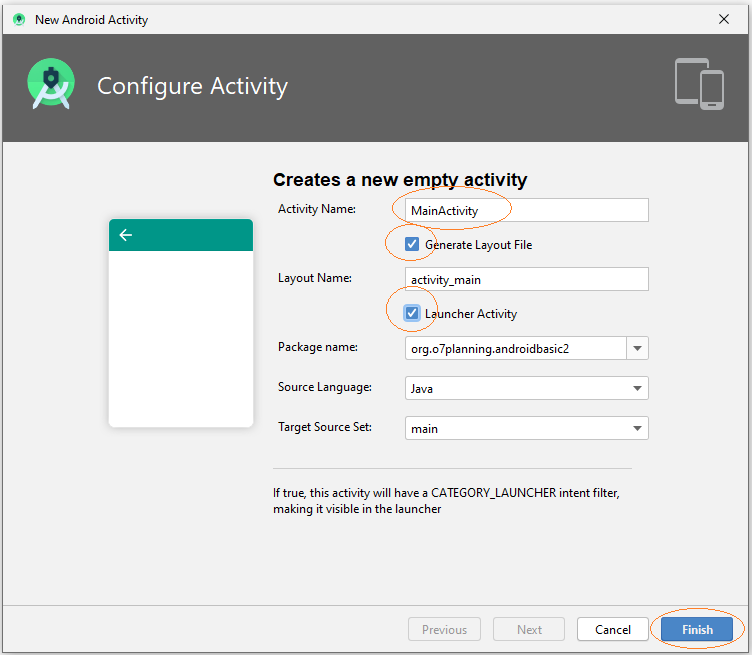
MainActivity a été créée, comprenant 2 fichiers MainActivity.java et main_activity.xml, les informations de cette Activity ont également été enregistrées avec AndroidManifest.xml.
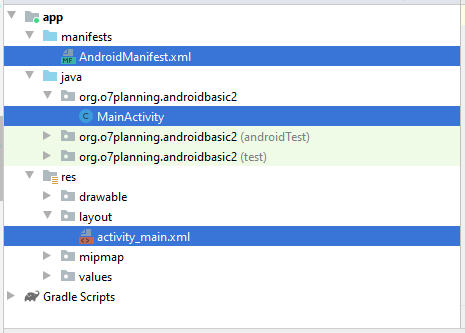
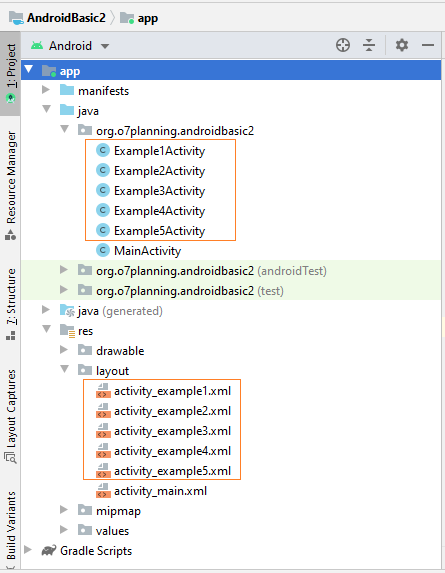
De même, nous créons 5 autres Activity.
- Example1Activity
- Example2Activity
- Example3Activity
- Example4Activity
- Example5Activity
Sur Android Studio, sélectionnez:
- File/New/Activity/Empty Activity
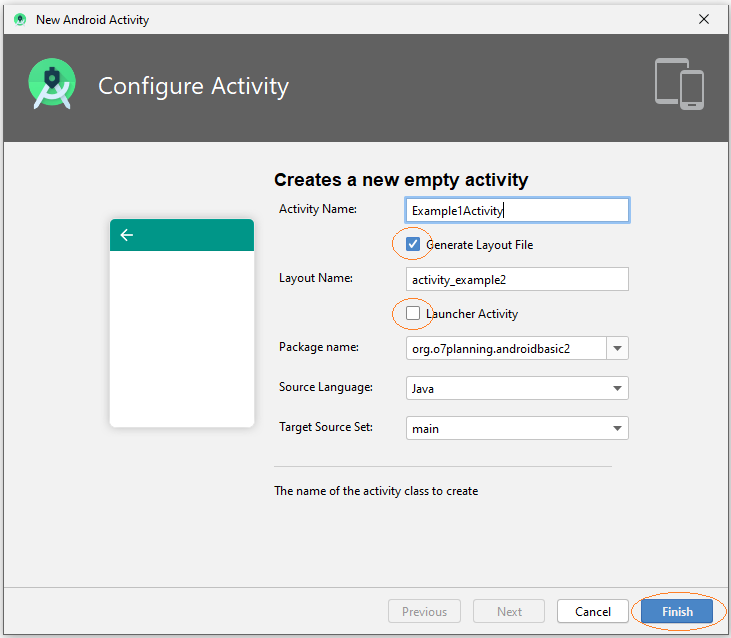
Remarque: Toute Activity nouvellement créée n'est pas une Activity principale, elle est appelée à partir de MainActivity, vous ne devez donc pas cocher "Launcher Activity".
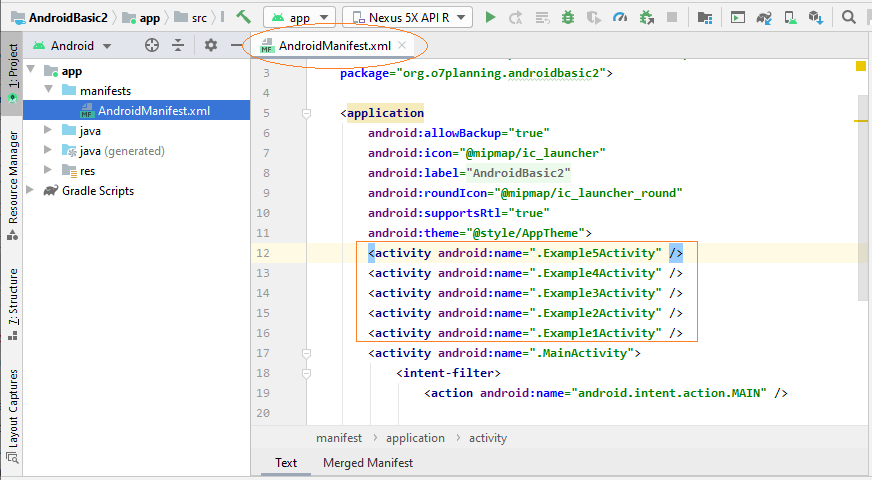
OK, 5 nouvelles Activity ont été créées et elles ont été enregistrées avec AndroidManifest.xml.
4. Concevoir l'interface main_activity.xml
Sur Android Studio, ouvrez main_activity.xml pour concevoir l'interface correspondante.
La fenêtre de conception a 3 modes.
- Code
- Split
- Design
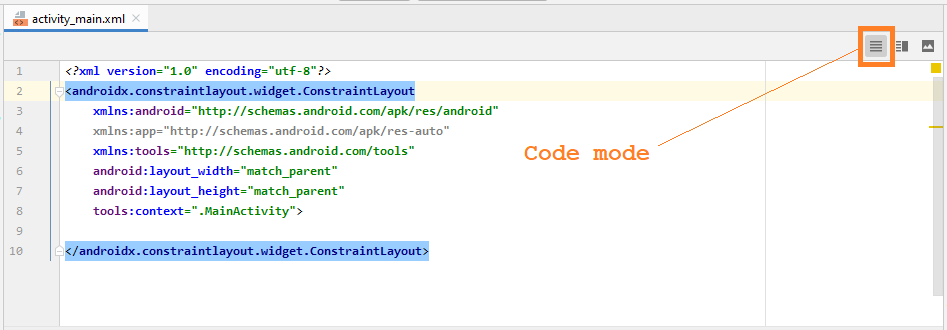
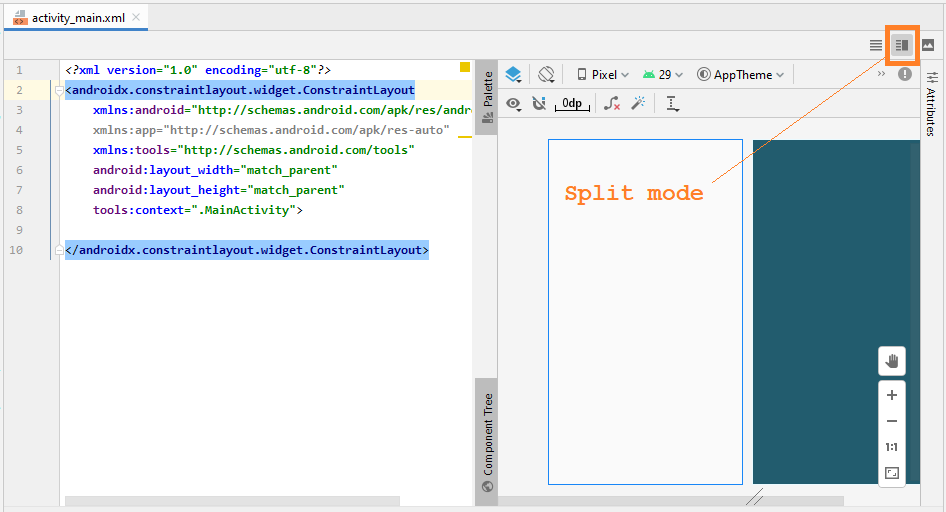
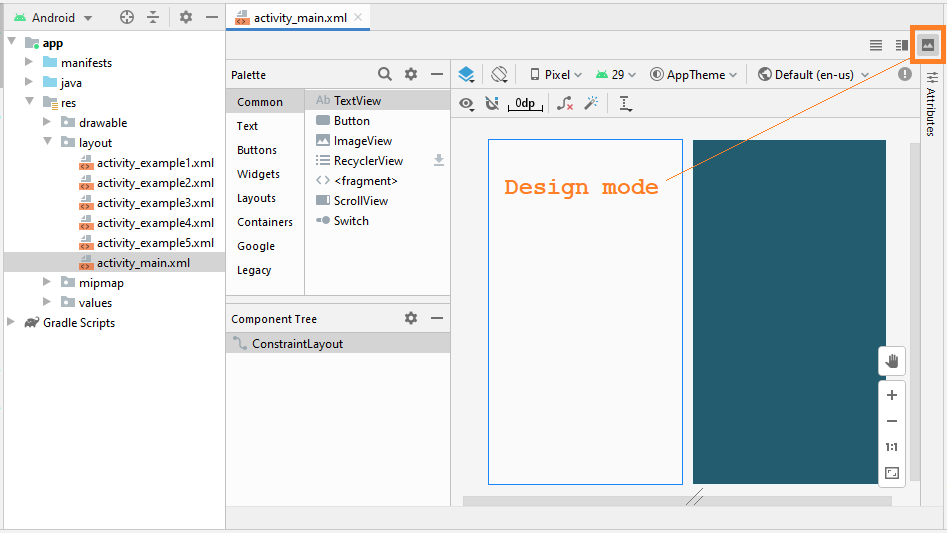
La plupart du temps, vous travaillez en mode Design (Design mode), cela vous aide à faire glisser et à déposer des composants dans l'interface et à générer (generate) automatiquement du code XML:
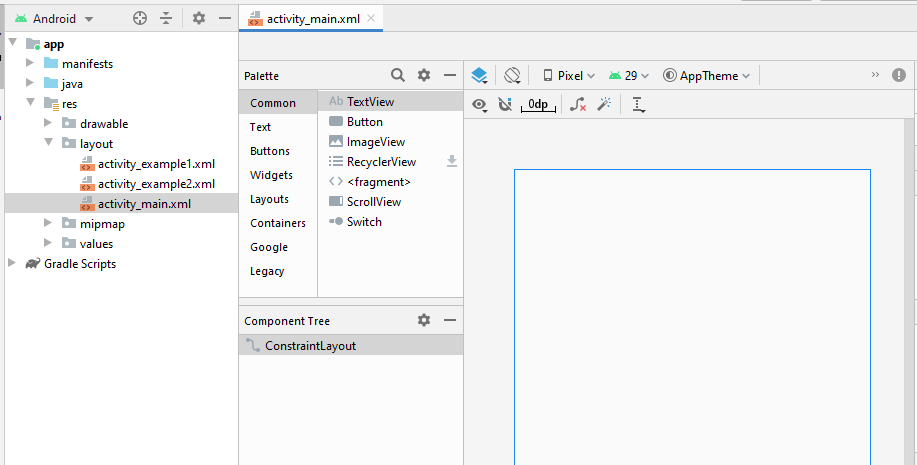
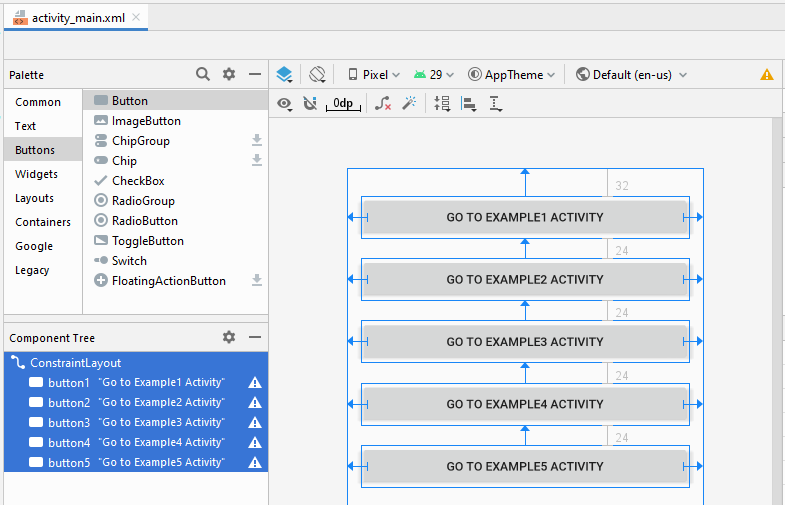
OK, nous allons concevoir une interface simple, comprenant 5 boutons:
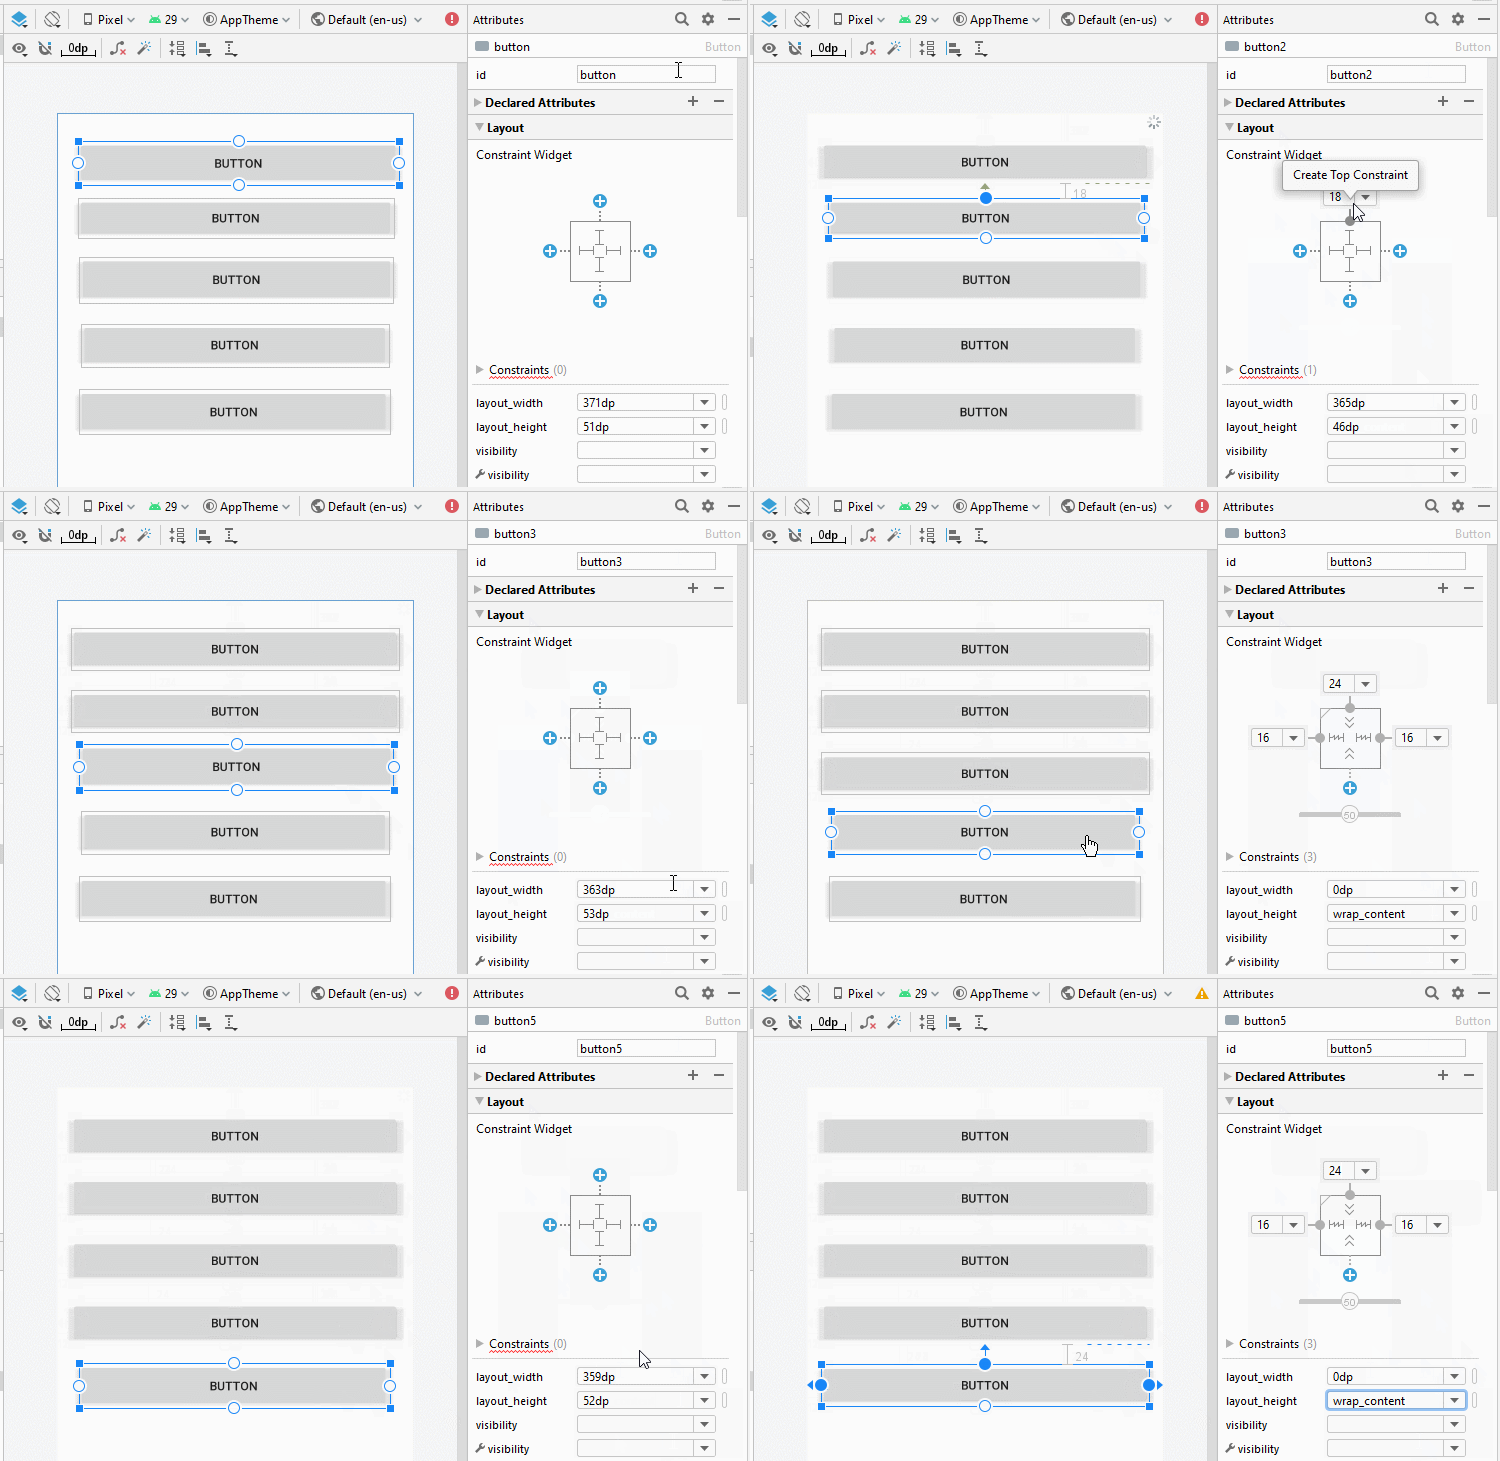
Faites glisser et déposez 5 boutons dans l'interface:
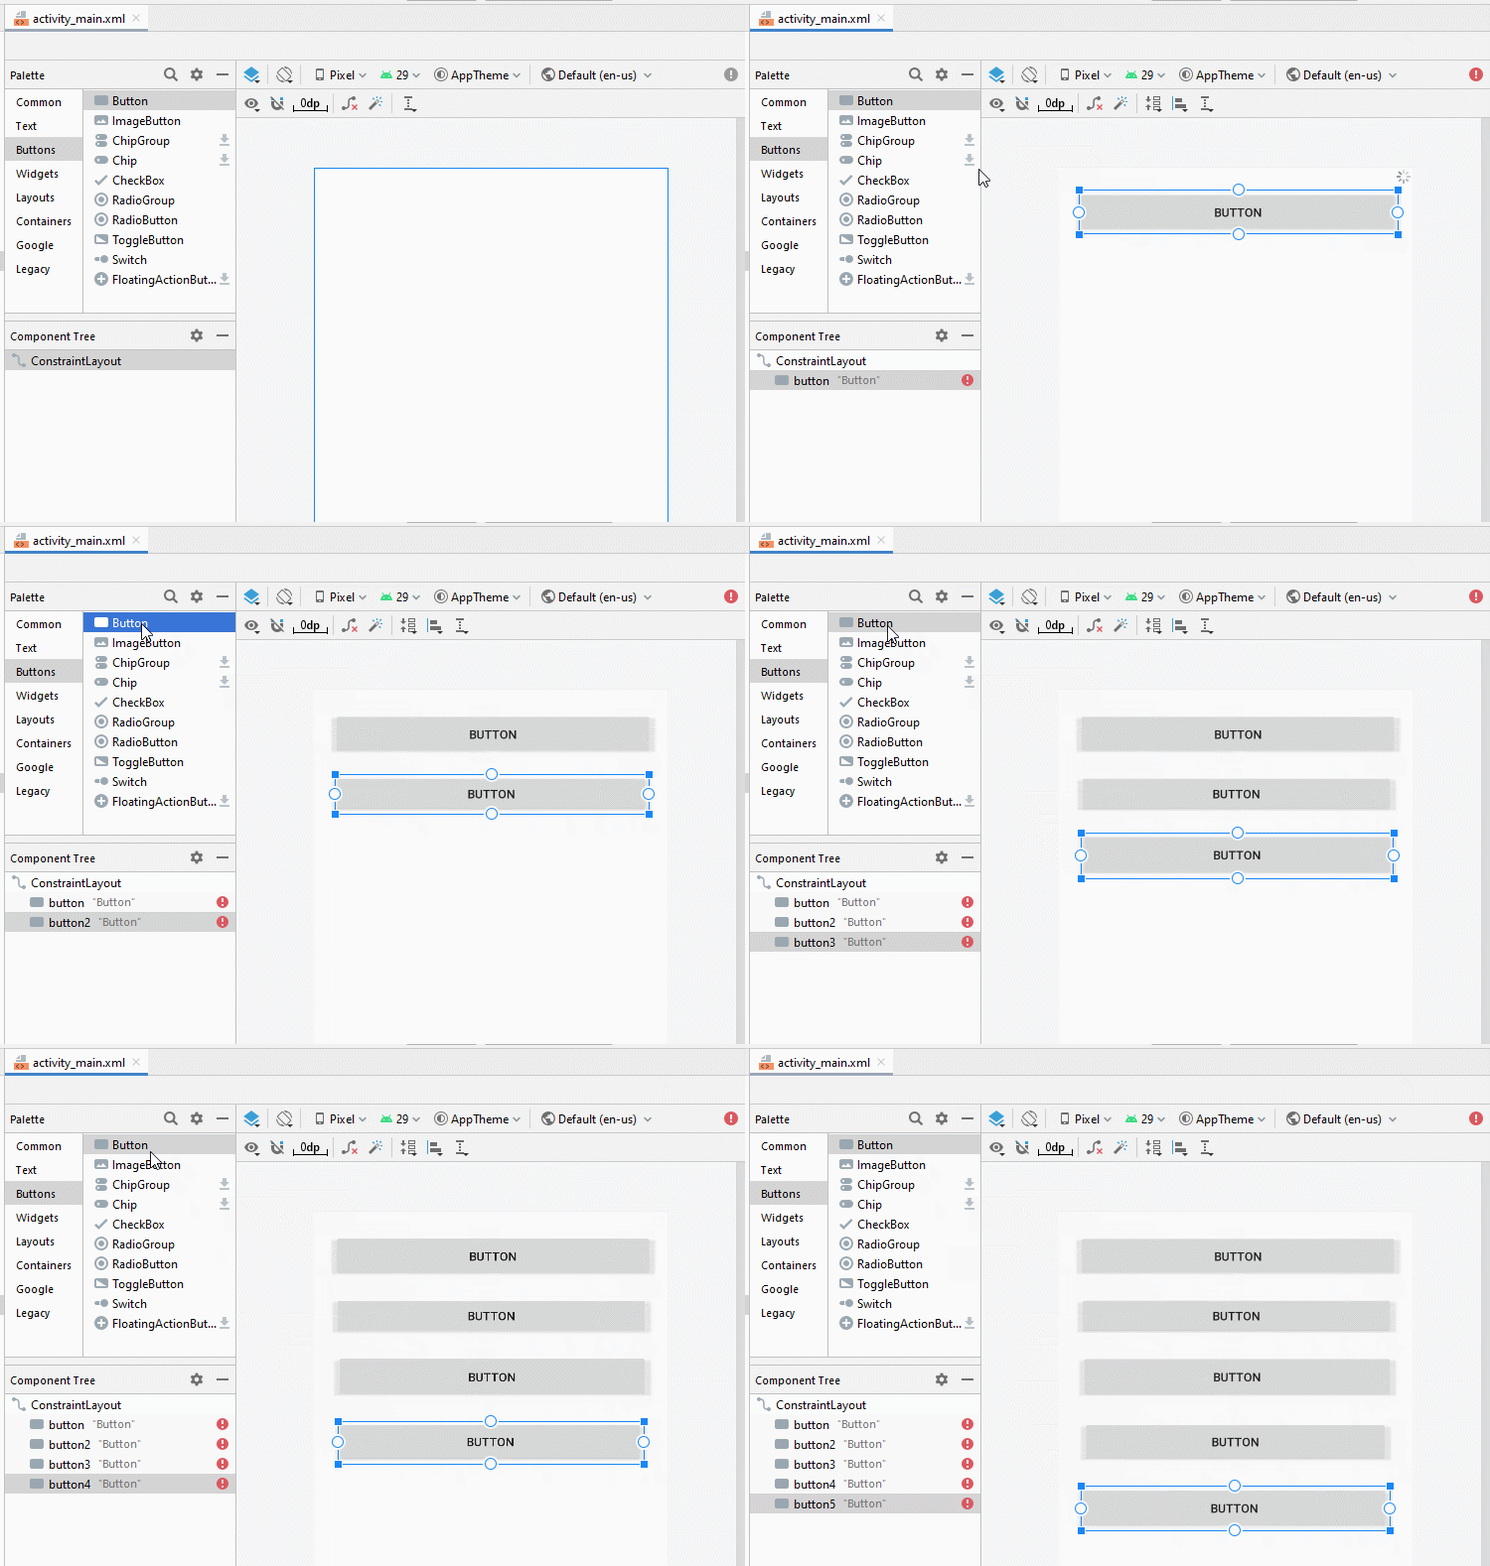
Définissez les contraintes des boutons.
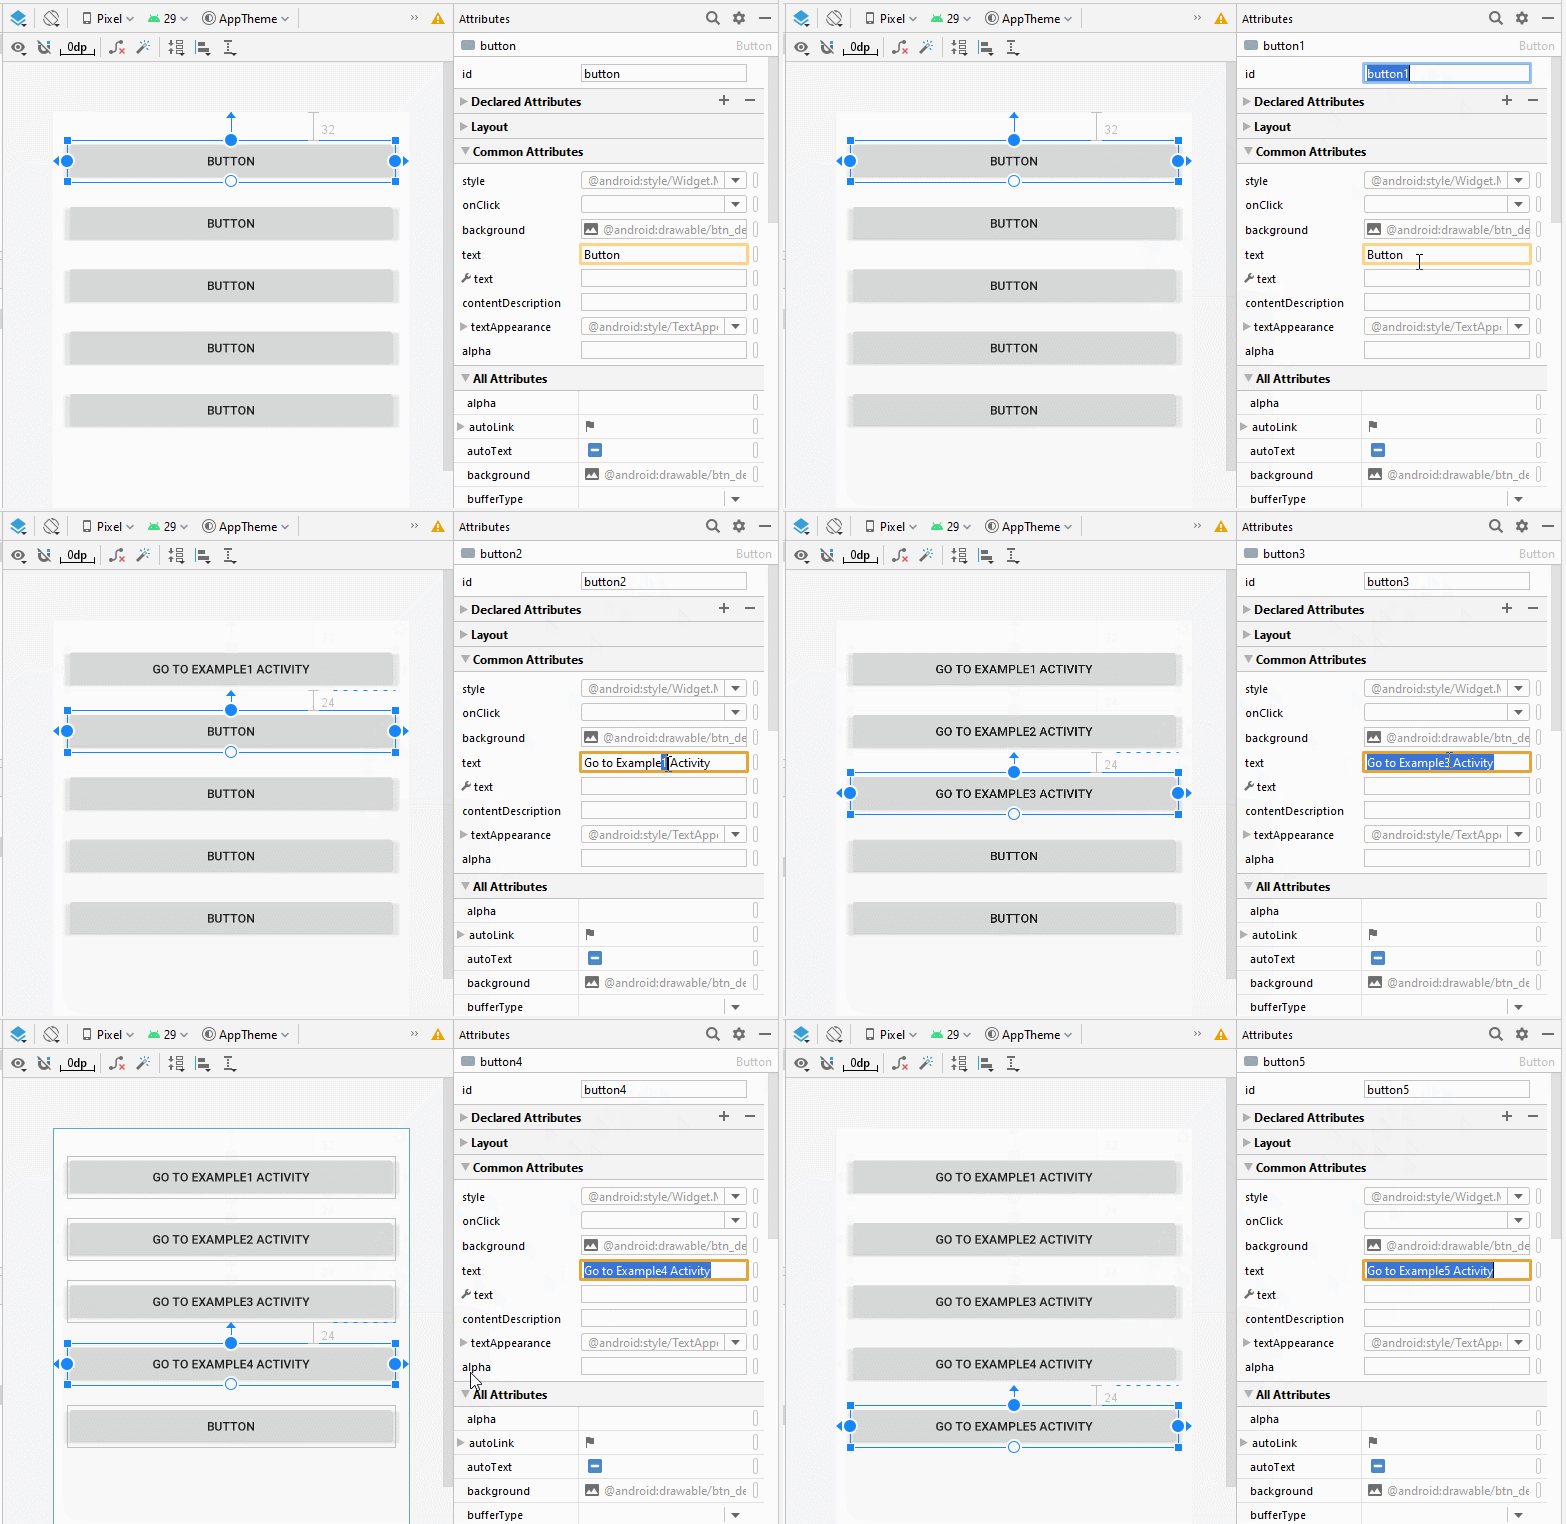
Définissez l'ID, le Text des boutons de l'interface. L'ID est très important, dans le code Java, vous pouvez accéder à un bouton via son ID.
Dans la fenêtre de conception, passez en mode Code (Code mode), vous verrez le code XML généré (generate).
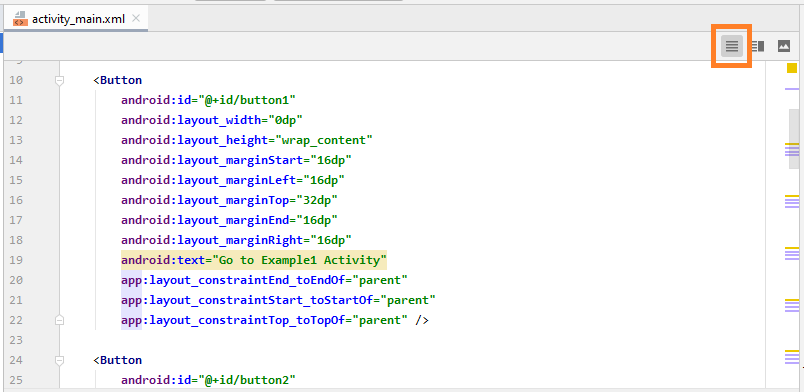
Ci-dessous le contenu de mon fichier activity_main.xml, vous pouvez copier et coller dans votre fenêtre Code pour obtenir une interface similaire.
activity_main.xml
<?xml version="1.0" encoding="utf-8"?>
<androidx.constraintlayout.widget.ConstraintLayout
    xmlns:android="http://schemas.android.com/apk/res/android"
    xmlns:app="http://schemas.android.com/apk/res-auto"
    xmlns:tools="http://schemas.android.com/tools"
    android:layout_width="match_parent"
    android:layout_height="match_parent"
    tools:context=".MainActivity">

    <Button
        android:id="@+id/button1"
        android:layout_width="0dp"
        android:layout_height="wrap_content"
        android:layout_marginStart="16dp"
        android:layout_marginLeft="16dp"
        android:layout_marginTop="32dp"
        android:layout_marginEnd="16dp"
        android:layout_marginRight="16dp"
        android:text="Go to Example1 Activity"
        app:layout_constraintEnd_toEndOf="parent"
        app:layout_constraintStart_toStartOf="parent"
        app:layout_constraintTop_toTopOf="parent" />

    <Button
        android:id="@+id/button2"
        android:layout_width="0dp"
        android:layout_height="wrap_content"
        android:layout_marginStart="16dp"
        android:layout_marginLeft="16dp"
        android:layout_marginTop="24dp"
        android:layout_marginEnd="16dp"
        android:layout_marginRight="16dp"
        android:text="Go to Example2 Activity"
        app:layout_constraintEnd_toEndOf="parent"
        app:layout_constraintStart_toStartOf="parent"
        app:layout_constraintTop_toBottomOf="@+id/button1" />

    <Button
        android:id="@+id/button3"
        android:layout_width="0dp"
        android:layout_height="wrap_content"
        android:layout_marginStart="16dp"
        android:layout_marginLeft="16dp"
        android:layout_marginTop="24dp"
        android:layout_marginEnd="16dp"
        android:layout_marginRight="16dp"
        android:text="Go to Example3 Activity"
        app:layout_constraintEnd_toEndOf="parent"
        app:layout_constraintStart_toStartOf="parent"
        app:layout_constraintTop_toBottomOf="@+id/button2" />

    <Button
        android:id="@+id/button4"
        android:layout_width="0dp"
        android:layout_height="wrap_content"
        android:layout_marginStart="16dp"
        android:layout_marginLeft="16dp"
        android:layout_marginTop="24dp"
        android:layout_marginEnd="16dp"
        android:layout_marginRight="16dp"
        android:text="Go to Example4 Activity"
        app:layout_constraintEnd_toEndOf="parent"
        app:layout_constraintStart_toStartOf="parent"
        app:layout_constraintTop_toBottomOf="@+id/button3" />

    <Button
        android:id="@+id/button5"
        android:layout_width="0dp"
        android:layout_height="wrap_content"
        android:layout_marginStart="16dp"
        android:layout_marginLeft="16dp"
        android:layout_marginTop="24dp"
        android:layout_marginEnd="16dp"
        android:layout_marginRight="16dp"
        android:text="Go to Example5 Activity"
        app:layout_constraintEnd_toEndOf="parent"
        app:layout_constraintStart_toStartOf="parent"
        app:layout_constraintTop_toBottomOf="@+id/button4" />
</androidx.constraintlayout.widget.ConstraintLayout>
5. Appeler une Activity à partir d'une Activity
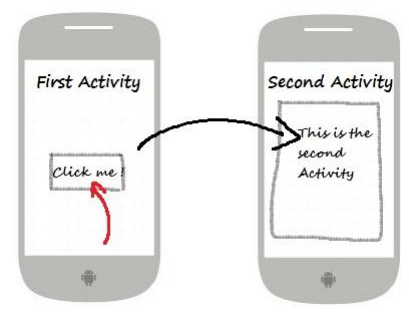
Here we will handle events when the user clicks on the Buttons, and they will call Example1Activity, ..Example5Activity respectively.
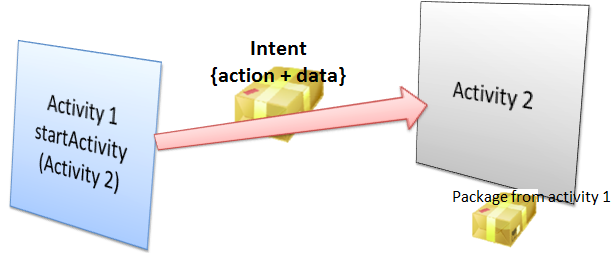
Activities talk with each other via Intent object. For example, Activity1 wants to call Activity2 to run, it will encapsulate what needs to say, and the request to an Intent object and send this Intent object to Activity2. You can see the illustration below.
Open MainActivity class, you can access the Button(s) via its ID on Java code
// Get button by ID
Button button1 = (Button) this.findViewById(R.id.go_button1);

// Register listener user clicks on the button1.
button1.setOnClickListener(new Button.OnClickListener() {

  @Override
  public void onClick(View v) {

     // Create a Intent:
     // (This object contains content that will be sent to Example1Activity).

      Intent myIntent = new Intent(MainActivity.this, Example1Activity.class);

      // Parameter for Intent.
      myIntent.putExtra("text1", "This is text1 sent from MainActivity at " + new Date());
      myIntent.putExtra("text2", "This is text2 sent from MainActivity at " + new Date());

      // Start Example1Activity.
      MainActivity.this.startActivity(myIntent);
  }
});
Complete Code of MainActivity.java:
MainActivity.java
package org.o7planning.androidbasic2;

import androidx.appcompat.app.AppCompatActivity;
import android.os.Bundle;
import android.content.Intent;
import android.view.View;
import android.widget.Button;

import java.util.Date;

public class MainActivity extends AppCompatActivity {

    private Button button1;
    private Button button2;
    private Button button3;
    private Button button4;
    private Button button5;

    @Override
    protected void onCreate(Bundle savedInstanceState) {
        super.onCreate(savedInstanceState);
        setContentView(R.layout.activity_main);

        // Find Button by its ID
        this.button1 = (Button) this.findViewById(R.id.button1);

        // Find button by its ID
        this.button2 = (Button) this.findViewById(R.id.button2);

        // Find button by its ID.
        this.button3 = (Button) this.findViewById(R.id.button3);

        // Find button by its ID.
        this.button4 = (Button) this.findViewById(R.id.button4);

        // Find button by its ID.
        this.button5 = (Button) this.findViewById(R.id.button5);

        // Called when the user clicks the button1.
        button1.setOnClickListener(new Button.OnClickListener() {

            @Override
            public void onClick(View v) {

                // Create a Intent:
                // (This object contains content that will be sent to Example1Activity).
                Intent myIntent = new Intent(MainActivity.this, Example1Activity.class);

                // Put parameters
                myIntent.putExtra("text1", "This is text1 sent from MainActivity at " + new Date());
                myIntent.putExtra("text2", "This is text2 sent from MainActivity at " + new Date());

                // Start Example1Activity.
                MainActivity.this.startActivity(myIntent);
            }
        });

        // Called when the user clicks the button2.
        button2.setOnClickListener(new Button.OnClickListener() {

            @Override
            public void onClick(View v) {

                // Create a Intent:
                // (This object contains content that will be sent to Example2Activity).
                Intent myIntent = new Intent(MainActivity.this, Example2Activity.class);

                // Start Example2Activity.
                MainActivity.this.startActivity(myIntent);
            }
        });

        // Called when the user clicks the button3.
        button3.setOnClickListener(new Button.OnClickListener() {

            @Override
            public void onClick(View v) {

                // Create a Intent:
                // (This object contains content that will be sent to Example3Activity).
                Intent myIntent = new Intent(MainActivity.this, Example3Activity.class);


                MainActivity.this.startActivity(myIntent);
            }
        });

        button4.setOnClickListener(new Button.OnClickListener() {

            @Override
            public void onClick(View v) {

                // Create a Intent:
                // (This object contains content that will be sent to Example4Activity).
                Intent myIntent = new Intent(MainActivity.this, Example4Activity.class);

                // Start Example4Activity.
                MainActivity.this.startActivity(myIntent);
            }
        });

        button5.setOnClickListener(new Button.OnClickListener() {

            @Override
            public void onClick(View v) {

                // Create a Intent:
                // (This object contains content that will be sent to Example5Activity).
                Intent myIntent = new Intent(MainActivity.this, Example5Activity.class);

                // Start Example5Activity.
                MainActivity.this.startActivity(myIntent);
            }
        });
    }
}
6. Example1Activity - Appeler une autre Activity
Ensuite, ouvrez activity_example1.xml, nous allons concevoir l'interface pour Example1Activity
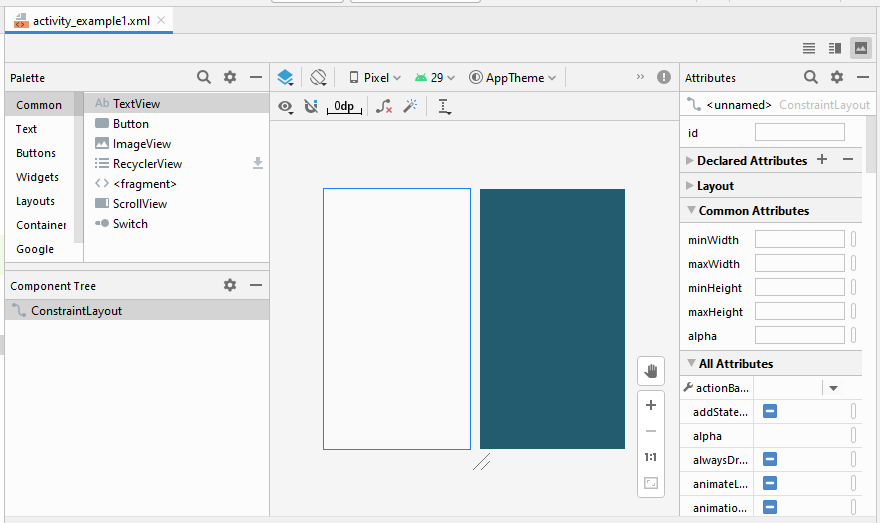
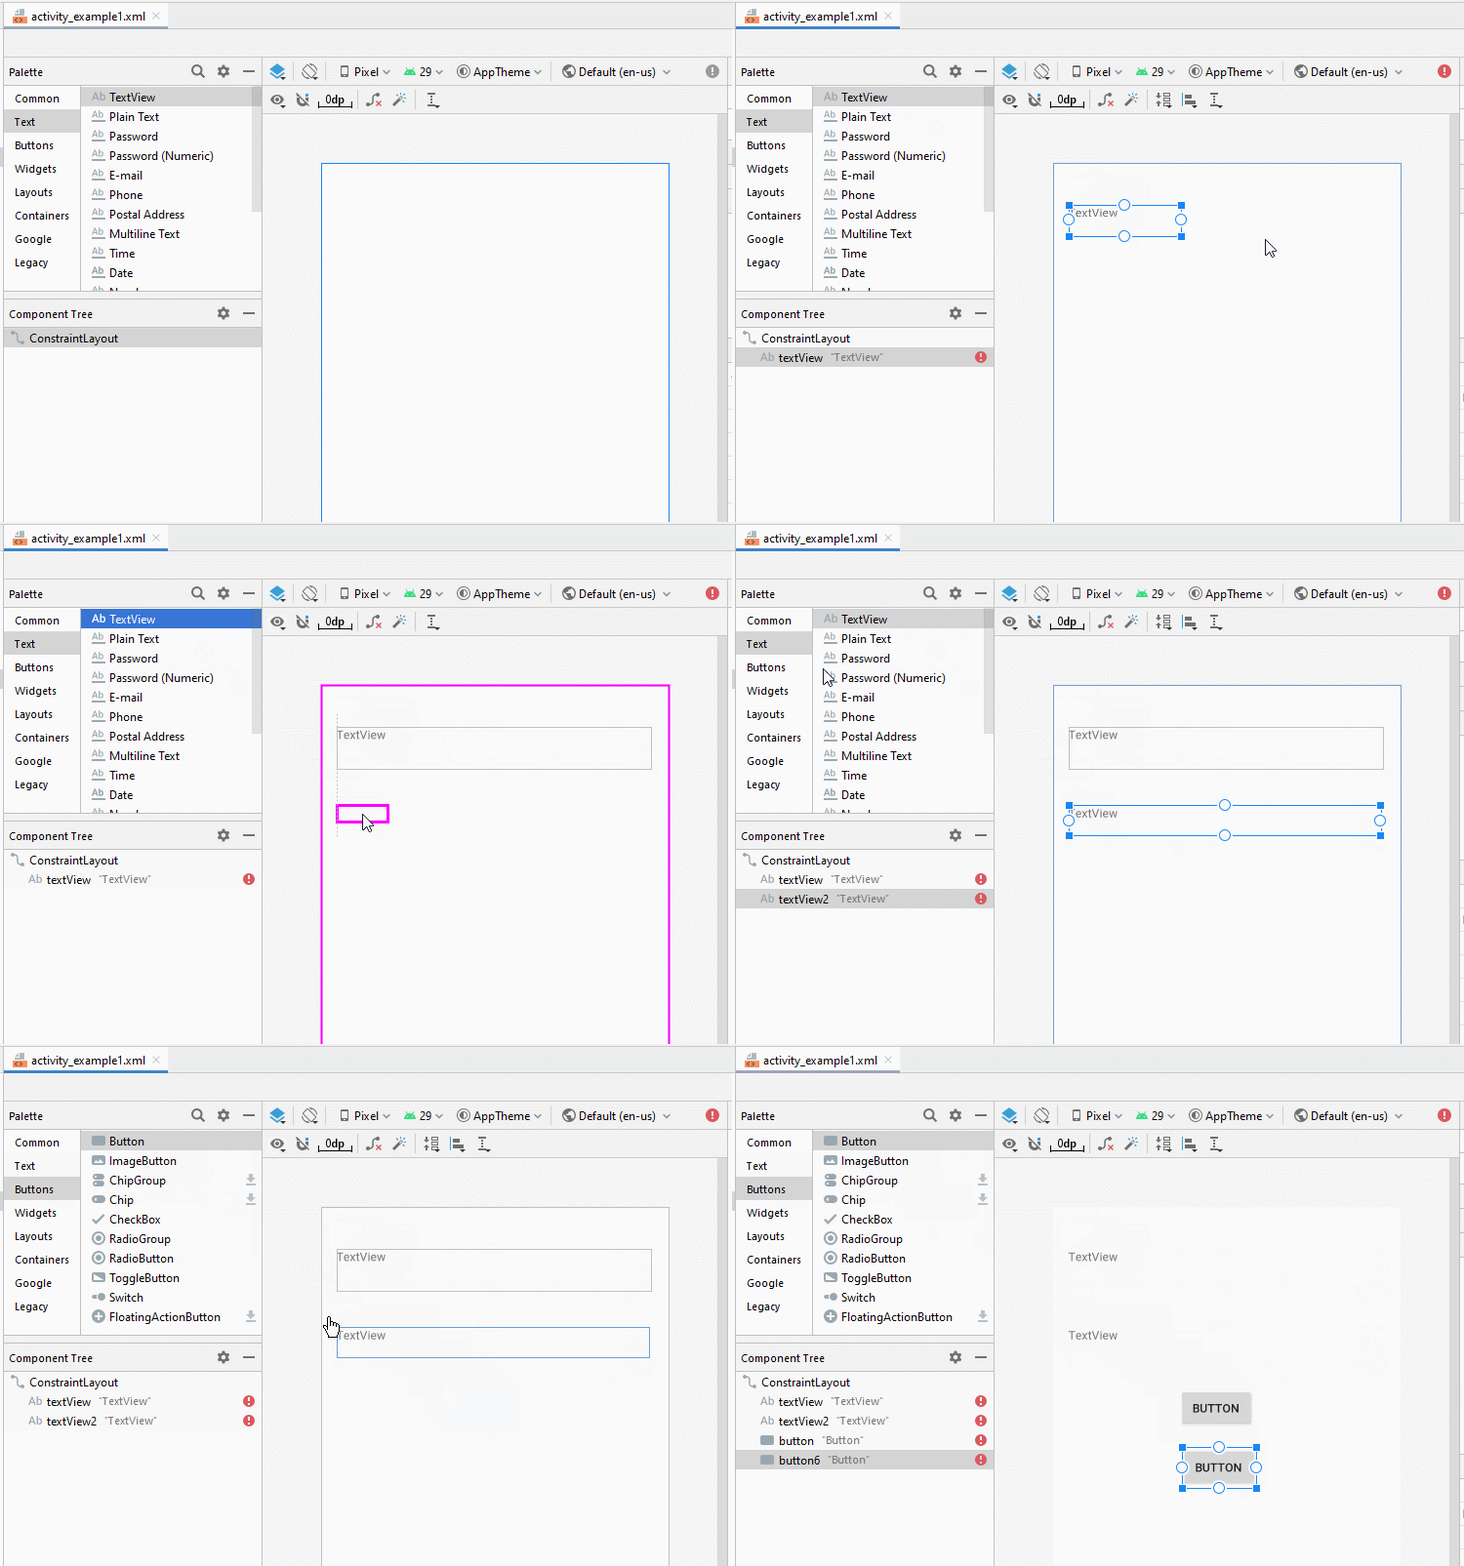
Définissez les contraintes pour les composants sur l'interface.
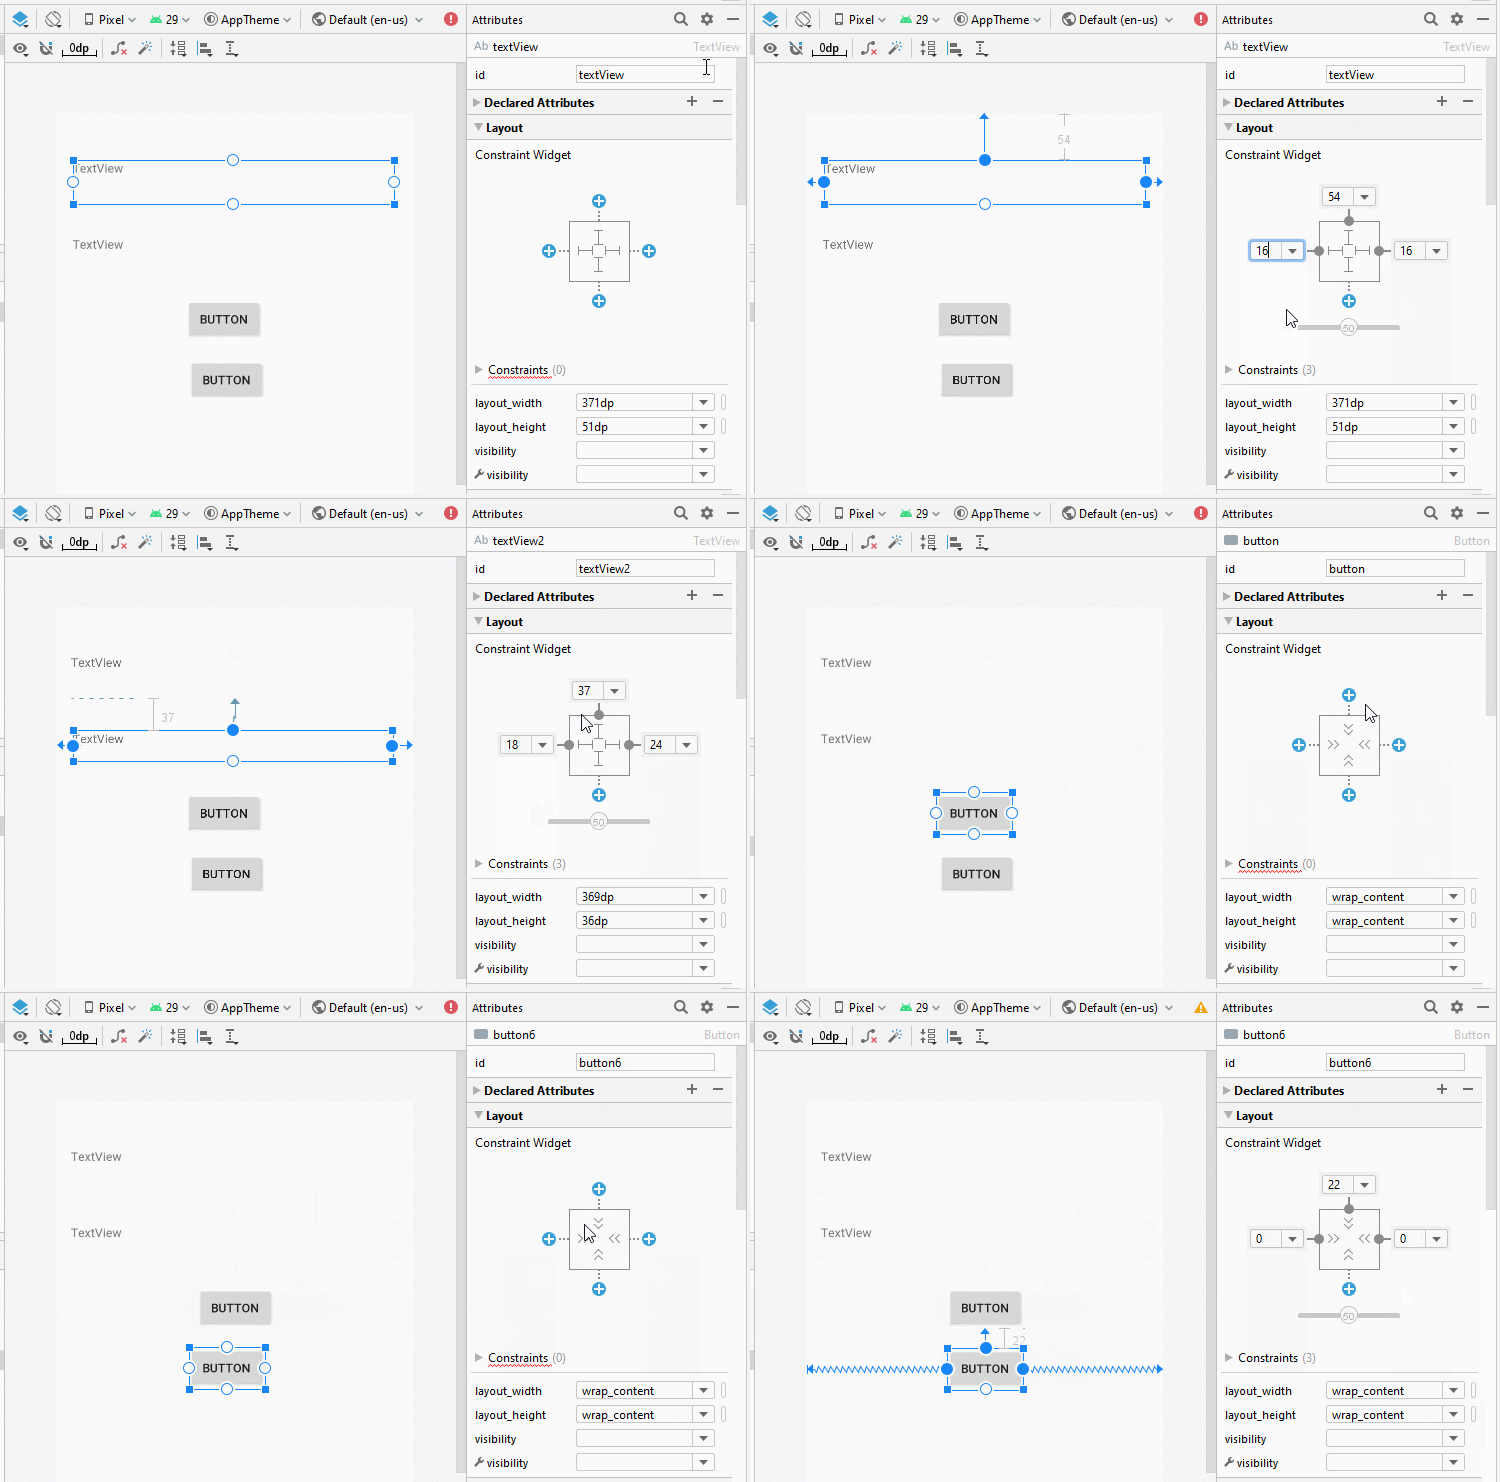
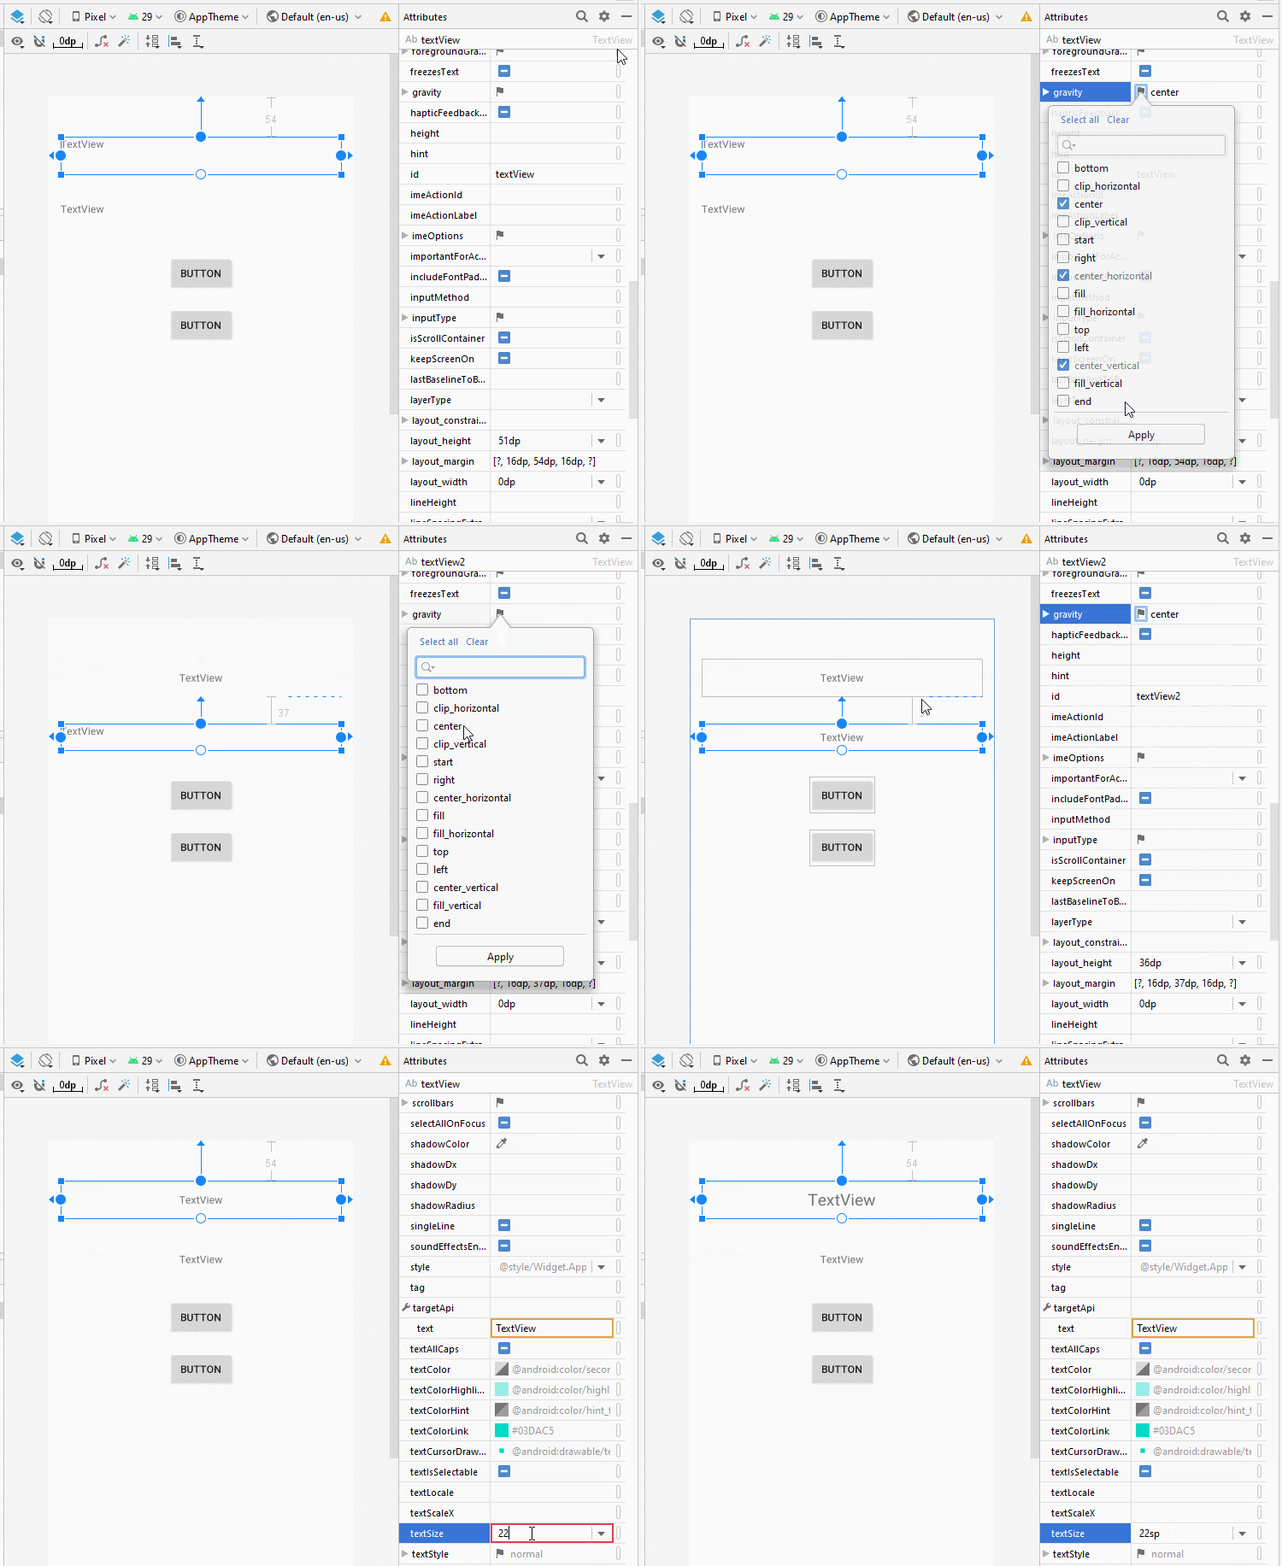
Définissez l'ID, le Text des composants sur l'interface:
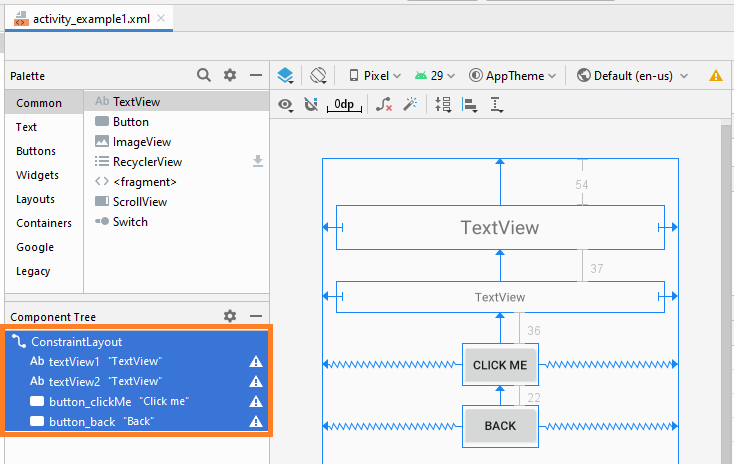
activity_example1.xml
<?xml version="1.0" encoding="utf-8"?>
<androidx.constraintlayout.widget.ConstraintLayout
    xmlns:android="http://schemas.android.com/apk/res/android"
    xmlns:app="http://schemas.android.com/apk/res-auto"
    xmlns:tools="http://schemas.android.com/tools"
    android:layout_width="match_parent"
    android:layout_height="match_parent"
    tools:context=".Example1Activity">

    <TextView
        android:id="@+id/textView1"
        android:layout_width="0dp"
        android:layout_height="51dp"
        android:layout_marginStart="16dp"
        android:layout_marginLeft="16dp"
        android:layout_marginTop="54dp"
        android:layout_marginEnd="16dp"
        android:layout_marginRight="16dp"
        android:gravity="center"
        android:text="TextView"
        android:textSize="22sp"
        app:layout_constraintEnd_toEndOf="parent"
        app:layout_constraintStart_toStartOf="parent"
        app:layout_constraintTop_toTopOf="parent" />

    <TextView
        android:id="@+id/textView2"
        android:layout_width="0dp"
        android:layout_height="36dp"
        android:layout_marginStart="16dp"
        android:layout_marginLeft="16dp"
        android:layout_marginTop="37dp"
        android:layout_marginEnd="16dp"
        android:layout_marginRight="16dp"
        android:gravity="center"
        android:text="TextView"
        app:layout_constraintEnd_toEndOf="parent"
        app:layout_constraintStart_toStartOf="parent"
        app:layout_constraintTop_toBottomOf="@+id/textView1" />

    <Button
        android:id="@+id/button_clickMe"
        android:layout_width="wrap_content"
        android:layout_height="wrap_content"
        android:layout_marginTop="36dp"
        android:text="Click me"
        app:layout_constraintEnd_toEndOf="parent"
        app:layout_constraintStart_toStartOf="parent"
        app:layout_constraintTop_toBottomOf="@+id/textView2" />

    <Button
        android:id="@+id/button_back"
        android:layout_width="wrap_content"
        android:layout_height="wrap_content"
        android:layout_marginTop="22dp"
        android:text="Back"
        app:layout_constraintEnd_toEndOf="parent"
        app:layout_constraintStart_toStartOf="parent"
        app:layout_constraintTop_toBottomOf="@+id/button_clickMe" />
</androidx.constraintlayout.widget.ConstraintLayout>
Example1Activity.java
package org.o7planning.androidbasic2;

import androidx.appcompat.app.AppCompatActivity;

import android.os.Bundle;
import android.content.Intent;
import android.view.View;
import android.widget.Button;
import android.widget.TextView;


public class Example1Activity extends AppCompatActivity {

    private Button buttonClickMe;
    private Button buttonBack;
    private TextView textView1;
    private TextView textView2;

    @Override
    protected void onCreate(Bundle savedInstanceState) {
        super.onCreate(savedInstanceState);
        setContentView(R.layout.activity_example1);

        // Find TextView by its ID
        this.textView1  = (TextView)this.findViewById(R.id.textView1);

        // Find TextView by its ID
        this.textView2 = (TextView)this.findViewById(R.id.textView2);

        this.buttonClickMe = (Button)this.findViewById(R.id.button_clickMe);

        this.buttonBack = (Button)this.findViewById(R.id.button_back);

        // Get the intent sent from MainActivity.
        Intent intent = getIntent();

        // Parameter in Intent, sent from MainActivity
        String value1 = intent.getStringExtra("text1");

        // Parameter in Intent, sent from MainActivity
        String value2 = intent.getStringExtra("text2");

        this.textView1.setText(value1);
        this.textView2.setText(value2);

        // When user click "Click me" button.
        this.buttonClickMe.setOnClickListener(new Button.OnClickListener() {

            @Override
            public void onClick(View v) {
                textView2.setText("You click button");
            }
        });

        // When user long click "Click me" button.
        this.buttonClickMe.setOnLongClickListener(new Button.OnLongClickListener() {


            // return true if the callback consumed the long click, false otherwise.
            @Override
            public boolean onLongClick(View v) {
                textView2.setText("You long click button");
                return true;
            }
        });

        // When user click "Back" button.
        this.buttonBack.setOnClickListener(new Button.OnClickListener() {

            @Override
            public void onClick(View v) {
                // Back to previous Activity.
                Example1Activity.this.finish();
            }
        });

    }
}
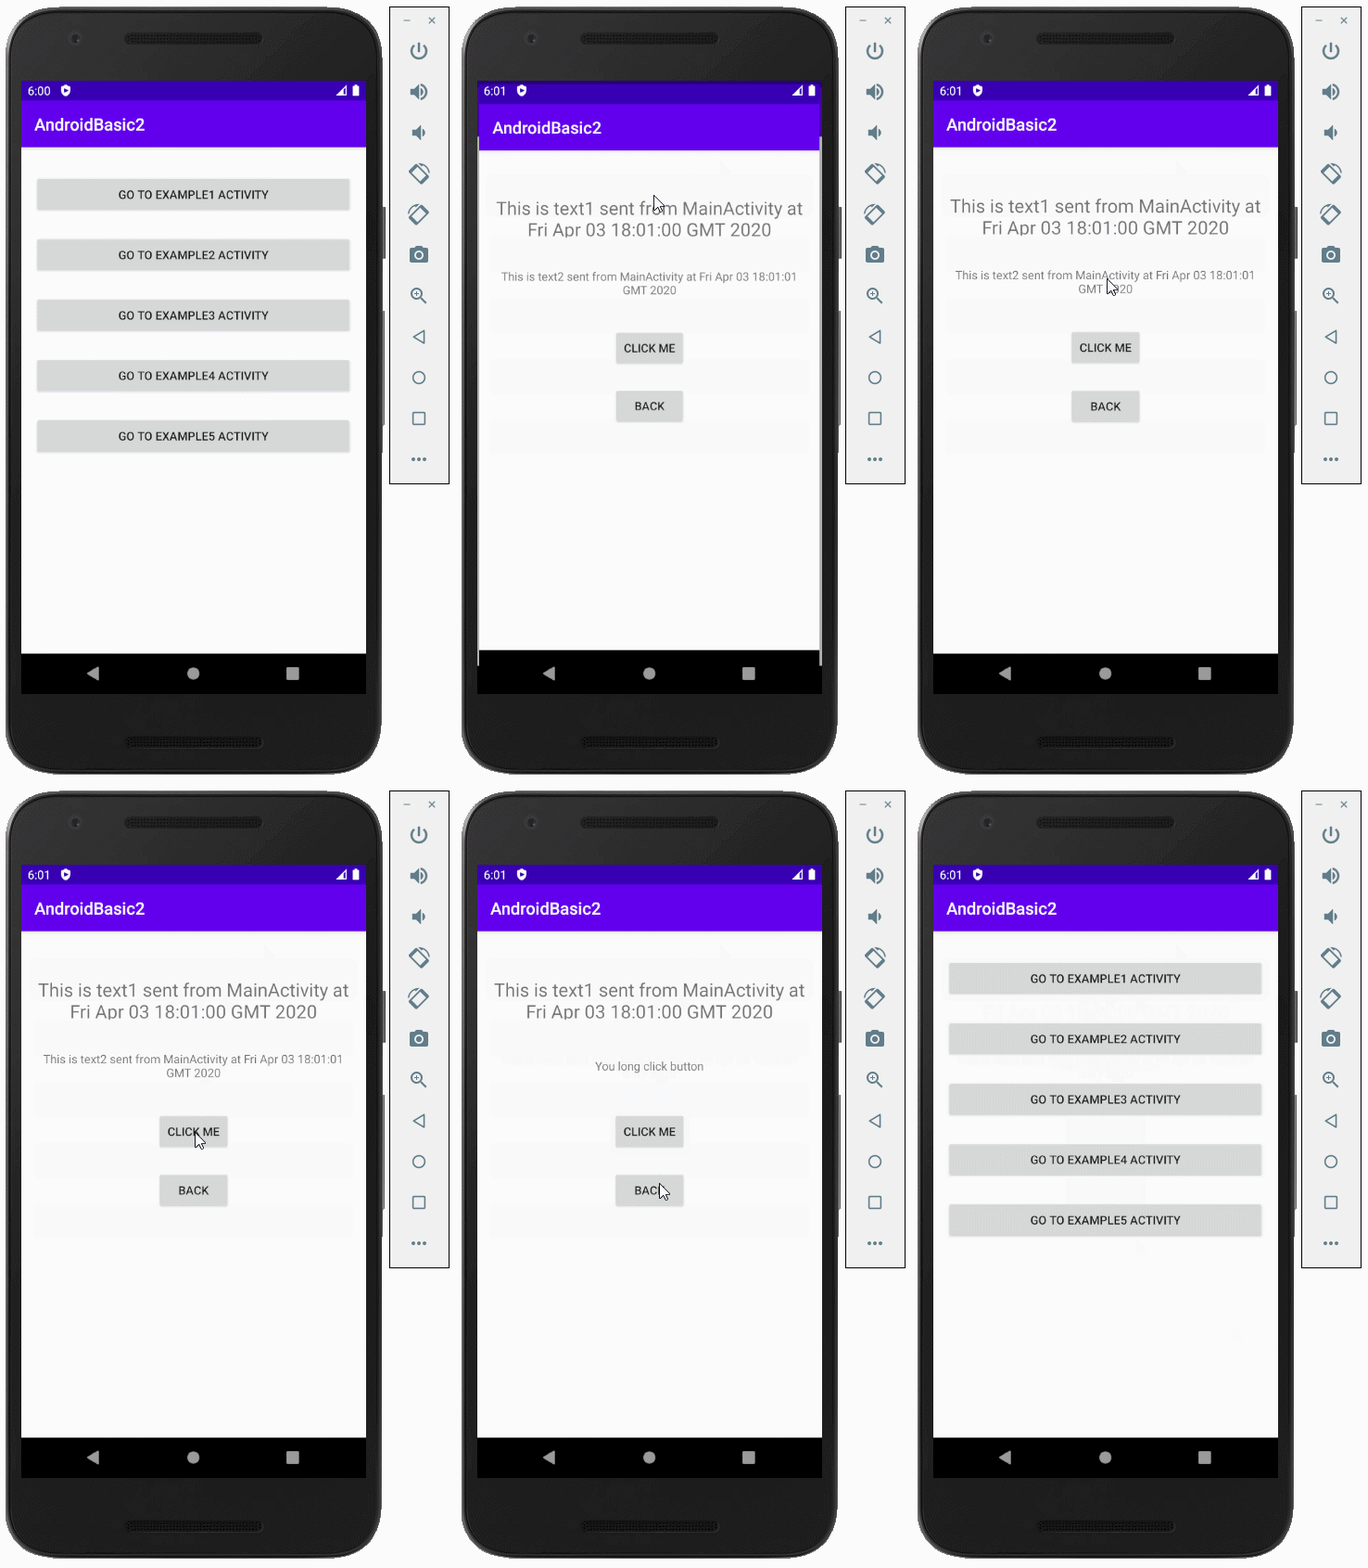
Exécutez l'exemple:
Tutoriels de programmation Android
- Configurer Android Emulator en Android Studio
- Le Tutoriel de Android ToggleButton
- Créer un File Finder Dialog simple dans Android
- Le Tutoriel de Android TimePickerDialog
- Le Tutoriel de Android DatePickerDialog
- De quoi avez-vous besoin pour démarrer avec Android?
- Installer Android Studio sur Windows
- Installer Intel® HAXM pour Android Studio
- Le Tutoriel de Android AsyncTask
- Le Tutoriel de Android AsyncTaskLoader
- Tutoriel Android pour débutant - Exemples de base
- Comment connaître le numéro de téléphone d'Android Emulator et le changer?
- Le Tutoriel de Android TextInputLayout
- Le Tutoriel de Android CardView
- Le Tutoriel de Android ViewPager2
- Obtenir un numéro de téléphone dans Android à l'aide de TelephonyManager
- Le Tutoriel de Android Phone Call
- Le Tutoriel de Android Wifi Scanning
- Le Tutoriel de programmation de jeux Android 2D pour débutant
- Le Tutoriel de Android DialogFragment
- Le Tutoriel de Android CharacterPickerDialog
- Le Tutoriel Android pour débutant - Hello Android
- Utiliser Android Device File Explorer
- Activer USB Debugging sur un appareil Android
- Le Tutoriel de Android UI Layouts
- Le Tutoriel de Android SMS
- Le Tutoriel de Android et SQLite Database
- Le Tutoriel de Google Maps Android API
- Le Tutoriel de texte pour parler dans Android
- Le Tutoriel de Android Space
- Le Tutoriel de Android Toast
- Créer un Android Toast personnalisé
- Le Tutoriel de Android SnackBar
- Le Tutoriel de Android TextView
- Le Tutoriel de Android TextClock
- Le Tutoriel de Android EditText
- Le Tutoriel de Android TextWatcher
- Formater le numéro de carte de crédit avec Android TextWatcher
- Le Tutoriel de Android Clipboard
- Créer un File Chooser simple dans Android
- Le Tutoriel de Android AutoCompleteTextView et MultiAutoCompleteTextView
- Le Tutoriel de Android ImageView
- Le Tutoriel de Android ImageSwitcher
- Le Tutoriel de Android ScrollView et HorizontalScrollView
- Le Tutoriel de Android WebView
- Le Tutoriel de Android SeekBar
- Le Tutoriel de Android Dialog
- Le Tutoriel de Android AlertDialog
- Tutoriel Android RatingBar
- Le Tutoriel de Android ProgressBar
- Le Tutoriel de Android Spinner
- Le Tutoriel de Android Button
- Le Tutoriel de Android Switch
- Le Tutoriel de Android ImageButton
- Le Tutoriel de Android FloatingActionButton
- Le Tutoriel de Android CheckBox
- Le Tutoriel de Android RadioGroup et RadioButton
- Le Tutoriel de Android Chip et ChipGroup
- Utilisation des Image assets et des Icon assets d'Android Studio
- Configuration de la Carte SD pour Android Emulator
- Exemple ChipGroup et Chip Entry
- Comment ajouter des bibliothèques externes à Android Project dans Android Studio?
- Comment désactiver les autorisations déjà accordées à l'application Android?
- Comment supprimer des applications de Android Emulator?
- Le Tutoriel de Android LinearLayout
- Le Tutoriel de Android TableLayout
- Le Tutoriel de Android FrameLayout
- Le Tutoriel de Android QuickContactBadge
- Le Tutoriel de Android StackView
- Le Tutoriel de Android Camera
- Le Tutoriel de Android MediaPlayer
- Le Tutoriel de Android VideoView
- Jouer des effets sonores dans Android avec SoundPool
- Le Tutoriel de Android Networking
- Analyser JSON dans Android
- Le Tutoriel de Android SharedPreferences
- Le Tutorial de stockage interne Android (Internal Storage)
- Le Tutoriel de Android External Storage
- Le Tutoriel de Android Intents
- Exemple d'une Android Intent explicite, appelant une autre Intent
- Exemple de Android Intent implicite, ouvrez une URL, envoyez un email
- Le Tutoriel de Android Service
- Le Tutoriel Android Notifications
- Le Tutoriel de Android DatePicker
- Le Tutoriel de Android TimePicker
- Le Tutoriel de Android Chronometer
- Le Tutoriel de Android OptionMenu
- Le Tutoriel de Android ContextMenu
- Le Tutoriel de Android PopupMenu
- Le Tutoriel de Android Fragment
- Le Tutoriel de Android ListView
- Android ListView avec Checkbox en utilisant ArrayAdapter
- Le Tutoriel de Android GridView
Show More