Le Tutoriel de Android GridView
1. Qu'est-ce que GridView?
GridView est un groupe de vues qui affiche des éléments dans une grille de défilement bidimensionnelle.
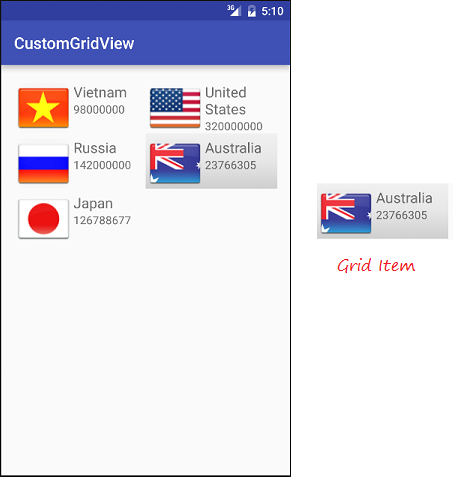
GridItem
Un Android GridView est constitué d'un groupe de GridItem(s). GridItem est une cellule (cell) individuelle dans gridview où les données seront affichées. Toutes les données dans gridview sont affichées uniquement via griditem.
Un Griditem est une partie de l'interface qui peut être créée par un certain nombre de View.
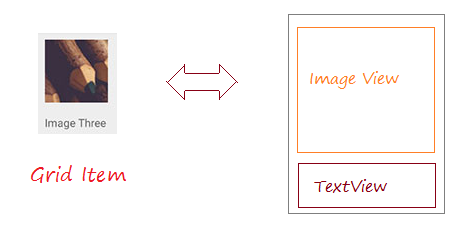
Android crée plusieurs formes différentes GridItem, appelées la disposition (Layout) prédéfinie, qui seront mentionnées dans les exemples de ce document.
Adapter
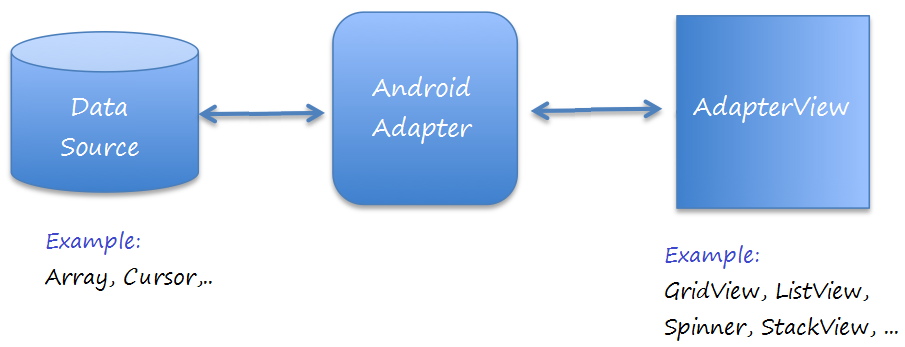
Android Adapter (l'adaptateur Android) est un pont entre la View et les données sous-jacentes pour cette View. Un Adapter gère les données et adapte les données à la cellule individuelle (gridItems) de la view.
Vous pouvez lier l'Adapter avec Android gridview via la méthode setAdapter. Maintenant, voyons comment Adapter fonctionne avec l'aide de l'image suivante.
Vous pouvez lier l'Adapter avec Android gridview via la méthode setAdapter. Maintenant, voyons comment Adapter fonctionne avec l'aide de l'image suivante.
GridView Selector
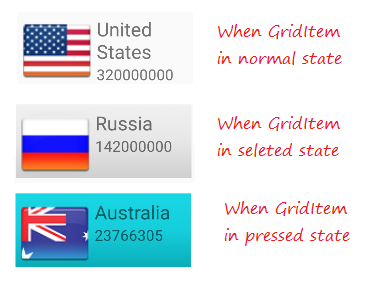
Pour que GridView devienne plus beau, il faut personnaliser les effets, par exemple, changer la couleur d'arrière-plan de GridItem lorsque le curseur se déplace dessus ou modifier la couleur d'arrière-plan lorsqu'il est sélectionné. Vous pouvez voir un exemple de personnalisation le GridView Selector à la fin de ce document.
2. GridView de base utilise ArrayAdapter
ArrayAdapter
ArrayAdapter propose d 'afficher GridView avec GridItem simple, GridItem peut être créé à partir d'un seul TextView, CheckedTextView, EditText, ...
Dans le cas où vous souhaitez avoir un GridView avec GridItem plus complexe, vous pouvez créer manuellement une Adapter personnalisée.
Dans le cas où vous souhaitez avoir un GridView avec GridItem plus complexe, vous pouvez créer manuellement une Adapter personnalisée.
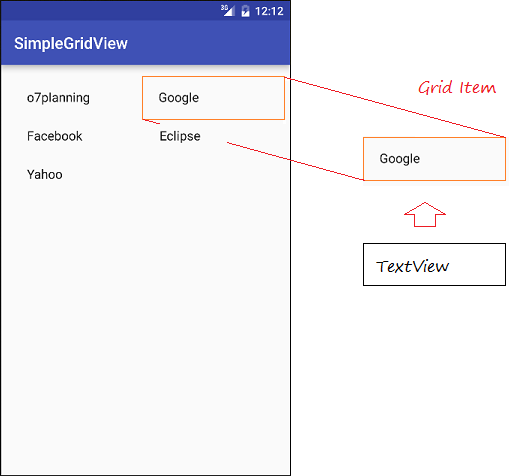
Exemple de GridView avec ArrayAdapter
Créez un nouveau projet Android nommé SimpleGridView.
- File > New > New Project > Empty Activity
- Name: SimpleGridView
- Package name: org.o7planning.simplegridview
- Language: Java
La conception de l'interface d'utilisateur:
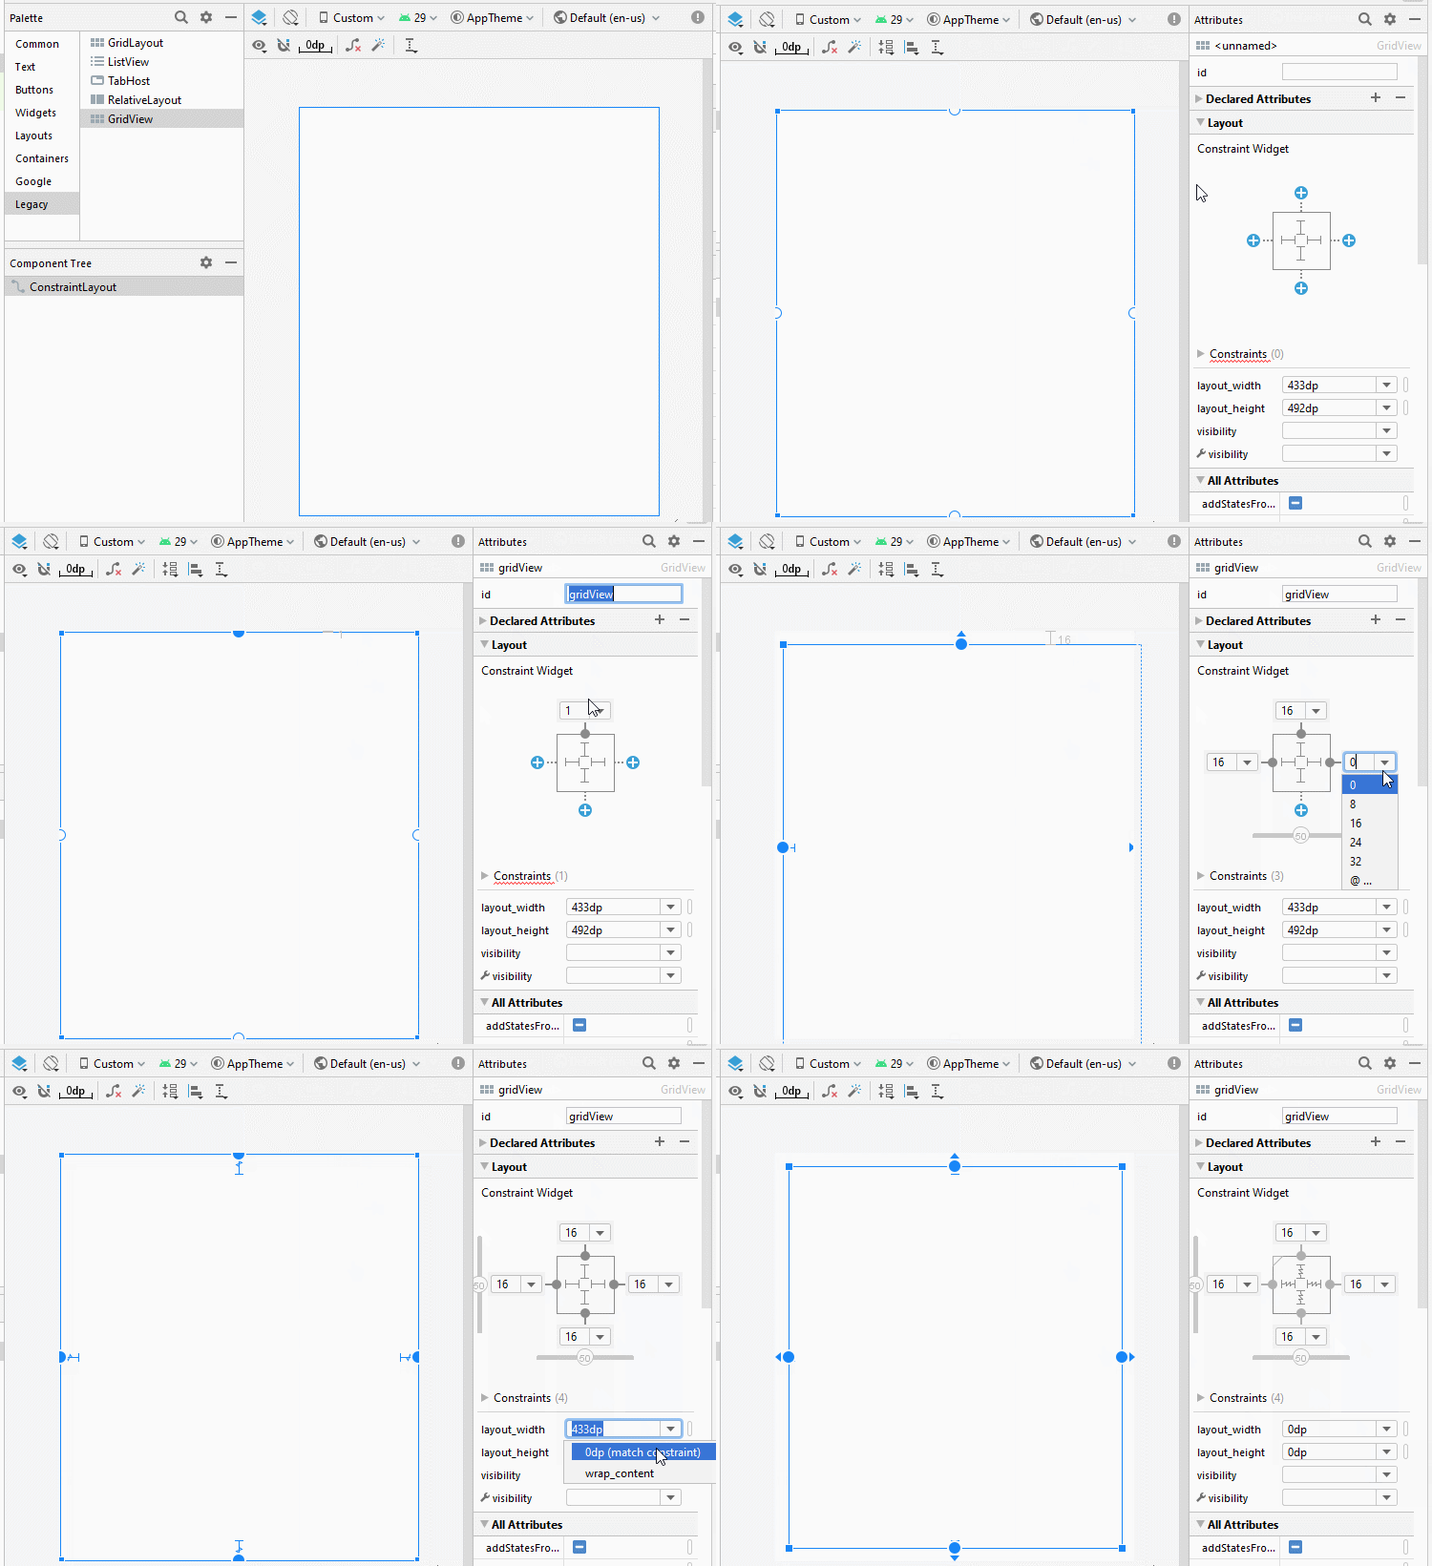
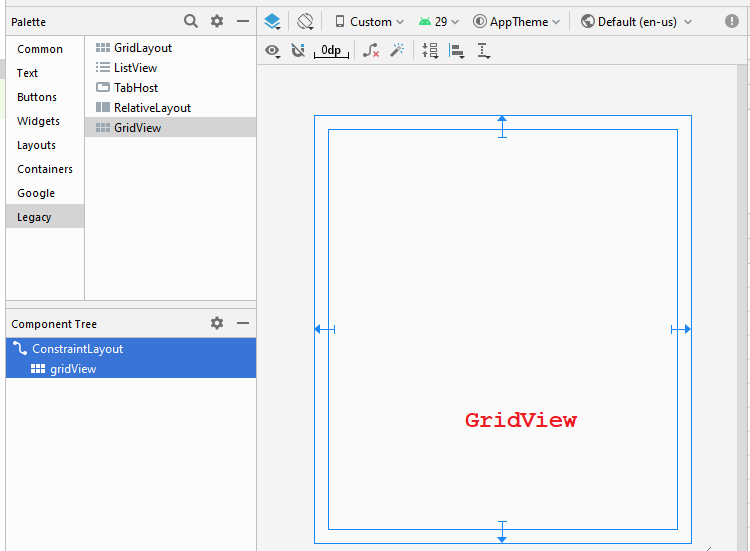
Changez des propriétés GridView:
GridView
- android:numColumns ="2"
- android:stretchMode ="columnWidth"
activity_main.xml
<?xml version="1.0" encoding="utf-8"?>
<androidx.constraintlayout.widget.ConstraintLayout
    xmlns:android="http://schemas.android.com/apk/res/android"
    xmlns:app="http://schemas.android.com/apk/res-auto"
    xmlns:tools="http://schemas.android.com/tools"
    android:layout_width="match_parent"
    android:layout_height="match_parent"
    tools:context=".MainActivity">

    <GridView
        android:id="@+id/gridView"
        android:layout_width="0dp"
        android:layout_height="0dp"
        android:layout_marginStart="16dp"
        android:layout_marginLeft="16dp"
        android:layout_marginTop="16dp"
        android:layout_marginEnd="16dp"
        android:layout_marginRight="16dp"
        android:layout_marginBottom="16dp"
        android:numColumns="2"
        android:stretchMode="columnWidth"
        app:layout_constraintBottom_toBottomOf="parent"
        app:layout_constraintEnd_toEndOf="parent"
        app:layout_constraintStart_toStartOf="parent"
        app:layout_constraintTop_toTopOf="parent" />

</androidx.constraintlayout.widget.ConstraintLayout>
Website.java
package org.o7planning.simplegridview;

public class Website {

    private String name;
    private String url;

    public Website(String name, String url)  {
        this.name= name;
        this.url= url;
    }

    public String getUrl() {
        return url;
    }

    public void setUrl(String url) {
        this.url = url;
    }

    public String getName() {
        return name;
    }

    public void setName(String name) {
        this.name = name;
    }

    @Override
    public String toString()  {
        return name;
    }
}
MainActivity.java
package org.o7planning.simplegridview;

import androidx.appcompat.app.AppCompatActivity;

import android.os.Bundle;
import android.os.Bundle;
import android.view.View;
import android.widget.AdapterView;
import android.widget.ArrayAdapter;
import android.widget.GridView;
import android.widget.Toast;

public class MainActivity extends AppCompatActivity {

    private GridView gridView;
    @Override
    protected void onCreate(Bundle savedInstanceState) {
        super.onCreate(savedInstanceState);
        setContentView(R.layout.activity_main);

        this.gridView = (GridView)findViewById(R.id.gridView);

        //

        Website o7planning = new Website("o7planning","http://o7planning.org");
        Website google = new Website("Google","http://google.com");
        Website facebook = new Website("Facebook","http://facebook.com");
        Website eclipse = new Website("Eclipse","http://eclipse.org");
        Website yahoo = new Website("Yahoo","http://yahoo.com");

        Website[] websites = new Website[]{o7planning,google, facebook,eclipse, yahoo};

        // android.R.layout.simple_list_item_1 is a constant predefined layout of Android.
        // used to create a GridView with simple GridItem (Only one TextView).

        ArrayAdapter<Website> arrayAdapter
                = new ArrayAdapter<Website>(this, android.R.layout.simple_list_item_1 , websites);


        gridView.setAdapter(arrayAdapter);

        // When the user clicks on the GridItem
        gridView.setOnItemClickListener(new AdapterView.OnItemClickListener() {

            @Override
            public void onItemClick(AdapterView<?> a, View v, int position, long id) {
                Object o = gridView.getItemAtPosition(position);
                Website website = (Website) o;
                Toast.makeText(MainActivity.this, "Selected :" + " " + website.getName()+"\n("+ website.getUrl()+")",
                        Toast.LENGTH_LONG).show();
            }
        });
    }

}
L'exécution l'exemple:
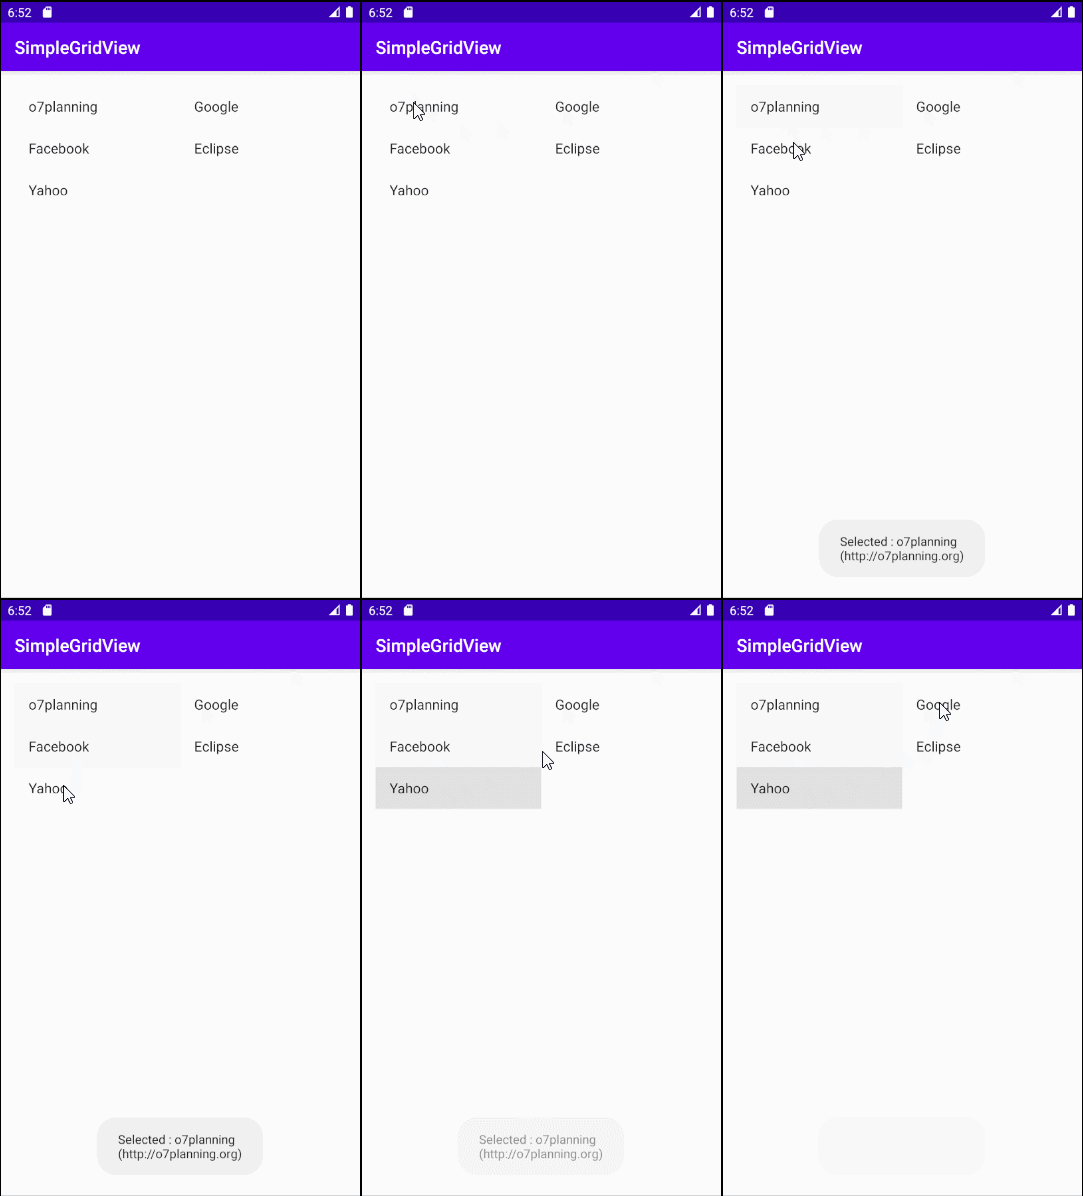
Les mises en page sont disponibles pour travailler avec ArrayAdapter
Android construit quelques Layout (pour GridItem, ListItem,..) qui peut fonctionner avec ArrayAdapter.
android.R.layout.simple_list_item_1
- C'est une simple layout de GridItem, qui est créée par un seul TextView (Vous pouvez voir des exemples ci-dessus).
android.R.layout.simple_list_item_checked & android.R.layout.simple_list_item_multiple_choice
- Deux Layouts ci-dessus sont les layouts simples pour créer une GridView avec GridItem créée par une seule checkbox.
- TODO
3. Personnaliser GridView en utilisant BaseAdapter
Vous pouvez personnaliser un GridViewer. Votre Adapter doit s'étendre à partir de la calsse BaseAdapter.
Exemple de l'usage GridView
Créez un nouveau projet "Empty Activity" nommé CustomGridView.
- File > New > New Project > Empty Activity
- Name: CustomGridView
- Package name: org.o7planning.customgridview
- Language: Java
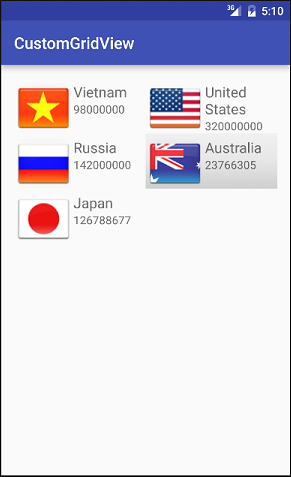
L'aperçu de l'application:
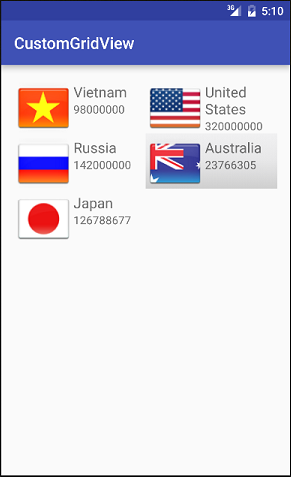
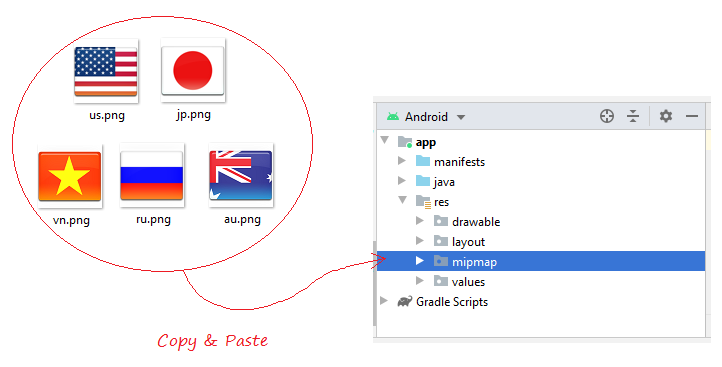
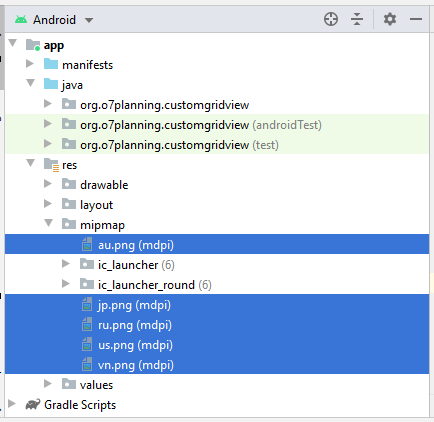
D'abord, vous devez préparer quelques images;
Copiez et collez le fichier image dans le dossier mipmap:
vn.png | us.png | ru.png | jp.png | au.png |
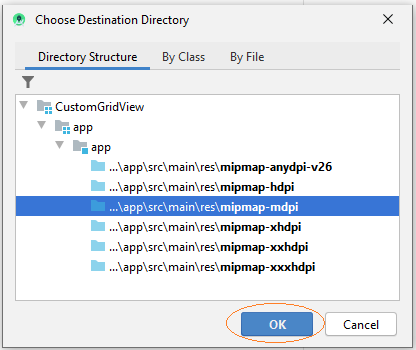
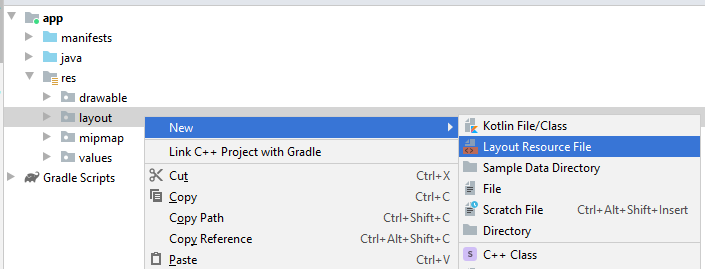
Vous devez concevoir une layout pour Griditem. Sur Android Studio cliquez sur le bouton droit de res/layout sélectionnez:
- New/Layout resource file
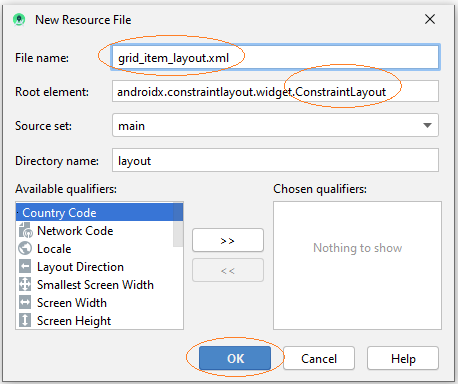
Saisissez:
- File name: grid_item_layout.xml
- Root element: androidx.constraintlayout.widget.ConstraintLayout
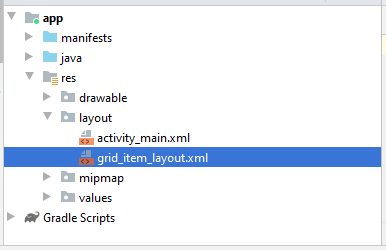
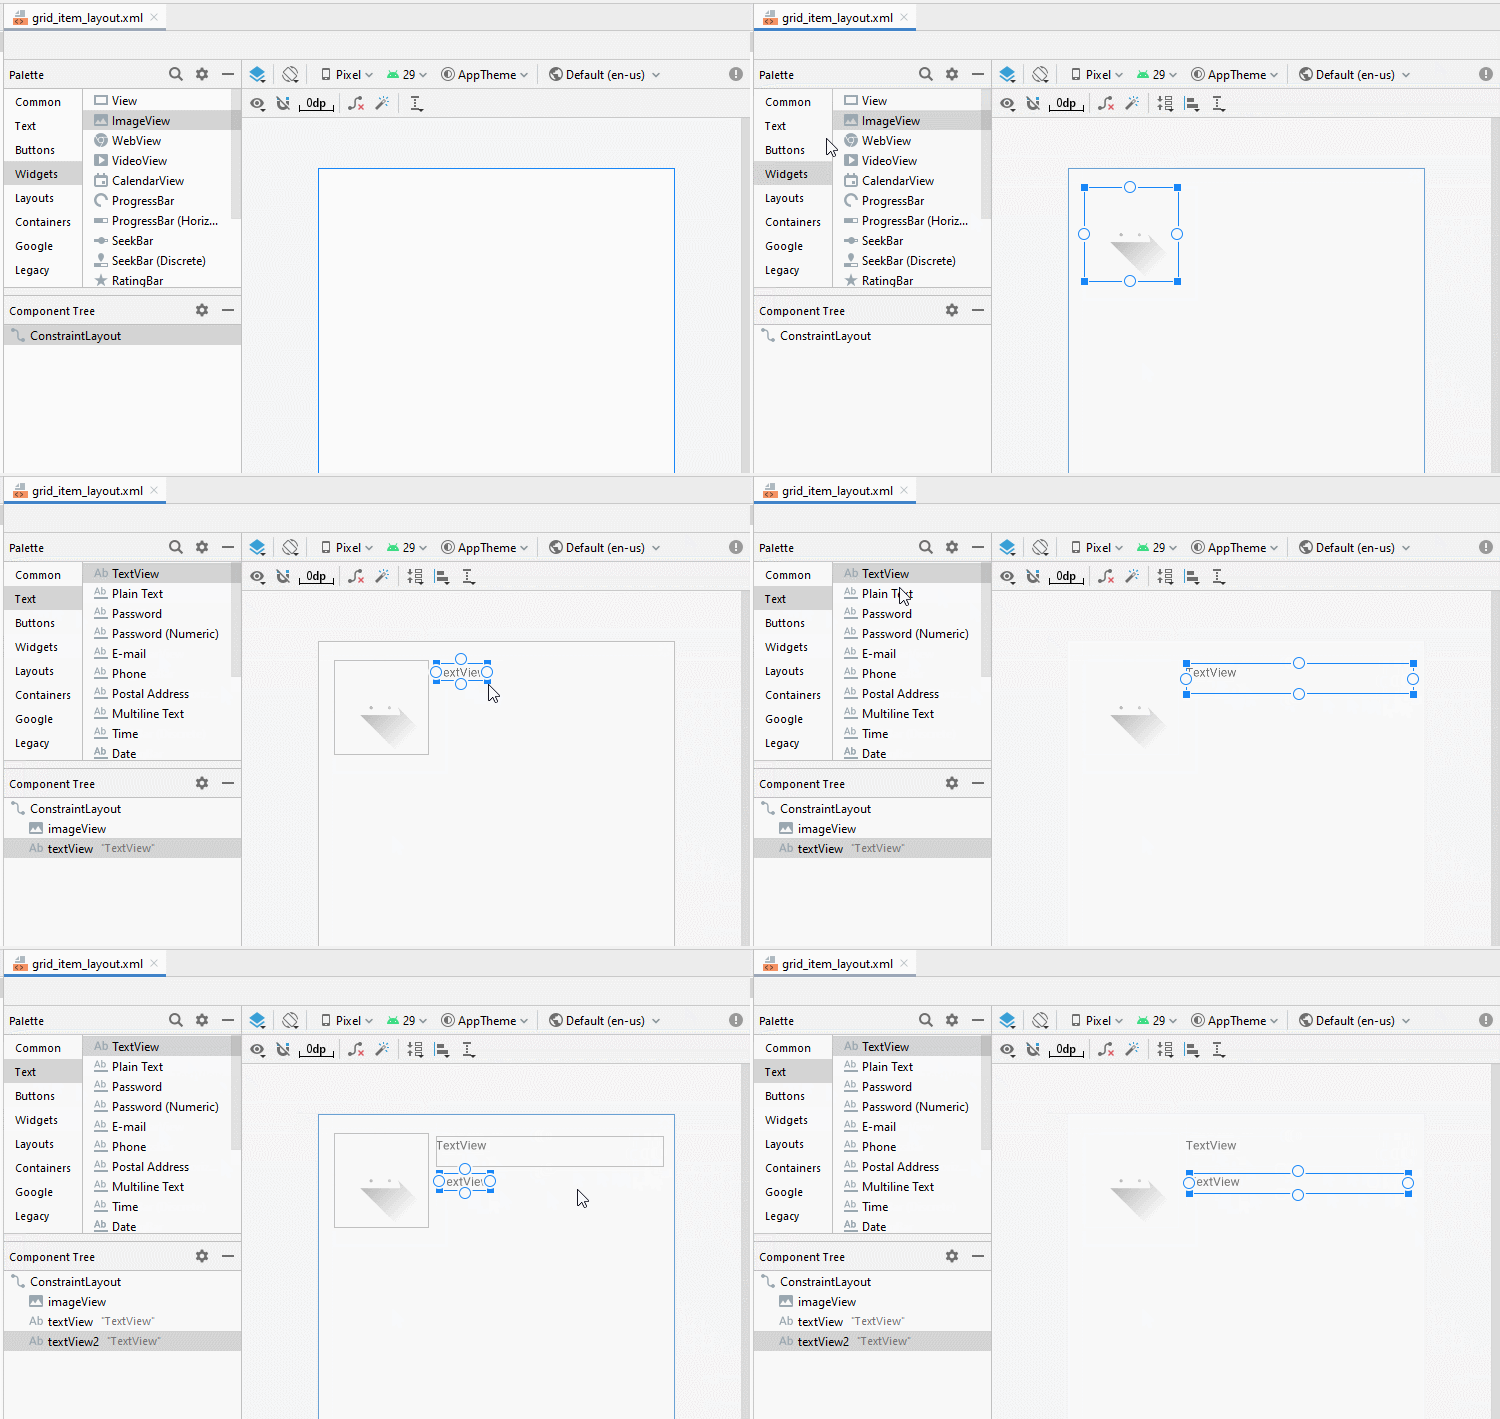
Conception de l'interface pour GridItem.
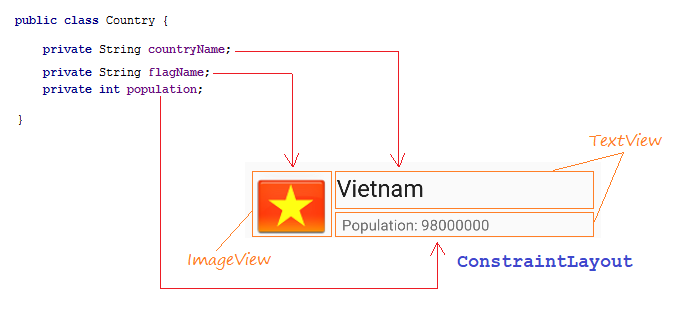
Slider, des étapes de conception d'interface pour GridItem:
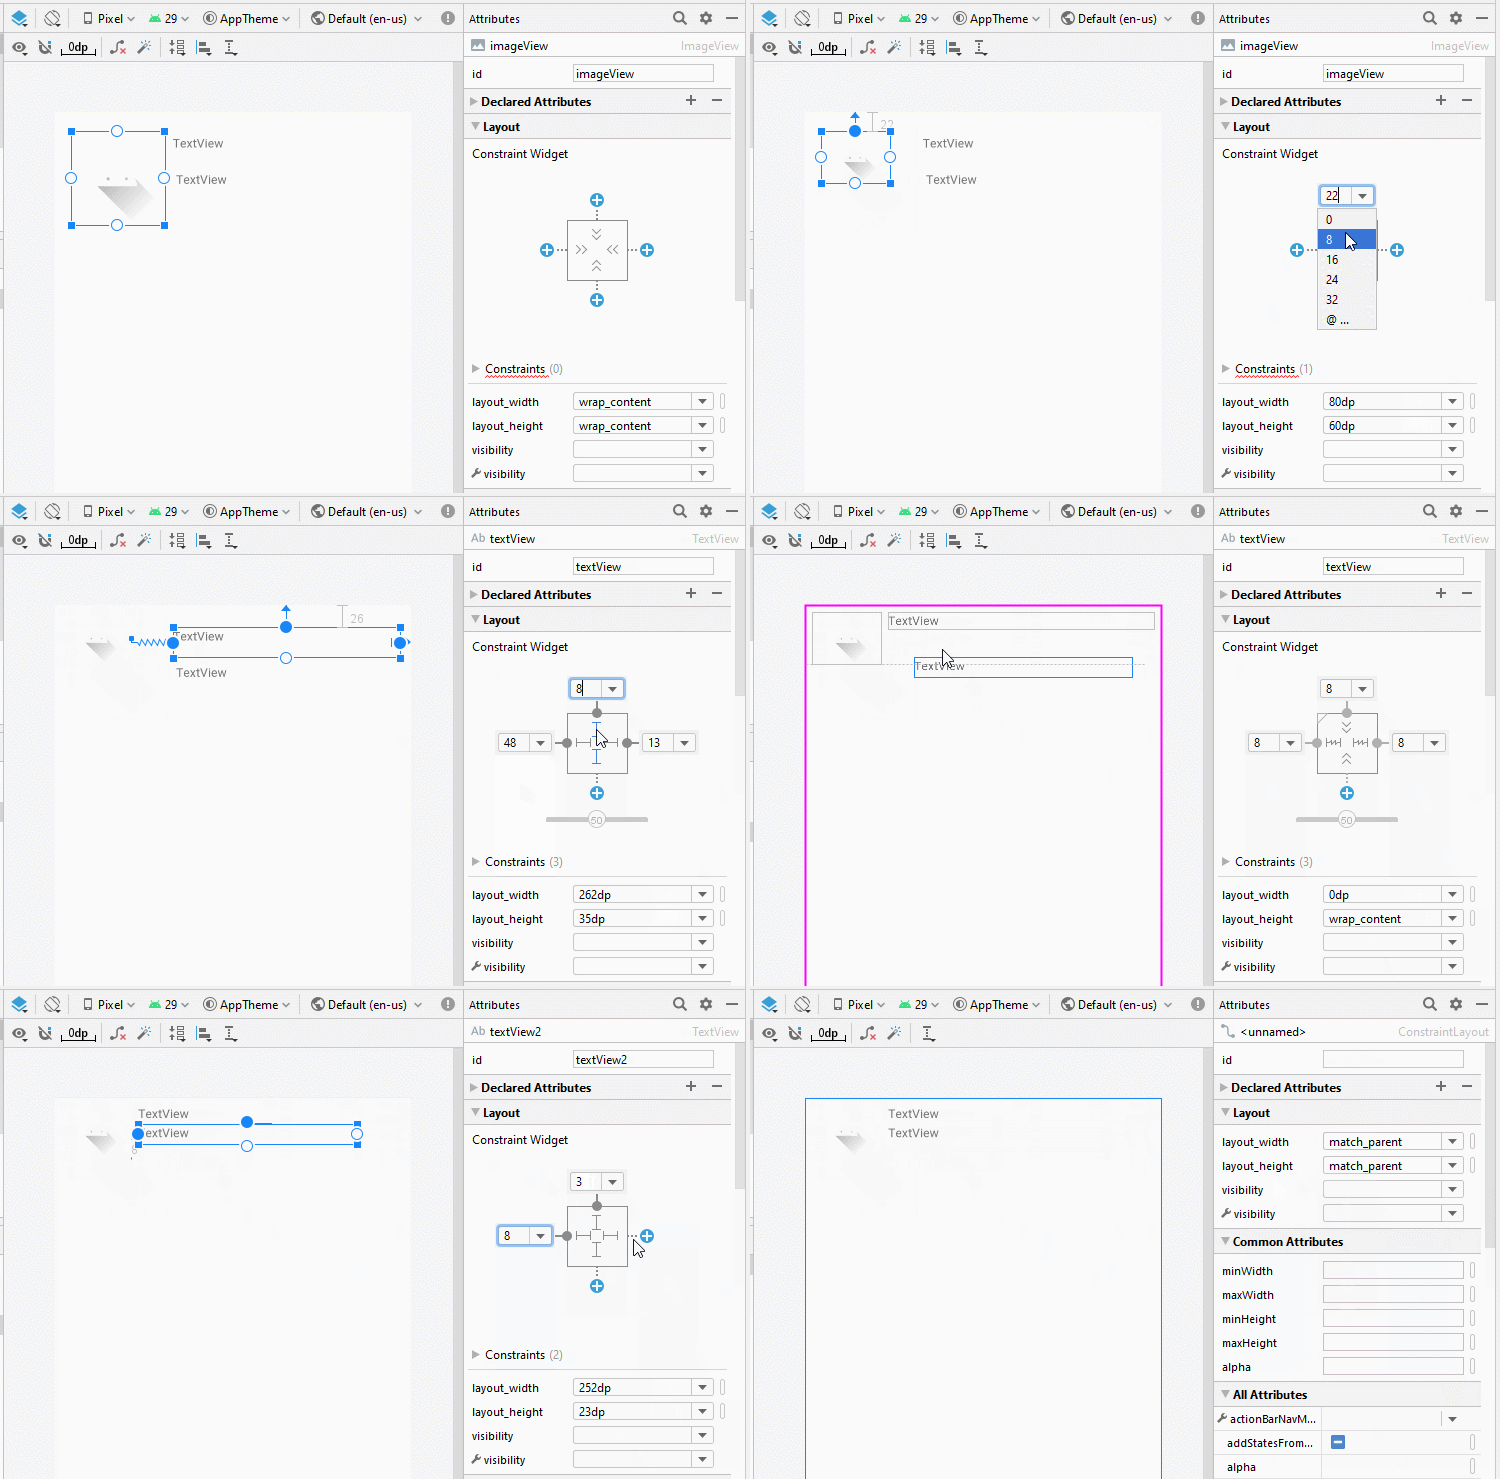
ImageView
TextView 1:
TextView 2:
- ID: imageView_flag
TextView 1:
- ID: textView_countryName
- Text: Country Name
TextView 2:
- ID: textView_population
- Text: Population ....
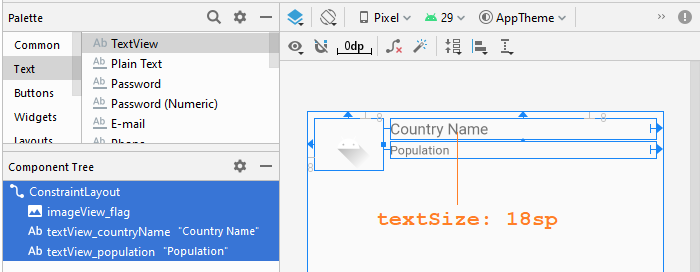
grid_item_layout.xml
<?xml version="1.0" encoding="utf-8"?>
<androidx.constraintlayout.widget.ConstraintLayout
    xmlns:android="http://schemas.android.com/apk/res/android"
    xmlns:app="http://schemas.android.com/apk/res-auto"
    xmlns:tools="http://schemas.android.com/tools"
    android:layout_width="match_parent"
    android:layout_height="match_parent">

    <ImageView
        android:id="@+id/imageView_flag"
        android:layout_width="80dp"
        android:layout_height="60dp"
        android:layout_marginStart="8dp"
        android:layout_marginLeft="8dp"
        android:layout_marginTop="8dp"
        app:layout_constraintStart_toStartOf="parent"
        app:layout_constraintTop_toTopOf="parent"
        app:srcCompat="@drawable/ic_launcher_foreground" />

    <TextView
        android:id="@+id/textView_countryName"
        android:layout_width="0dp"
        android:layout_height="wrap_content"
        android:layout_marginStart="8dp"
        android:layout_marginLeft="8dp"
        android:layout_marginTop="8dp"
        android:layout_marginEnd="8dp"
        android:layout_marginRight="8dp"
        android:text="Country Name"
        android:textSize="18sp"
        app:layout_constraintEnd_toEndOf="parent"
        app:layout_constraintStart_toEndOf="@+id/imageView_flag"
        app:layout_constraintTop_toTopOf="parent" />

    <TextView
        android:id="@+id/textView_population"
        android:layout_width="0dp"
        android:layout_height="wrap_content"
        android:layout_marginStart="8dp"
        android:layout_marginLeft="8dp"
        android:layout_marginTop="3dp"
        android:layout_marginEnd="8dp"
        android:layout_marginRight="8dp"
        android:text="Population"
        app:layout_constraintEnd_toEndOf="parent"
        app:layout_constraintStart_toEndOf="@+id/imageView_flag"
        app:layout_constraintTop_toBottomOf="@+id/textView_countryName" />
</androidx.constraintlayout.widget.ConstraintLayout>
activity_main.xml
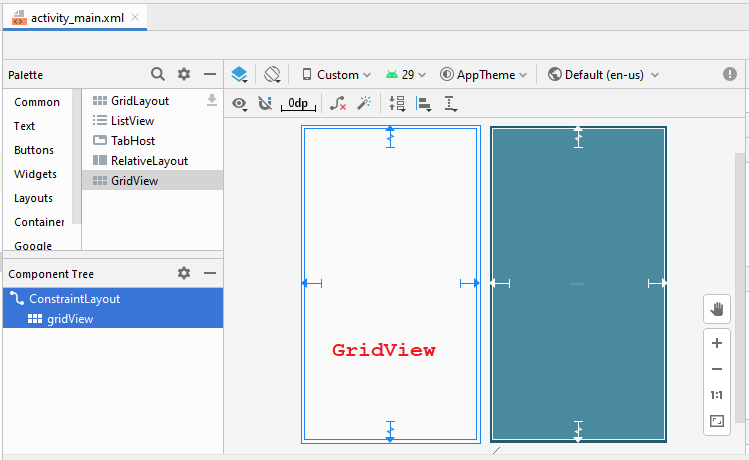
GridView
- android:numColumns ="2"
- android:stretchMode ="columnWidth"
activity_main.xml
<?xml version="1.0" encoding="utf-8"?>
<androidx.constraintlayout.widget.ConstraintLayout
    xmlns:android="http://schemas.android.com/apk/res/android"
    xmlns:app="http://schemas.android.com/apk/res-auto"
    xmlns:tools="http://schemas.android.com/tools"
    android:layout_width="match_parent"
    android:layout_height="match_parent"
    tools:context=".MainActivity">

    <GridView
        android:id="@+id/gridView"
        android:layout_width="0dp"
        android:layout_height="0dp"
        android:layout_marginStart="8dp"
        android:layout_marginLeft="8dp"
        android:layout_marginTop="8dp"
        android:layout_marginEnd="8dp"
        android:layout_marginRight="8dp"
        android:layout_marginBottom="8dp"
        android:numColumns="2"
        android:stretchMode="columnWidth"
        app:layout_constraintBottom_toBottomOf="parent"
        app:layout_constraintEnd_toEndOf="parent"
        app:layout_constraintStart_toStartOf="parent"
        app:layout_constraintTop_toTopOf="parent" />

</androidx.constraintlayout.widget.ConstraintLayout>
CustomGridAdapter est une classe s'étendant depuis BaseAdapter, elle sert à afficher des données sur GridItem.
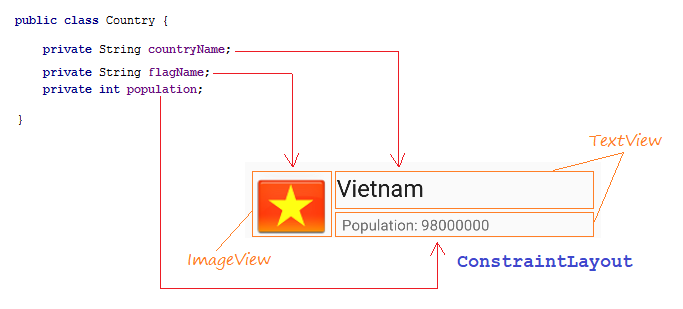
Country.java
package org.o7planning.customgridview;

public class Country {

    private String countryName;

    // Image name (Without extension)
    private String flagName;
    private int population;

    public Country(String countryName, String flagName, int population) {
        this.countryName= countryName;
        this.flagName= flagName;
        this.population= population;
    }

    public int getPopulation() {
        return population;
    }

    public void setPopulation(int population) {
        this.population = population;
    }

    public String getCountryName() {
        return countryName;
    }

    public void setCountryName(String countryName) {
        this.countryName = countryName;
    }

    public String getFlagName() {
        return flagName;
    }

    public void setFlagName(String flagName) {
        this.flagName = flagName;
    }

    @Override
    public String toString()  {
        return this.countryName+" (Population: "+ this.population+")";
    }
}
CustomGridAdapter.java
package org.o7planning.customgridview;

import android.content.Context;
import android.util.Log;
import android.view.LayoutInflater;
import android.view.View;
import android.view.ViewGroup;
import android.widget.BaseAdapter;
import android.widget.ImageView;
import android.widget.TextView;
import java.util.List;

public class CustomGridAdapter  extends BaseAdapter {

    private List<Country> listData;
    private LayoutInflater layoutInflater;
    private Context context;

    public CustomGridAdapter(Context aContext,  List<Country> listData) {
        this.context = aContext;
        this.listData = listData;
        layoutInflater = LayoutInflater.from(aContext);
    }

    @Override
    public int getCount() {
        return listData.size();
    }

    @Override
    public Object getItem(int position) {
        return listData.get(position);
    }

    @Override
    public long getItemId(int position) {
        return position;
    }

    public View getView(int position, View convertView, ViewGroup parent) {
        ViewHolder holder;
        if (convertView == null) {
            convertView = layoutInflater.inflate(R.layout.grid_item_layout, null);
            holder = new ViewHolder();
            holder.flagView = (ImageView) convertView.findViewById(R.id.imageView_flag);
            holder.countryNameView = (TextView) convertView.findViewById(R.id.textView_countryName);
            holder.populationView = (TextView) convertView.findViewById(R.id.textView_population);
            convertView.setTag(holder);
        } else {
            holder = (ViewHolder) convertView.getTag();
        }

        Country country = this.listData.get(position);
        holder.countryNameView.setText(country.getCountryName());
        holder.populationView.setText("" + country.getPopulation());

        int imageId = this.getMipmapResIdByName(country.getFlagName());

        holder.flagView.setImageResource(imageId);

        return convertView;
    }

    // Find Image ID corresponding to the name of the image (in the directory mipmap).
    public int getMipmapResIdByName(String resName)  {
        String pkgName = context.getPackageName();

        // Return 0 if not found.
        int resID = context.getResources().getIdentifier(resName , "mipmap", pkgName);
        Log.i("CustomGridView", "Res Name: "+ resName+"==> Res ID = "+ resID);
        return resID;
    }

    static class ViewHolder {
        ImageView flagView;
        TextView countryNameView;
        TextView populationView;
    }

}
ActivityMain.java
package org.o7planning.customgridview;

import androidx.appcompat.app.AppCompatActivity;
import android.os.Bundle;
import android.view.View;
import android.widget.AdapterView;
import android.widget.GridView;
import android.widget.ListView;
import android.widget.Toast;
import java.util.ArrayList;
import java.util.List;

public class MainActivity extends AppCompatActivity {

    @Override
    protected void onCreate(Bundle savedInstanceState) {
        super.onCreate(savedInstanceState);
        setContentView(R.layout.activity_main);


        List<Country> image_details = getListData();
        final GridView gridView = (GridView) findViewById(R.id.gridView);
        gridView.setAdapter(new CustomGridAdapter(this, image_details));

        // When the user clicks on the GridItem
        gridView.setOnItemClickListener(new AdapterView.OnItemClickListener() {

            @Override
            public void onItemClick(AdapterView<?> a, View v, int position, long id) {
                Object o = gridView.getItemAtPosition(position);
                Country country = (Country) o;
                Toast.makeText(MainActivity.this, "Selected :"
                        + " " + country, Toast.LENGTH_LONG).show();
            }
        });
    }

    private  List<Country> getListData() {
        List<Country> list = new ArrayList<Country>();
        Country vietnam = new Country("Vietnam", "vn", 98000000);
        Country usa = new Country("United States", "us", 320000000);
        Country russia = new Country("Russia", "ru", 142000000);
        Country australia = new Country("Australia", "au", 23766305);
        Country japan = new Country("Japan", "jp", 126788677);

        list.add(vietnam);
        list.add(usa);
        list.add(russia);
        list.add(australia);
        list.add(japan);

        return list;
    }

}
Exécutez l'application:
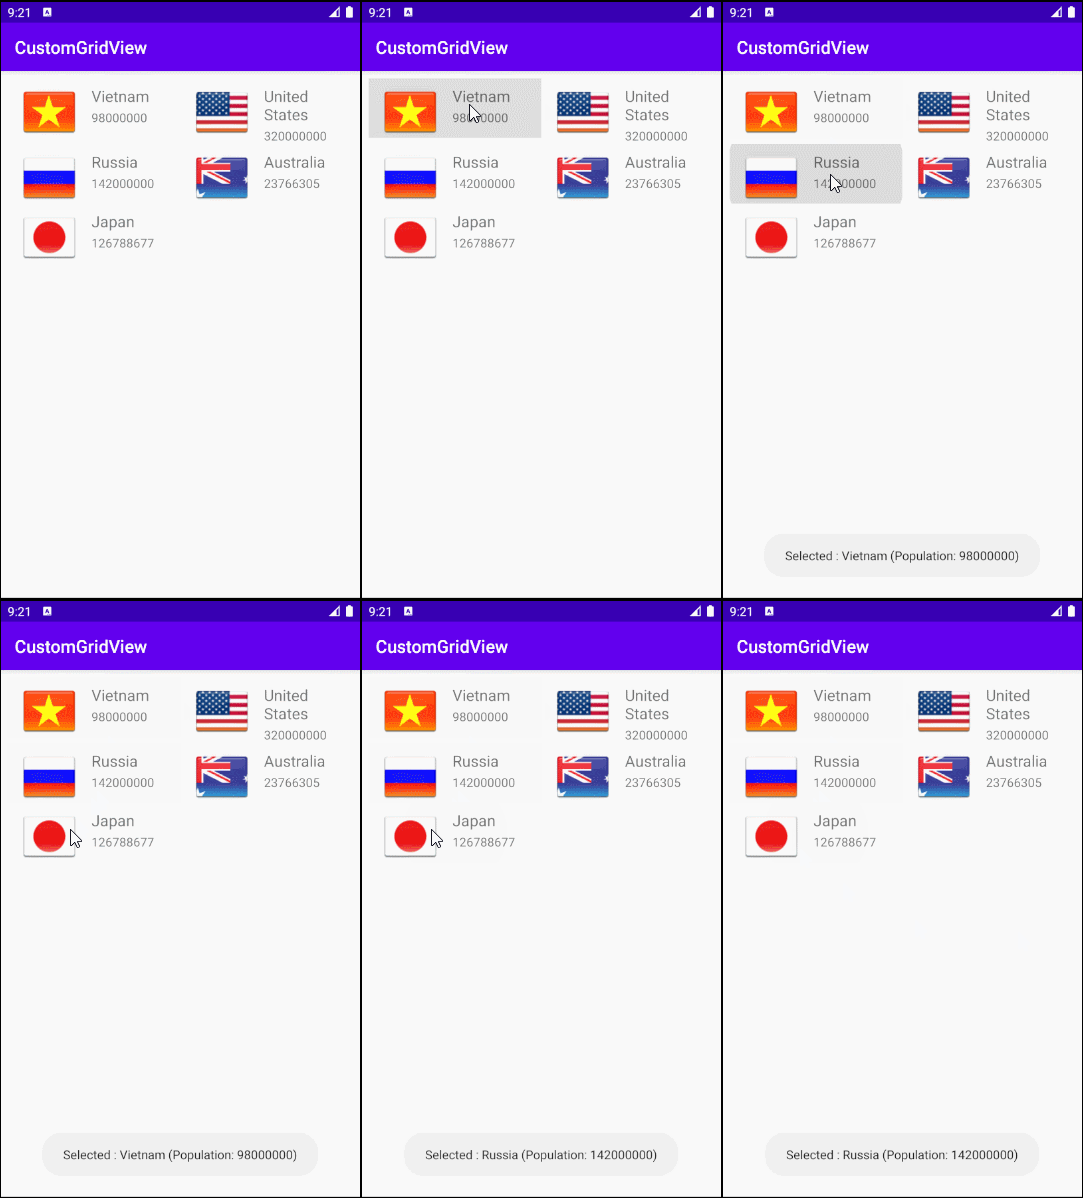
Exemple de l'usage du Selecteur
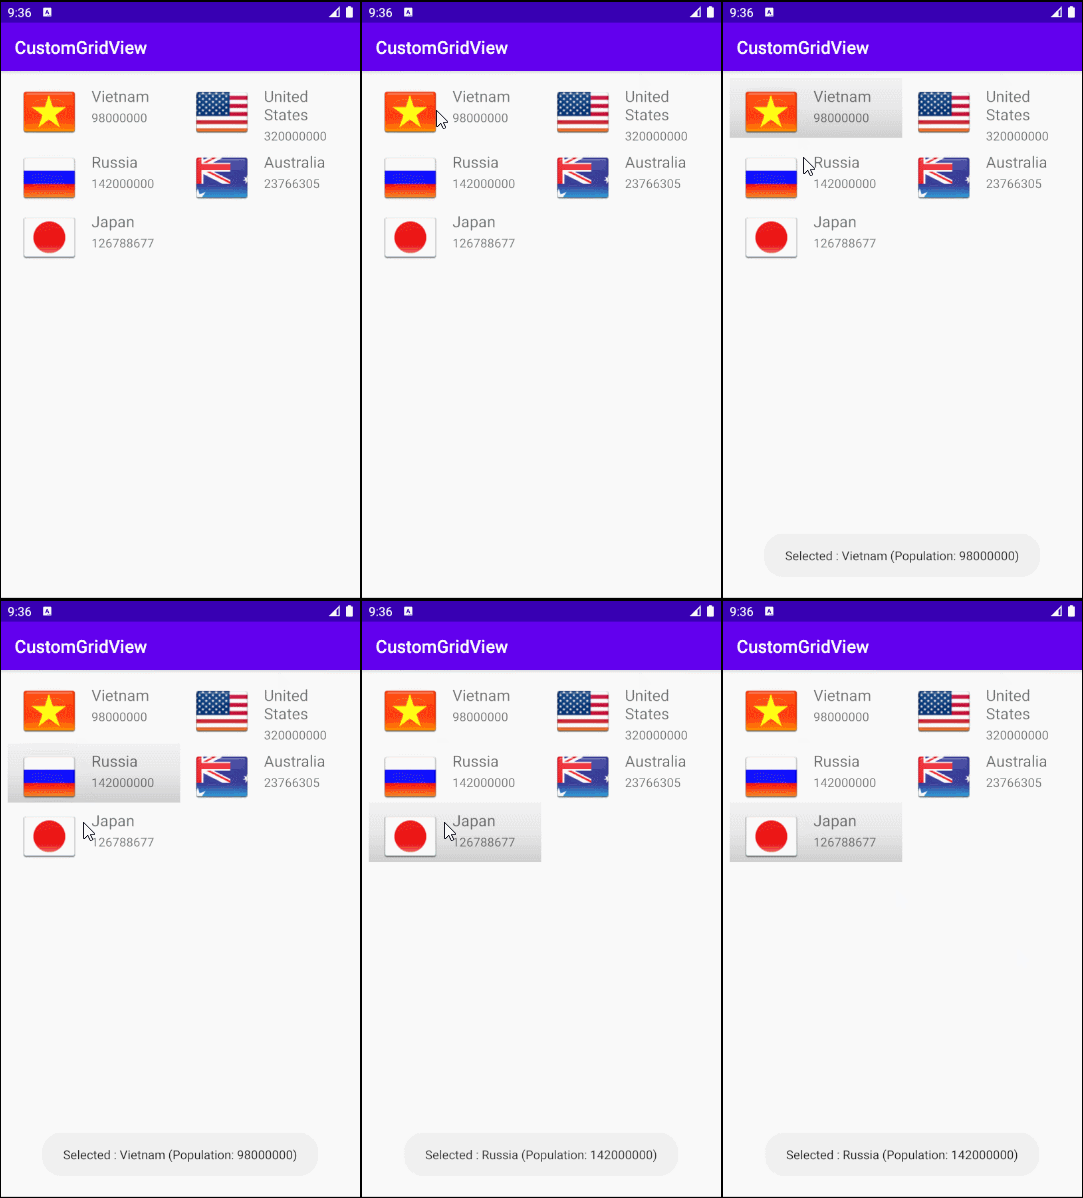
Pour que GridView devienne plus beau, il faut personnaliser les effets, par exemple, changer la couleur d'arrière-plan de GridItem lorsque le curseur se déplace dessus ou modifier la couleur d'arrière-plan lorsqu'il est sélectionné. Nous continuons avec l'exemple ci-dessus.
Créez les fichiers de configuration:
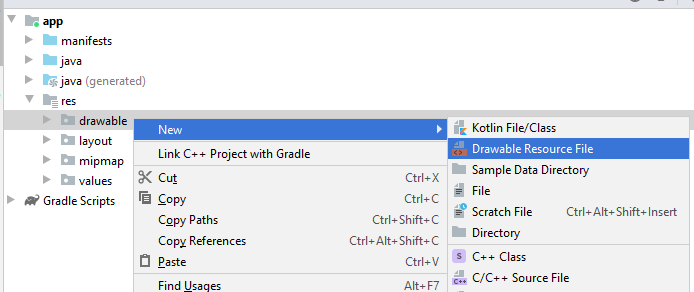
- File name: item_state_normal.xml
- Directory: drawable
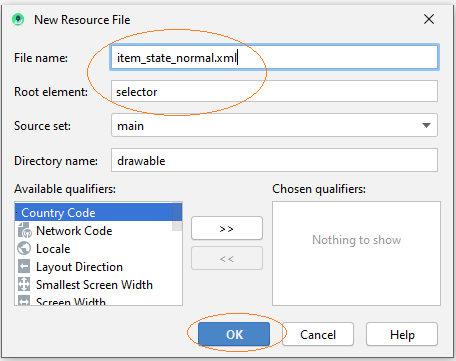
De la même façon, créez trois fichiers différents:
- item_state_pressed.xml
- item_state_selected.xml
- list_selector.xml
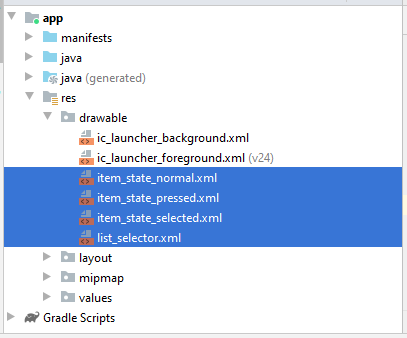
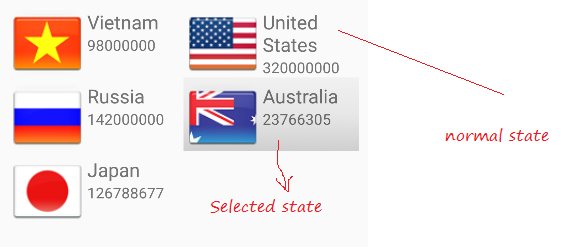
Lorsque l'élément de grille dans un état normal, les styles qui sont configurés dans item_state_normal.xml seront appliqués à GridItem.
item_state_normal.xml
<?xml version="1.0" encoding="utf-8"?>

<shape xmlns:android="http://schemas.android.com/apk/res/android"
  android:shape="rectangle">

  <gradient
      android:startColor="#f1f1f2"
      android:centerColor="#e7e7e8"
      android:endColor="#cfcfcf"
      android:angle="270" />

</shape>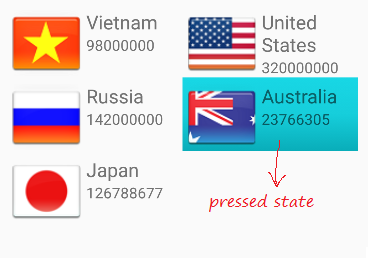
Lorsque Grid Item est pressé, les styles mis en place dans item_state_pressed.xml seront appliqués à GridItem
item_state_pressed.xml
<?xml version="1.0" encoding="utf-8"?>

<shape xmlns:android="http://schemas.android.com/apk/res/android"
  android:shape="rectangle">

  <gradient
      android:startColor="#18d7e5"
      android:centerColor="#16cedb"
      android:endColor="#09adb9"
      android:angle="270" />

</shape>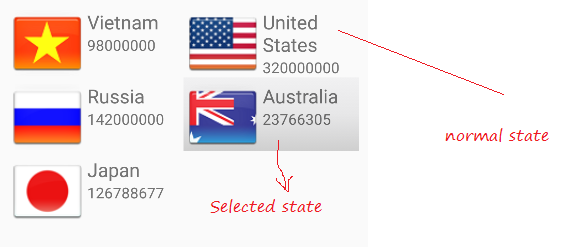
Lorsque Grid Item est sélectionné, les styles mis en place dans item_state_pressed.xml seront appliqués à GridItem
item_state_selected.xml
<?xml version="1.0" encoding="utf-8"?>

<shape xmlns:android="http://schemas.android.com/apk/res/android"
   android:shape="rectangle">

   <gradient
       android:startColor="#18d7e5"
       android:centerColor="#16cedb"
       android:endColor="#09adb9"
       android:angle="270" />

</shape>
La modélisationde l'état spécifique de GridItem de liste avec les fichiers xml.
list_selector.xml
<?xml version="1.0" encoding="utf-8"?>

<selector xmlns:android="http://schemas.android.com/apk/res/android">

       <item
           android:state_selected="false"
           android:state_pressed="false"
           android:drawable="@drawable/item_state_normal" />

       <item android:state_pressed="true"
           android:drawable="@drawable/item_state_pressed" />

       <item android:state_selected="true"
           android:state_pressed="false"
           android:drawable="@drawable/item_state_selected" />


</selector>
Définissez ListSelector pour GridView:
<GridView
     ...
     android:listSelector="@drawable/list_selector" />
activity_main.xml
<?xml version="1.0" encoding="utf-8"?>
<androidx.constraintlayout.widget.ConstraintLayout
    xmlns:android="http://schemas.android.com/apk/res/android"
    xmlns:app="http://schemas.android.com/apk/res-auto"
    xmlns:tools="http://schemas.android.com/tools"
    android:layout_width="match_parent"
    android:layout_height="match_parent"
    tools:context=".MainActivity">

    <GridView
        android:id="@+id/gridView"
        android:layout_width="0dp"
        android:layout_height="0dp"
        android:layout_marginStart="8dp"
        android:layout_marginLeft="8dp"
        android:layout_marginTop="8dp"
        android:layout_marginEnd="8dp"
        android:layout_marginRight="8dp"
        android:layout_marginBottom="8dp"
        android:numColumns="2"
        android:stretchMode="columnWidth"
        app:layout_constraintBottom_toBottomOf="parent"
        app:layout_constraintEnd_toEndOf="parent"
        app:layout_constraintStart_toStartOf="parent"
        app:layout_constraintTop_toTopOf="parent"
        android:listSelector="@drawable/list_selector" />

</androidx.constraintlayout.widget.ConstraintLayout>
Relancez votre application:
Tutoriels de programmation Android
- Configurer Android Emulator en Android Studio
- Le Tutoriel de Android ToggleButton
- Créer un File Finder Dialog simple dans Android
- Le Tutoriel de Android TimePickerDialog
- Le Tutoriel de Android DatePickerDialog
- De quoi avez-vous besoin pour démarrer avec Android?
- Installer Android Studio sur Windows
- Installer Intel® HAXM pour Android Studio
- Le Tutoriel de Android AsyncTask
- Le Tutoriel de Android AsyncTaskLoader
- Tutoriel Android pour débutant - Exemples de base
- Comment connaître le numéro de téléphone d'Android Emulator et le changer?
- Le Tutoriel de Android TextInputLayout
- Le Tutoriel de Android CardView
- Le Tutoriel de Android ViewPager2
- Obtenir un numéro de téléphone dans Android à l'aide de TelephonyManager
- Le Tutoriel de Android Phone Call
- Le Tutoriel de Android Wifi Scanning
- Le Tutoriel de programmation de jeux Android 2D pour débutant
- Le Tutoriel de Android DialogFragment
- Le Tutoriel de Android CharacterPickerDialog
- Le Tutoriel Android pour débutant - Hello Android
- Utiliser Android Device File Explorer
- Activer USB Debugging sur un appareil Android
- Le Tutoriel de Android UI Layouts
- Le Tutoriel de Android SMS
- Le Tutoriel de Android et SQLite Database
- Le Tutoriel de Google Maps Android API
- Le Tutoriel de texte pour parler dans Android
- Le Tutoriel de Android Space
- Le Tutoriel de Android Toast
- Créer un Android Toast personnalisé
- Le Tutoriel de Android SnackBar
- Le Tutoriel de Android TextView
- Le Tutoriel de Android TextClock
- Le Tutoriel de Android EditText
- Le Tutoriel de Android TextWatcher
- Formater le numéro de carte de crédit avec Android TextWatcher
- Le Tutoriel de Android Clipboard
- Créer un File Chooser simple dans Android
- Le Tutoriel de Android AutoCompleteTextView et MultiAutoCompleteTextView
- Le Tutoriel de Android ImageView
- Le Tutoriel de Android ImageSwitcher
- Le Tutoriel de Android ScrollView et HorizontalScrollView
- Le Tutoriel de Android WebView
- Le Tutoriel de Android SeekBar
- Le Tutoriel de Android Dialog
- Le Tutoriel de Android AlertDialog
- Tutoriel Android RatingBar
- Le Tutoriel de Android ProgressBar
- Le Tutoriel de Android Spinner
- Le Tutoriel de Android Button
- Le Tutoriel de Android Switch
- Le Tutoriel de Android ImageButton
- Le Tutoriel de Android FloatingActionButton
- Le Tutoriel de Android CheckBox
- Le Tutoriel de Android RadioGroup et RadioButton
- Le Tutoriel de Android Chip et ChipGroup
- Utilisation des Image assets et des Icon assets d'Android Studio
- Configuration de la Carte SD pour Android Emulator
- Exemple ChipGroup et Chip Entry
- Comment ajouter des bibliothèques externes à Android Project dans Android Studio?
- Comment désactiver les autorisations déjà accordées à l'application Android?
- Comment supprimer des applications de Android Emulator?
- Le Tutoriel de Android LinearLayout
- Le Tutoriel de Android TableLayout
- Le Tutoriel de Android FrameLayout
- Le Tutoriel de Android QuickContactBadge
- Le Tutoriel de Android StackView
- Le Tutoriel de Android Camera
- Le Tutoriel de Android MediaPlayer
- Le Tutoriel de Android VideoView
- Jouer des effets sonores dans Android avec SoundPool
- Le Tutoriel de Android Networking
- Analyser JSON dans Android
- Le Tutoriel de Android SharedPreferences
- Le Tutorial de stockage interne Android (Internal Storage)
- Le Tutoriel de Android External Storage
- Le Tutoriel de Android Intents
- Exemple d'une Android Intent explicite, appelant une autre Intent
- Exemple de Android Intent implicite, ouvrez une URL, envoyez un email
- Le Tutoriel de Android Service
- Le Tutoriel Android Notifications
- Le Tutoriel de Android DatePicker
- Le Tutoriel de Android TimePicker
- Le Tutoriel de Android Chronometer
- Le Tutoriel de Android OptionMenu
- Le Tutoriel de Android ContextMenu
- Le Tutoriel de Android PopupMenu
- Le Tutoriel de Android Fragment
- Le Tutoriel de Android ListView
- Android ListView avec Checkbox en utilisant ArrayAdapter
- Le Tutoriel de Android GridView
Show More