Le Tutoriel de Android CardView
1. Android CardView
Android 5.0 (API Niveau 21) introduit un nouveau composant appelé CardView, qui est essentiellement un conteneur rectangulaire avec quatre coins arrondis (Rounded Corner), et un effet ombré (Shawdow) à les frontières. CardView est souvent utilisé comme conteneur racine pour les Item dans ListView, GridView ou RecyclerView.
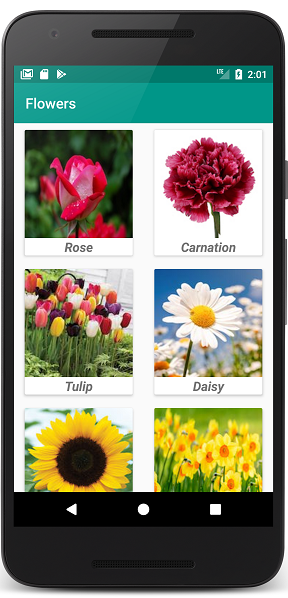
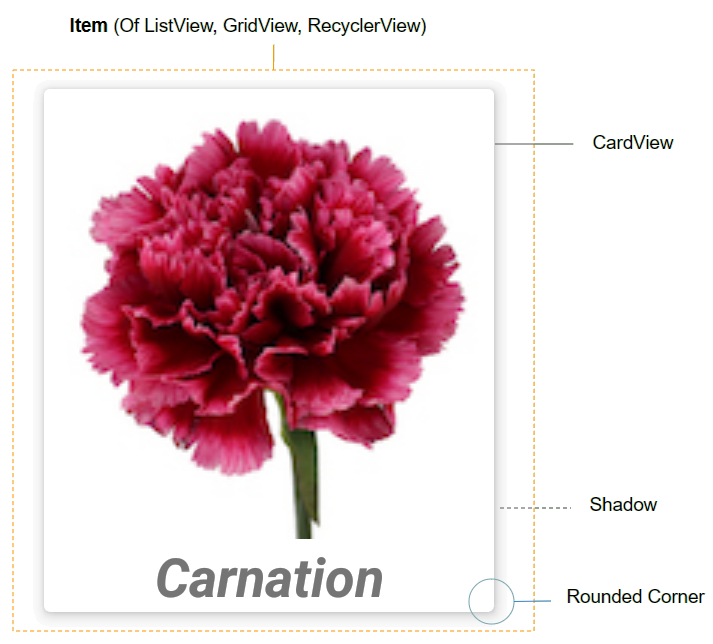
CardView par défaut n'est pas disponible dans le Android SDK, vous devez donc ajouter des bibliothèques à votre projet.
Sur Android Studio, vous pouvez installer la bibliothèque CardView à partir de la Palette.
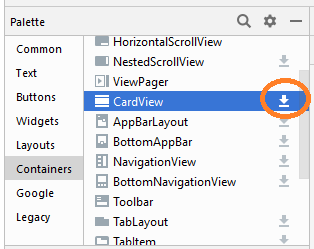
Après l'installation, vous verrez que la bibliothèque a été déclarée sur build.gradle (Module: app).
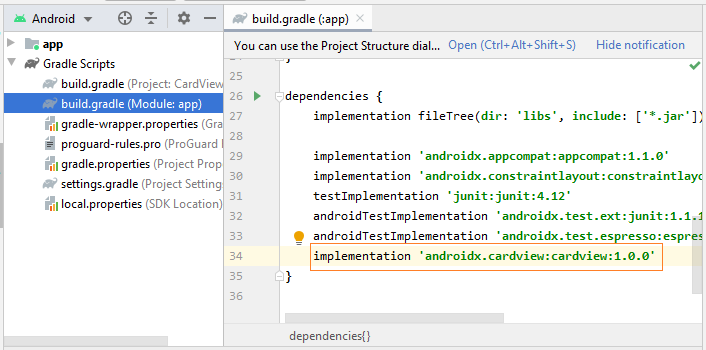
implementation 'androidx.cardview:cardview:1.0.0'Quelques propriétés importantes de CardView que vous devez définir:
- android:layout_marginLeft
- android:layout_marginTop
- android:layout_marginRight
- android:layout_marginBottom
- app:cardBackgroundColor
2. Example de CardView
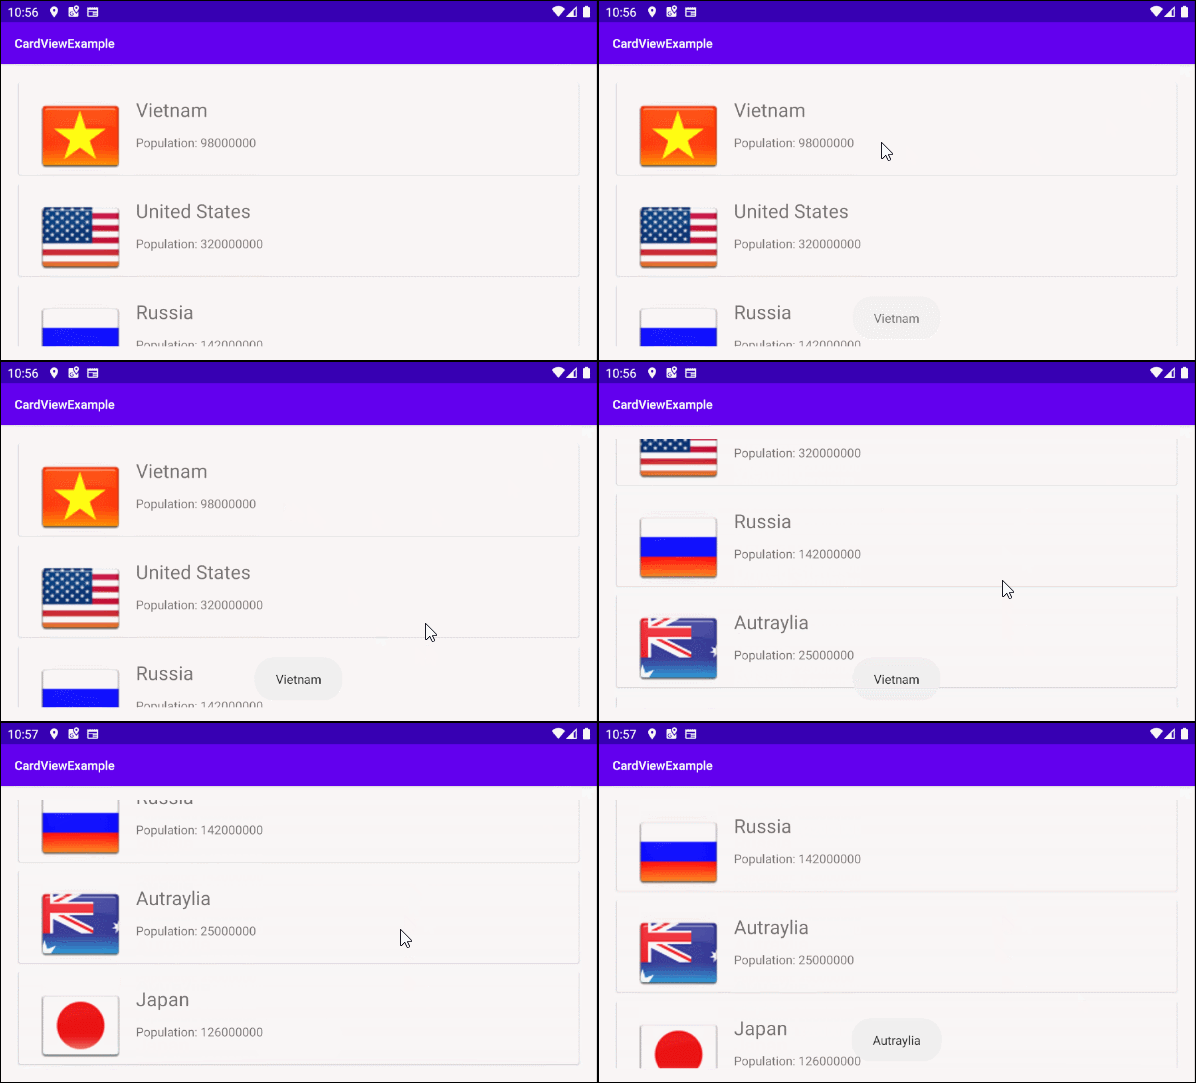
Nous allons maintenant faire un exemple avec RecyclerView et CardView. OK, voici l'aperçu de cet exemple:
Sur Android Studio, créez un projet:
- File > New > New Project > Empty Activity
- Name: CardViewExample
- Package name: org.o7planning.cardviewexample
Installez les bibliothèques RecyclerView et CardView dans votre projet:
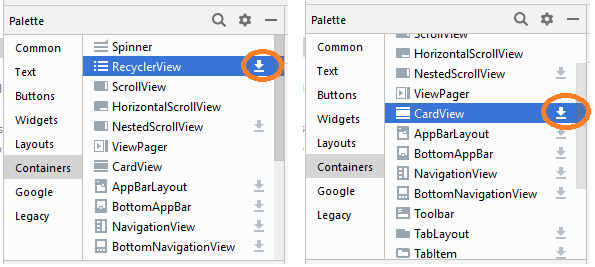
Après l'installation, vous verrez les bibliothèques qui ont été déclarées dans build.gradle (Module: app):
implementation 'androidx.cardview:cardview:1.0.0'
implementation 'androidx.recyclerview:recyclerview:1.0.0'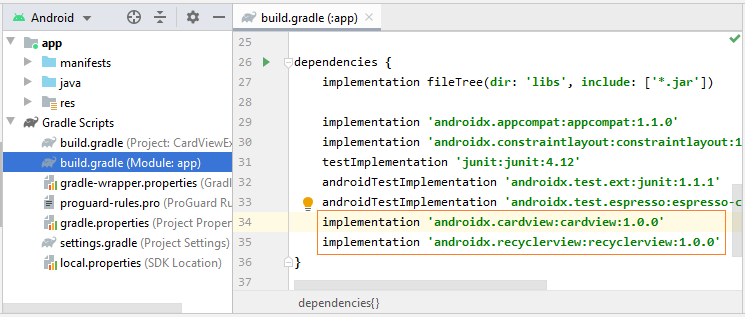
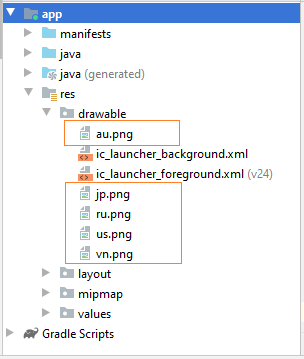
Vous avez besoin de quelques fichiers image, copiez-le dans le répertoire drawable du projet:
vn.png | us.png | ru.png | jp.png | au.png |
Ensuite, vous devez créer Layout de l'élément RecyclerView Item. Faites un clic droit sur le dossier "res / layout" et choisissez:
- New > Layout resource file
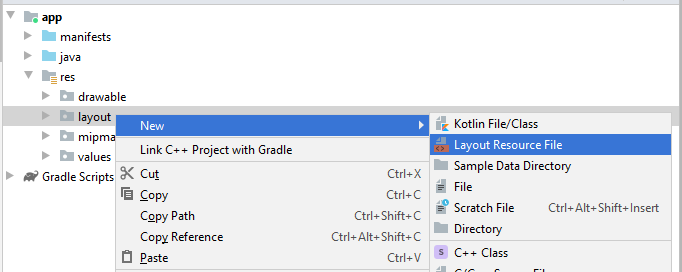
Entrez:
- File name: recyclerview_item_layout.xml
- Root element: androidx.cardview.widget.CardView
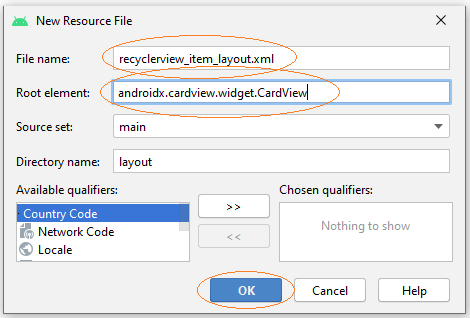
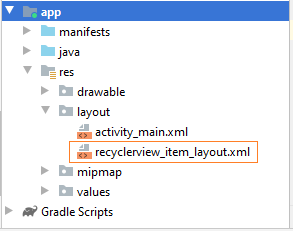
Conception de l'interface de l'élément RecyclerView Item:
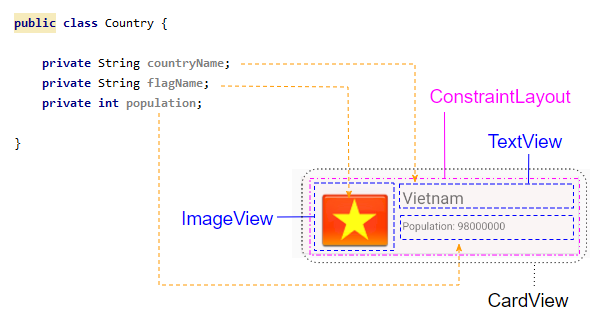
Ouvrez le fichier recyclerview_item_layout.xml et définissez certaines propriétés importantes pour CardView:
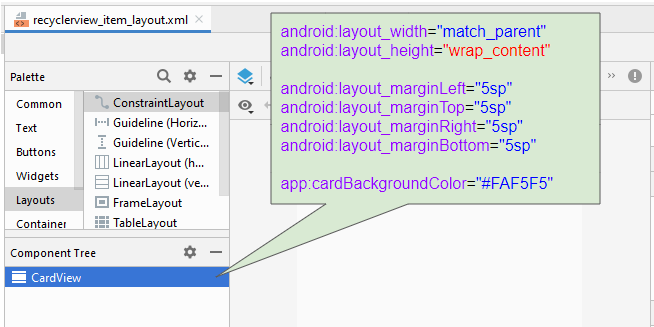
* recyclerview_item_layout.xml *
<?xml version="1.0" encoding="utf-8"?>
<androidx.cardview.widget.CardView
    xmlns:android="http://schemas.android.com/apk/res/android"
    xmlns:app="http://schemas.android.com/apk/res-auto"
    xmlns:tools="http://schemas.android.com/tools"
    android:layout_width="match_parent"
    android:layout_height="wrap_content"
    android:layout_marginLeft="5sp"
    android:layout_marginTop="5sp"
    android:layout_marginRight="5sp"
    android:layout_marginBottom="5sp"
    app:cardBackgroundColor="#FAF5F5">

</androidx.cardview.widget.CardView>
Continuez à concevoir l'interface pour RecyclerView Item:
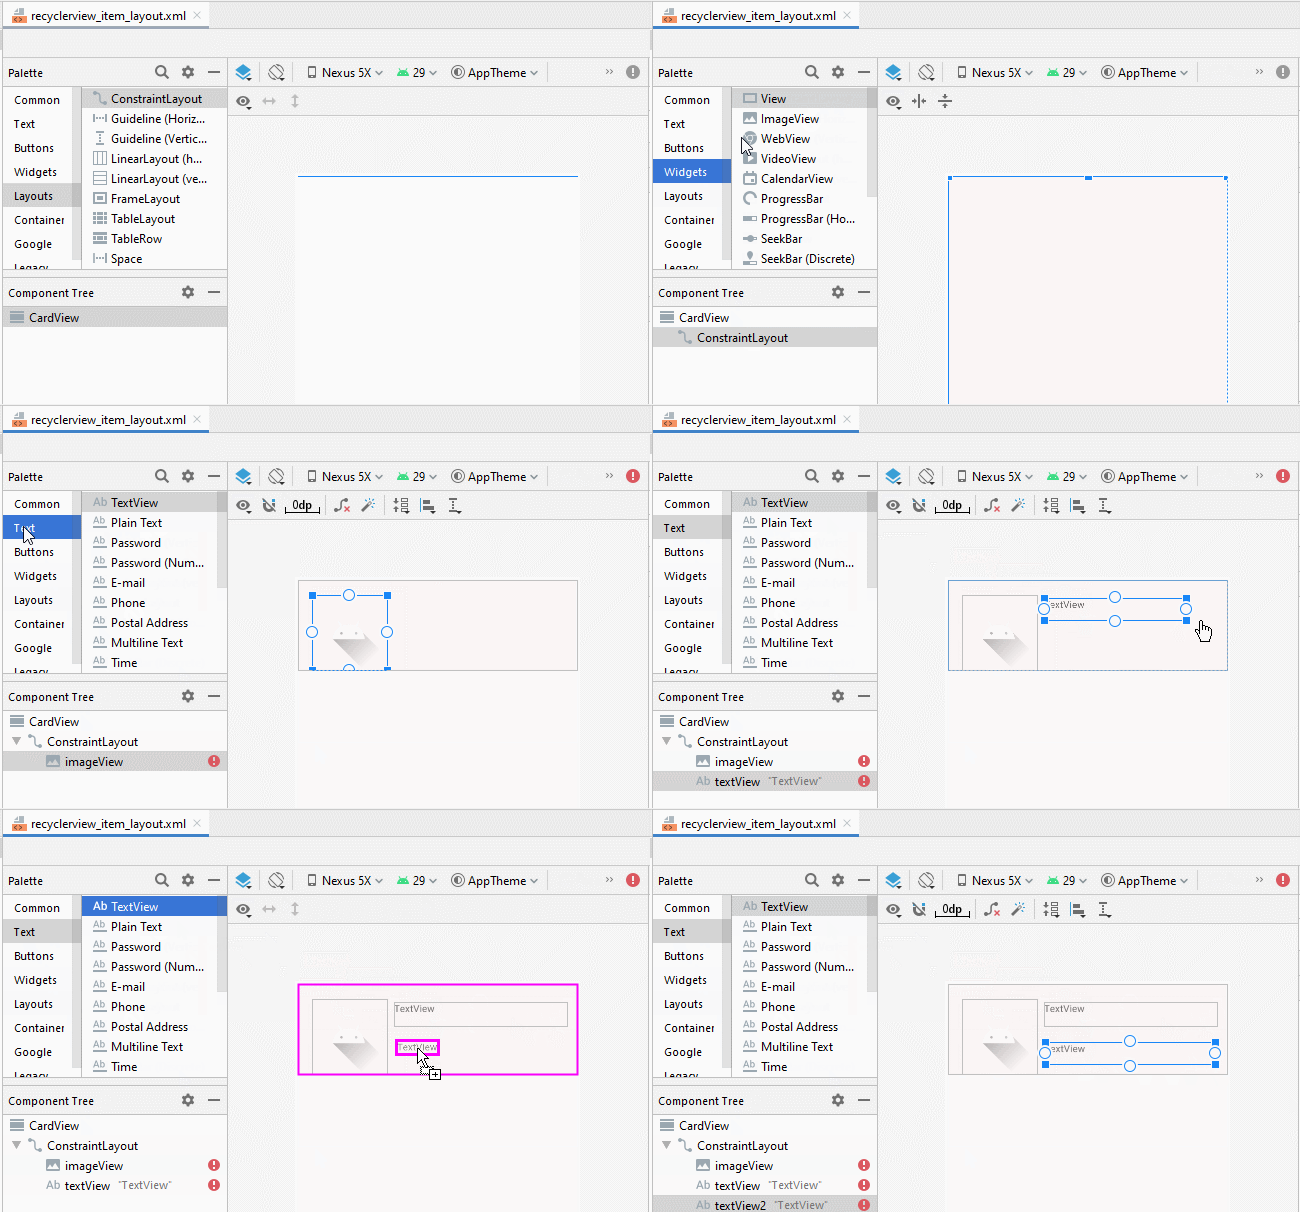
Ajustez la position des composants sur l'interface:
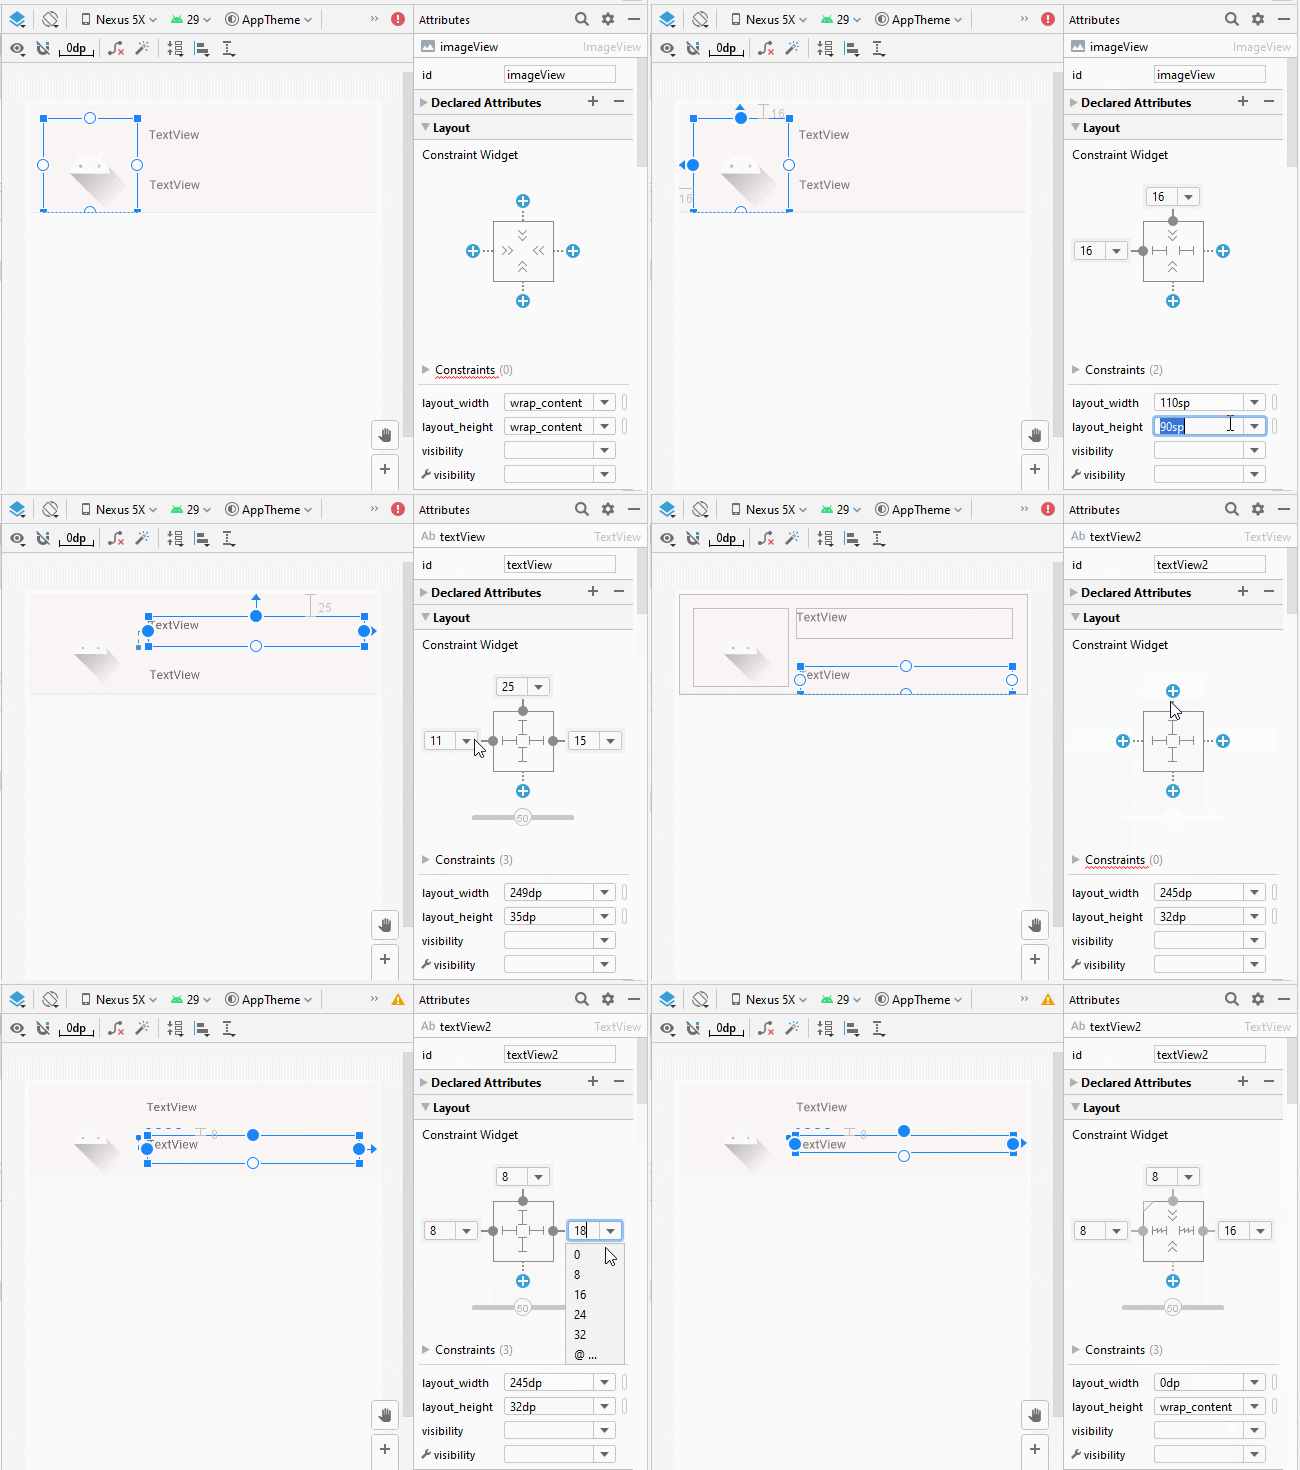
Définissez ID, Text, textSize pour les composants sur l'interface:
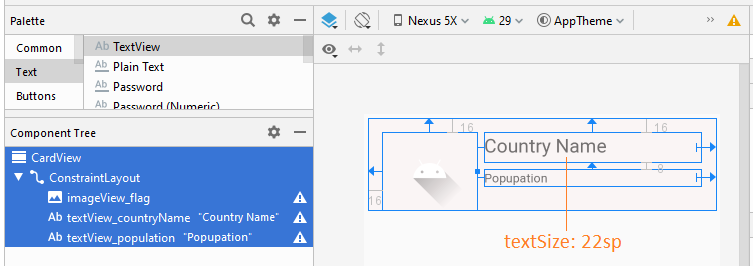
recyclerview_item_layout.xml
<?xml version="1.0" encoding="utf-8"?>
<androidx.cardview.widget.CardView
    xmlns:android="http://schemas.android.com/apk/res/android"
    xmlns:app="http://schemas.android.com/apk/res-auto"
    xmlns:tools="http://schemas.android.com/tools"
    android:layout_width="match_parent"
    android:layout_height="wrap_content"
    android:layout_marginLeft="5sp"
    android:layout_marginTop="5sp"
    android:layout_marginRight="5sp"
    android:layout_marginBottom="5sp"
    app:cardBackgroundColor="#FAF5F5">

    <androidx.constraintlayout.widget.ConstraintLayout
        android:layout_width="match_parent"
        android:layout_height="match_parent">

        <ImageView
            android:id="@+id/imageView_flag"
            android:layout_width="110sp"
            android:layout_height="90sp"
            android:layout_marginStart="16dp"
            android:layout_marginLeft="16dp"
            android:layout_marginTop="16dp"
            app:layout_constraintStart_toStartOf="parent"
            app:layout_constraintTop_toTopOf="parent"
            app:srcCompat="@drawable/ic_launcher_foreground"
            tools:ignore="VectorDrawableCompat" />

        <TextView
            android:id="@+id/textView_countryName"
            android:layout_width="0dp"
            android:layout_height="35dp"
            android:layout_marginStart="8dp"
            android:layout_marginLeft="8dp"
            android:layout_marginTop="16dp"
            android:layout_marginEnd="16dp"
            android:layout_marginRight="16dp"
            android:text="Country Name"
            android:textSize="22sp"
            app:layout_constraintEnd_toEndOf="parent"
            app:layout_constraintStart_toEndOf="@+id/imageView_flag"
            app:layout_constraintTop_toTopOf="parent" />

        <TextView
            android:id="@+id/textView_population"
            android:layout_width="0dp"
            android:layout_height="wrap_content"
            android:layout_marginStart="8dp"
            android:layout_marginLeft="8dp"
            android:layout_marginTop="8dp"
            android:layout_marginEnd="16dp"
            android:layout_marginRight="16dp"
            android:text="Popupation"
            app:layout_constraintEnd_toEndOf="parent"
            app:layout_constraintStart_toEndOf="@+id/imageView_flag"
            app:layout_constraintTop_toBottomOf="@+id/textView_countryName" />
    </androidx.constraintlayout.widget.ConstraintLayout>
</androidx.cardview.widget.CardView>
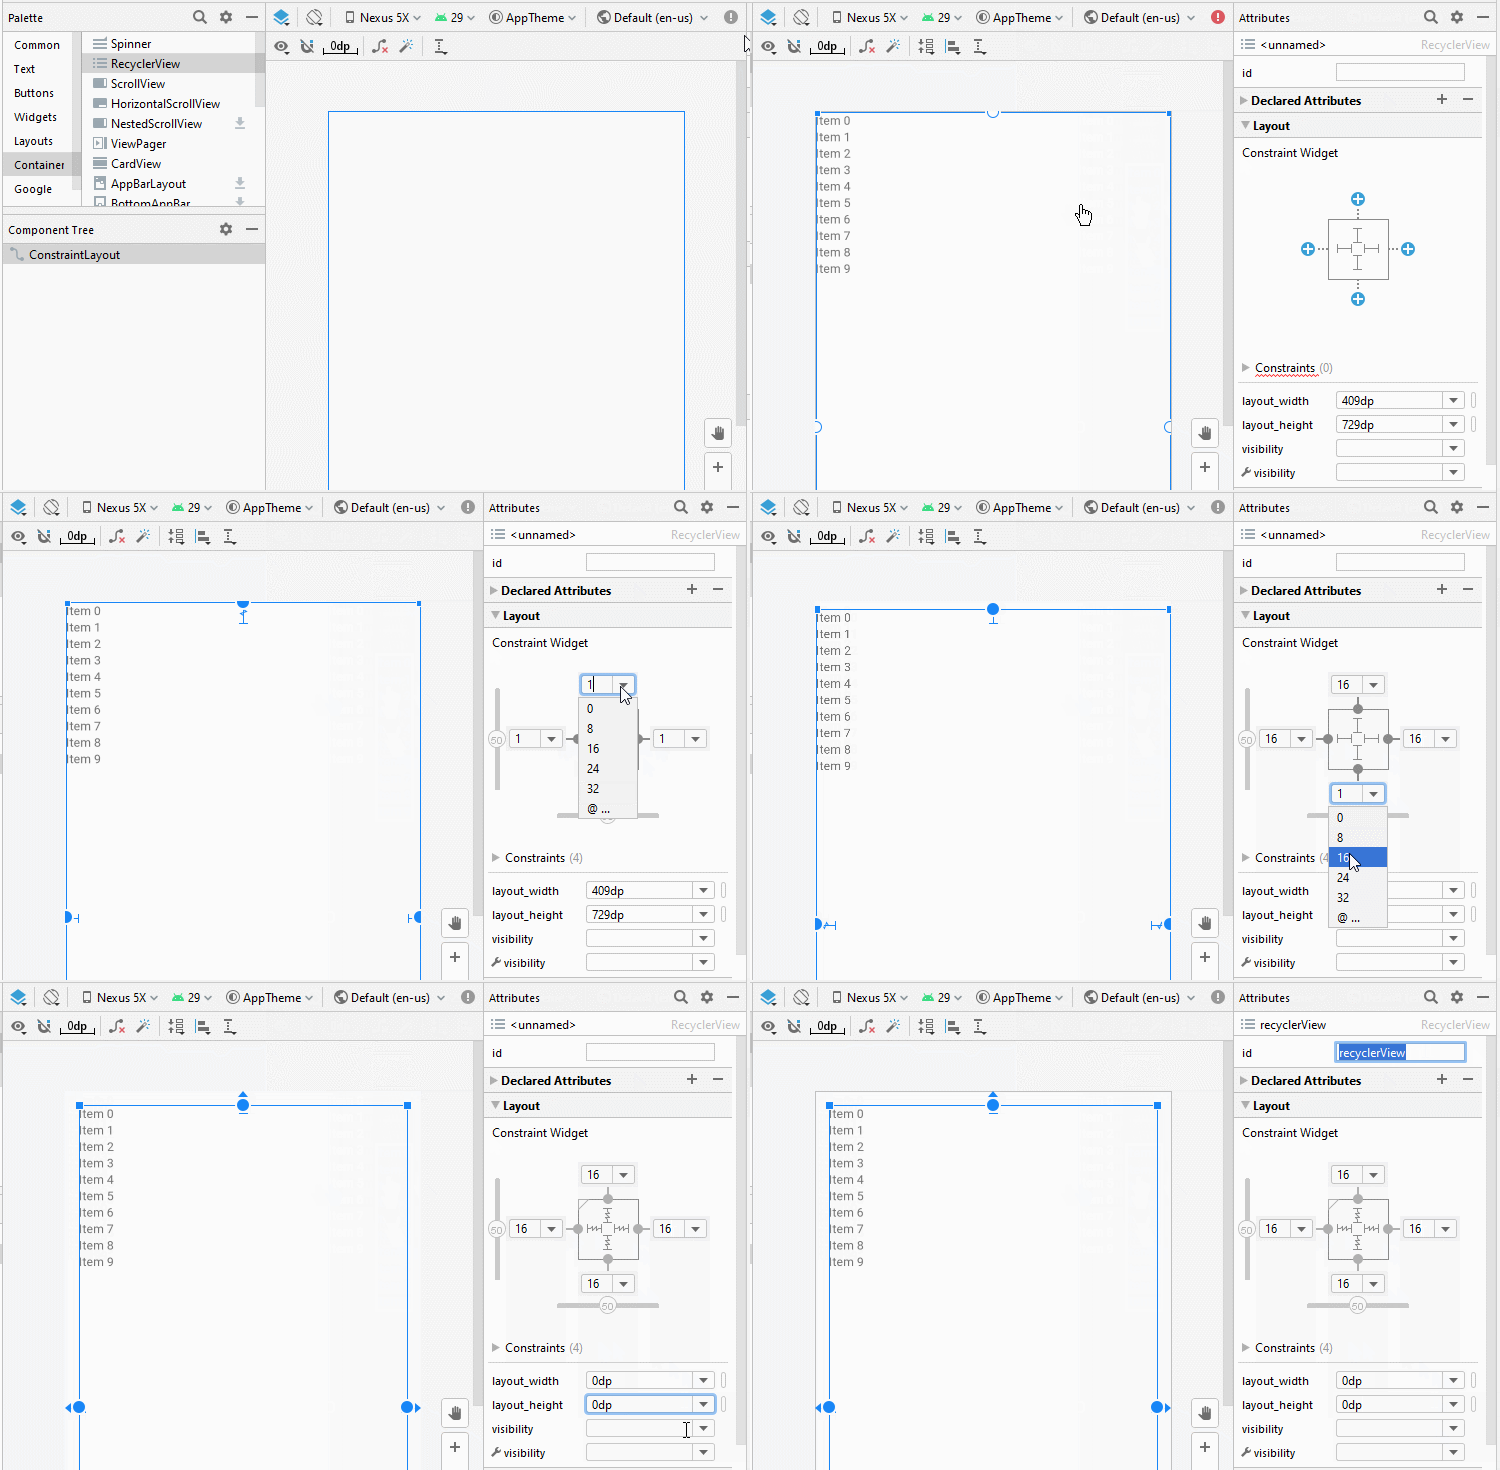
Conception d'interface pour activity_main.xml:
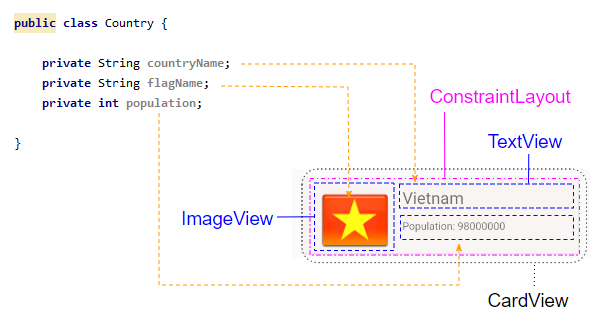
Country.java
package org.o7planning.cardviewexample;

public class Country {

    private String countryName;

    // Image name (Without extension)
    private String flagName;
    private int population;

    public Country(String countryName, String flagName, int population) {
        this.countryName= countryName;
        this.flagName= flagName;
        this.population= population;
    }

    public int getPopulation() {
        return population;
    }

    public void setPopulation(int population) {
        this.population = population;
    }

    public String getCountryName() {
        return countryName;
    }

    public void setCountryName(String countryName) {
        this.countryName = countryName;
    }

    public String getFlagName() {
        return flagName;
    }

    public void setFlagName(String flagName) {
        this.flagName = flagName;
    }

    @Override
    public String toString()  {
        return this.countryName+" (Population: "+ this.population+")";
    }
}
activity_main.xml
<?xml version="1.0" encoding="utf-8"?>
<androidx.constraintlayout.widget.ConstraintLayout
    xmlns:android="http://schemas.android.com/apk/res/android"
    xmlns:app="http://schemas.android.com/apk/res-auto"
    xmlns:tools="http://schemas.android.com/tools"
    android:layout_width="match_parent"
    android:layout_height="match_parent"
    tools:context=".MainActivity">

    <androidx.recyclerview.widget.RecyclerView
        android:id="@+id/recyclerView"
        android:layout_width="0dp"
        android:layout_height="0dp"
        android:layout_marginStart="16dp"
        android:layout_marginLeft="16dp"
        android:layout_marginTop="16dp"
        android:layout_marginEnd="16dp"
        android:layout_marginRight="16dp"
        android:layout_marginBottom="16dp"
        app:layout_constraintBottom_toBottomOf="parent"
        app:layout_constraintEnd_toEndOf="parent"
        app:layout_constraintStart_toStartOf="parent"
        app:layout_constraintTop_toTopOf="parent" />
</androidx.constraintlayout.widget.ConstraintLayout>
CustomRecyclerViewAdapter est une classe s'étendant de RecyclerView.Adapter, elle est responsable de l'affichage des données sur RecyclerView Item.
CustomRecyclerViewAdapter.java
package org.o7planning.cardviewexample;
import android.content.Context;
import android.util.Log;
import android.view.LayoutInflater;
import android.view.View;
import android.view.ViewGroup;
import android.widget.Toast;

import androidx.recyclerview.widget.RecyclerView;

import java.util.List;

public class CustomRecyclerViewAdapter extends RecyclerView.Adapter<CountryViewHolder> {


    private List<Country> countries;
    private Context context;
    private LayoutInflater mLayoutInflater;

    public CustomRecyclerViewAdapter(Context context, List<Country> datas ) {
        this.context = context;
        this.countries = datas;
        this.mLayoutInflater = LayoutInflater.from(context);
    }

    @Override
    public CountryViewHolder onCreateViewHolder(final ViewGroup parent, int viewType) {
        // Inflate view from recyclerview_item_layout.xml
        View recyclerViewItem = mLayoutInflater.inflate(R.layout.recyclerview_item_layout, parent, false);

        recyclerViewItem.setOnClickListener(new View.OnClickListener() {
            @Override
            public void onClick(View v) {
                handleRecyclerItemClick( (RecyclerView)parent, v);
            }
        });
        return new CountryViewHolder(recyclerViewItem);
    }


    @Override
    public void onBindViewHolder(CountryViewHolder holder, int position) {
        // Cet country in countries via position
        Country country = this.countries.get(position);

        int imageResId = this.getDrawableResIdByName(country.getFlagName());
        // Bind data to viewholder
        holder.flagView.setImageResource(imageResId);
        holder.countryNameView.setText(country.getCountryName() );
        holder.populationView.setText("Population: "+ country.getPopulation());
    }

    @Override
    public int getItemCount() {
        return this.countries.size();
    }

    // Find Image ID corresponding to the name of the image (in the directory drawable).
    public int getDrawableResIdByName(String resName)  {
        String pkgName = context.getPackageName();
        // Return 0 if not found.
        int resID = context.getResources().getIdentifier(resName , "drawable", pkgName);
        Log.i(MainActivity.LOG_TAG, "Res Name: "+ resName+"==> Res ID = "+ resID);
        return resID;
    }

    // Click on RecyclerView Item.
    private void handleRecyclerItemClick(RecyclerView recyclerView, View itemView) {
        int itemPosition = recyclerView.getChildLayoutPosition(itemView);
        Country country  = this.countries.get(itemPosition);

        Toast.makeText(this.context, country.getCountryName(), Toast.LENGTH_LONG).show();
    }
}
CountryViewHolder.java
package org.o7planning.cardviewexample;

import android.view.View;
import android.widget.ImageView;
import android.widget.TextView;

import androidx.annotation.NonNull;
import androidx.recyclerview.widget.RecyclerView;

public class CountryViewHolder extends   RecyclerView.ViewHolder {

    ImageView flagView;
    TextView countryNameView;
    TextView populationView;

    // @itemView: recyclerview_item_layout.xml
    public CountryViewHolder(@NonNull View itemView) {
        super(itemView);

        this.flagView = (ImageView) itemView.findViewById(R.id.imageView_flag);
        this.countryNameView = (TextView) itemView.findViewById(R.id.textView_countryName);
        this.populationView = (TextView) itemView.findViewById(R.id.textView_population);
    }
}
MainActivity.java
package org.o7planning.cardviewexample;

import android.os.Bundle;

import androidx.appcompat.app.AppCompatActivity;
import androidx.recyclerview.widget.LinearLayoutManager;
import androidx.recyclerview.widget.RecyclerView;

import java.util.ArrayList;
import java.util.List;

public class MainActivity extends AppCompatActivity {

    public static final String LOG_TAG = "AndroidExample";
    private RecyclerView recyclerView;

    @Override
    protected void onCreate(Bundle savedInstanceState) {
        super.onCreate(savedInstanceState);
        setContentView(R.layout.activity_main);


        List<Country> countries = getListData();
        this.recyclerView = (RecyclerView) this.findViewById(R.id.recyclerView);
        recyclerView.setAdapter(new CustomRecyclerViewAdapter(this, countries));

        // RecyclerView scroll vertical
        LinearLayoutManager linearLayoutManager = new LinearLayoutManager(this, LinearLayoutManager.VERTICAL, false);
        recyclerView.setLayoutManager(linearLayoutManager);
    }

    private  List<Country> getListData() {
        List<Country> list = new ArrayList<Country>();
        Country vietnam = new Country("Vietnam", "vn", 98000000);
        Country usa = new Country("United States", "us", 320000000);
        Country russia = new Country("Russia", "ru", 142000000);
        Country autraylia = new Country("Autraylia", "au", 25000000);
        Country japan = new Country("Japan", "jp", 126000000);

        list.add(vietnam);
        list.add(usa);
        list.add(russia);
        list.add(autraylia);
        list.add(japan);

        return list;
    }


}
Tutoriels de programmation Android
- Configurer Android Emulator en Android Studio
- Le Tutoriel de Android ToggleButton
- Créer un File Finder Dialog simple dans Android
- Le Tutoriel de Android TimePickerDialog
- Le Tutoriel de Android DatePickerDialog
- De quoi avez-vous besoin pour démarrer avec Android?
- Installer Android Studio sur Windows
- Installer Intel® HAXM pour Android Studio
- Le Tutoriel de Android AsyncTask
- Le Tutoriel de Android AsyncTaskLoader
- Tutoriel Android pour débutant - Exemples de base
- Comment connaître le numéro de téléphone d'Android Emulator et le changer?
- Le Tutoriel de Android TextInputLayout
- Le Tutoriel de Android CardView
- Le Tutoriel de Android ViewPager2
- Obtenir un numéro de téléphone dans Android à l'aide de TelephonyManager
- Le Tutoriel de Android Phone Call
- Le Tutoriel de Android Wifi Scanning
- Le Tutoriel de programmation de jeux Android 2D pour débutant
- Le Tutoriel de Android DialogFragment
- Le Tutoriel de Android CharacterPickerDialog
- Le Tutoriel Android pour débutant - Hello Android
- Utiliser Android Device File Explorer
- Activer USB Debugging sur un appareil Android
- Le Tutoriel de Android UI Layouts
- Le Tutoriel de Android SMS
- Le Tutoriel de Android et SQLite Database
- Le Tutoriel de Google Maps Android API
- Le Tutoriel de texte pour parler dans Android
- Le Tutoriel de Android Space
- Le Tutoriel de Android Toast
- Créer un Android Toast personnalisé
- Le Tutoriel de Android SnackBar
- Le Tutoriel de Android TextView
- Le Tutoriel de Android TextClock
- Le Tutoriel de Android EditText
- Le Tutoriel de Android TextWatcher
- Formater le numéro de carte de crédit avec Android TextWatcher
- Le Tutoriel de Android Clipboard
- Créer un File Chooser simple dans Android
- Le Tutoriel de Android AutoCompleteTextView et MultiAutoCompleteTextView
- Le Tutoriel de Android ImageView
- Le Tutoriel de Android ImageSwitcher
- Le Tutoriel de Android ScrollView et HorizontalScrollView
- Le Tutoriel de Android WebView
- Le Tutoriel de Android SeekBar
- Le Tutoriel de Android Dialog
- Le Tutoriel de Android AlertDialog
- Tutoriel Android RatingBar
- Le Tutoriel de Android ProgressBar
- Le Tutoriel de Android Spinner
- Le Tutoriel de Android Button
- Le Tutoriel de Android Switch
- Le Tutoriel de Android ImageButton
- Le Tutoriel de Android FloatingActionButton
- Le Tutoriel de Android CheckBox
- Le Tutoriel de Android RadioGroup et RadioButton
- Le Tutoriel de Android Chip et ChipGroup
- Utilisation des Image assets et des Icon assets d'Android Studio
- Configuration de la Carte SD pour Android Emulator
- Exemple ChipGroup et Chip Entry
- Comment ajouter des bibliothèques externes à Android Project dans Android Studio?
- Comment désactiver les autorisations déjà accordées à l'application Android?
- Comment supprimer des applications de Android Emulator?
- Le Tutoriel de Android LinearLayout
- Le Tutoriel de Android TableLayout
- Le Tutoriel de Android FrameLayout
- Le Tutoriel de Android QuickContactBadge
- Le Tutoriel de Android StackView
- Le Tutoriel de Android Camera
- Le Tutoriel de Android MediaPlayer
- Le Tutoriel de Android VideoView
- Jouer des effets sonores dans Android avec SoundPool
- Le Tutoriel de Android Networking
- Analyser JSON dans Android
- Le Tutoriel de Android SharedPreferences
- Le Tutorial de stockage interne Android (Internal Storage)
- Le Tutoriel de Android External Storage
- Le Tutoriel de Android Intents
- Exemple d'une Android Intent explicite, appelant une autre Intent
- Exemple de Android Intent implicite, ouvrez une URL, envoyez un email
- Le Tutoriel de Android Service
- Le Tutoriel Android Notifications
- Le Tutoriel de Android DatePicker
- Le Tutoriel de Android TimePicker
- Le Tutoriel de Android Chronometer
- Le Tutoriel de Android OptionMenu
- Le Tutoriel de Android ContextMenu
- Le Tutoriel de Android PopupMenu
- Le Tutoriel de Android Fragment
- Le Tutoriel de Android ListView
- Android ListView avec Checkbox en utilisant ArrayAdapter
- Le Tutoriel de Android GridView
Show More