Le Tutoriel de Android Spinner
1. Android Spinner
Sous Android, Spinner est un ViewGroup permettant à l'utilisateur de sélectionner une valeur dans une liste de valeurs. Par défaut, Android Spinner fonctionne comme un Dropdown List (Menu déroulant) ou Combox dans les autres languages de programmation.
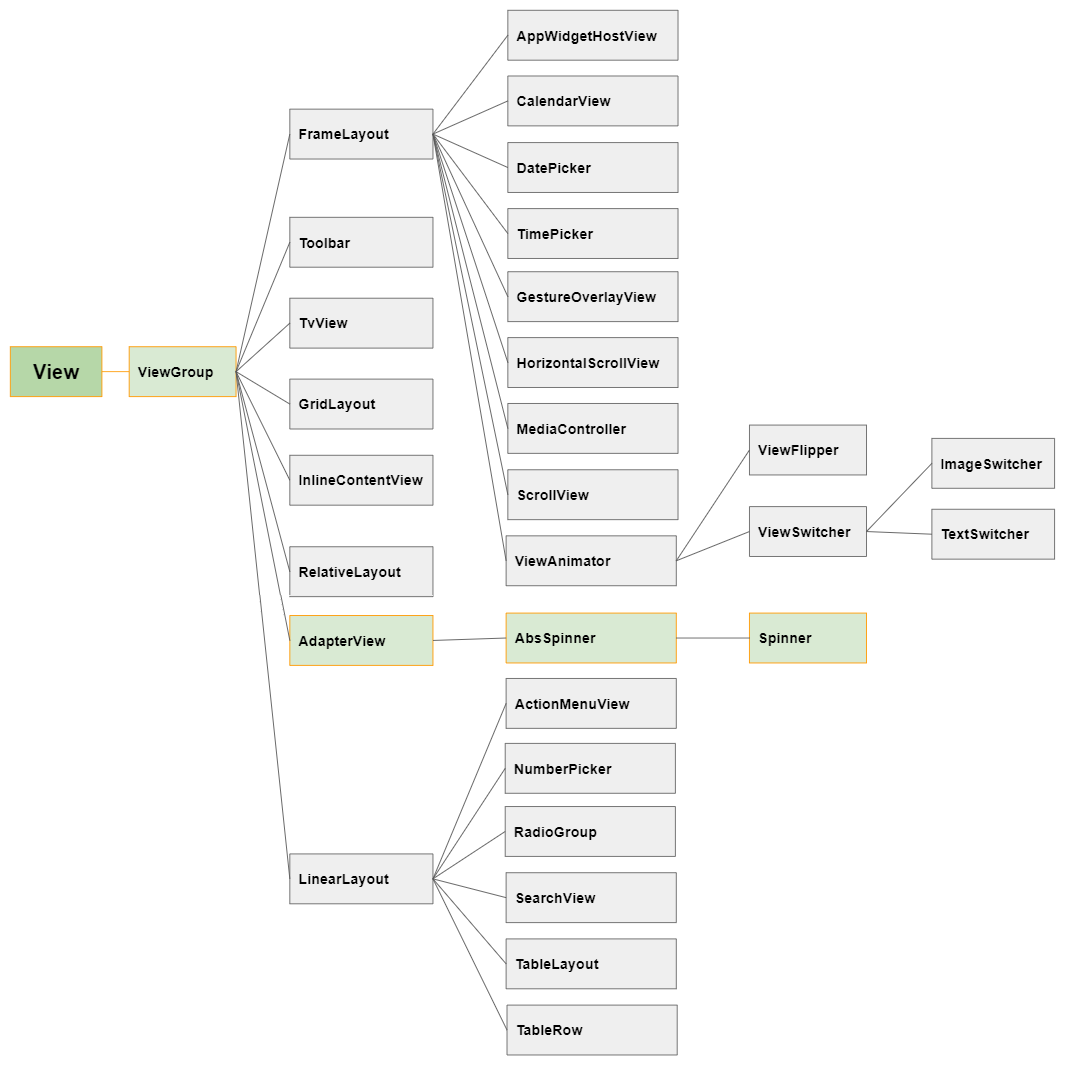
Quand l'utilisateur clique sur Android Spinner, une liste contenant des valeurs est déroulée et l'utilisateur peut en choisir une.
Android Spinner a 2 modes (modes) avec des interfaces complètement différents:
- android:spinnerMode="dropdown"
- android:spinnerMode="dialog"
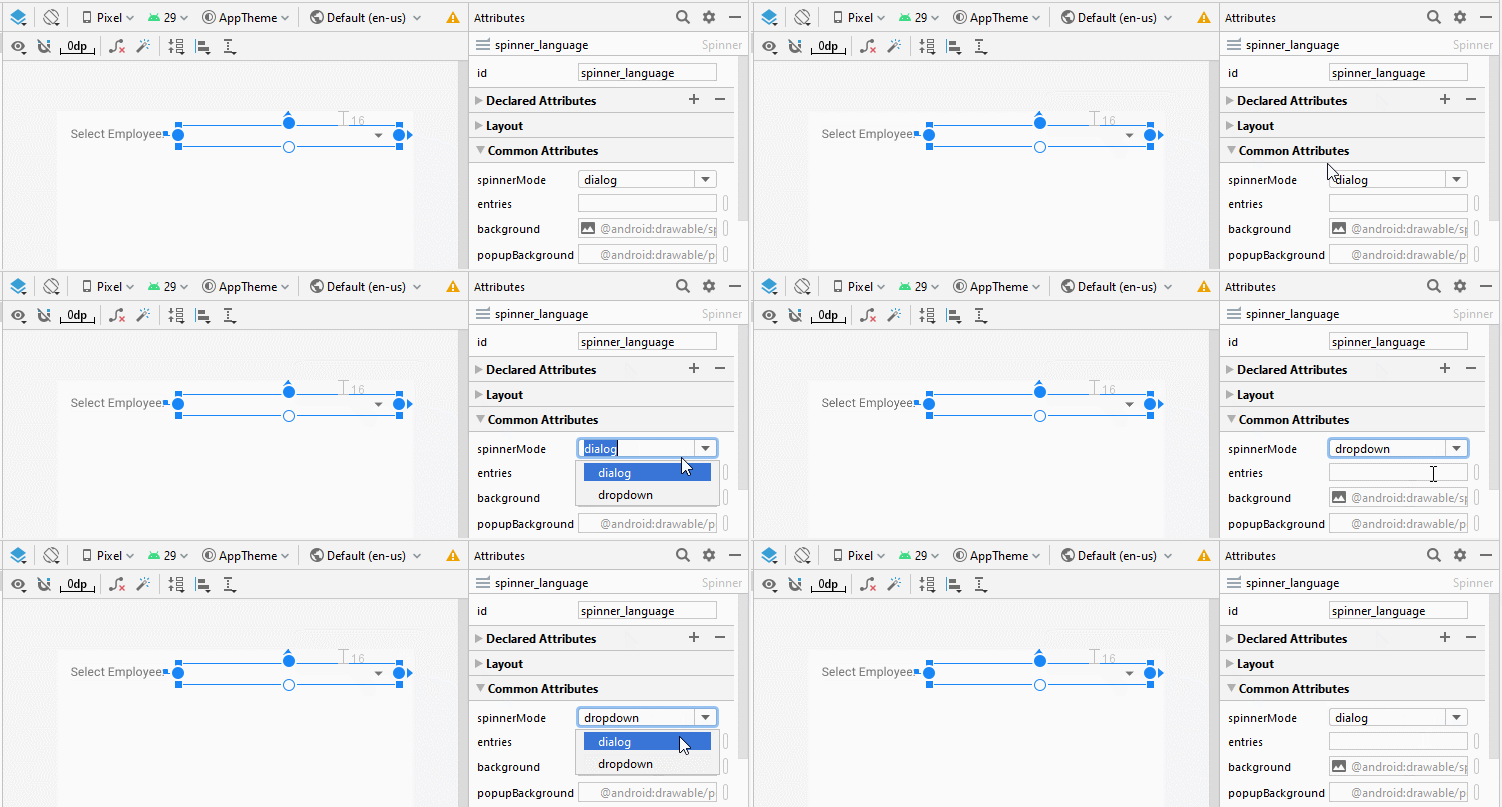
android:spinnerMode="dropdown"
Quand l'utilisateur clique (click) sur Spinner, un Dropdown List (Menu déroulant) est affiché et permet à l'utilisateur de choisir une valeur. C'est le mode par défaut de Spinner.
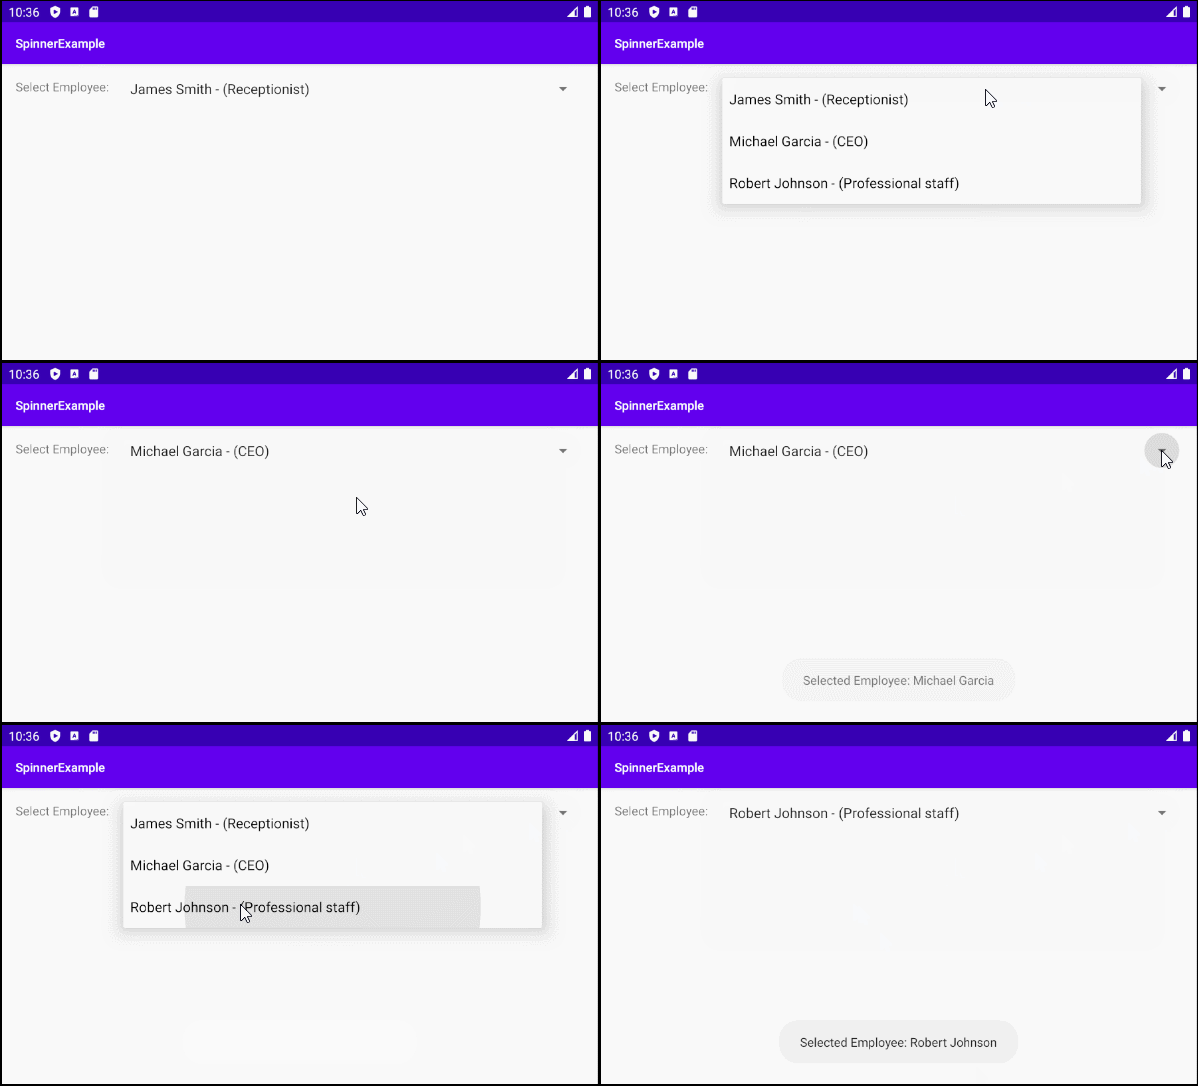
android:spinnerMode="dropdown"
android:spinnerMode="dialog"
Quand l'utilisateur clique (click) sur Spinner, un Dialog contenant une liste des valeurs est affiché et permet à l'utilisateur de choisir une valeur.
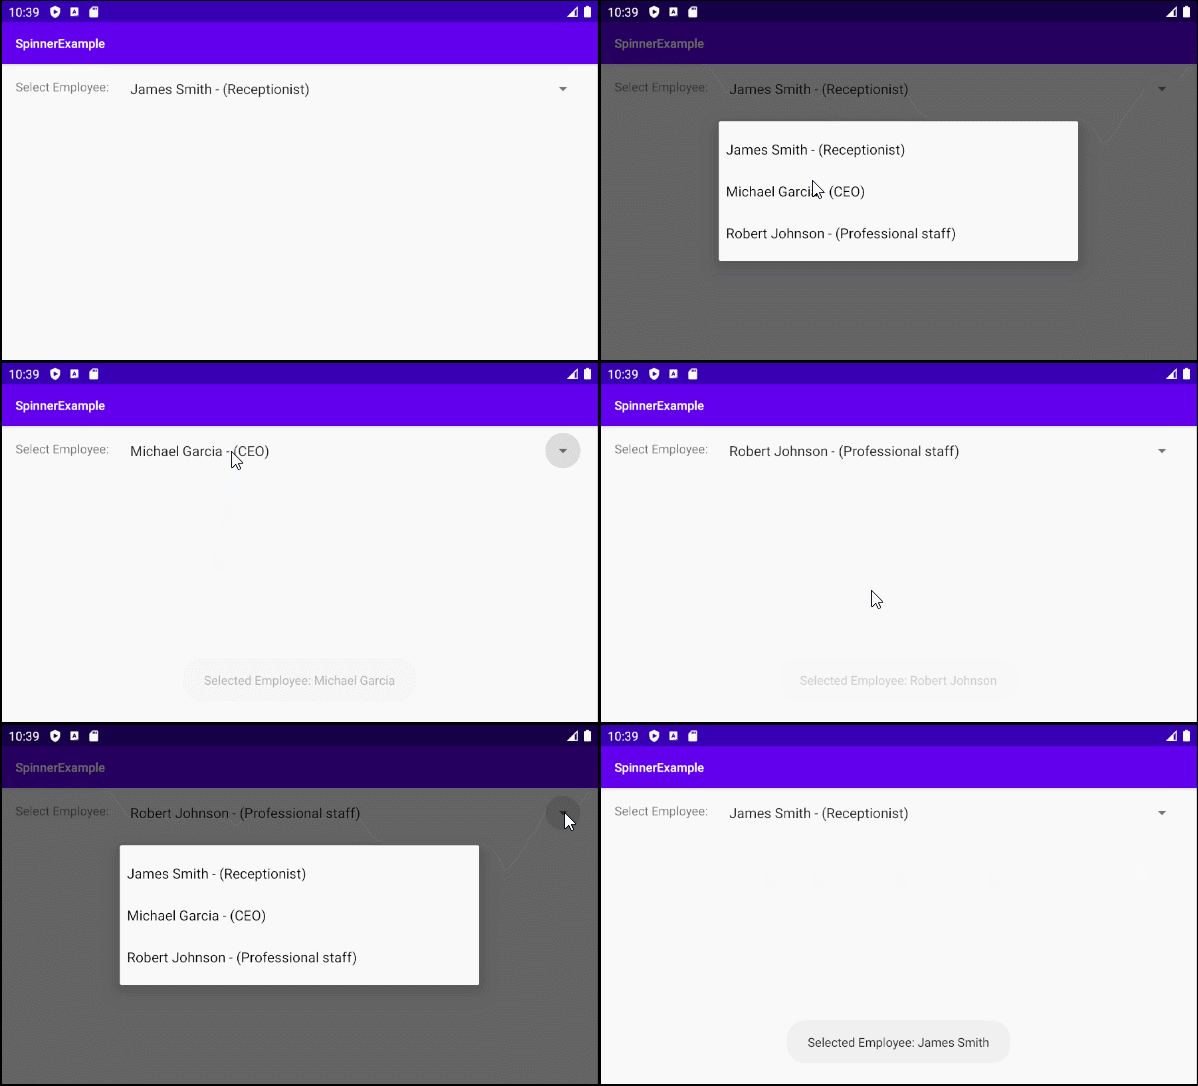
android:spinnerMode="dialog"
2. Exemple de Spinner + ArrayAdapter
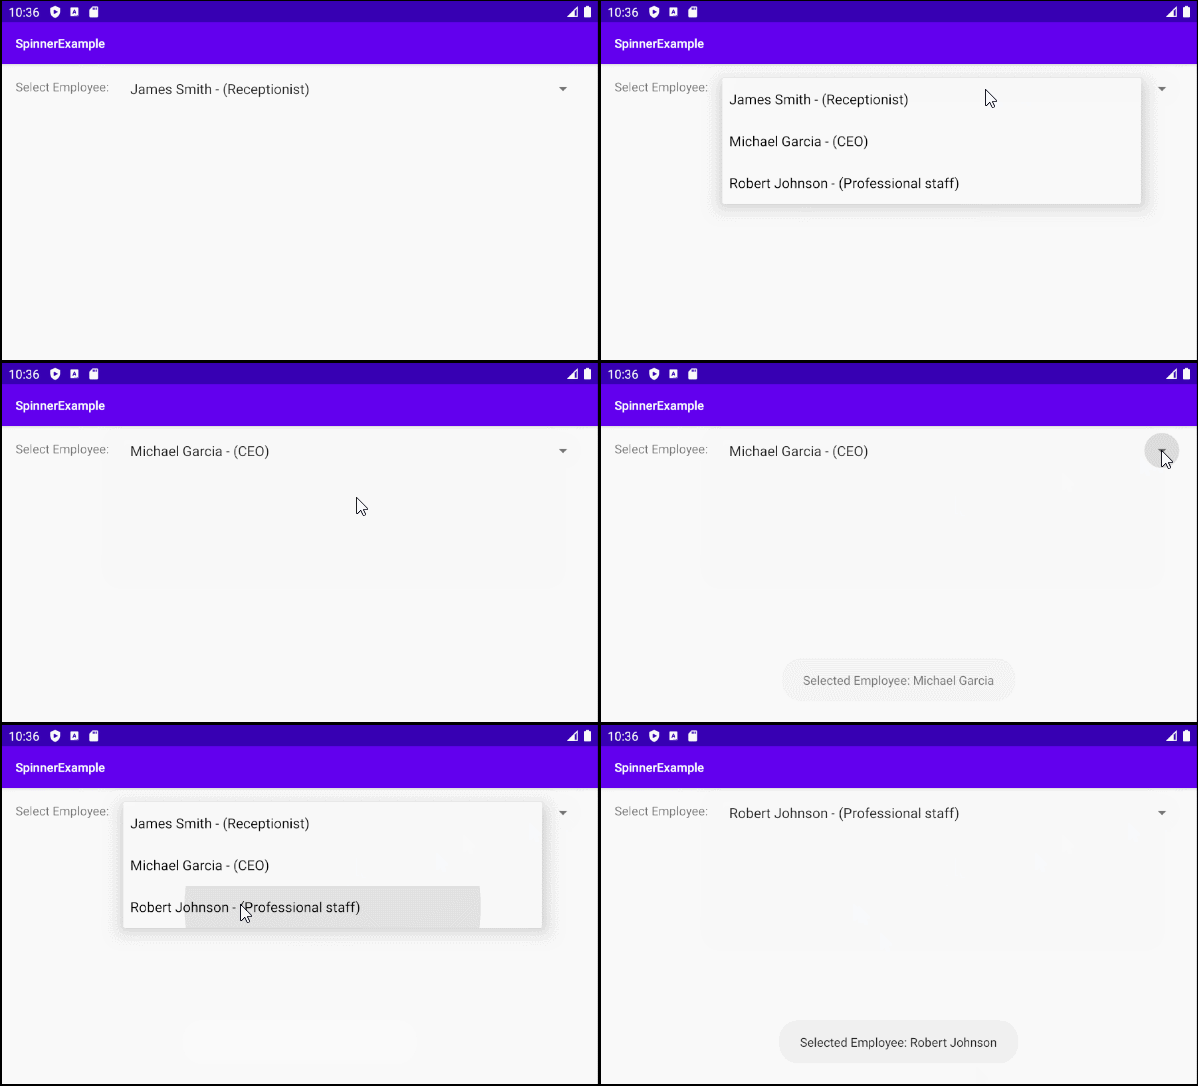
OK, on commence par un simple exemple en utilisant Spinner et ArrayAdapter. Dans cet exemple, Spinner contient une liste d'objets Employee:
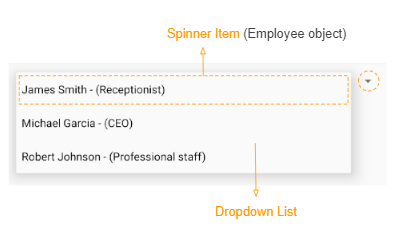
Un Adapter combine un Spinner-Item Layout Resource et les données pour créer un Spinner.
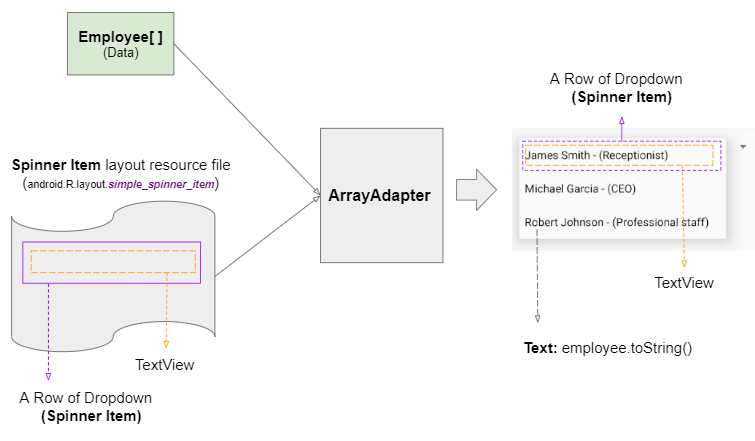
ArrayAdapter est une classe disponible dans la bibliothèque d'Android. C'est un Adapter simple qui accepte un Spinner-Item Layout Resource simple incluant un TextView, et probablement un CheckBox, ImageView, etc.
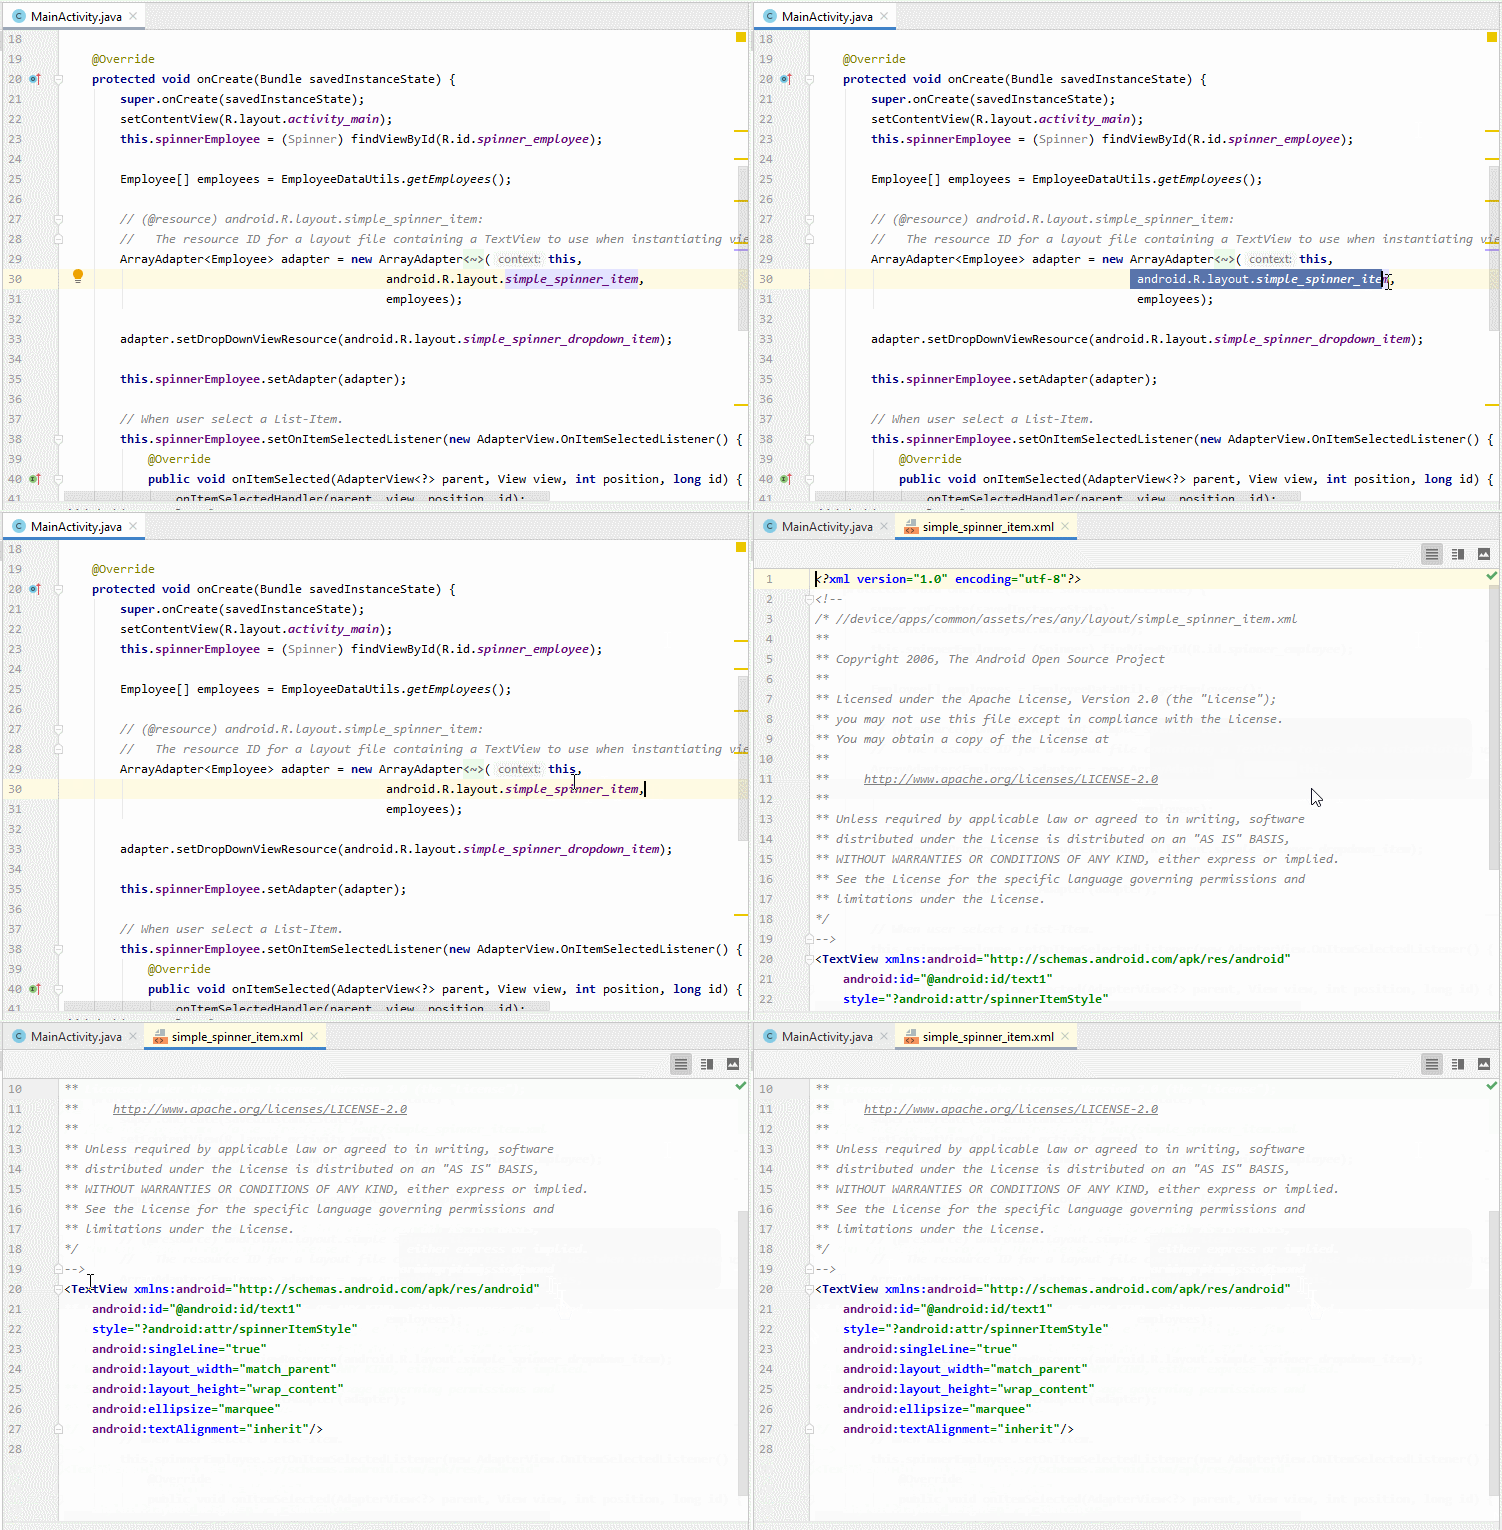
Exemple: Un Spinner-Item Layout Resource simple dont l'ID est android.R.layout.simple_spinner_item est défini dans Android SDK et vous pouvez l'utiliser. Android Studio permet d'afficher le contenu de ces fichiers. Il suffit d'appuyer longuement sur le bouton CONTROL et de cliquer dessus, comme l'illustration ci-dessous:
Dans Android Studio, créer un nouveau projet:
- File > New > New Project > Empty Activity
- Name: SpinnerExample
- Package name: org.o7planning.spinnerexample
- Language: Java
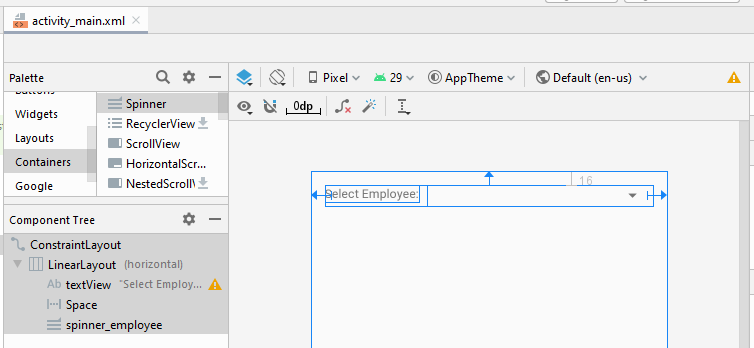
activity_main.xml
<?xml version="1.0" encoding="utf-8"?>
<androidx.constraintlayout.widget.ConstraintLayout
    xmlns:android="http://schemas.android.com/apk/res/android"
    xmlns:app="http://schemas.android.com/apk/res-auto"
    xmlns:tools="http://schemas.android.com/tools"
    android:layout_width="match_parent"
    android:layout_height="match_parent"
    tools:context=".MainActivity">

    <LinearLayout
        android:layout_width="0dp"
        android:layout_height="wrap_content"
        android:layout_marginStart="16dp"
        android:layout_marginLeft="16dp"
        android:layout_marginTop="16dp"
        android:layout_marginEnd="16dp"
        android:layout_marginRight="16dp"
        android:orientation="horizontal"
        app:layout_constraintEnd_toEndOf="parent"
        app:layout_constraintStart_toStartOf="parent"
        app:layout_constraintTop_toTopOf="parent">

        <TextView
            android:id="@+id/textView"
            android:layout_width="wrap_content"
            android:layout_height="wrap_content"
            android:layout_weight="0"
            android:text="Select Employee:" />

        <Space
            android:layout_width="10dp"
            android:layout_height="wrap_content"
            android:layout_weight="0" />

        <Spinner
            android:id="@+id/spinner_employee"
            android:layout_width="wrap_content"
            android:layout_height="wrap_content"
            android:layout_weight="1" />
    </LinearLayout>

</androidx.constraintlayout.widget.ConstraintLayout>
MainActivity.java
package org.o7planning.spinnerexample;

import android.os.Bundle;
import android.view.View;
import android.widget.Adapter;
import android.widget.AdapterView;
import android.widget.ArrayAdapter;
import android.widget.Spinner;
import android.widget.Toast;

import androidx.appcompat.app.AppCompatActivity;

public class MainActivity extends AppCompatActivity {

    private Spinner spinnerEmployee;

    @Override
    protected void onCreate(Bundle savedInstanceState) {
        super.onCreate(savedInstanceState);
        setContentView(R.layout.activity_main);
        this.spinnerEmployee = (Spinner) findViewById(R.id.spinner_employee);

        Employee[] employees = EmployeeDataUtils.getEmployees();

        // (@resource) android.R.layout.simple_spinner_item:
        //   The resource ID for a layout file containing a TextView to use when instantiating views.
        //    (Layout for one ROW of Spinner)
        ArrayAdapter<Employee> adapter = new ArrayAdapter<Employee>(this,
                                              android.R.layout.simple_spinner_item,
                                              employees);

        // Layout for All ROWs of Spinner.  (Optional for ArrayAdapter).
        adapter.setDropDownViewResource(android.R.layout.simple_spinner_dropdown_item);

        this.spinnerEmployee.setAdapter(adapter);

        // When user select a List-Item.
        this.spinnerEmployee.setOnItemSelectedListener(new AdapterView.OnItemSelectedListener() {

            @Override
            public void onItemSelected(AdapterView<?> parent, View view, int position, long id) {
                onItemSelectedHandler(parent, view, position, id);
            }

            @Override
            public void onNothingSelected(AdapterView<?> parent) {

            }
        });
    }


    private void onItemSelectedHandler(AdapterView<?> adapterView, View view, int position, long id) {
        Adapter adapter = adapterView.getAdapter();
        Employee employee = (Employee) adapter.getItem(position);

        Toast.makeText(getApplicationContext(), "Selected Employee: " + employee.getFullName() ,Toast.LENGTH_SHORT).show();
    }

}
Employee.java
package org.o7planning.spinnerexample;

public class Employee {

    private String firstName;
    private String lastName;
    private String position;
    private int salary;

    public Employee(String firstName, String lastName, String position, int salary) {
        this.firstName = firstName;
        this.lastName = lastName;
        this.position = position;
        this.salary = salary;
    }

    public String getFirstName() {
        return firstName;
    }

    public void setFirstName(String firstName) {
        this.firstName = firstName;
    }

    public String getLastName() {
        return lastName;
    }

    public void setLastName(String lastName) {
        this.lastName = lastName;
    }

    public String getPosition() {
        return position;
    }

    public void setPosition(String position) {
        this.position = position;
    }

    public int getSalary() {
        return salary;
    }

    public void setSalary(int salary) {
        this.salary = salary;
    }

    public String getFullName()  {
        return this.firstName + " " + this.lastName;
    }

    // Text show in Spinner
    @Override
    public String toString()  {
        return this.getFullName() + " - (" + this.position+")";
    }
}
EmployeeDataUtils.java
package org.o7planning.spinnerexample;

public class EmployeeDataUtils {

    public static Employee[] getEmployees()  {
        Employee emp1 = new Employee("James", "Smith", "Receptionist", 1000);
        Employee emp2 = new Employee("Michael", "Garcia", "CEO", 50000);
        Employee emp3 = new Employee("Robert", "Johnson", "Professional staff", 2000);

        return new Employee[] {emp1, emp2, emp3};
    }
}
3. Exemple: Spinner + CustomAdapter
Adapter personnalisé vous permet d'obtenir un Spinner plus complexe et plus beau. Ci-dessous une illustration d'un Spinner contenant une liste d'objets Language. C'est également notre prochain exemple:
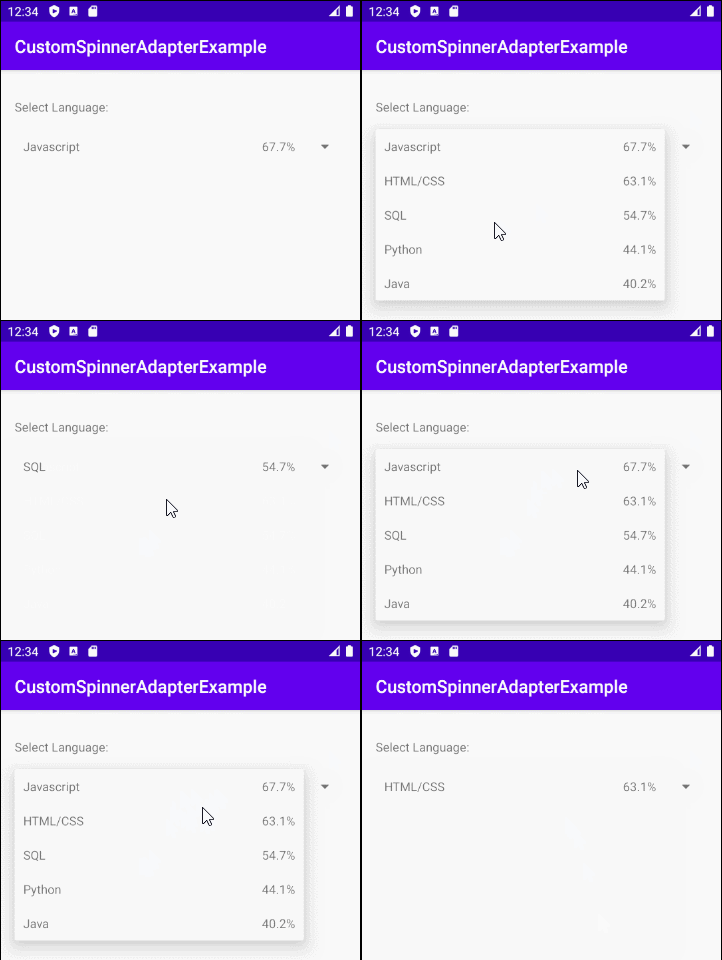
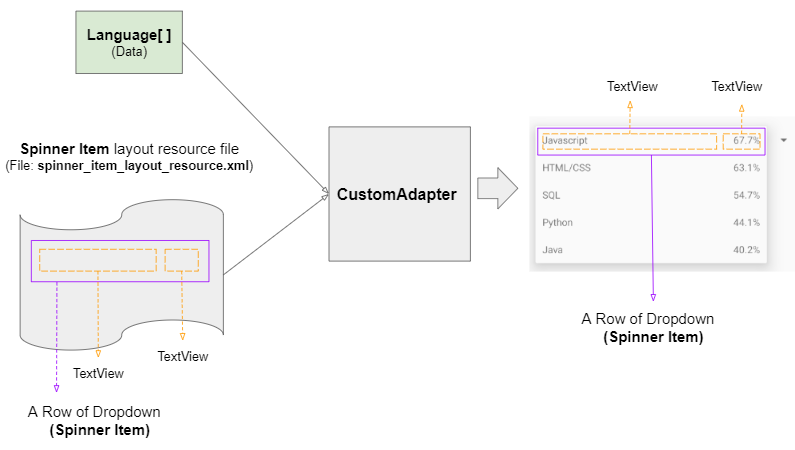
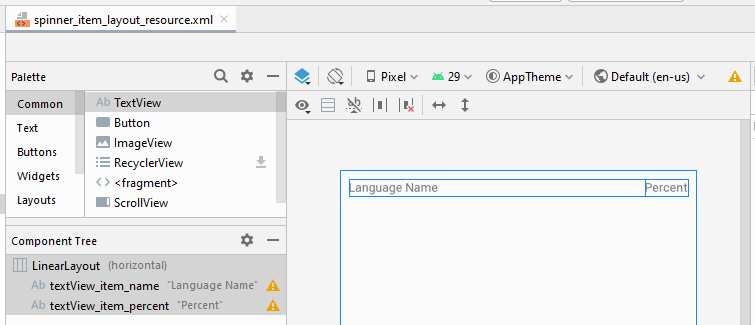
Dans cet exemple, on crée un "Spinner Item Layout Resource File" pour définir Layout d'une ligne (row) de Spinner. CustomAdapter combine les données et "Spinner Item Layout Resource" pour créer un Spinner que l'utilisateur peut voir.
OK. Dans Android Studio, créer un nouveau projet:
- File > New > New Project > Empty Activity
- Name: CustomSpinnerAdapterExample
- Package name: org.o7planning.customspinneradapterexample
- Language: Java
D'abord, il faut créer un Layout Resource File afin de définir Layout pour Spinner Item:
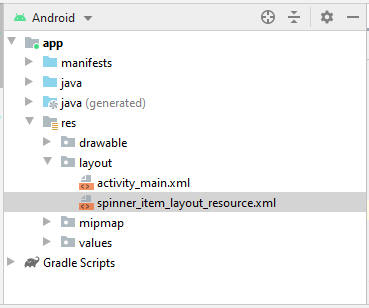
Ensuite, dans Android Studio, choisir le dossier "layout", et sélectionner:
- File > New > Layout Resource File
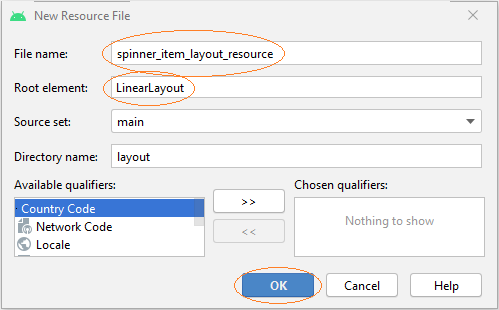
- File Name: spinner_item_layout_resource.xml
- Root element: LinearLayout
Concevoir l'interface pour spinner_item_layout_resource:
spinner_item_layout_resource.xml
<?xml version="1.0" encoding="utf-8"?>
<LinearLayout xmlns:android="http://schemas.android.com/apk/res/android"
    xmlns:app="http://schemas.android.com/apk/res-auto"
    android:layout_width="match_parent"
    android:layout_height="match_parent"
    android:orientation="horizontal"
    android:padding="10dp">

    <TextView
        android:id="@+id/textView_item_name"
        android:layout_width="wrap_content"
        android:layout_height="wrap_content"
        android:layout_weight="1"
        android:text="Language Name" />

    <TextView
        android:id="@+id/textView_item_percent"
        android:layout_width="wrap_content"
        android:layout_height="wrap_content"
        android:layout_weight="0"
        android:text="Percent" />
</LinearLayout>
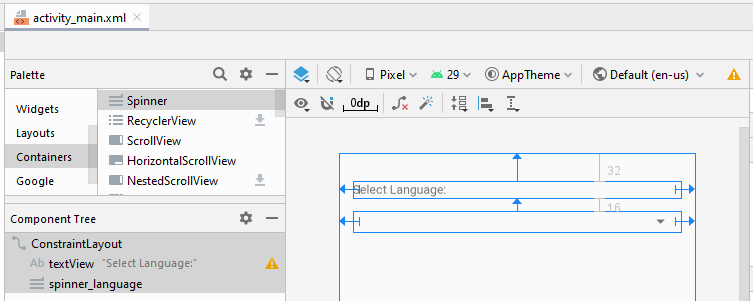
Enfin, voici l'interface de l'application:
activity_main.xml
<?xml version="1.0" encoding="utf-8"?>
<androidx.constraintlayout.widget.ConstraintLayout
    xmlns:android="http://schemas.android.com/apk/res/android"
    xmlns:app="http://schemas.android.com/apk/res-auto"
    xmlns:tools="http://schemas.android.com/tools"
    android:layout_width="match_parent"
    android:layout_height="match_parent"
    tools:context=".MainActivity">

    <TextView
        android:id="@+id/textView"
        android:layout_width="0dp"
        android:layout_height="wrap_content"
        android:layout_marginStart="16dp"
        android:layout_marginLeft="16dp"
        android:layout_marginTop="32dp"
        android:layout_marginEnd="16dp"
        android:layout_marginRight="16dp"
        android:text="Select Language:"
        app:layout_constraintEnd_toEndOf="parent"
        app:layout_constraintHorizontal_bias="1.0"
        app:layout_constraintStart_toStartOf="parent"
        app:layout_constraintTop_toTopOf="parent" />

    <Spinner
        android:id="@+id/spinner_language"
        android:layout_width="wrap_content"
        android:layout_height="wrap_content"
        android:layout_marginStart="16dp"
        android:layout_marginLeft="16dp"
        android:layout_marginTop="16dp"
        android:spinnerMode="dialog"
        app:layout_constraintStart_toStartOf="parent"
        app:layout_constraintTop_toBottomOf="@+id/textView" />

</androidx.constraintlayout.widget.ConstraintLayout>
MainActivity.java
package org.o7planning.customspinneradapterexample;

import androidx.appcompat.app.AppCompatActivity;

import android.os.Bundle;
import android.widget.Spinner;

import java.util.List;

public class MainActivity extends AppCompatActivity {

    private Spinner spinner;
    private List<Language> languages;

    @Override
    protected void onCreate(Bundle savedInstanceState) {
        super.onCreate(savedInstanceState);
        setContentView(R.layout.activity_main);

        // Data:
        this.languages = LanguageDataUtils.getLanguages();


        this.spinner = (Spinner) this.findViewById(R.id.spinner_language);

        // Adapter"
        CustomAdapter adapter = new CustomAdapter(MainActivity.this,
                R.layout.spinner_item_layout_resource,
                R.id.textView_item_name,
                R.id.textView_item_percent,
                this.languages);

        this.spinner.setAdapter(adapter);
    }

}
CustomAdapter.java
package org.o7planning.customspinneradapterexample;

import android.app.Activity;
import android.view.View;
import android.view.ViewGroup;
import android.view.LayoutInflater;
import android.widget.BaseAdapter;
import android.widget.TextView;

import java.util.List;

public class CustomAdapter extends BaseAdapter  {

    private LayoutInflater flater;
    private List<Language> list;
    private int listItemLayoutResource;
    private int textViewItemNameId;
    private int textViewItemPercentId;


    // Arguments example:
    //  @listItemLayoutResource: R.layout.spinner_item_layout_resource
    //        (File: layout/spinner_item_layout_resource.xmll)
    //  @textViewItemNameId: R.id.textView_item_name
    //        (A TextVew in file layout/spinner_item_layout_resource.xmlxml)
    //  @textViewItemPercentId: R.id.textView_item_percent
    //        (A TextVew in file layout/spinner_item_layout_resource.xmll)
    public CustomAdapter(Activity context, int listItemLayoutResource,
                         int textViewItemNameId, int textViewItemPercentId,
                         List<Language> list) {
        this.listItemLayoutResource = listItemLayoutResource;

        this.textViewItemNameId = textViewItemNameId;
        this.textViewItemPercentId = textViewItemPercentId;
        this.list = list;
        this.flater = context.getLayoutInflater();
    }

    @Override
    public int getCount() {
        if(this.list == null)  {
            return 0;
        }
        return this.list.size();
    }

    @Override
    public Object getItem(int position) {
        return this.list.get(position);
    }

    @Override
    public long getItemId(int position) {
        Language language = (Language) this.getItem(position);
        return language.getId();
        // return position; (Return position if you need).
    }

    @Override
    public View getView(int position, View convertView, ViewGroup parent) {

        Language language = (Language) getItem(position);

        // Example: @listItemLayoutResource: R.layout.spinner_item_layout_resource
        // (File: layout/spinner_item_layout_resourcerce.xml)
        View rowView = this.flater.inflate(this.listItemLayoutResource, null,true);

        // Example: @textViewItemNameId: R.id.textView_item_name
        // (A TextView in file layout/spinner_item_layout_resourcerce.xml)
        TextView textViewItemName = (TextView) rowView.findViewById(this.textViewItemNameId);
        textViewItemName.setText(language.getName());

        // Example: @textViewItemPercentId: R.id.textView_item_percent
        // (A TextView in file layout/spinner_item_layout_resource.xmlxml)
        TextView textViewItemPercent = (TextView) rowView.findViewById(textViewItemPercentId);
        textViewItemPercent.setText(language.getPercent() + "%");

        return rowView;
    }
}
Language.java
package org.o7planning.customspinneradapterexample;

public class Language {

    private long id;
    private String name;
    private float percent;

    public Language(long id, String name, float percent) {
        this.id = id;
        this.name = name;
        this.percent = percent;
    }

    public long getId() {
        return id;
    }

    public void setId(long id) {
        this.id = id;
    }

    public String getName() {
        return name;
    }

    public void setName(String name) {
        this.name = name;
    }

    public float getPercent() {
        return percent;
    }

    public void setPercent(float percent) {
        this.percent = percent;
    }
}
LanguageDataUtils.java
package org.o7planning.customspinneradapterexample;

import java.util.ArrayList;
import java.util.List;

public class LanguageDataUtils {

    public static List<Language> getLanguages( ) {
        Language javascript = new Language(1,"Javascript", 67.7f);
        Language htmlCss = new Language(2,"HTML/CSS", 63.1f);
        Language sql = new Language(3,"SQL", 54.7f);
        Language python = new Language(4,"Python", 44.1f);
        Language java = new Language(5, "Java", 40.2f);

        List<Language> list = new ArrayList<Language>();
        list.add(javascript);
        list.add(htmlCss);
        list.add(sql);
        list.add(python);
        list.add(java);

        return list;
    }
}
Tutoriels de programmation Android
- Configurer Android Emulator en Android Studio
- Le Tutoriel de Android ToggleButton
- Créer un File Finder Dialog simple dans Android
- Le Tutoriel de Android TimePickerDialog
- Le Tutoriel de Android DatePickerDialog
- De quoi avez-vous besoin pour démarrer avec Android?
- Installer Android Studio sur Windows
- Installer Intel® HAXM pour Android Studio
- Le Tutoriel de Android AsyncTask
- Le Tutoriel de Android AsyncTaskLoader
- Tutoriel Android pour débutant - Exemples de base
- Comment connaître le numéro de téléphone d'Android Emulator et le changer?
- Le Tutoriel de Android TextInputLayout
- Le Tutoriel de Android CardView
- Le Tutoriel de Android ViewPager2
- Obtenir un numéro de téléphone dans Android à l'aide de TelephonyManager
- Le Tutoriel de Android Phone Call
- Le Tutoriel de Android Wifi Scanning
- Le Tutoriel de programmation de jeux Android 2D pour débutant
- Le Tutoriel de Android DialogFragment
- Le Tutoriel de Android CharacterPickerDialog
- Le Tutoriel Android pour débutant - Hello Android
- Utiliser Android Device File Explorer
- Activer USB Debugging sur un appareil Android
- Le Tutoriel de Android UI Layouts
- Le Tutoriel de Android SMS
- Le Tutoriel de Android et SQLite Database
- Le Tutoriel de Google Maps Android API
- Le Tutoriel de texte pour parler dans Android
- Le Tutoriel de Android Space
- Le Tutoriel de Android Toast
- Créer un Android Toast personnalisé
- Le Tutoriel de Android SnackBar
- Le Tutoriel de Android TextView
- Le Tutoriel de Android TextClock
- Le Tutoriel de Android EditText
- Le Tutoriel de Android TextWatcher
- Formater le numéro de carte de crédit avec Android TextWatcher
- Le Tutoriel de Android Clipboard
- Créer un File Chooser simple dans Android
- Le Tutoriel de Android AutoCompleteTextView et MultiAutoCompleteTextView
- Le Tutoriel de Android ImageView
- Le Tutoriel de Android ImageSwitcher
- Le Tutoriel de Android ScrollView et HorizontalScrollView
- Le Tutoriel de Android WebView
- Le Tutoriel de Android SeekBar
- Le Tutoriel de Android Dialog
- Le Tutoriel de Android AlertDialog
- Tutoriel Android RatingBar
- Le Tutoriel de Android ProgressBar
- Le Tutoriel de Android Spinner
- Le Tutoriel de Android Button
- Le Tutoriel de Android Switch
- Le Tutoriel de Android ImageButton
- Le Tutoriel de Android FloatingActionButton
- Le Tutoriel de Android CheckBox
- Le Tutoriel de Android RadioGroup et RadioButton
- Le Tutoriel de Android Chip et ChipGroup
- Utilisation des Image assets et des Icon assets d'Android Studio
- Configuration de la Carte SD pour Android Emulator
- Exemple ChipGroup et Chip Entry
- Comment ajouter des bibliothèques externes à Android Project dans Android Studio?
- Comment désactiver les autorisations déjà accordées à l'application Android?
- Comment supprimer des applications de Android Emulator?
- Le Tutoriel de Android LinearLayout
- Le Tutoriel de Android TableLayout
- Le Tutoriel de Android FrameLayout
- Le Tutoriel de Android QuickContactBadge
- Le Tutoriel de Android StackView
- Le Tutoriel de Android Camera
- Le Tutoriel de Android MediaPlayer
- Le Tutoriel de Android VideoView
- Jouer des effets sonores dans Android avec SoundPool
- Le Tutoriel de Android Networking
- Analyser JSON dans Android
- Le Tutoriel de Android SharedPreferences
- Le Tutorial de stockage interne Android (Internal Storage)
- Le Tutoriel de Android External Storage
- Le Tutoriel de Android Intents
- Exemple d'une Android Intent explicite, appelant une autre Intent
- Exemple de Android Intent implicite, ouvrez une URL, envoyez un email
- Le Tutoriel de Android Service
- Le Tutoriel Android Notifications
- Le Tutoriel de Android DatePicker
- Le Tutoriel de Android TimePicker
- Le Tutoriel de Android Chronometer
- Le Tutoriel de Android OptionMenu
- Le Tutoriel de Android ContextMenu
- Le Tutoriel de Android PopupMenu
- Le Tutoriel de Android Fragment
- Le Tutoriel de Android ListView
- Android ListView avec Checkbox en utilisant ArrayAdapter
- Le Tutoriel de Android GridView
Show More