Le Tutoriel de Android Service
1. Les types de services sur Android
Qu'est-ce que le service?
Un service est un composant qui s'exécute en arrière-plan pour effectuer des opérations de longue durée sans avoir à interagir avec l'utilisateur et il fonctionne même si l'application est détruite. Un service peut essentiellement prendre deux états.
État | Description |
Started
(Démarré) | Un service est started (démarre) lorsqu'un composant d'application, tel qu'une Activity, démarre en appelant startService(). Une fois démarré, un service peut s'exécuter en arrière-plan indéfiniment, même si le composant qui l'a démarré, est détruit.
Ce service est également connu sous le nom un service illimité (Un Bounded Service). |
Bound
(Relié) | Un service est bound (relié) lorsqu'un composant d'application se lie à celui- ci appelant bindService(). Un service relié offre une interface client-serveur qui permet aux composants d'interagir avec le service, d'envoyer des requêtes, d'obtenir des résultats et même de les faire dans tous des processus avec communication interprocessus (IPC). |
En informatique, l'inter-processus communication (IPC) est l'activité de partage de données sur des processus multiples et généralement spécialisés utilisant des protocoles de communication. En règle générale, les applications utilisant IPC sont classées en tant que des clients et des serveurs, où le client demande des données et le serveur répond aux demandes des clients.
Un service a des méthodes de rappel de cycle de vie (life cycle callback methods) que vous pouvez mettre en oeuvre (implement) pour surveiller les changements dans l'état du service et vous pouvez effectuer un travail au stade approprié. Le diagramme suivant à gauche montre le cycle de vie lorsque le service est créé avec startService() et le diagramme de droite montre le cycle de vie lorsque le service est créé avec bindService().
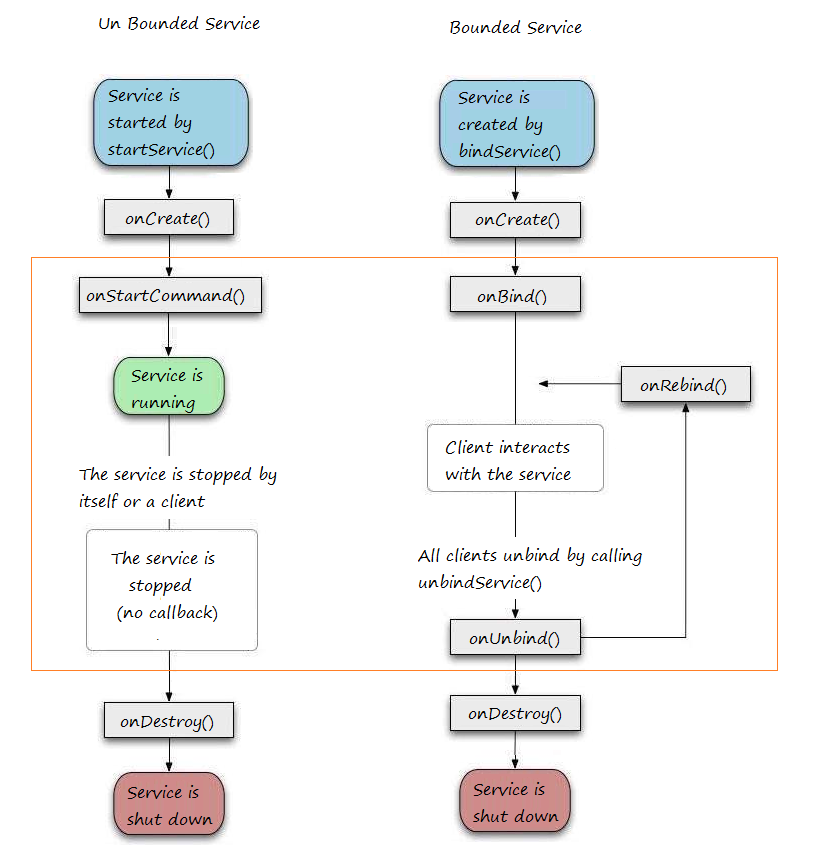
Pour créer un service, vous créez une classe Java qui étend la classe de Base de service ou l'une de ses sous-classes existantes. La classe de base du service définit diverrses méthodes de rappel et les plus importantes sont données ci-dessous. Vous n'avez pas besoin de mettre en œuvre (implements) toutes les méthodes de rappel. Cependant, il est important que vous compreniez chacun et mettez en œuvre ceux qui garantissent que votre application se comporte de la façon dont les utilisateurs attendent.
En outre, il existe un autre service appelé IntentService. IntentService est utilisé pour effectuer une tâche unique, c'est-à-dire lorsque la tâche complète le service se détruit.
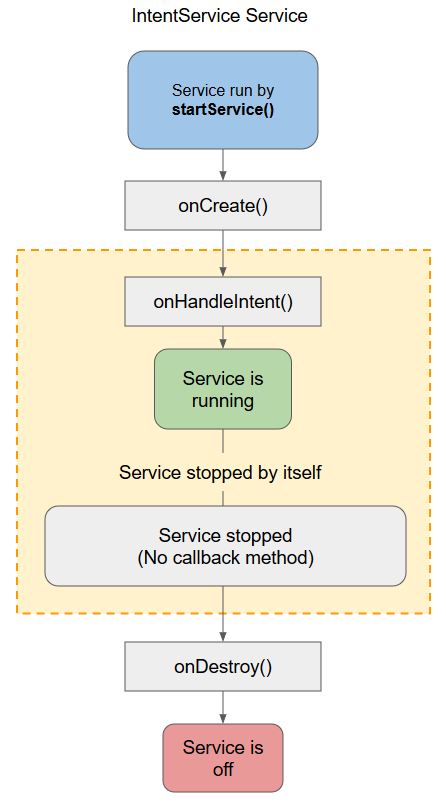
Comparaison des services:
Unbound Service (Service non relié) | Bound Service (Relié) | Intent Service |
Unbounded Service est utilisé pour effectuer une longue tâche répétitive. | Bounded Service est utilisé pour effectuer une tâche de'n arrière- plan (background) en liaison avec un autre composant. | Intent Service est utilisé pour effectuer une tâche unique, c'est-à-dire lorsque la tâche complète le service se détruit. |
Unbound Service démarre en appelant startService(). | Bounded Service démarre en appelant bindService(). | Intent Service démarre en appelant startService(). |
Unbound Service est arrêté ou détruit explicitement en appelant stopService(). | Bounded Service est déconnecté ou détruit en appelant unbindService(). | IntentService appelle implicitement la méthode stopself() pour détruire |
Unbound Service est indépendant du composant dans lequel il est démarré | Bound Service est dépendant du composant dans lequel il est démarré. | Intent Service est indépendant du composant dans lequel il est démarré. |
Les méthode de rappel et la description:
Callback | Description |
onStartCommand() | The system calls this method when another component, such as an activity, requests that the service be started, by calling startService(). If you implement this method, it is your responsibility to stop the service when its work is done, by calling stopSelf() or stopService() methods. |
onBind() | The system calls this method when another component wants to bind with the service by calling bindService(). If you implement this method, you must provide an interface that clients use to communicate with the service, by returning an IBinder object. You must always implement this method, but if you don't want to allow binding, then you should return null. |
onUnbind() | The system calls this method when all clients have disconnected from a particular interface published by the service. |
onRebind() | The system calls this method when new clients have connected to the service, after it had previously been notified that all had disconnected in its onUnbind(Intent). |
onCreate() | The system calls this method when the service is first created using onStartCommand() or onBind(). This call is required to perform one-time set-up. |
onDestroy() | The system calls this method when the service is no longer used and is being destroyed. Your service should implement this to clean up any resources such as threads, registered listeners, receivers, etc. |
2. Service illimité (Un bounded Service)
Unbound Service (ou Started Service): Dans ce cas, un composant d'application démarre le service en appelant startService (), et il continuera à s'exécuter en arrière-plan, même si le composant d'origine qui l'a déclenché est détruit. Par exemple, au démarrage, un service continuerait de jouer de la musique en arrière-plan indéfiniment.
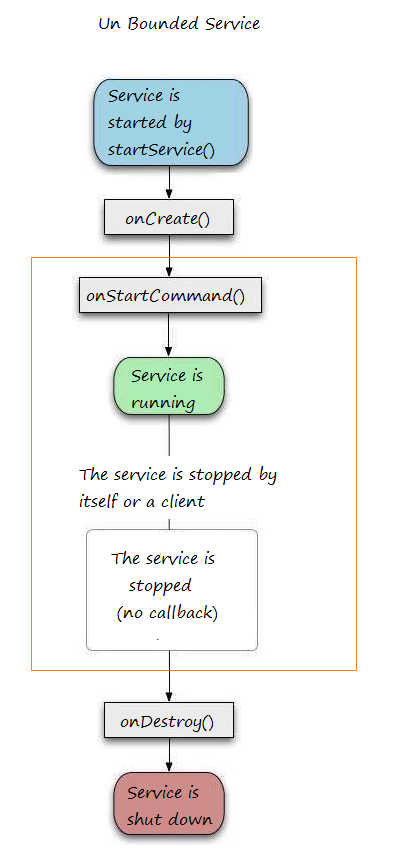
La méthode onStartCommand() renvoie le type integer, et il est une des valeurs ci- dessous:
- START_STICKY
- START_NOT_STICKY
- TART_REDELIVER_INTENT
START_STICKY & START_NOT_STICKYLes deux valeurs ne sont pertinentes que lorsque le téléphone manque de mémoire et tue le service avant qu'il ne soit terminé.START_STICKY indique au système d'exploitation de recréer le service après avoir suffisamment de mémoire et d'appeler onStartCommand() encore avec une Intent nulle.START_NOT_STICKY indique à l'OS de ne plus déranger de recréer le service.Il y a encore le troisième code START_REDELIVER_INTENT qui indique au système d'exploitation de récréer des services et redélivrer un pareil Intent pour onStartCommand().
Exemple de la lecture de la musique (Exécuter en arrière- plan)
Créez un nouveau projet "Empty Activity" baptisé PlaySongService
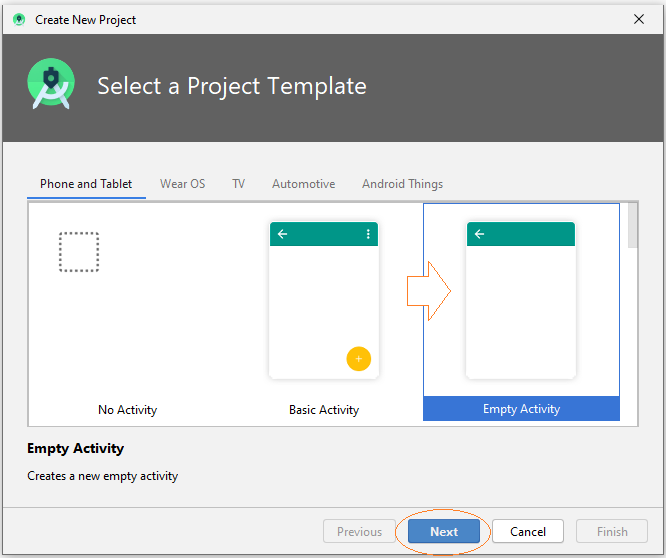
- Name: PlaySongService
- Package name: org.o7planning.playsongservice
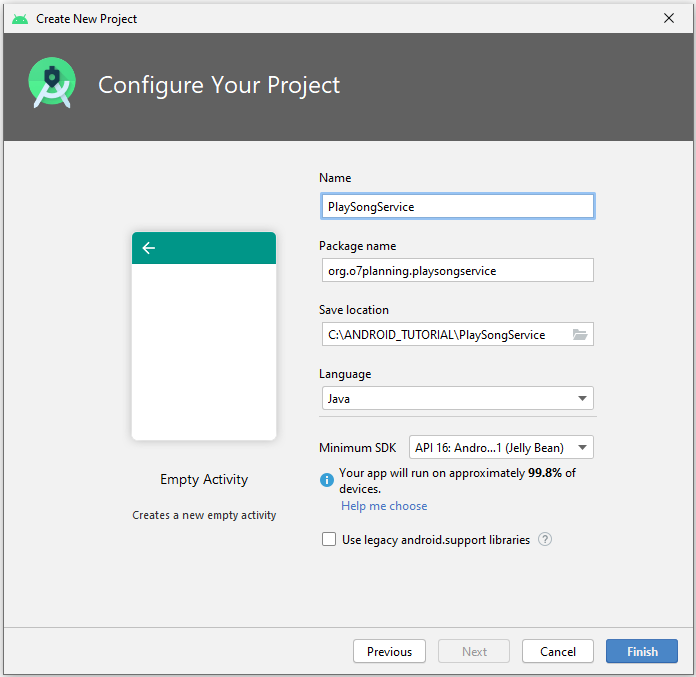
Le projet est créé.
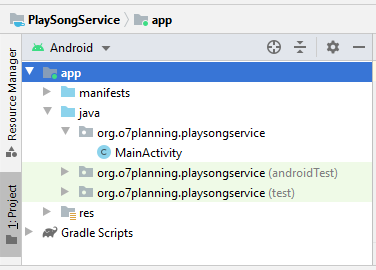
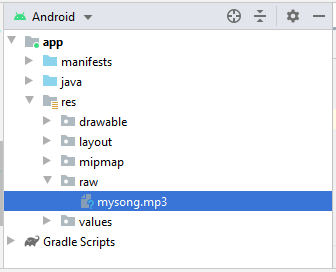
Préparez le fichier mp3:
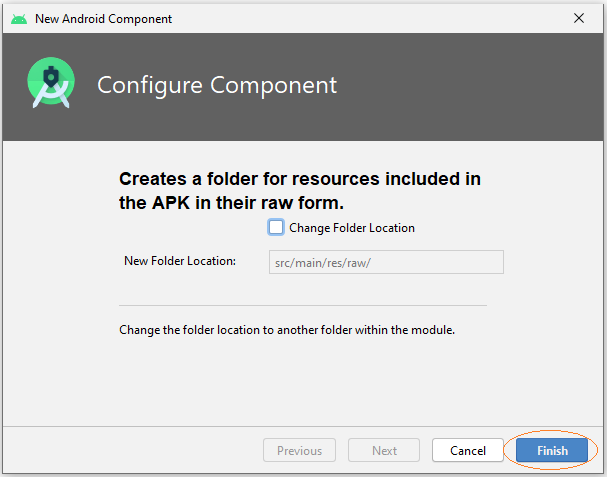
Cliquez sur le bouton droit sur le dossier res et sélectionnez:
- New > Folder > Raw Resources Folder
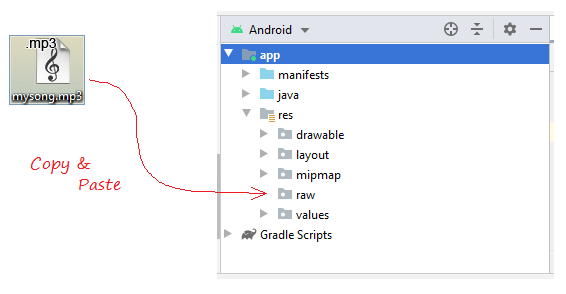
Copier et Coller un fichier de la musique mp3 dans le dossier 'raw' que vous venez de créer.
Interface design of the application:
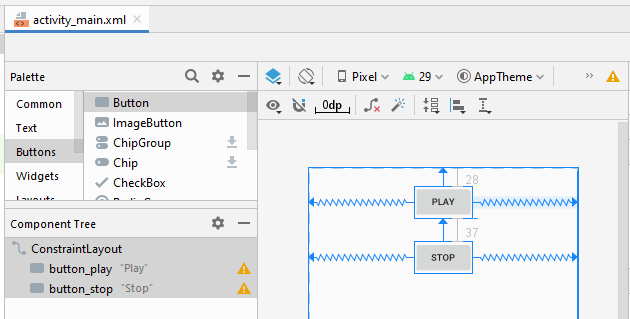
activity_main.xml
<?xml version="1.0" encoding="utf-8"?>
<androidx.constraintlayout.widget.ConstraintLayout
    xmlns:android="http://schemas.android.com/apk/res/android"
    xmlns:app="http://schemas.android.com/apk/res-auto"
    xmlns:tools="http://schemas.android.com/tools"
    android:layout_width="match_parent"
    android:layout_height="match_parent"
    tools:context=".MainActivity">

    <Button
        android:id="@+id/button_play"
        android:layout_width="wrap_content"
        android:layout_height="wrap_content"
        android:layout_marginTop="28dp"
        android:text="Play"
        app:layout_constraintEnd_toEndOf="parent"
        app:layout_constraintStart_toStartOf="parent"
        app:layout_constraintTop_toTopOf="parent" />

    <Button
        android:id="@+id/button_stop"
        android:layout_width="wrap_content"
        android:layout_height="wrap_content"
        android:layout_marginTop="37dp"
        android:text="Stop"
        app:layout_constraintEnd_toEndOf="parent"
        app:layout_constraintStart_toStartOf="parent"
        app:layout_constraintTop_toBottomOf="@+id/button_play" />
</androidx.constraintlayout.widget.ConstraintLayout>
Créer une classe de Service
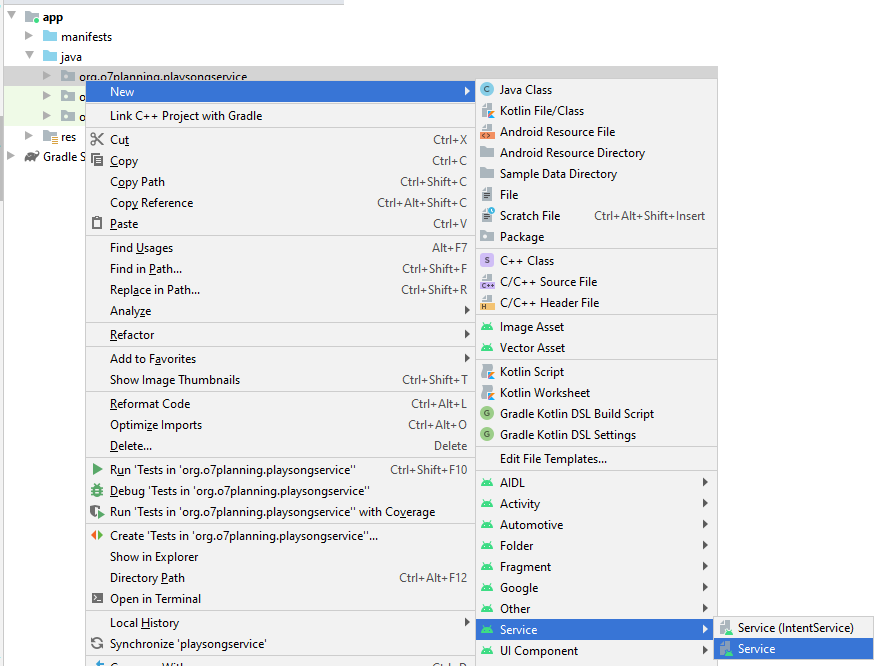
Cliquez sur le bouton droit sur un paquet Java, sélectionnez:
- New > Service > Service
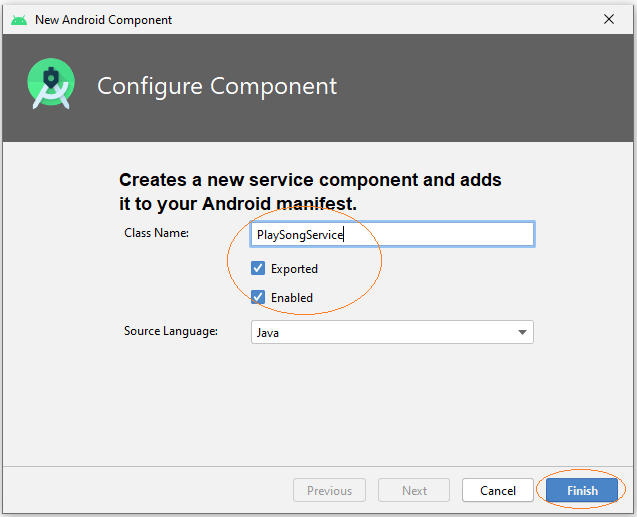
Saisissez le nom de la classe:
- PlaySongService
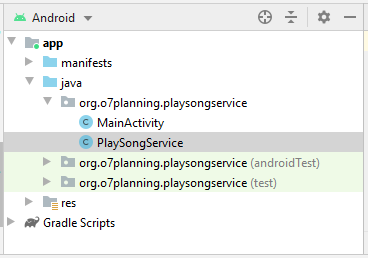
You can see that PlaySongService has been declared with AndroidManifest.xml:
** AndroidManifest.xml **
<?xml version="1.0" encoding="utf-8"?>
<manifest xmlns:android="http://schemas.android.com/apk/res/android"
    package="org.o7planning.playsongservice">

    <application ...>

        <service
            android:name=".PlaySongService"
            android:enabled="true"
            android:exported="true"></service>

            ....

    </application>

</manifest>
PlaySongService.java
package org.o7planning.playsongservice;

import android.app.Service;
import android.content.Intent;
import android.os.IBinder;
import android.media.MediaPlayer;

public class PlaySongService extends Service {

    private MediaPlayer mediaPlayer;

    public PlaySongService() {
    }

    // Return the communication channel to the service.
    @Override
    public IBinder onBind(Intent intent){
        // This service is unbounded
        // So this method is never called.
        return null;
    }


    @Override
    public void onCreate(){
        super.onCreate();
        // Create MediaPlayer object, to play your song.
        mediaPlayer = MediaPlayer.create(getApplicationContext(), R.raw.mysong);
    }

    @Override
    public int onStartCommand(Intent intent, int flags, int startId){
        // Play song.
        mediaPlayer.start();

        return START_STICKY;
    }

    // Destroy
    @Override
    public void onDestroy() {
        // Release the resources
        mediaPlayer.release();
        super.onDestroy();
    }
}
MainActivity.java
package org.o7planning.playsongservice;

import androidx.appcompat.app.AppCompatActivity;

import android.os.Bundle;
import android.content.Intent;
import android.view.View;
import android.widget.Button;

public class MainActivity extends AppCompatActivity {

    private Button buttonPlay;
    private Button buttonStop;

    @Override
    protected void onCreate(Bundle savedInstanceState) {
        super.onCreate(savedInstanceState);
        setContentView(R.layout.activity_main);

        this.buttonPlay = (Button) this.findViewById(R.id.button_play);
        this.buttonStop = (Button) this.findViewById(R.id.button_stop);

        this.buttonPlay.setOnClickListener(new View.OnClickListener() {
            @Override
            public void onClick(View v) {
                playSong();
            }
        });

        this.buttonStop.setOnClickListener(new View.OnClickListener() {
            @Override
            public void onClick(View v) {
                stopSong();
            }
        });
    }

    // This method is called when users click on the Play button.
    public void playSong()  {
        // Create Intent object for PlaySongService.
        Intent myIntent = new Intent(MainActivity.this, PlaySongService.class);

        // Call startService with Intent parameter.
        this.startService(myIntent);
    }

    // This method is called when users click on the Stop button.
    public void stopSong( )  {

        // Create Intent object
        Intent myIntent = new Intent(MainActivity.this, PlaySongService.class);
        this.stopService(myIntent);
    }

}
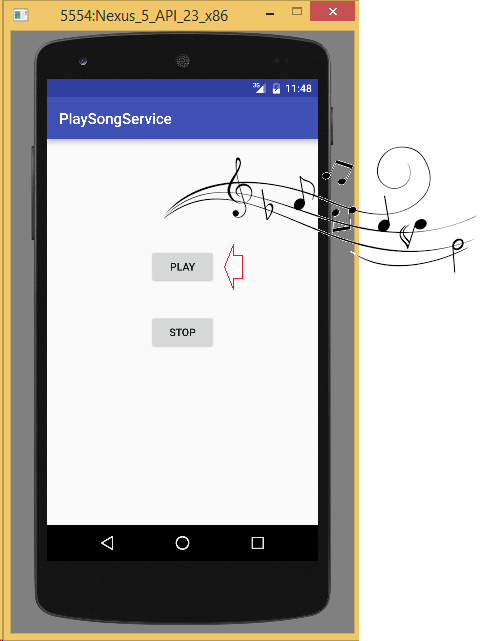
C'est OK, vous pouvez exécuter votre application et profiter de la chanson.
3. Service délimité (Bounded Service)
Ci-après, je simule un service qui fournit des informations météorologiques la journée en cours, avec l'entrée géographique (Hanoi, Chicago, ...), le résultat retourné est pluvieux, ensoleillé ...
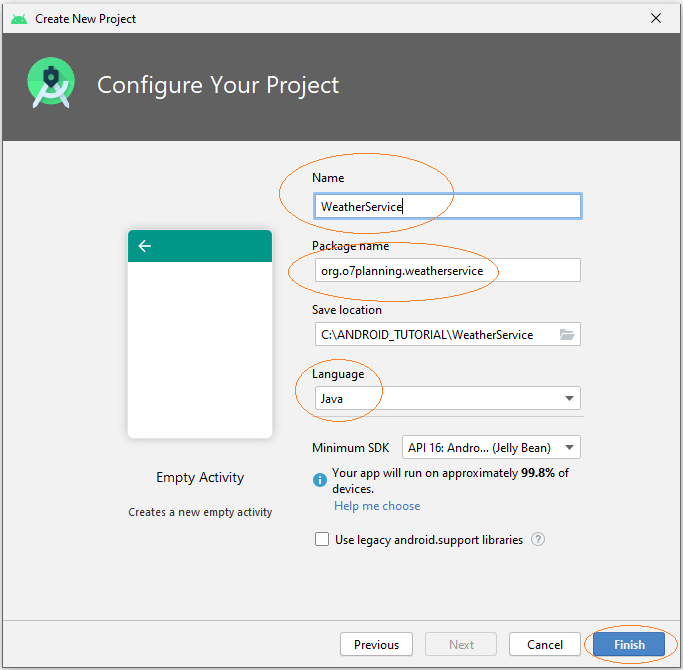
Créez un projet nommé WeatherService.
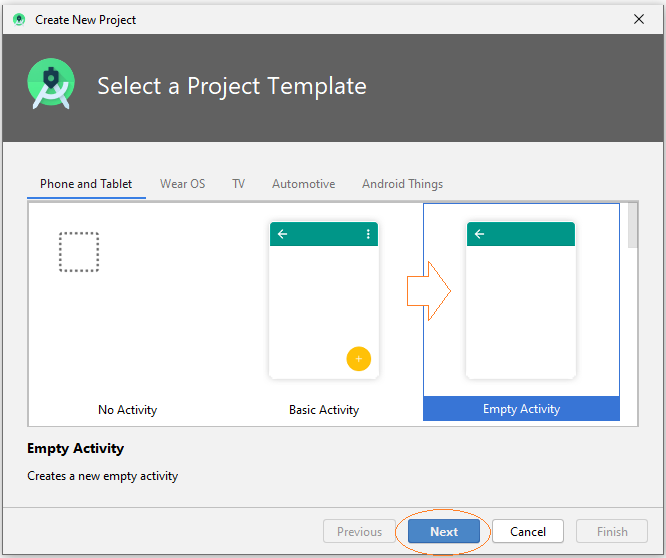
- Name: WeatherService
- Package name: org.o7planning.weatherservice
Interface design for the application:
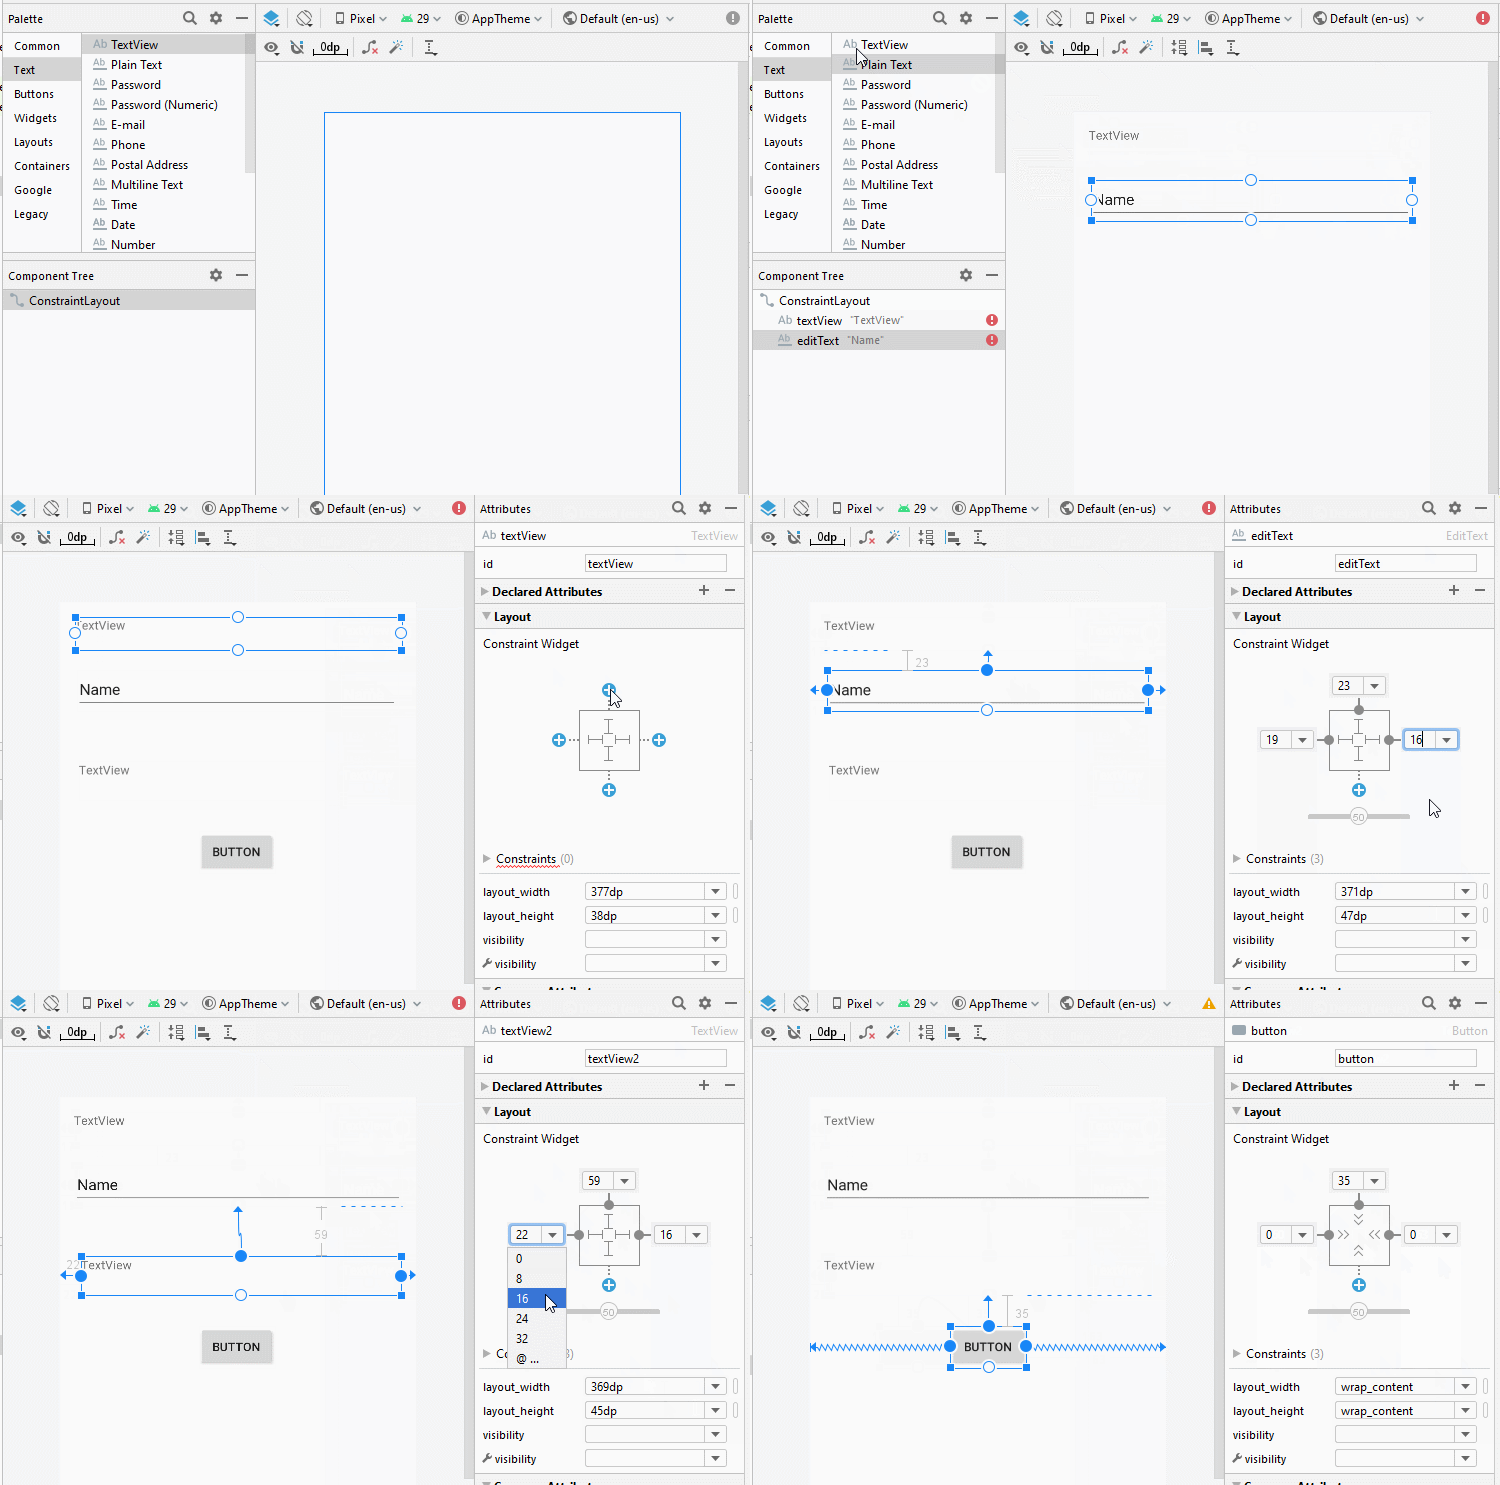
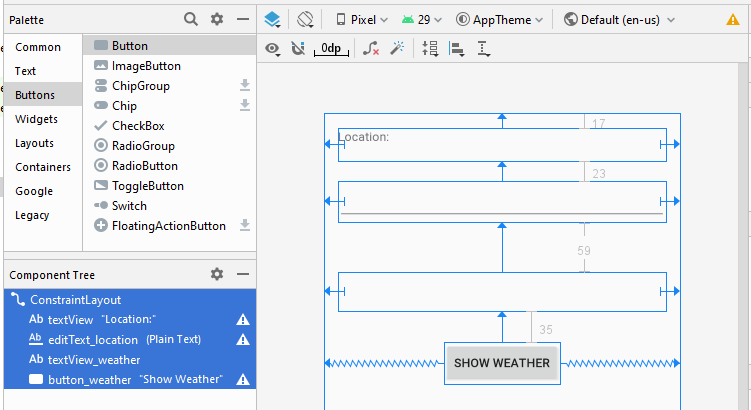
activity_main.xml
<?xml version="1.0" encoding="utf-8"?>
<androidx.constraintlayout.widget.ConstraintLayout
    xmlns:android="http://schemas.android.com/apk/res/android"
    xmlns:app="http://schemas.android.com/apk/res-auto"
    xmlns:tools="http://schemas.android.com/tools"
    android:layout_width="match_parent"
    android:layout_height="match_parent"
    tools:context=".MainActivity">

    <TextView
        android:id="@+id/textView"
        android:layout_width="0dp"
        android:layout_height="38dp"
        android:layout_marginStart="16dp"
        android:layout_marginLeft="16dp"
        android:layout_marginTop="17dp"
        android:layout_marginEnd="16dp"
        android:layout_marginRight="16dp"
        android:text="Location:"
        app:layout_constraintEnd_toEndOf="parent"
        app:layout_constraintStart_toStartOf="parent"
        app:layout_constraintTop_toTopOf="parent" />

    <EditText
        android:id="@+id/editText_location"
        android:layout_width="0dp"
        android:layout_height="47dp"
        android:layout_marginStart="16dp"
        android:layout_marginLeft="16dp"
        android:layout_marginTop="23dp"
        android:layout_marginEnd="16dp"
        android:layout_marginRight="16dp"
        android:ems="10"
        android:inputType="textPersonName"
        app:layout_constraintEnd_toEndOf="parent"
        app:layout_constraintStart_toStartOf="parent"
        app:layout_constraintTop_toBottomOf="@+id/textView" />

    <TextView
        android:id="@+id/textView_weather"
        android:layout_width="0dp"
        android:layout_height="45dp"
        android:layout_marginStart="16dp"
        android:layout_marginLeft="16dp"
        android:layout_marginTop="59dp"
        android:layout_marginEnd="16dp"
        android:layout_marginRight="16dp"
        app:layout_constraintEnd_toEndOf="parent"
        app:layout_constraintStart_toStartOf="parent"
        app:layout_constraintTop_toBottomOf="@+id/editText_location" />

    <Button
        android:id="@+id/button_weather"
        android:layout_width="wrap_content"
        android:layout_height="wrap_content"
        android:layout_marginTop="35dp"
        android:text="Show Weather"
        app:layout_constraintEnd_toEndOf="parent"
        app:layout_constraintStart_toStartOf="parent"
        app:layout_constraintTop_toBottomOf="@+id/textView_weather" />
</androidx.constraintlayout.widget.ConstraintLayout>
Créez Service:
Cliquez sur le bouton droit à un java package et sélectionnez:
- New > Service > Service
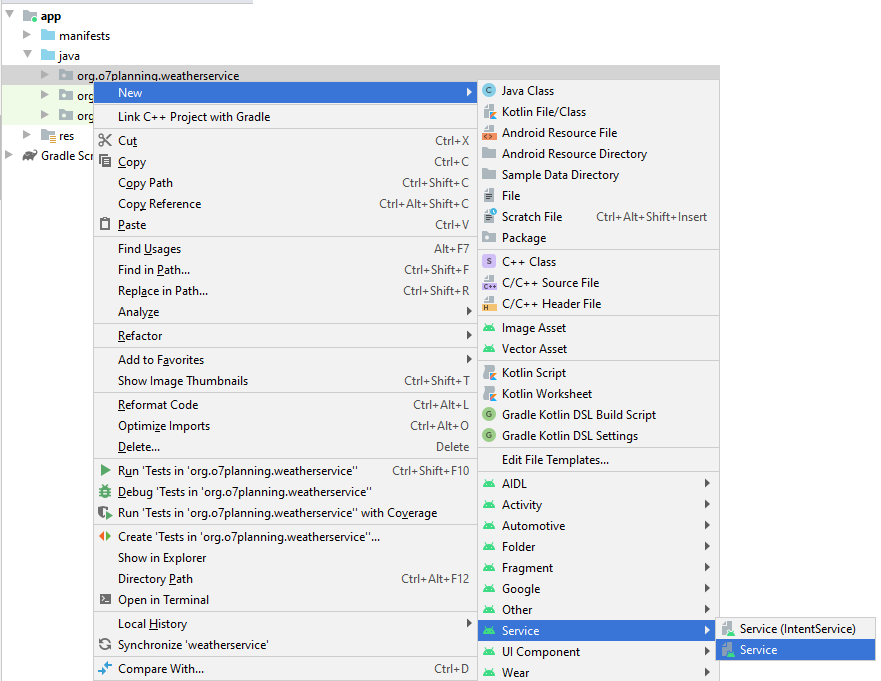
Saisissez:
- Class name: WeatherService
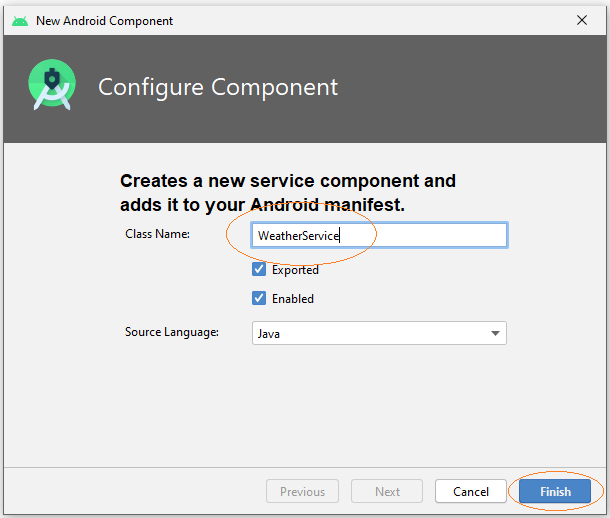
La classe WeatherService qui est étendue à partir de la classe android.app.Service a été créée.
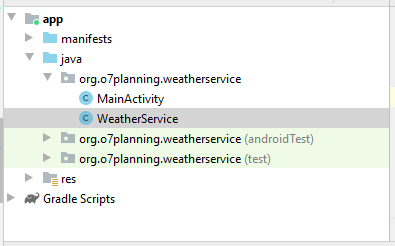
You can see the WeatherService has been declared with AndroidManifest.xml:
** AndroidManifest.xml **
<?xml version="1.0" encoding="utf-8"?>
<manifest xmlns:android="http://schemas.android.com/apk/res/android"
    package="org.o7planning.weatherservice">

    <application ...>
        <service
            android:name=".WeatherService"
            android:enabled="true"
            android:exported="true"></service>

        ...

    </application>

</manifest>
WeatherService.java
package org.o7planning.weatherservice;

import android.app.Service;
import android.content.Intent;
import android.os.IBinder;
import android.os.Binder;
import android.util.Log;
import java.text.DateFormat;
import java.text.SimpleDateFormat;
import java.util.Date;
import java.util.HashMap;
import java.util.Map;
import java.util.Random;


public class WeatherService extends Service {

    private static String LOG_TAG = "WeatherService";

    // Store the weather data.
    private static final Map<String, String> weatherData = new HashMap<String,String>();

    private final IBinder binder = new LocalWeatherBinder();

    public class LocalWeatherBinder extends Binder {

        public WeatherService getService()  {
            return WeatherService.this;
        }
    }

    public WeatherService() {
    }

    @Override
    public IBinder onBind(Intent intent) {
        Log.i(LOG_TAG,"onBind");
        return this.binder;
    }

    @Override
    public void onRebind(Intent intent) {
        Log.i(LOG_TAG, "onRebind");
        super.onRebind(intent);
    }

    @Override
    public boolean onUnbind(Intent intent) {
        Log.i(LOG_TAG, "onUnbind");
        return true;
    }

    @Override
    public void onDestroy() {
        super.onDestroy();
        Log.i(LOG_TAG, "onDestroy");
    }

    // Returns the weather information corresponding to the location of the current date.
    public String getWeatherToday(String location) {
        Date now= new Date();
        DateFormat df= new SimpleDateFormat("dd-MM-yyyy");

        String dayString = df.format(now);
        String keyLocAndDay = location + "$"+ dayString;

        String weather=  weatherData.get(keyLocAndDay);
        //
        if(weather != null)  {
            return weather;
        }

        //
        String[] weathers = new String[]{"Rainy", "Hot", "Cool", "Warm" ,"Snowy"};

        // Random value from 0 to 4
        int i= new Random().nextInt(5);

        weather =weathers[i];
        weatherData.put(keyLocAndDay, weather);
        //
        return weather;
    }

}
MainActivity.java
package org.o7planning.weatherservice;

import androidx.appcompat.app.AppCompatActivity;

import android.os.Bundle;
import android.content.ComponentName;
import android.content.Context;
import android.content.Intent;
import android.content.ServiceConnection;
import android.os.IBinder;
import android.view.View;
import android.widget.Button;
import android.widget.EditText;
import android.widget.TextView;

public class MainActivity extends AppCompatActivity {

    private boolean binded = false;
    private WeatherService weatherService;

    private TextView textViewWeather;
    private EditText editTextLocation;
    private Button buttonWeather;

    ServiceConnection weatherServiceConnection = new ServiceConnection() {

        @Override
        public void onServiceConnected(ComponentName name, IBinder service) {
            WeatherService.LocalWeatherBinder binder = (WeatherService.LocalWeatherBinder) service;
            weatherService = binder.getService();
            binded = true;
        }

        @Override
        public void onServiceDisconnected(ComponentName name) {
            binded = false;
        }
    };

    // When the Activity creating its interface.
    @Override
    protected void onCreate(Bundle savedInstanceState) {
        super.onCreate(savedInstanceState);
        setContentView(R.layout.activity_main);


        this.textViewWeather = (TextView) this.findViewById(R.id.textView_weather);
        this.editTextLocation = (EditText) this.findViewById(R.id.editText_location);
        this.buttonWeather = (Button) this.findViewById(R.id.button_weather);

        this.buttonWeather.setOnClickListener(new View.OnClickListener() {
            @Override
            public void onClick(View v) {
                 showWeather();
            }
        });
    }

    // When Activity starting.
    @Override
    protected void onStart() {
        super.onStart();

        // Create Intent object for WeatherService.
        Intent intent = new Intent(this, WeatherService.class);

        // Call bindService(..) method to bind service with UI.
        this.bindService(intent, weatherServiceConnection, Context.BIND_AUTO_CREATE);
    }

    // Activity stop
    @Override
    protected void onStop() {
        super.onStop();
        if (binded) {
            // Unbind Service
            this.unbindService(weatherServiceConnection);
            binded = false;
        }
    }

    // When user click on 'Show weather' button.
    public void showWeather()  {
        String location = this.editTextLocation.getText().toString();

        String weather= this.weatherService.getWeatherToday(location);

        this.textViewWeather.setText(weather);
    }

}
OK, maintenant vous pouvez exécuter l'application.
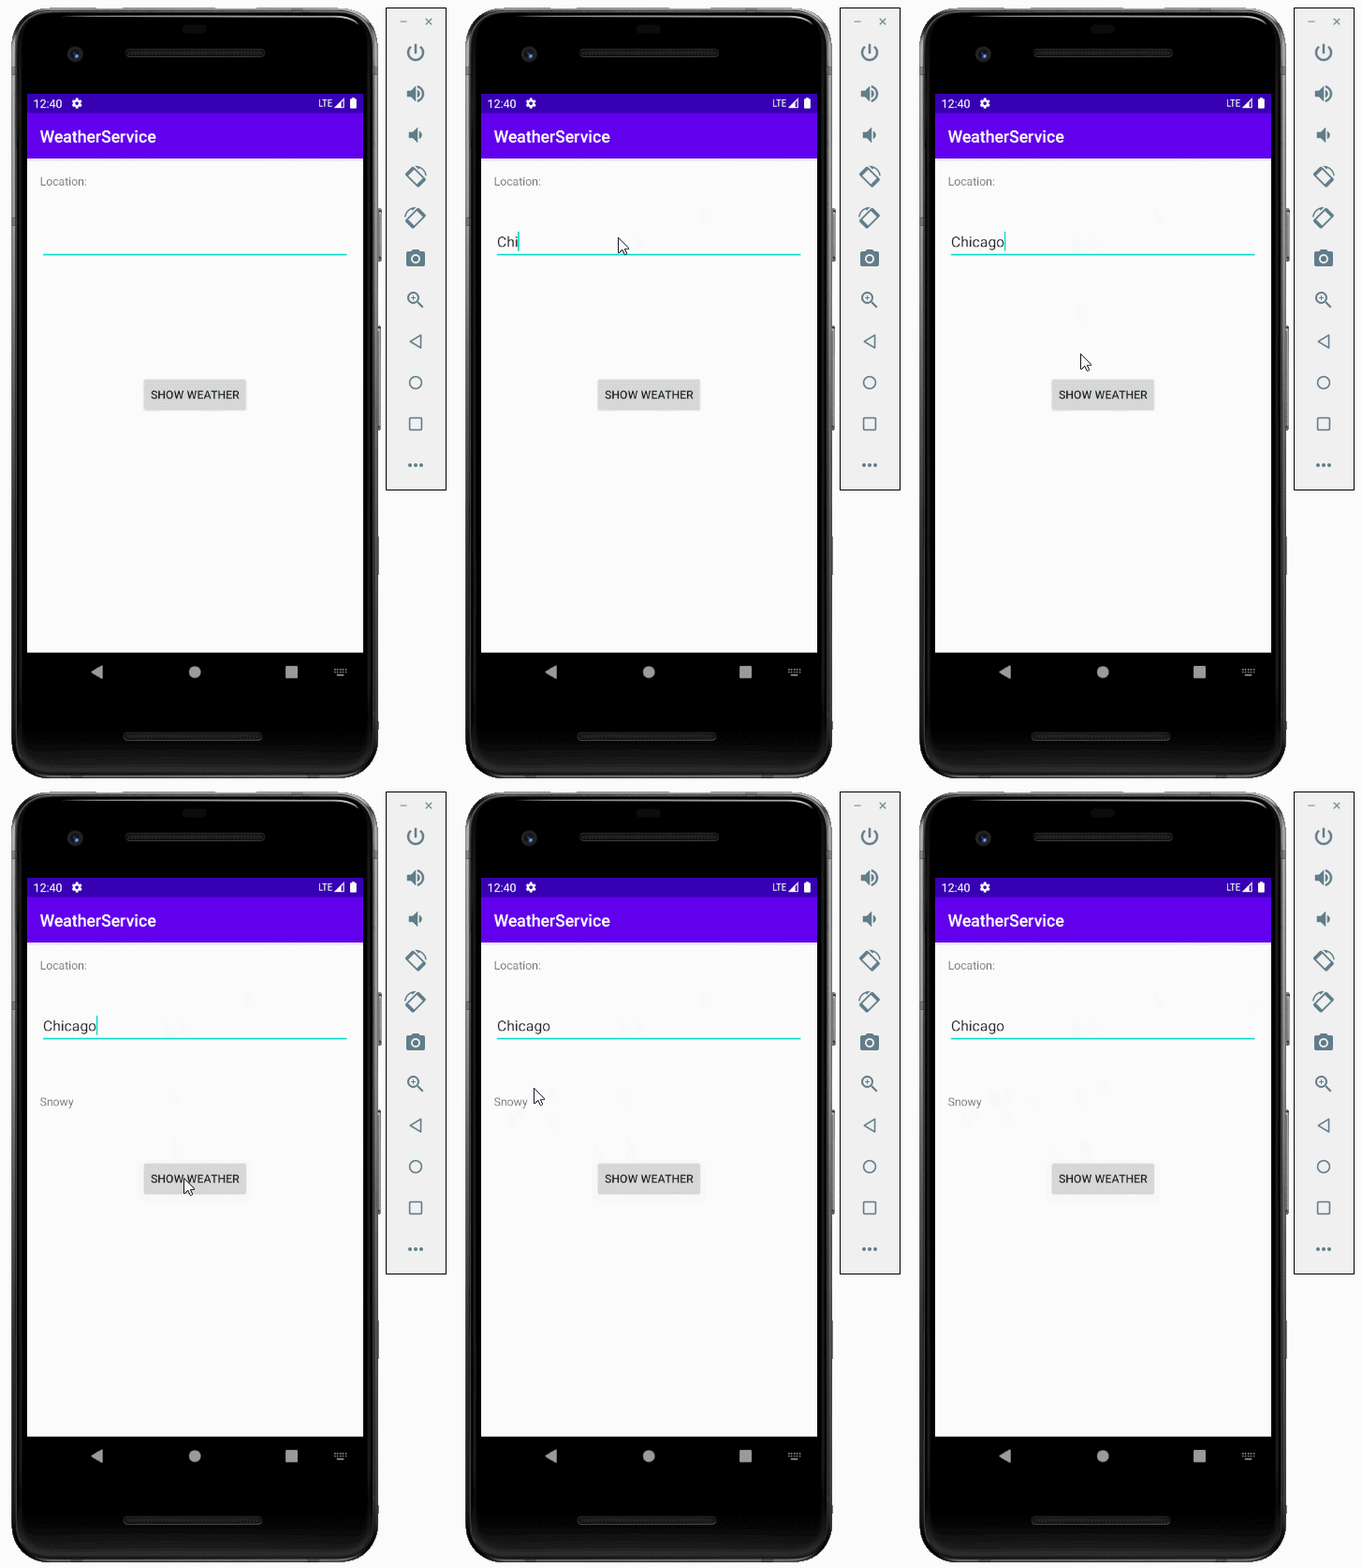
4. Service IntentService
Exemple IntentService:
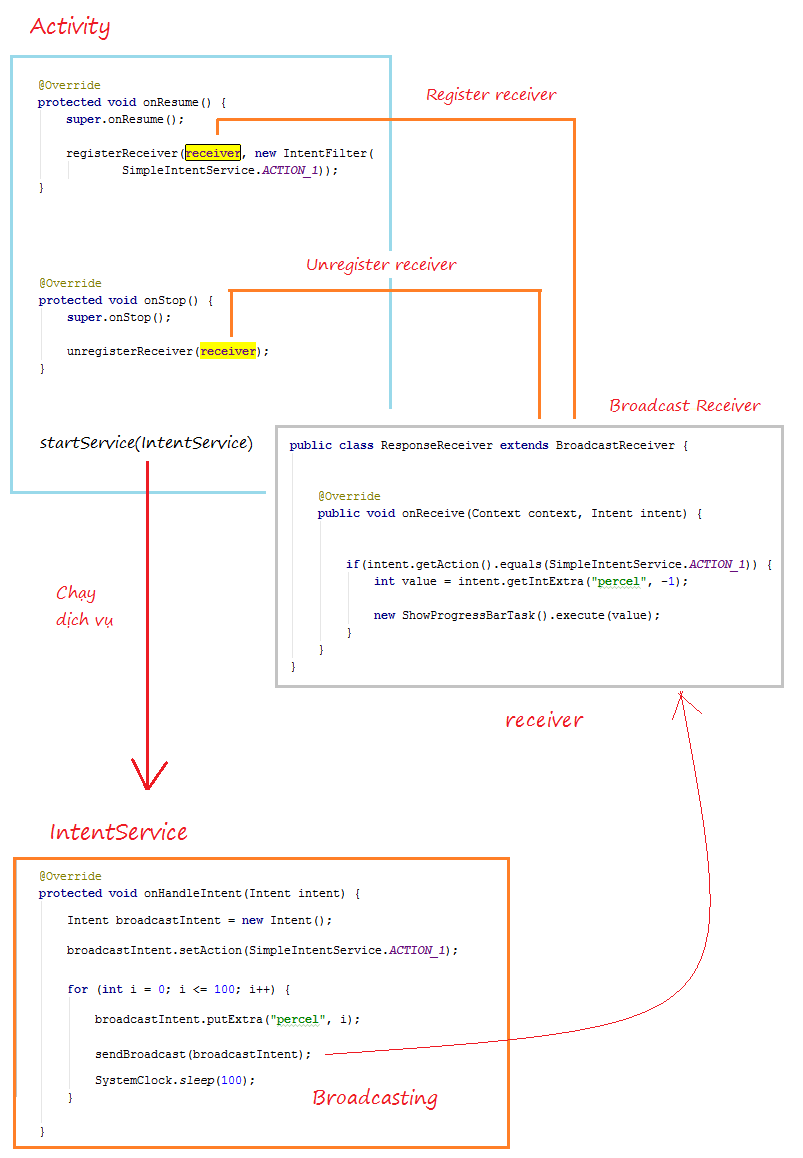
L'image ci-dessous illustre la communication entre Client (Activity) et IntentService. Le client démarre le service, il envoie une demande via un objet Intent, le service est exécuté et accomplit ses tâches, en même temps, il peut envoyer des informations relatives à sa situation de travail. Par exemple, combien de pourcentage fonctionne-t-il. Au client, vous pouvez utiliser ProgressBar pour afficher le pourcentage de travail.
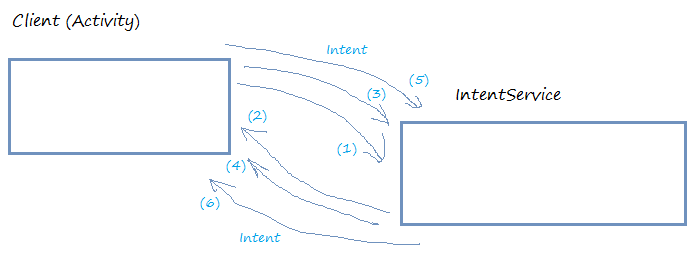
The IntentService is designed to automatically stop naturally when the job is done, and only use once, so you should use it in such situations. The <context>.stopService(intentService) method will not work with the IntentService. Moreover, it is difficult for you to use the application's UI to interact with the IntentService.
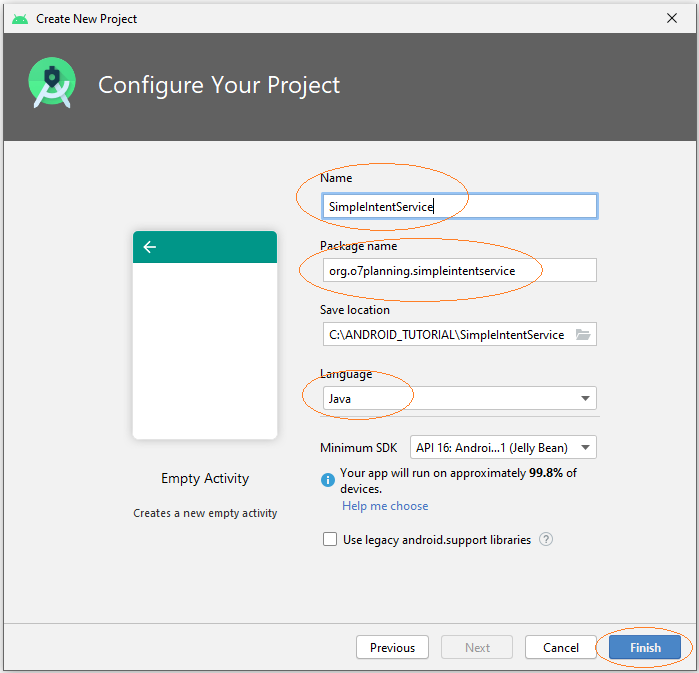
Créez un nouveau projet SimpleIntentService.
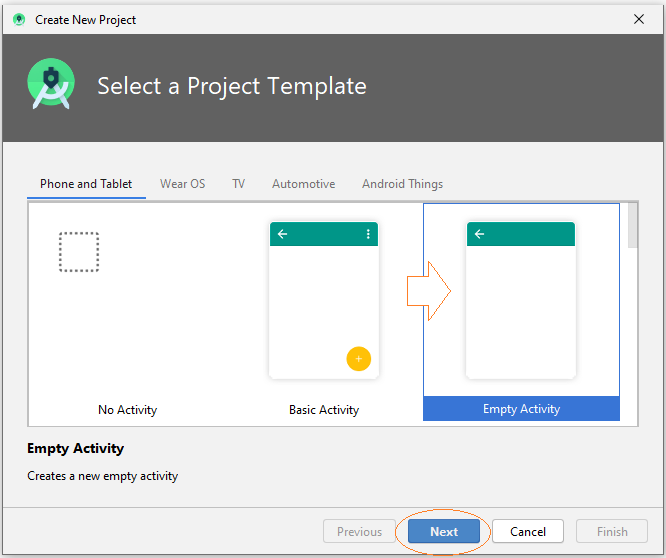
- Name: SimpleIntentService
- Package name: org.o7planning.simpleintentservice
Interface design:
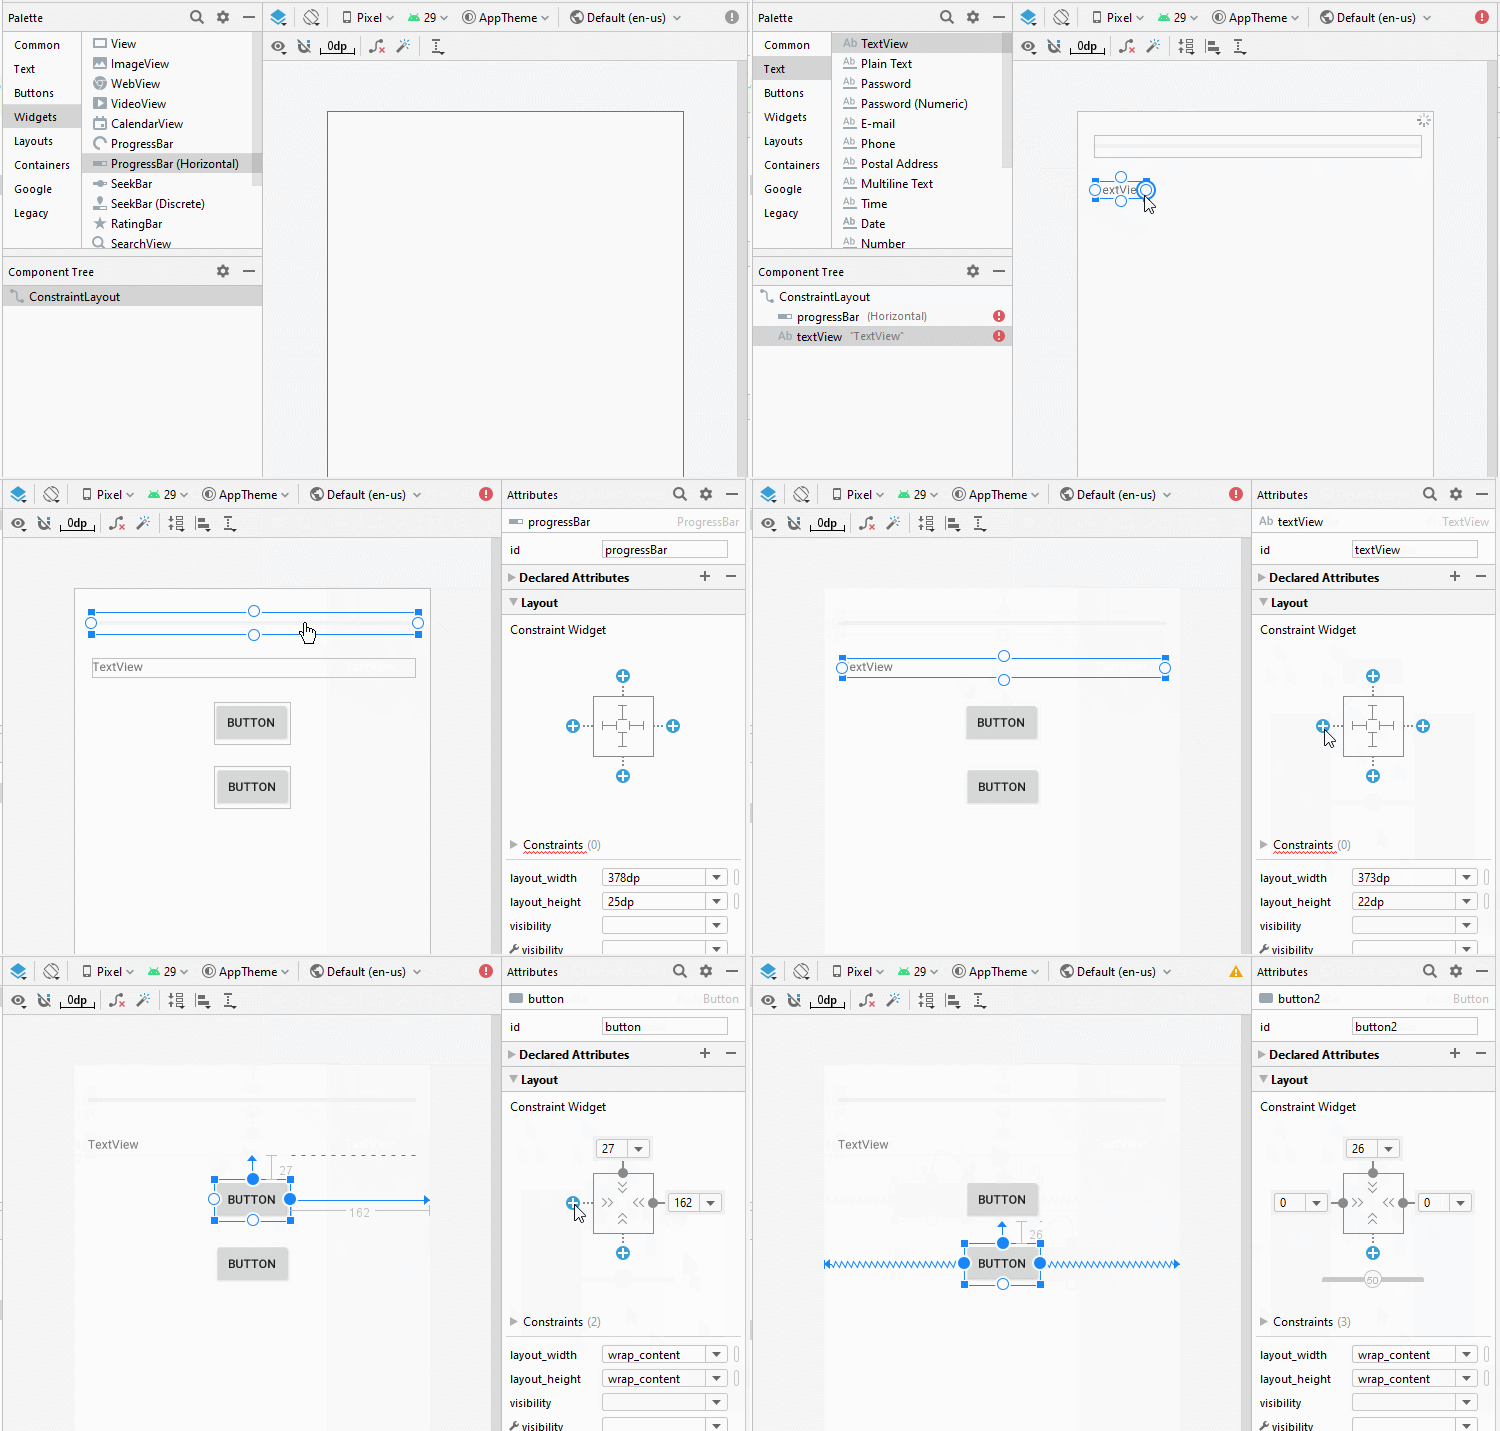
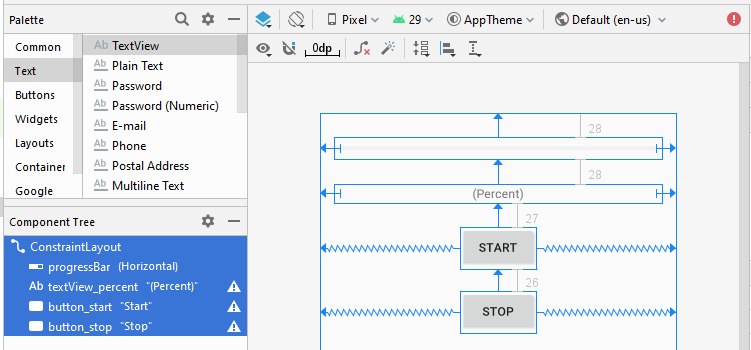
activity_main.xml
<?xml version="1.0" encoding="utf-8"?>
<androidx.constraintlayout.widget.ConstraintLayout
    xmlns:android="http://schemas.android.com/apk/res/android"
    xmlns:app="http://schemas.android.com/apk/res-auto"
    xmlns:tools="http://schemas.android.com/tools"
    android:layout_width="match_parent"
    android:layout_height="match_parent"
    tools:context=".MainActivity">

    <ProgressBar
        android:id="@+id/progressBar"
        style="?android:attr/progressBarStyleHorizontal"
        android:layout_width="0dp"
        android:layout_height="25dp"
        android:layout_marginStart="16dp"
        android:layout_marginLeft="16dp"
        android:layout_marginTop="28dp"
        android:layout_marginEnd="16dp"
        android:layout_marginRight="16dp"
        app:layout_constraintEnd_toEndOf="parent"
        app:layout_constraintStart_toStartOf="parent"
        app:layout_constraintTop_toTopOf="parent" />

    <TextView
        android:id="@+id/textView_percent"
        android:layout_width="0dp"
        android:layout_height="22dp"
        android:layout_marginStart="16dp"
        android:layout_marginLeft="16dp"
        android:layout_marginTop="28dp"
        android:layout_marginEnd="16dp"
        android:layout_marginRight="16dp"
        android:gravity="center"
        android:text="(Percent)"
        app:layout_constraintEnd_toEndOf="parent"
        app:layout_constraintStart_toStartOf="parent"
        app:layout_constraintTop_toBottomOf="@+id/progressBar" />

    <Button
        android:id="@+id/button_start"
        android:layout_width="wrap_content"
        android:layout_height="wrap_content"
        android:layout_marginTop="27dp"
        android:text="Start"
        app:layout_constraintEnd_toEndOf="parent"
        app:layout_constraintStart_toStartOf="parent"
        app:layout_constraintTop_toBottomOf="@+id/textView_percent" />

    <Button
        android:id="@+id/button_stop"
        android:layout_width="wrap_content"
        android:layout_height="wrap_content"
        android:layout_marginTop="26dp"
        android:text="Stop"
        app:layout_constraintEnd_toEndOf="parent"
        app:layout_constraintStart_toStartOf="parent"
        app:layout_constraintTop_toBottomOf="@+id/button_start" />
</androidx.constraintlayout.widget.ConstraintLayout>
Créez un IntentService en cliquant sur le bouton droit d' un package et sélectionnez:
- New > Service > Service (IntentService)
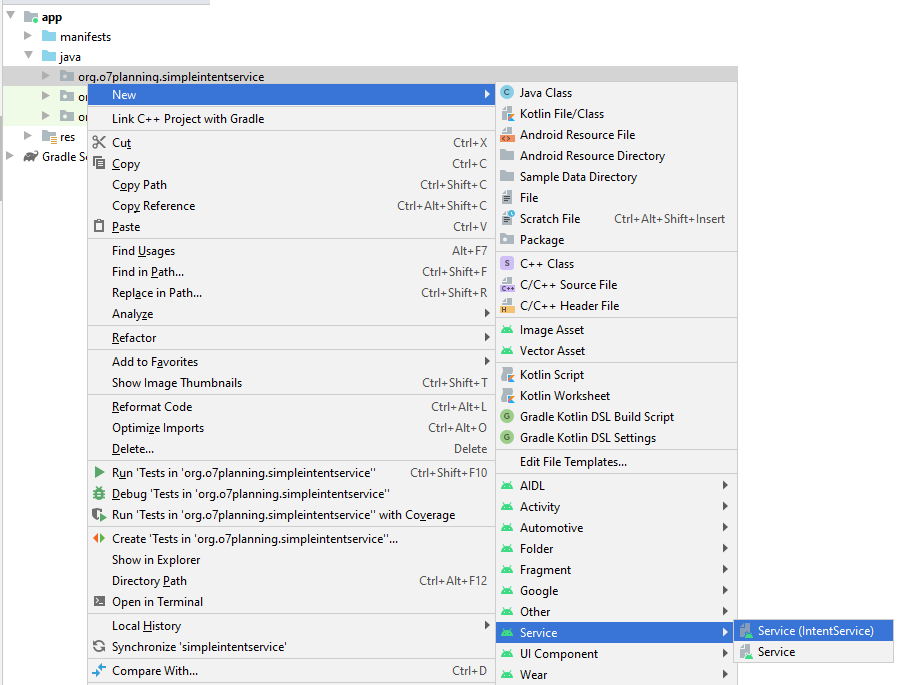
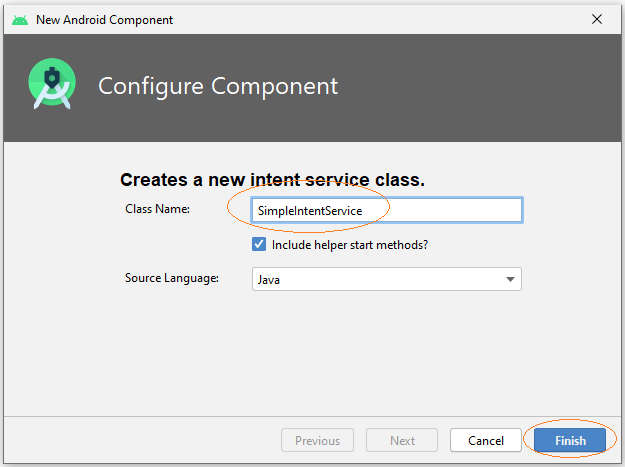
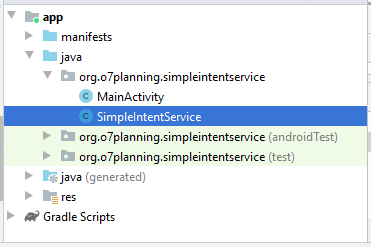
You can see SimpleIntentService has been declared with AndroidManifest.xml:
** AndroidManifest.xml **
<?xml version="1.0" encoding="utf-8"?>
<manifest xmlns:android="http://schemas.android.com/apk/res/android"
    package="org.o7planning.simpleintentservice">

    <application ...>
        <service
            android:name=".SimpleIntentService"
            android:exported="false"></service>

        ...
    </application>

</manifest>
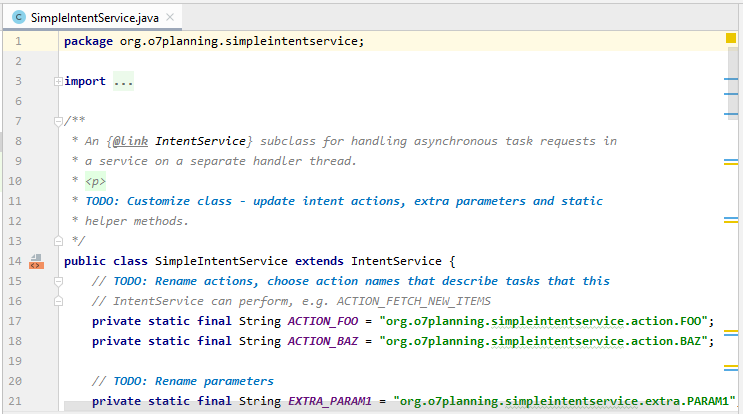
La classe SimpleIntentService a été créée, elle est également enregistrée avec AndroidManifest.xml, le code généré est une suggestion pour que vous puissiez écrire un IntentService, vous pouvez effacer le code généré.
SimpleIntentService.java
package org.o7planning.simpleintentservice;

import android.app.IntentService;
import android.content.Intent;
import android.os.SystemClock;

public class SimpleIntentService extends IntentService {

    public static volatile boolean shouldStop = false;

    public static final String ACTION_1 ="MY_ACTION_1";

    public static final String PARAM_PERCENT = "percent";

    public SimpleIntentService() {
        super("SimpleIntentService");
    }

    @Override
    protected void onHandleIntent(Intent intent) {

        // Create Intent object (to broadcast).
        Intent broadcastIntent = new Intent();

        // Set Action name for this Intent.
        // A Intent can perform many different actions.
        broadcastIntent.setAction(SimpleIntentService.ACTION_1);

        // Loop 100 times broadcast of Intent.
        for (int i = 0; i <= 100; i++) {

            // Set data
            // (Percent of work)
            broadcastIntent.putExtra(PARAM_PERCENT, i);

            // Send broadcast
            sendBroadcast(broadcastIntent);

            // Sleep 100 Milliseconds.
            SystemClock.sleep(100);

            if(shouldStop) {
                stopSelf();
                return;
            }
        }

    }
}
MainActivity.java
package org.o7planning.simpleintentservice;

import androidx.appcompat.app.AppCompatActivity;

import android.os.Bundle;
import android.content.BroadcastReceiver;
import android.content.Context;
import android.content.Intent;
import android.content.IntentFilter;
import android.os.AsyncTask;
import android.view.View;
import android.widget.Button;
import android.widget.ProgressBar;
import android.widget.TextView;

public class MainActivity extends AppCompatActivity {

    private Button buttonStart;
    private Button buttonStop;
    private TextView textViewPercent;

    private ProgressBar progressBar;

    private Intent serviceIntent;

    private ResponseReceiver receiver = new ResponseReceiver();


    // Broadcast component
    public class ResponseReceiver extends BroadcastReceiver {

        // On broadcast received
        @Override
        public void onReceive(Context context, Intent intent) {

            // Check action name.
            if(intent.getAction().equals(SimpleIntentService.ACTION_1)) {
                int value = intent.getIntExtra(SimpleIntentService.PARAM_PERCENT, 0);

                new ShowProgressBarTask().execute(value);
            }
        }
    }

    // Display value for the ProgressBar.
    class ShowProgressBarTask extends AsyncTask<Integer, Integer, Integer> {

        @Override
        protected Integer doInBackground(Integer... args) {

            return args[0];
        }

        @Override
        protected void onPostExecute(Integer result) {
            super.onPostExecute(result);

            progressBar.setProgress(result);

            textViewPercent.setText(result + " % Loaded");

            if (result == 100) {
                textViewPercent.setText("Completed");
                buttonStart.setEnabled(true);
            }

        }
    }

    @Override
    protected void onCreate(Bundle savedInstanceState) {
        super.onCreate(savedInstanceState);
        setContentView(R.layout.activity_main);

        this.textViewPercent = (TextView) this.findViewById(R.id.textView_percent);
        this.progressBar = (ProgressBar) this.findViewById(R.id.progressBar);
        this.buttonStart = (Button) this.findViewById(R.id.button_start);
        this.buttonStop = (Button)this.findViewById(R.id.button_stop);

        this.buttonStart.setOnClickListener(new View.OnClickListener() {
            @Override
            public void onClick(View v) {
                buttonStartClicked();
            }
        });

        this.buttonStop.setOnClickListener(new View.OnClickListener() {
            @Override
            public void onClick(View v) {
                buttonStopClicked();
            }
        });
    }


    // On Resume of MainActivity
    @Override
    protected void onResume() {
        super.onResume();

        // Register receiver with Activity.
        registerReceiver(receiver, new IntentFilter(
                SimpleIntentService.ACTION_1));
    }

    // On Stop of MainActivity
    @Override
    protected void onStop() {
        super.onStop();

        // Unregister receiver with Activity.
        unregisterReceiver(receiver);
    }

    // Method is called when the user clicks on the Start button.
    public void buttonStartClicked( )  {
        this.buttonStart.setEnabled(false);

        this.serviceIntent = new Intent(this, SimpleIntentService.class);

        startService(this.serviceIntent);
    }


    public void buttonStopClicked( )  {
        if(this.serviceIntent!= null)  {
            // stopService(this.serviceIntent) does not work with IntentService(s).

            // Mandatory stopping of an IntentService is not recommended.
            SimpleIntentService.shouldStop = true;
        }
    }

}
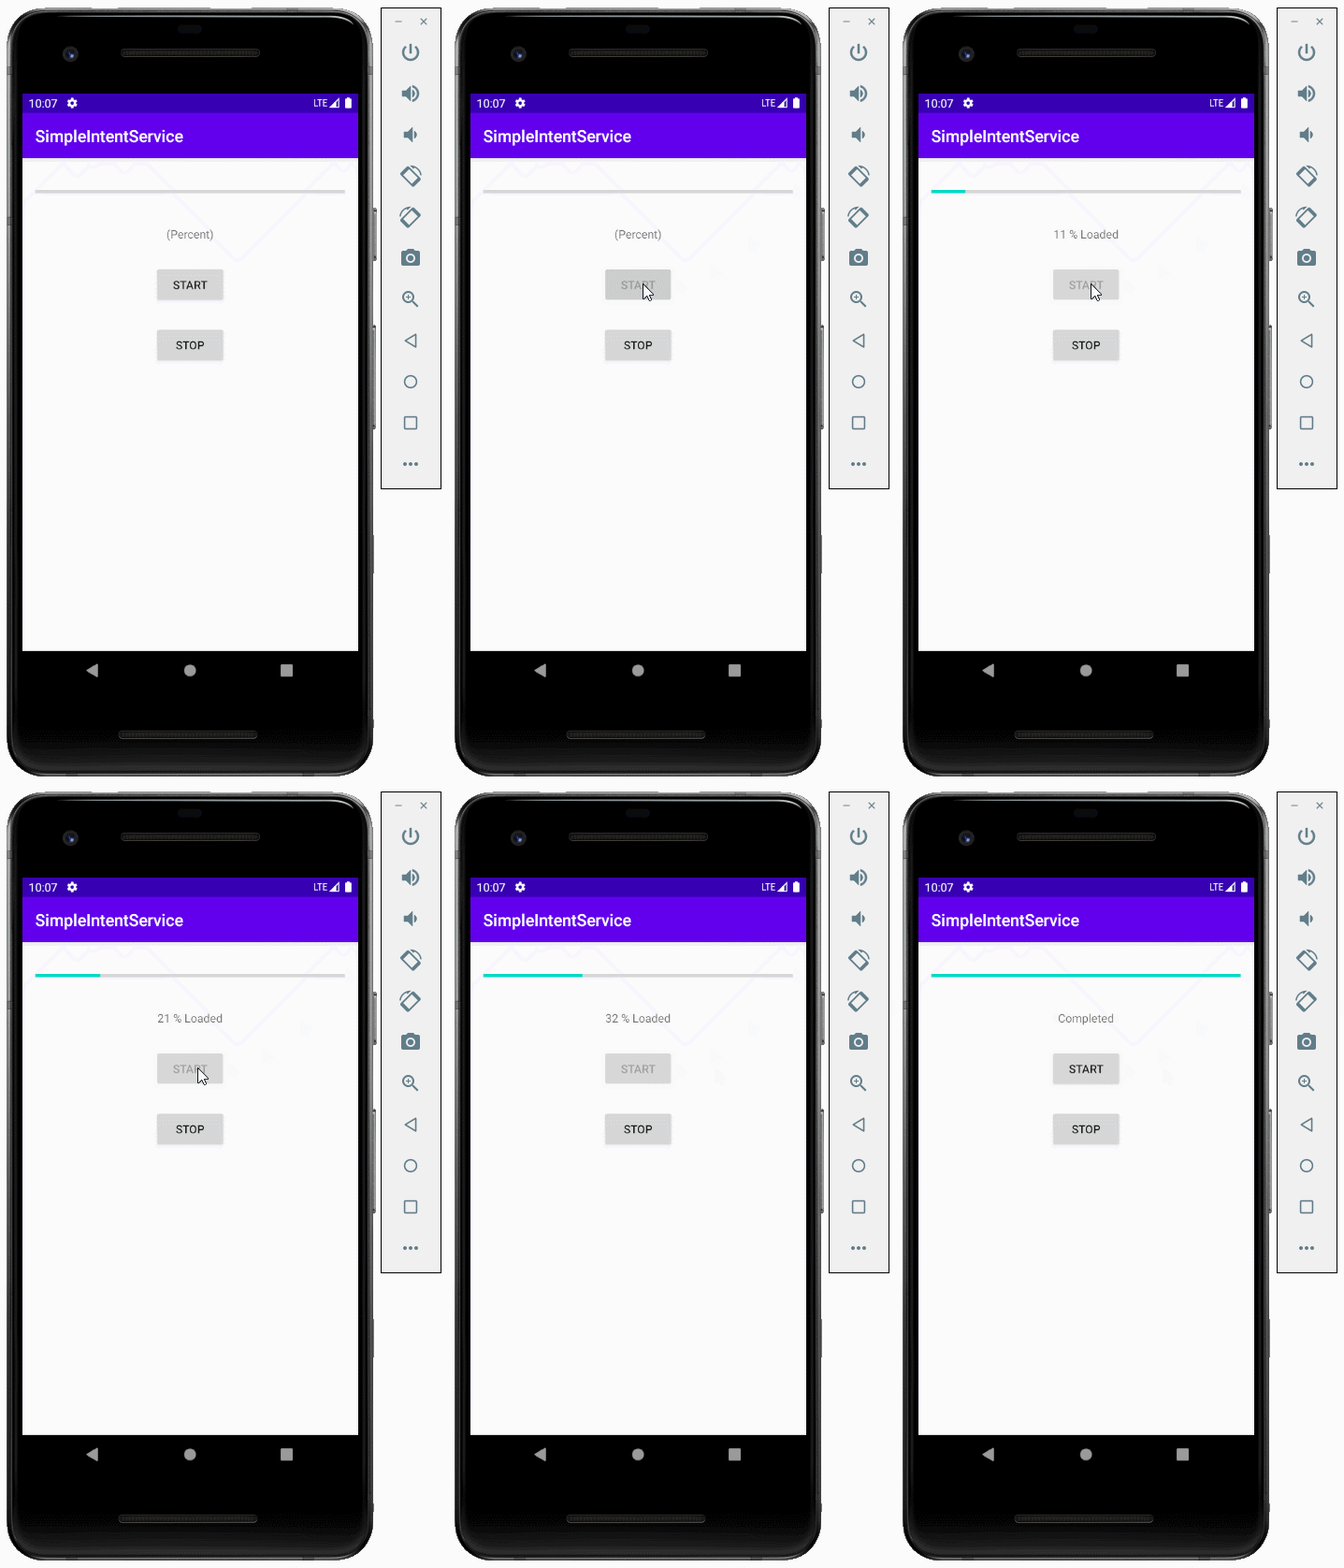
Run the application:
Et vous pouvez voir le principe de fonctionnement de cet exemple selon l'illustration ci-dessous:
Tutoriels de programmation Android
- Configurer Android Emulator en Android Studio
- Le Tutoriel de Android ToggleButton
- Créer un File Finder Dialog simple dans Android
- Le Tutoriel de Android TimePickerDialog
- Le Tutoriel de Android DatePickerDialog
- De quoi avez-vous besoin pour démarrer avec Android?
- Installer Android Studio sur Windows
- Installer Intel® HAXM pour Android Studio
- Le Tutoriel de Android AsyncTask
- Le Tutoriel de Android AsyncTaskLoader
- Tutoriel Android pour débutant - Exemples de base
- Comment connaître le numéro de téléphone d'Android Emulator et le changer?
- Le Tutoriel de Android TextInputLayout
- Le Tutoriel de Android CardView
- Le Tutoriel de Android ViewPager2
- Obtenir un numéro de téléphone dans Android à l'aide de TelephonyManager
- Le Tutoriel de Android Phone Call
- Le Tutoriel de Android Wifi Scanning
- Le Tutoriel de programmation de jeux Android 2D pour débutant
- Le Tutoriel de Android DialogFragment
- Le Tutoriel de Android CharacterPickerDialog
- Le Tutoriel Android pour débutant - Hello Android
- Utiliser Android Device File Explorer
- Activer USB Debugging sur un appareil Android
- Le Tutoriel de Android UI Layouts
- Le Tutoriel de Android SMS
- Le Tutoriel de Android et SQLite Database
- Le Tutoriel de Google Maps Android API
- Le Tutoriel de texte pour parler dans Android
- Le Tutoriel de Android Space
- Le Tutoriel de Android Toast
- Créer un Android Toast personnalisé
- Le Tutoriel de Android SnackBar
- Le Tutoriel de Android TextView
- Le Tutoriel de Android TextClock
- Le Tutoriel de Android EditText
- Le Tutoriel de Android TextWatcher
- Formater le numéro de carte de crédit avec Android TextWatcher
- Le Tutoriel de Android Clipboard
- Créer un File Chooser simple dans Android
- Le Tutoriel de Android AutoCompleteTextView et MultiAutoCompleteTextView
- Le Tutoriel de Android ImageView
- Le Tutoriel de Android ImageSwitcher
- Le Tutoriel de Android ScrollView et HorizontalScrollView
- Le Tutoriel de Android WebView
- Le Tutoriel de Android SeekBar
- Le Tutoriel de Android Dialog
- Le Tutoriel de Android AlertDialog
- Tutoriel Android RatingBar
- Le Tutoriel de Android ProgressBar
- Le Tutoriel de Android Spinner
- Le Tutoriel de Android Button
- Le Tutoriel de Android Switch
- Le Tutoriel de Android ImageButton
- Le Tutoriel de Android FloatingActionButton
- Le Tutoriel de Android CheckBox
- Le Tutoriel de Android RadioGroup et RadioButton
- Le Tutoriel de Android Chip et ChipGroup
- Utilisation des Image assets et des Icon assets d'Android Studio
- Configuration de la Carte SD pour Android Emulator
- Exemple ChipGroup et Chip Entry
- Comment ajouter des bibliothèques externes à Android Project dans Android Studio?
- Comment désactiver les autorisations déjà accordées à l'application Android?
- Comment supprimer des applications de Android Emulator?
- Le Tutoriel de Android LinearLayout
- Le Tutoriel de Android TableLayout
- Le Tutoriel de Android FrameLayout
- Le Tutoriel de Android QuickContactBadge
- Le Tutoriel de Android StackView
- Le Tutoriel de Android Camera
- Le Tutoriel de Android MediaPlayer
- Le Tutoriel de Android VideoView
- Jouer des effets sonores dans Android avec SoundPool
- Le Tutoriel de Android Networking
- Analyser JSON dans Android
- Le Tutoriel de Android SharedPreferences
- Le Tutorial de stockage interne Android (Internal Storage)
- Le Tutoriel de Android External Storage
- Le Tutoriel de Android Intents
- Exemple d'une Android Intent explicite, appelant une autre Intent
- Exemple de Android Intent implicite, ouvrez une URL, envoyez un email
- Le Tutoriel de Android Service
- Le Tutoriel Android Notifications
- Le Tutoriel de Android DatePicker
- Le Tutoriel de Android TimePicker
- Le Tutoriel de Android Chronometer
- Le Tutoriel de Android OptionMenu
- Le Tutoriel de Android ContextMenu
- Le Tutoriel de Android PopupMenu
- Le Tutoriel de Android Fragment
- Le Tutoriel de Android ListView
- Android ListView avec Checkbox en utilisant ArrayAdapter
- Le Tutoriel de Android GridView
Show More