Le Tutoriel de Android Button
1. Android Button
Sous Android, Button est un contrôle d'interface utilisateur (user interface control) permettant d'effectuer une action quand l'utilisateur clique dessus.
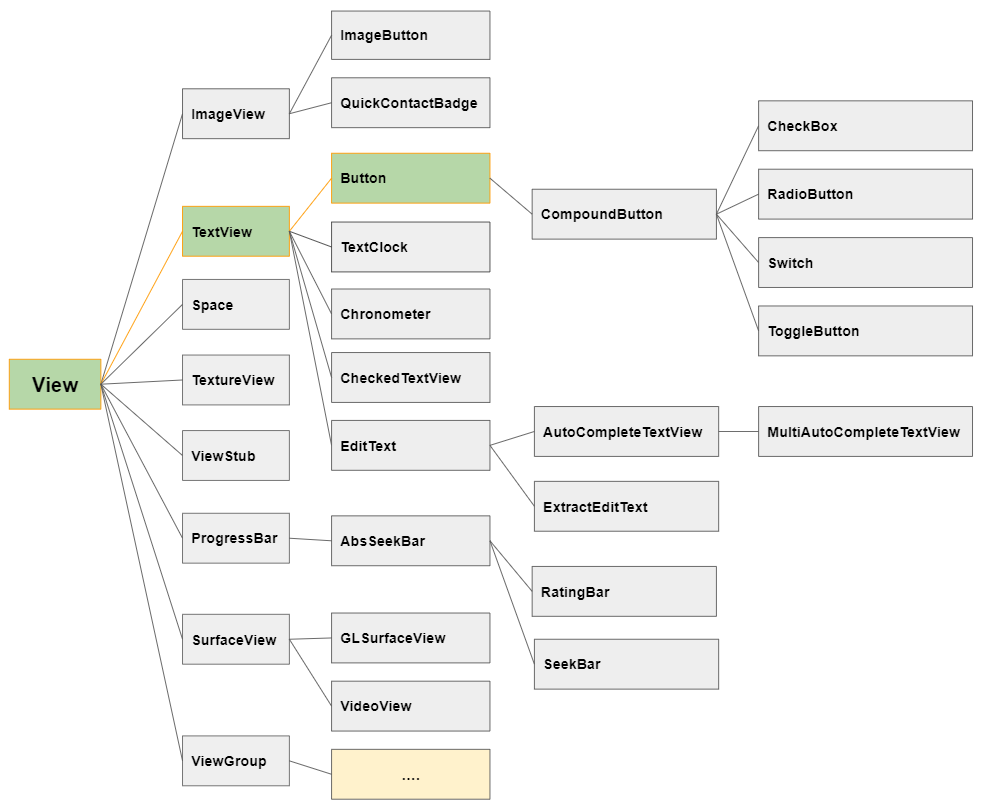
Dans la hiérarchie des classes, Button est une sous-classe de TextView, cela hérite donc de toutes les fonctions d'un TextView.

android:textAllCaps
Par défaut, lors de l'affichage du contenu, le texte de Button est transformé en majuscule (uppercase), par conséquent, il faut définir android:textAllCaps="false" afin de s'assurer que le contenu est affiché exactement comme dans l'original.
<Button
    android:id="@+id/button3"
    android:text="Alarm"
    android:drawableLeft="@drawable/icon_alarm"
    android:textAllCaps="false"
    ... />
android:gravity
L'attribut android:gravity est utilisé pour définir la position d'affichage du texte d'un Button. Sa valeur est la combinaison des valeurs suivantes:
Constant in Java | Value | Description |
Gravity.LEFT | left | |
Gravity.CENTER_HORIZONTAL | center_horizontal | |
Gravity.RIGHT | right | |
Gravity.TOP | top | |
Gravity.CENTER_VERTICAL | center_vertical | |
Gravity.BOTTOM | bottom | |
Gravity.START | start | |
Gravity.END | end | |
Gravity.CENTER | center | |
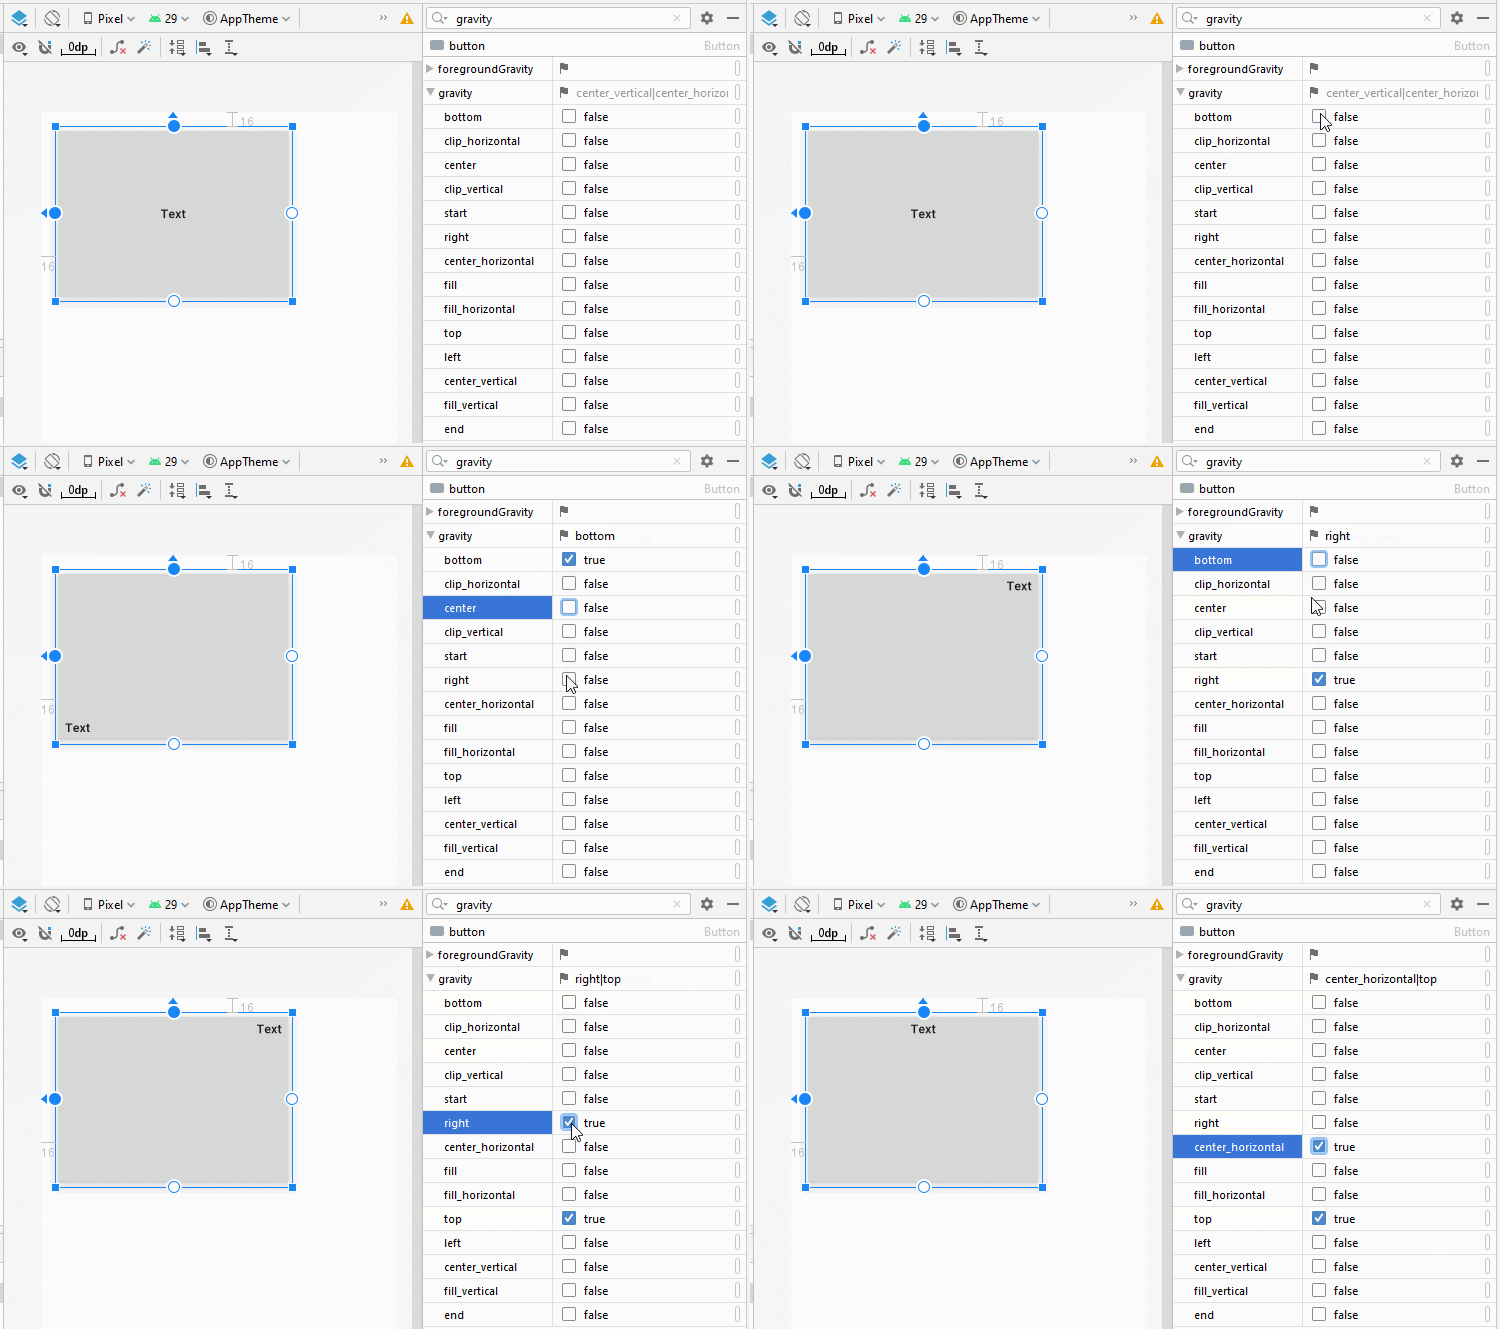
<Button
    android:id="@+id/button"
    android:gravity="center_horizontal|top"
    android:text="Text"
    ... />
Icon - android:drawableLef, android:drawableTop,..
Android permet d'ajouter 4 icônes dans un Button via les attributs android:drawableLef, android:drawableTop, android:drawableRight, android:drawableBottom, android:drawableStart, android:drawableEnd.
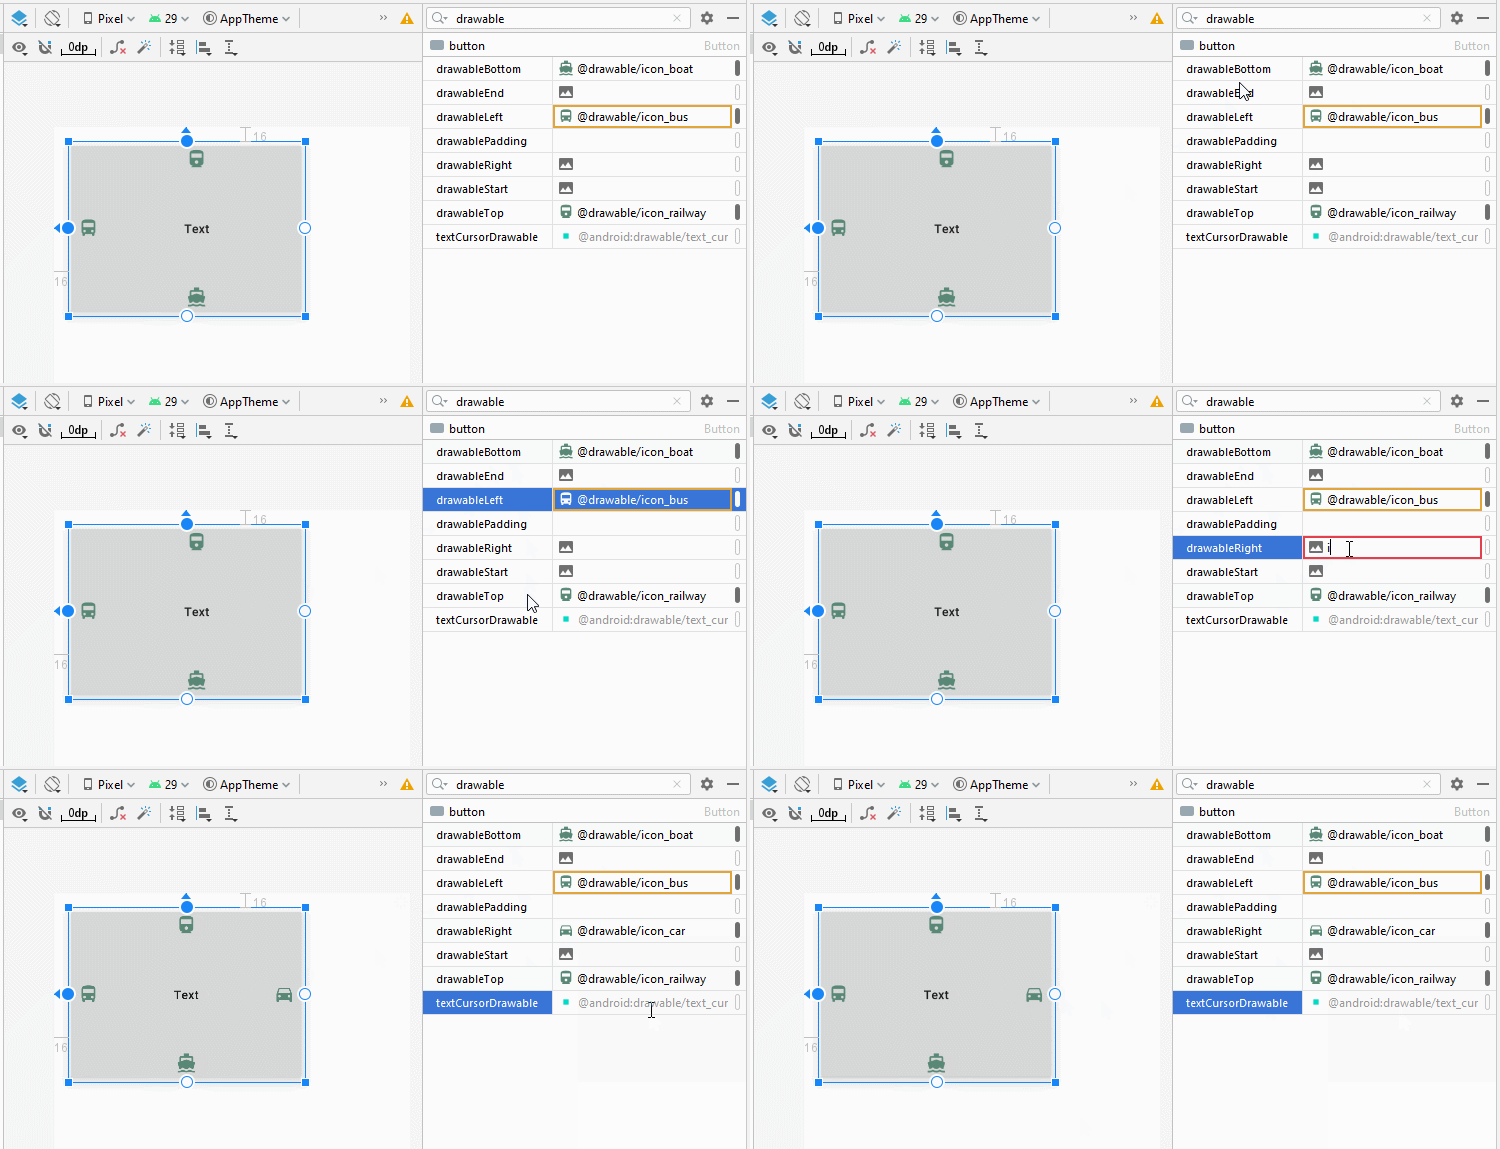
<Button
    android:id="@+id/button"
    android:drawableLeft="@drawable/icon_bus"
    android:drawableTop="@drawable/icon_railway"
    android:drawableRight="@drawable/icon_car"
    android:drawableBottom="@drawable/icon_boat"
    android:text="Text"
    ...  />
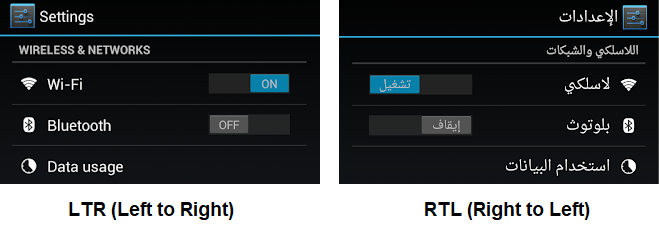
Android 4.1 assiste les différences dans la mise en forme des différentes langues. Précisément, en anglais, le texte est écrit de gauche à droite, alors que dans les langues arabes, le texte est écrit de droite à gauche.
LTR (Left to Right)
En mode de disposition LTR (Left to Right): l'attribut android:drawableStart fonctionne de même manière que android:drawableLeft, et android:drawableEnd fonctionne de même manière que android:drawableRight.
RTL (Right to Left)
En mode de disposition RTL (Right to Left): l'attribut android:drawableStart fonctionne de même manière que android:drawableRight, et android:drawableEnd fonctionne de même manière que android:drawableStart.
- Android LTR, RTL Support
2. Button Click Event
L'évènement Click (Cliquer) se produit après que l'utilisateur appuie (Press down) et lâche (Release) Button.
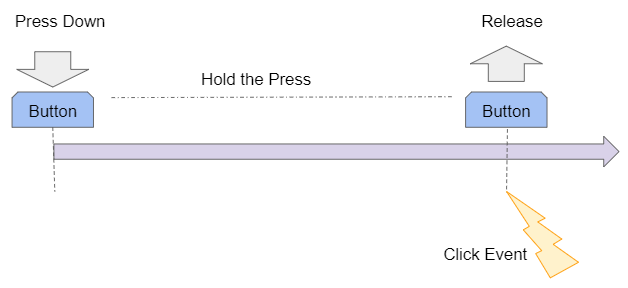
Vous pouvez définir le nom de la méthode qui sera convoquée quand l'utilisateur clique sur (click) sur Button en utilisant l'attribut android.onClick.
<Button
    android:id="@+id/button_clickMe"
    android:onClick="onClickHandler"
    android:text="Click Me"
    ... />
En même temps, créer cette méthode dans la classe MainActivity.
// MainActivity

public void onClickHandler(View view)  {
    Toast.makeText(this, "You click on 'Click Me' button!", Toast.LENGTH_SHORT).show();
}
Vous pouvez définir la méthode convoquée quand l'utilisateur clique sur Button par le code Java:
this.buttonClickMe = (Button) this.findViewById(R.id.button_clickMe);

this.buttonClickMe.setOnClickListener(new View.OnClickListener() {
    @Override
    public void onClick(View v) {
        Toast.makeText(MainActivity.this, "You click on 'Click Me' button!", Toast.LENGTH_SHORT).show();
    }
});
3. Button Long Click Event
L'évènement Long Click (clic long) sous Android se produit quand l'utilisateur appuie (Press down) longuement sur View. Précisément, l'évènement se produit à la miliseconde LONG_PRESS_TIMEOUT à partir du moment où l'utilisateur appuie dessus (Press down). Vous obtenez la valeur de LONG_PRESS_TIMEOUT par la méthode ViewConfiguration.getLongPressTimeout().
La durée par défaut d'un clic long (Long-Click) sous Android est DEFAULT_LONG_PRESS_TIMEOUT miliseconde. L'utilisateur peut modifier la durée du clic long (Long-Click) dans les Settings de l'appareil, laquelle est applicable à toutes les applications du système. Les développeurs d'application ne peuvent pas modifier cette valeur.
Constant (private) | Method | Value (Milliseconds) |
DEFAULT_LONG_PRESS_TIMEOUT | 500 | |
ViewConfiguration.getLongPressTimeout() | 500 (default) |
Exemple: Gérer l'évènement quand l'utilisateur procède à un Long Click (clic long) sur un Button par les codes Java (Remarque: Vous ne pouvez pas le pratiquer avec XML).
this.buttonClickMe = (Button) this.findViewById(R.id.button_clickMe);


this.buttonClickMe.setOnLongClickListener(new View.OnLongClickListener() {
    @Override
    public boolean onLongClick(View v) {
        Toast.makeText(MainActivity.this, "You long click on 'Click Me' button!", Toast.LENGTH_SHORT).show();
        return true;
    }
});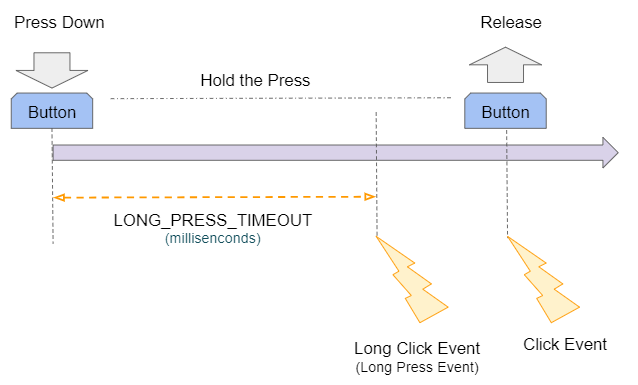
Si l'utilisateur clique (click) longuement sur View (plus que LONG_PRESS_TIMEOUT milisecondes), cette action peut générer deux évènements consécutifs que sont Long-Click et Click.
La méthode onLongClick(View) renvoie une valeur boolean. Renvoyer true signifie que vous avez procédé à l'évènement Long-Click, et l'évènement Click produit après sera ignoré. À l'inverse, si la méthode onLongClick(View) renvoie la valeur false, cela signifie que l'évènement Click produit après sera exécuté.
4. Exemple pour Android Button
Ci-dessous un simple exemple: l'utilisateur entrera deux numéros et appuie sur Button pour additionner ces deux numéros.
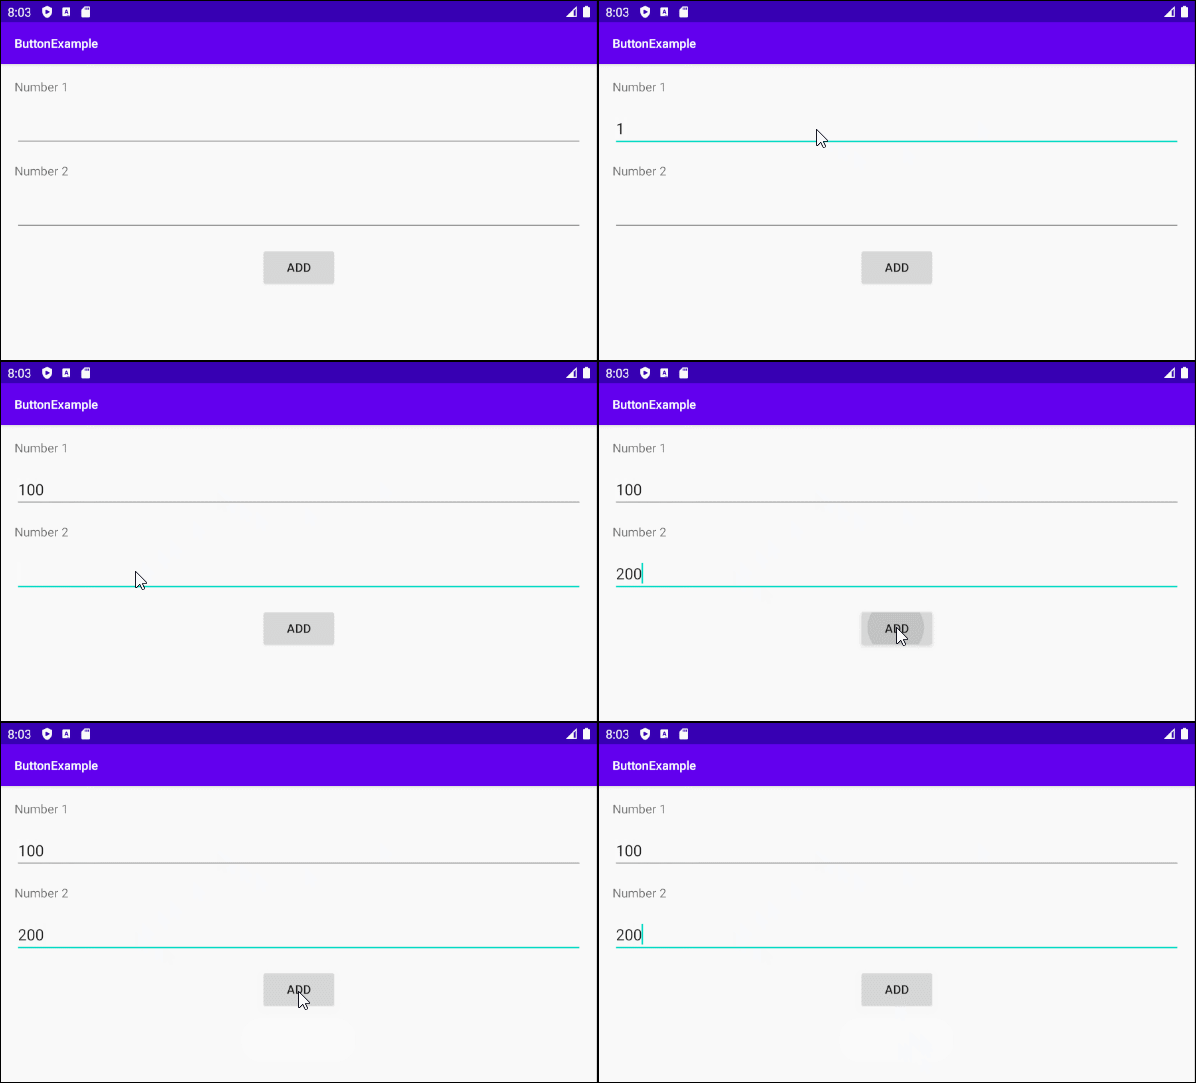
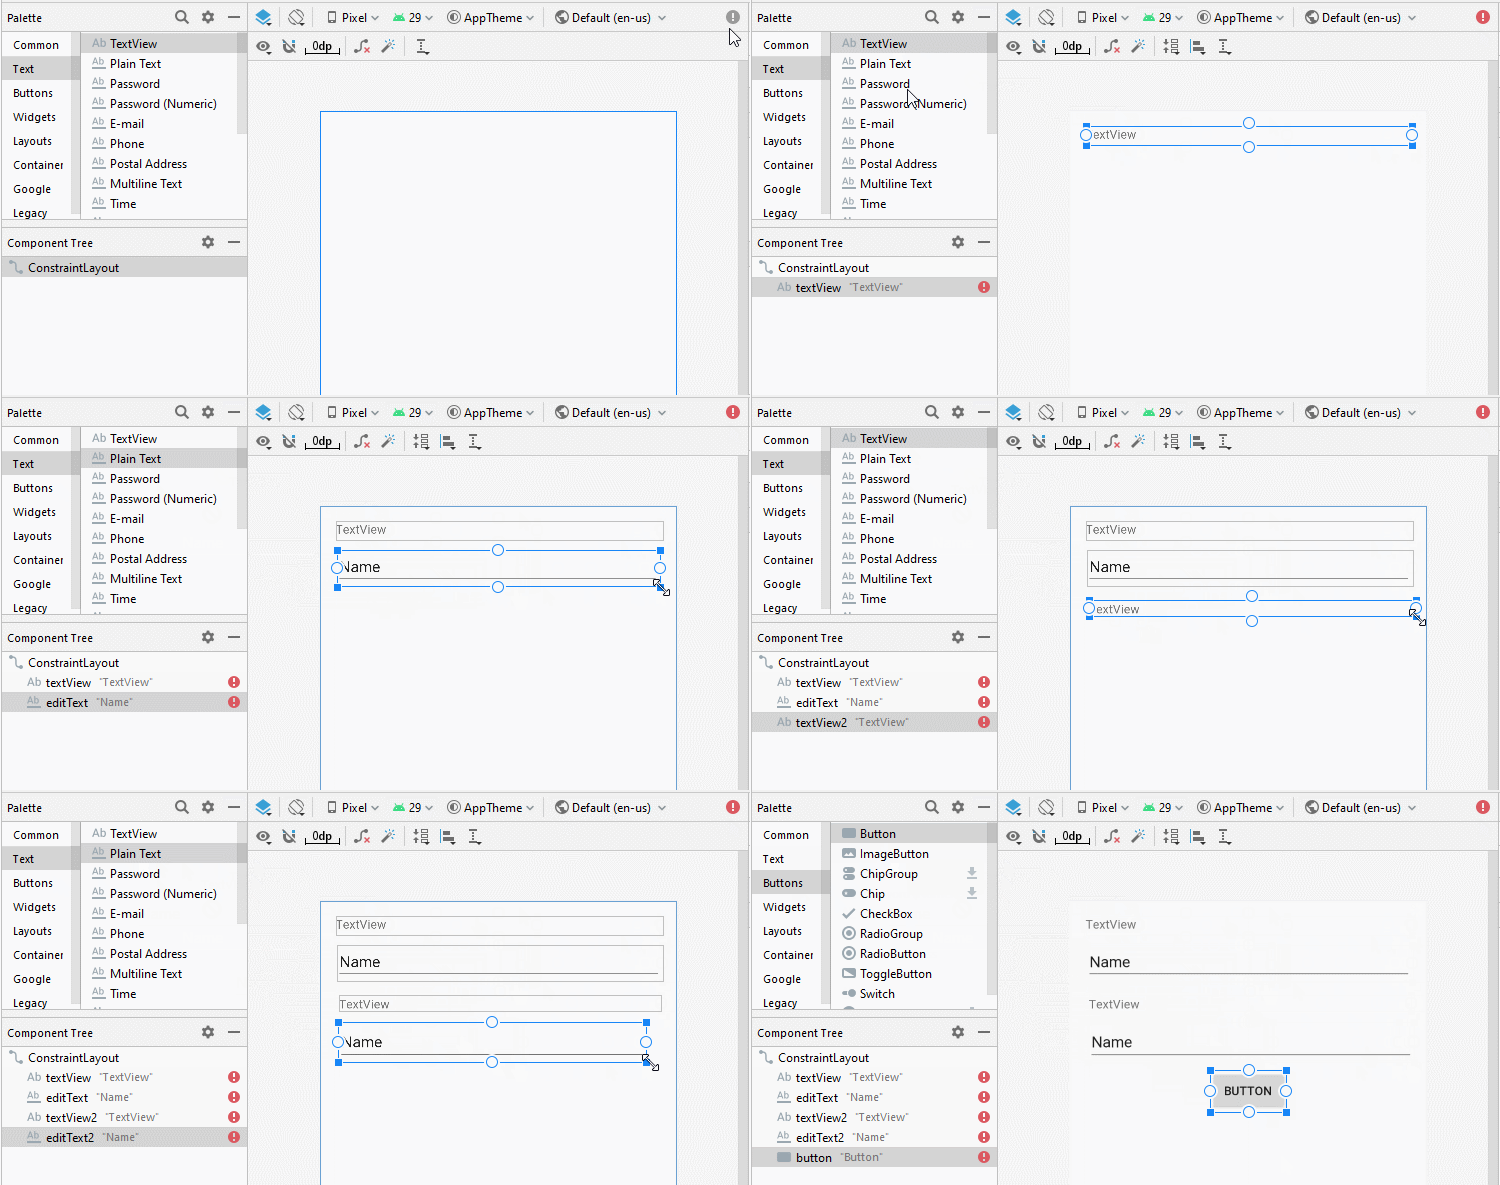
Concevoir l'interface de l'exemple:
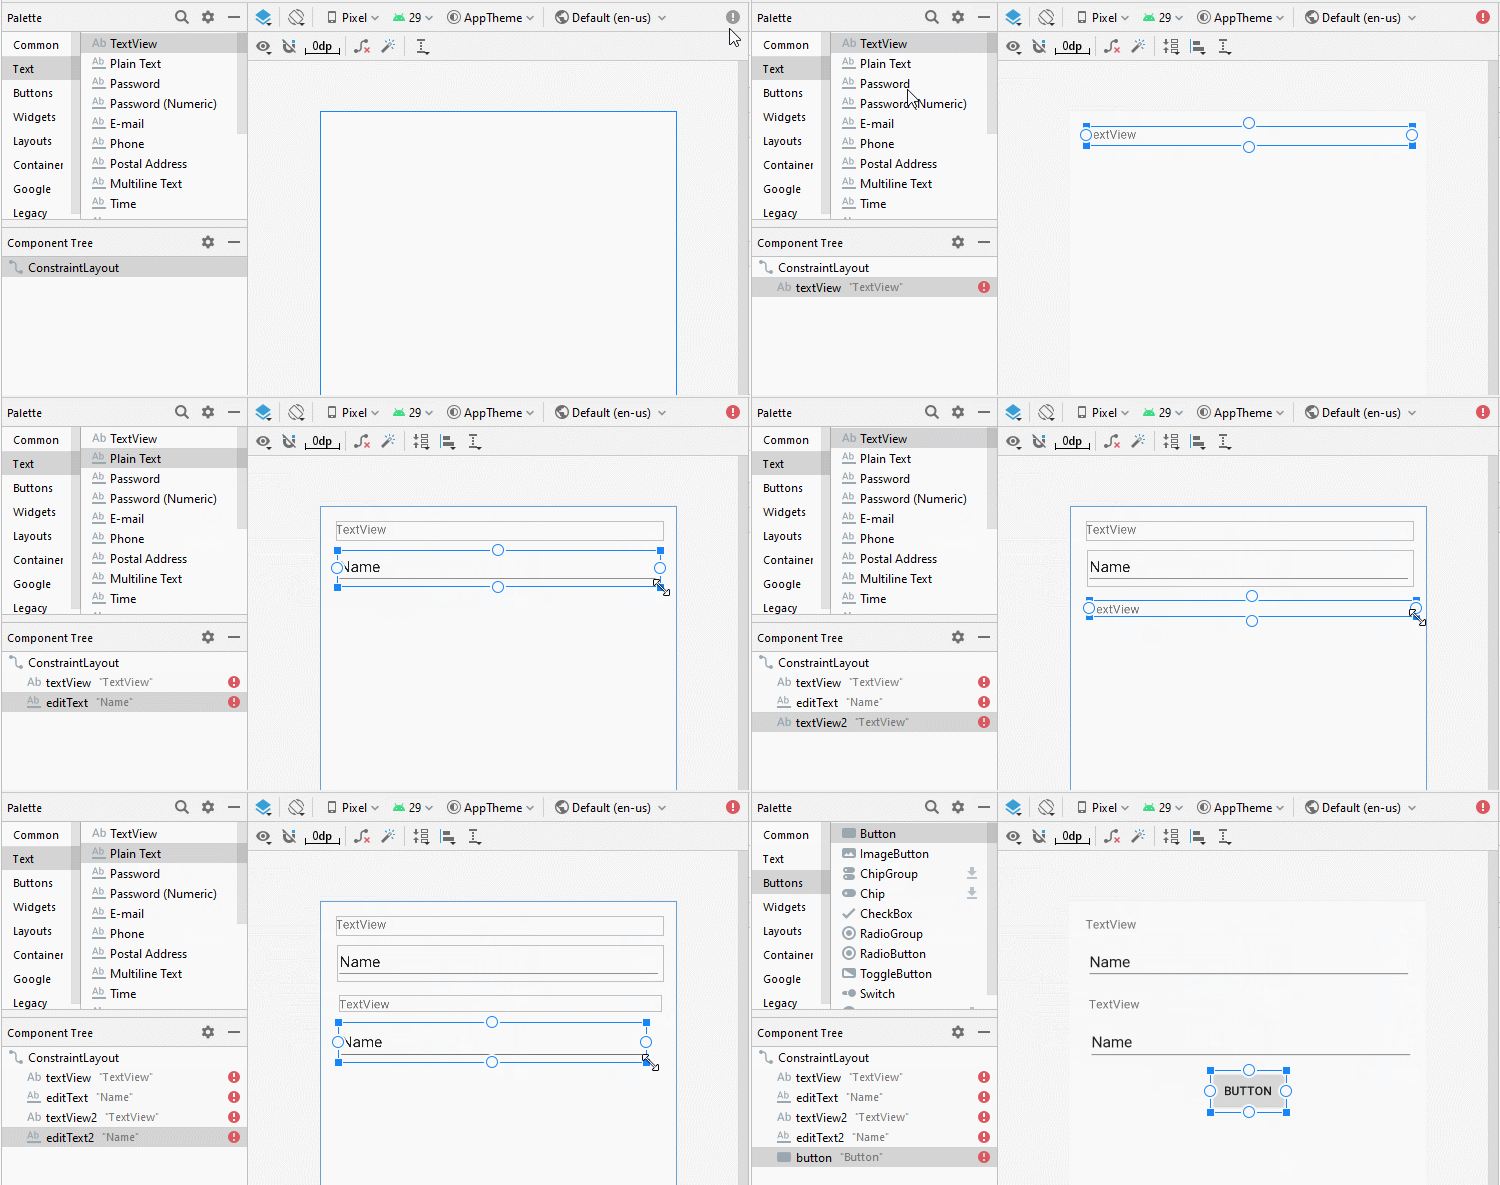
Aligner la position des composants de l'interface:
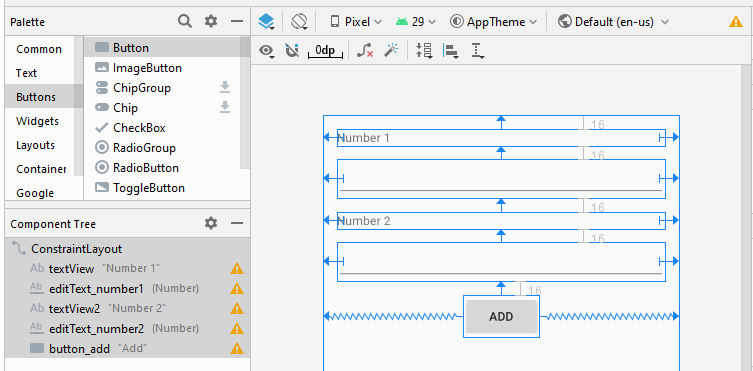
Définir ID, Text pour les composants de l'interface:
activity_main.xml
<?xml version="1.0" encoding="utf-8"?>
<androidx.constraintlayout.widget.ConstraintLayout
    xmlns:android="http://schemas.android.com/apk/res/android"
    xmlns:app="http://schemas.android.com/apk/res-auto"
    xmlns:tools="http://schemas.android.com/tools"
    android:layout_width="match_parent"
    android:layout_height="match_parent"
    tools:context=".MainActivity">

    <TextView
        android:id="@+id/textView"
        android:layout_width="0dp"
        android:layout_height="wrap_content"
        android:layout_marginStart="16dp"
        android:layout_marginLeft="16dp"
        android:layout_marginTop="16dp"
        android:layout_marginEnd="16dp"
        android:layout_marginRight="16dp"
        android:text="Number 1"
        app:layout_constraintEnd_toEndOf="parent"
        app:layout_constraintStart_toStartOf="parent"
        app:layout_constraintTop_toTopOf="parent" />

    <EditText
        android:id="@+id/editText_number1"
        android:layout_width="0dp"
        android:layout_height="wrap_content"
        android:layout_marginStart="16dp"
        android:layout_marginLeft="16dp"
        android:layout_marginTop="16dp"
        android:layout_marginEnd="16dp"
        android:layout_marginRight="16dp"
        android:ems="10"
        android:inputType="number"
        app:layout_constraintEnd_toEndOf="parent"
        app:layout_constraintStart_toStartOf="parent"
        app:layout_constraintTop_toBottomOf="@+id/textView" />

    <TextView
        android:id="@+id/textView2"
        android:layout_width="0dp"
        android:layout_height="wrap_content"
        android:layout_marginStart="16dp"
        android:layout_marginLeft="16dp"
        android:layout_marginTop="16dp"
        android:layout_marginEnd="16dp"
        android:layout_marginRight="16dp"
        android:text="Number 2"
        app:layout_constraintEnd_toEndOf="parent"
        app:layout_constraintStart_toStartOf="parent"
        app:layout_constraintTop_toBottomOf="@+id/editText_number1" />

    <EditText
        android:id="@+id/editText_number2"
        android:layout_width="0dp"
        android:layout_height="wrap_content"
        android:layout_marginStart="16dp"
        android:layout_marginLeft="16dp"
        android:layout_marginTop="16dp"
        android:layout_marginEnd="16dp"
        android:layout_marginRight="16dp"
        android:ems="10"
        android:inputType="number"
        app:layout_constraintEnd_toEndOf="parent"
        app:layout_constraintStart_toStartOf="parent"
        app:layout_constraintTop_toBottomOf="@+id/textView2" />

    <Button
        android:id="@+id/button_add"
        android:layout_width="wrap_content"
        android:layout_height="wrap_content"
        android:layout_marginTop="16dp"
        android:text="Add"
        app:layout_constraintEnd_toEndOf="parent"
        app:layout_constraintStart_toStartOf="parent"
        app:layout_constraintTop_toBottomOf="@+id/editText_number2" />
</androidx.constraintlayout.widget.ConstraintLayout>
MainActivity.java
package org.o7planning.buttonexample;

import androidx.appcompat.app.AppCompatActivity;

import android.os.Bundle;
import android.view.View;
import android.view.ViewConfiguration;
import android.widget.Button;
import android.widget.EditText;
import android.widget.Toast;

public class MainActivity extends AppCompatActivity {

    private EditText editTextNumber1;
    private EditText editTextNumber2;
    private Button buttonAdd;

    @Override
    protected void onCreate(Bundle savedInstanceState) {
        super.onCreate(savedInstanceState);
        setContentView(R.layout.activity_main);

        this.editTextNumber1 = (EditText) this.findViewById(R.id.editText_number1);
        this.editTextNumber2 = (EditText) this.findViewById(R.id.editText_number2);

        this.buttonAdd = (Button) this.findViewById(R.id.button_add);

        this.buttonAdd.setOnClickListener(new View.OnClickListener() {
            @Override
            public void onClick(View v) {
                add2Number();
            }
        });
    }


    private void add2Number()  {
        String str1 = this.editTextNumber1.getText().toString();
        String str2 = this.editTextNumber2.getText().toString();
        try {
            double value1 = Double.parseDouble(str1);
            double value2 = Double.parseDouble(str2);

            double result = value1 + value2;

            Toast.makeText(this, "Result: " + result, Toast.LENGTH_SHORT).show();
        } catch(Exception e)  {
            Toast.makeText(this, "Error: "+ e, Toast.LENGTH_SHORT).show();
        }
    }

}
Tutoriels de programmation Android
- Configurer Android Emulator en Android Studio
- Le Tutoriel de Android ToggleButton
- Créer un File Finder Dialog simple dans Android
- Le Tutoriel de Android TimePickerDialog
- Le Tutoriel de Android DatePickerDialog
- De quoi avez-vous besoin pour démarrer avec Android?
- Installer Android Studio sur Windows
- Installer Intel® HAXM pour Android Studio
- Le Tutoriel de Android AsyncTask
- Le Tutoriel de Android AsyncTaskLoader
- Tutoriel Android pour débutant - Exemples de base
- Comment connaître le numéro de téléphone d'Android Emulator et le changer?
- Le Tutoriel de Android TextInputLayout
- Le Tutoriel de Android CardView
- Le Tutoriel de Android ViewPager2
- Obtenir un numéro de téléphone dans Android à l'aide de TelephonyManager
- Le Tutoriel de Android Phone Call
- Le Tutoriel de Android Wifi Scanning
- Le Tutoriel de programmation de jeux Android 2D pour débutant
- Le Tutoriel de Android DialogFragment
- Le Tutoriel de Android CharacterPickerDialog
- Le Tutoriel Android pour débutant - Hello Android
- Utiliser Android Device File Explorer
- Activer USB Debugging sur un appareil Android
- Le Tutoriel de Android UI Layouts
- Le Tutoriel de Android SMS
- Le Tutoriel de Android et SQLite Database
- Le Tutoriel de Google Maps Android API
- Le Tutoriel de texte pour parler dans Android
- Le Tutoriel de Android Space
- Le Tutoriel de Android Toast
- Créer un Android Toast personnalisé
- Le Tutoriel de Android SnackBar
- Le Tutoriel de Android TextView
- Le Tutoriel de Android TextClock
- Le Tutoriel de Android EditText
- Le Tutoriel de Android TextWatcher
- Formater le numéro de carte de crédit avec Android TextWatcher
- Le Tutoriel de Android Clipboard
- Créer un File Chooser simple dans Android
- Le Tutoriel de Android AutoCompleteTextView et MultiAutoCompleteTextView
- Le Tutoriel de Android ImageView
- Le Tutoriel de Android ImageSwitcher
- Le Tutoriel de Android ScrollView et HorizontalScrollView
- Le Tutoriel de Android WebView
- Le Tutoriel de Android SeekBar
- Le Tutoriel de Android Dialog
- Le Tutoriel de Android AlertDialog
- Tutoriel Android RatingBar
- Le Tutoriel de Android ProgressBar
- Le Tutoriel de Android Spinner
- Le Tutoriel de Android Button
- Le Tutoriel de Android Switch
- Le Tutoriel de Android ImageButton
- Le Tutoriel de Android FloatingActionButton
- Le Tutoriel de Android CheckBox
- Le Tutoriel de Android RadioGroup et RadioButton
- Le Tutoriel de Android Chip et ChipGroup
- Utilisation des Image assets et des Icon assets d'Android Studio
- Configuration de la Carte SD pour Android Emulator
- Exemple ChipGroup et Chip Entry
- Comment ajouter des bibliothèques externes à Android Project dans Android Studio?
- Comment désactiver les autorisations déjà accordées à l'application Android?
- Comment supprimer des applications de Android Emulator?
- Le Tutoriel de Android LinearLayout
- Le Tutoriel de Android TableLayout
- Le Tutoriel de Android FrameLayout
- Le Tutoriel de Android QuickContactBadge
- Le Tutoriel de Android StackView
- Le Tutoriel de Android Camera
- Le Tutoriel de Android MediaPlayer
- Le Tutoriel de Android VideoView
- Jouer des effets sonores dans Android avec SoundPool
- Le Tutoriel de Android Networking
- Analyser JSON dans Android
- Le Tutoriel de Android SharedPreferences
- Le Tutorial de stockage interne Android (Internal Storage)
- Le Tutoriel de Android External Storage
- Le Tutoriel de Android Intents
- Exemple d'une Android Intent explicite, appelant une autre Intent
- Exemple de Android Intent implicite, ouvrez une URL, envoyez un email
- Le Tutoriel de Android Service
- Le Tutoriel Android Notifications
- Le Tutoriel de Android DatePicker
- Le Tutoriel de Android TimePicker
- Le Tutoriel de Android Chronometer
- Le Tutoriel de Android OptionMenu
- Le Tutoriel de Android ContextMenu
- Le Tutoriel de Android PopupMenu
- Le Tutoriel de Android Fragment
- Le Tutoriel de Android ListView
- Android ListView avec Checkbox en utilisant ArrayAdapter
- Le Tutoriel de Android GridView
Show More