Le Tutoriel de Android TableLayout
1. Android TableLayout
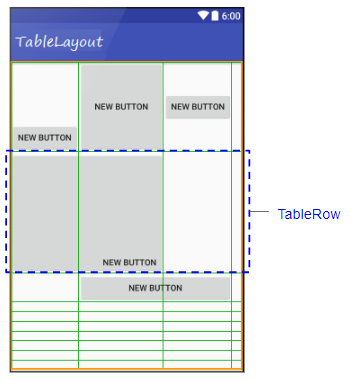
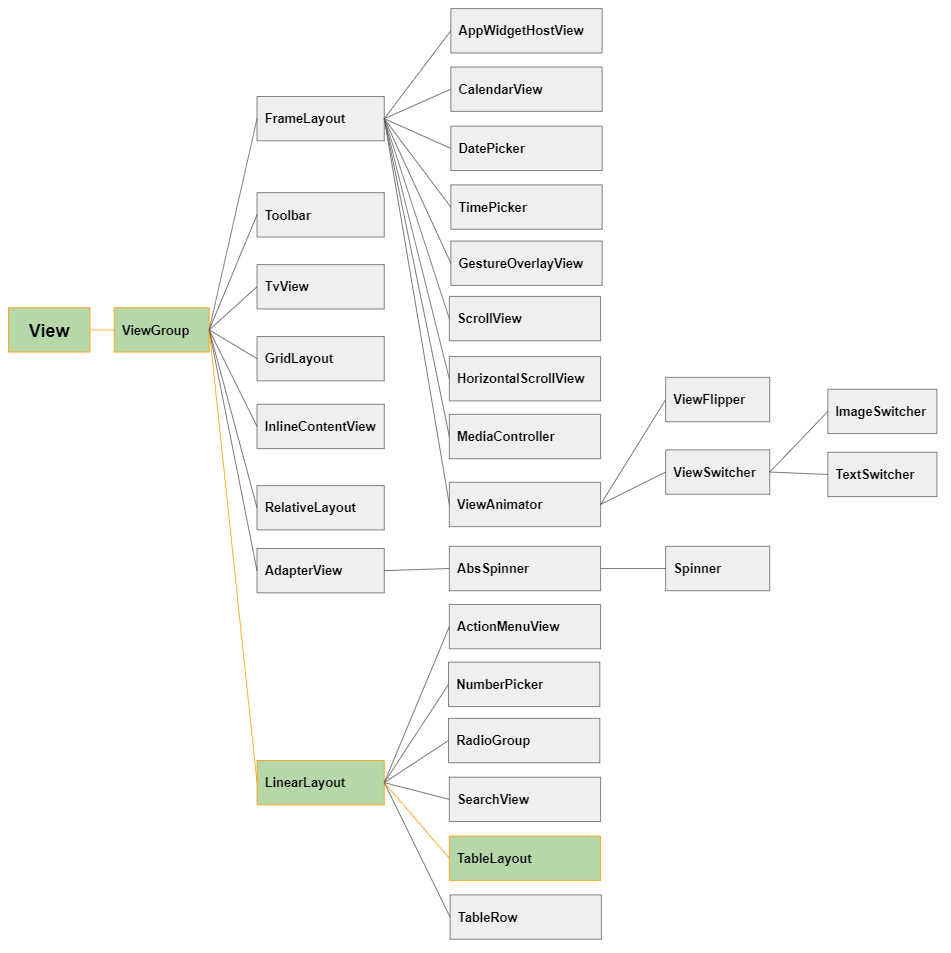
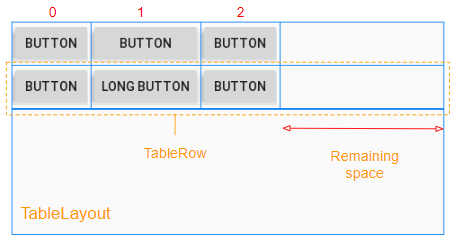
TableLayout organise les View qu'il contient sous forme de tables. Plus précisément, TableLayout est un ViewGroup contenant un ou plusieurs TableRow, chaque TableRow est une ligne (row) dans le tableau, contenant des cellules (cell). Les View enfant peuvent être placées dans une cellule ou dans une cellule fusionnée à partir de cellules consécutives d'une ligne. Contrairement aux tableaux en HTML, vous ne pouvez pas fusionner des cellules consécutives sur la même colonne.
TableLayout est comme une View normale, vous pouvez la glisser-déposer dans une interface disponible:
Ou utilisez-le comme la Layout originale de l'interface:
Ajoutez des TableRow et des View dans TableLayout:
2. TableLayout - android:stretchColumns
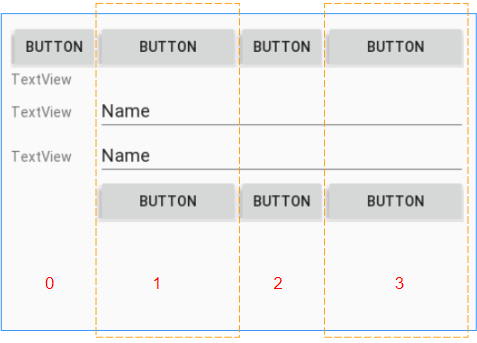
Dans TableLayout, les colonnes sont indexées 0, 1, 2 ... propriété android:stretchColumns vous permet de spécifier quelles colonnes seront étirées (stretched) pour remplir l'espace horizontal libre de TableLayout.
<!-- The columns with indexes 0 and 2 will be stretched. -->
<TableLayout
    ...
    android:stretchColumns="0, 2">

     ...

</TableLayout>


<!-- All columns will be stretched. -->
<TableLayout
    ...
    android:stretchColumns="*">

     ...

</TableLayout>
3. TableLayout - android:shrinkColumns
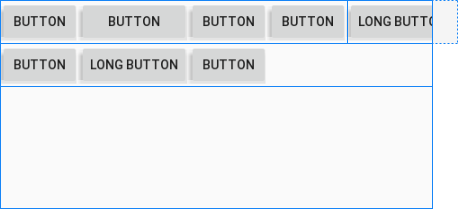
Contrairement à android:stretchColumns, l'attribut android:shrinkColumns spécifie les colonnes qui seront réduites(shrinked) pour empêcher les View enfant de déborder de TableLayout.
<!-- The columns with indexes 0 and 2 will be shrinked. -->
<TableLayout
    ...
    android:shrinkColumns="0, 2">

     ...

</TableLayout>


<!-- All columns will be shrinked. -->
<TableLayout
    ...
    android:shrinkColumns="*">

     ...

</TableLayout>
4. TableLayout - android:collapseColumns
L'attribut android:collapseColumns spécifie que les colonnes vont se réduire (collapsed), ce qui signifie que la largeur de la colonne sera 0, la colonne sera masquée.
<!-- The columns with indexes 0 and 2 will be collapsed-->
<TableLayout
    ...
    android:collapseColumns="0, 2">

     ...

</TableLayout>


<!-- All columns will be collapsed---->
<TableLayout
    ...
    android:collapseColumns="*">

     ...

</TableLayout>
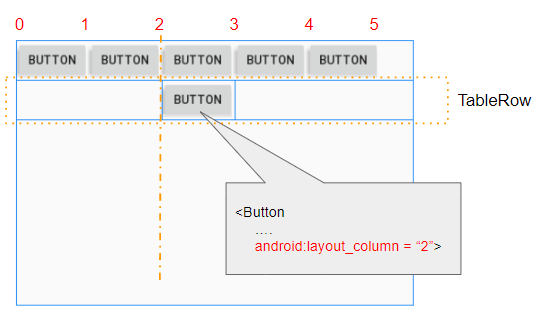
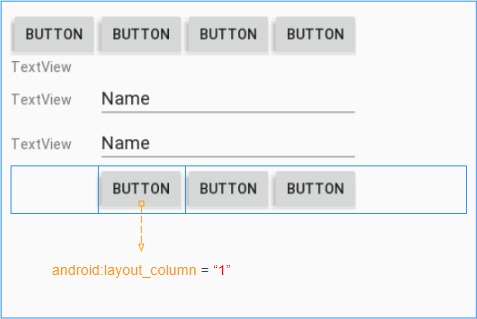
5. View - android:layout_column
L'attribut android:layout_column est appliqué à une View enfant dans un TableRow pour spécifier son index de colonne. Les valeurs possibles sont 0, 1, 2, ...
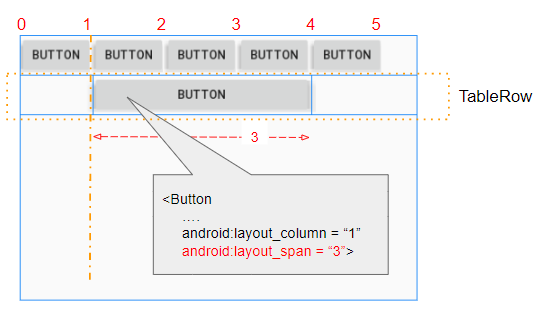
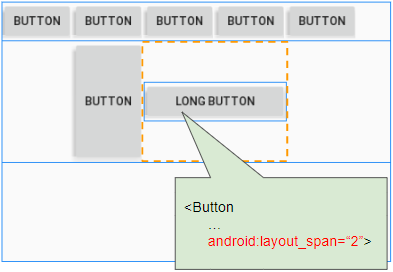
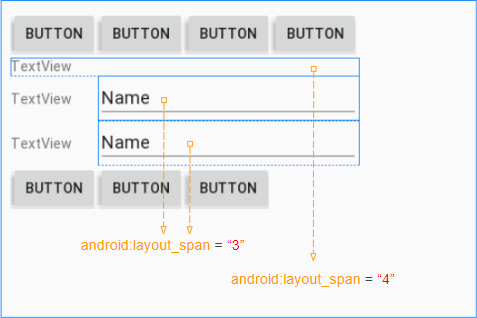
6. View - android:layout_span
L'attribut android:layout_span s'applique à la View enfant pour spécifier le nombre de cellules consécutives dans un TableRow qui seront fusionnées ensemble.
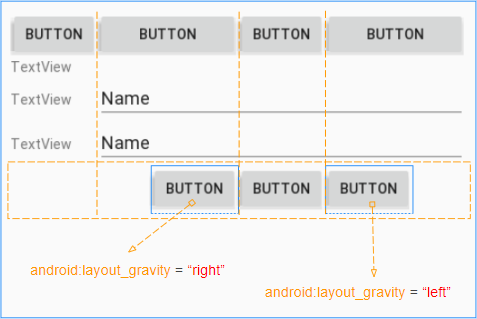
7. View - android:layout_gravity
L'attribut android:layout_gravity est appliqué aux View enfants (de TableRow) pour spécifier sa position relative par rapport à la cellule qui le contient. Cet attribut affecte le comportement de la propriété android:layout_width.
Cas 1: Si la propriété android:layout_gravity n'est pas définie pour la View enfant ( de TableRow), la View enfant aura toujours une largeur remplie avec la cellule qui la contient, ce qui signifie que la propriété android:layout_width obtiendra toujours la valeur MATCH_PARENT.
Cas 2: si la propriété android:layout_gravity est définie sur la View enfant (de TableRow), View enfant aura toujours la largeur par défaut, ce qui signifie que la propriété android:layout_width recevra toujours la valeur WRAP_CONTENT.
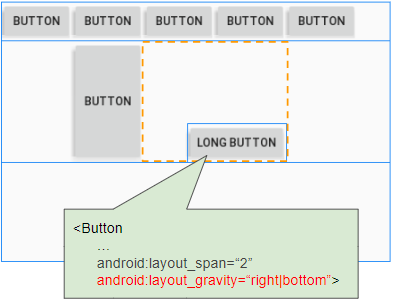
L'attribut android:layout_gravity est utilisé pour spécifier l'emplacement de View dans la cellule qui la contient.
Constant in Java | Value | Description |
Gravity.LEFT | left | |
Gravity.CENTER_HORIZONTAL | center_horizontal | |
Gravity.RIGHT | right | |
Gravity.TOP | top | |
Gravity.CENTER_VERTICAL | center_vertical | |
Gravity.BOTTOM | bottom | |
Gravity.START | start | |
Gravity.END | end | |
Gravity.CENTER | center | |
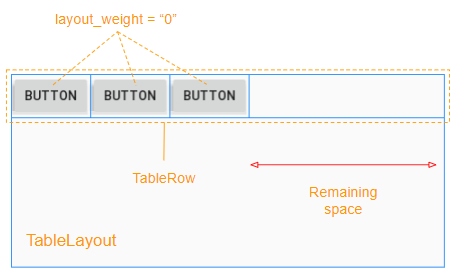
8. View - android:layout_weight
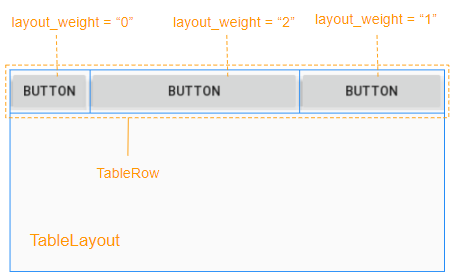
L'attribut android:layout_weight est utilisé pour les View enfant (de TableRow), il spécifie combien d'espace cette View enfant occupera horizontalement dans View parent (TableRow). Une valeur layout_weight supérieure à zéro permet à View enfant de se développer pour remplir tout espace restant dans View parent. Les View enfant peuvent spécifier une valeur layout_weight, puis tout espace restant dans View parent sera affecté aux View enfant en fonction de leur ratio layout_weight.
Lorsque toutes les View enfants (de TableRow) ont android:layout_weight = 0, vous verrez un espace vide dans View parent (TableRow):
View enfant a android:layout_weight> 0 occupera l'espace libre de View parent (TableRow):
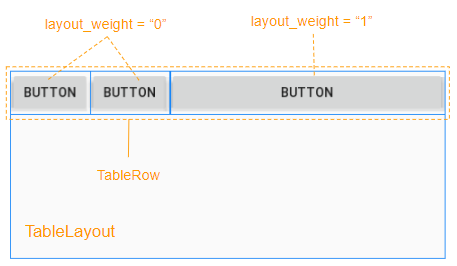
L'espace libre de View parent (TableRow) sera alloué a View enfant en fonction de leur ratio layout_weight.
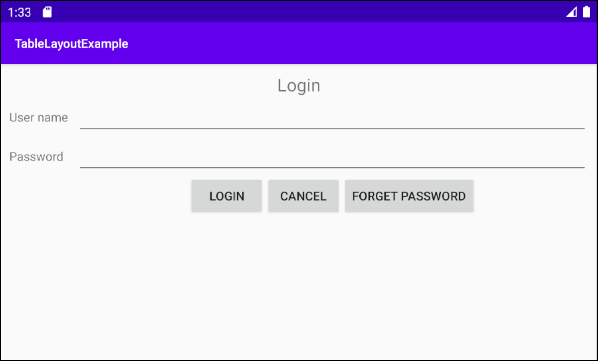
9. Exemple de TableLayout
Voici une fenêtre de connexion, pensez-vous que vous pouvez utiliser TableLayout pour concevoir l'interface pour cela?
La réponse est "Absolument possible", et voici l'esquisse de l'idée de design:
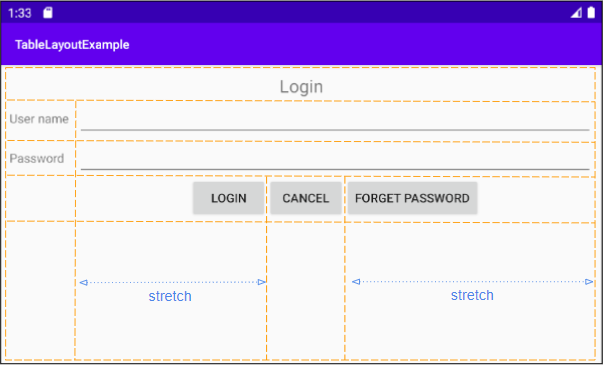
Ensuite, il faut suivre l'idée:
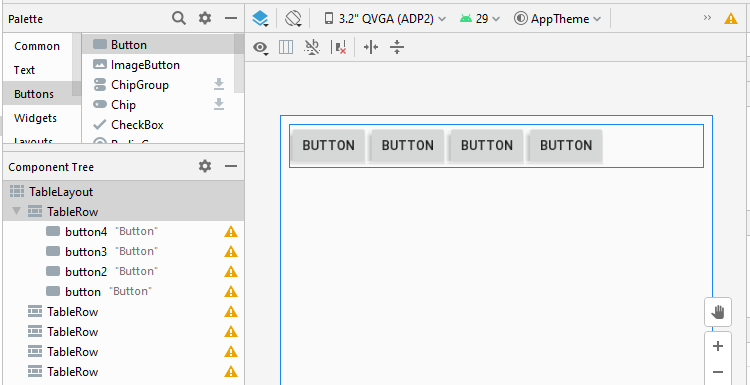
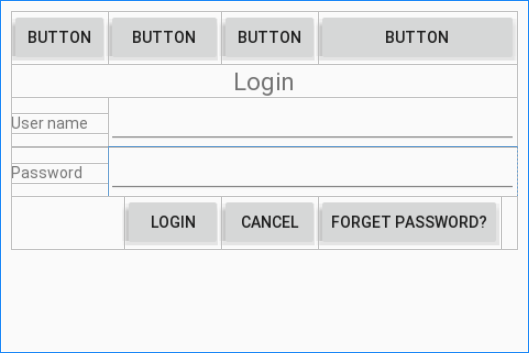
Étape 1: Ajoutez 5 TableRow à TableLayout:
Étape 2: Ajoutez 4 Button au premier TableRow, nous aurons un TableLayout avec 4 colonnes, cela facilitera le processus de conception. Le premier TableRow sera supprimé de l'interface une fois le processus de conception terminé.
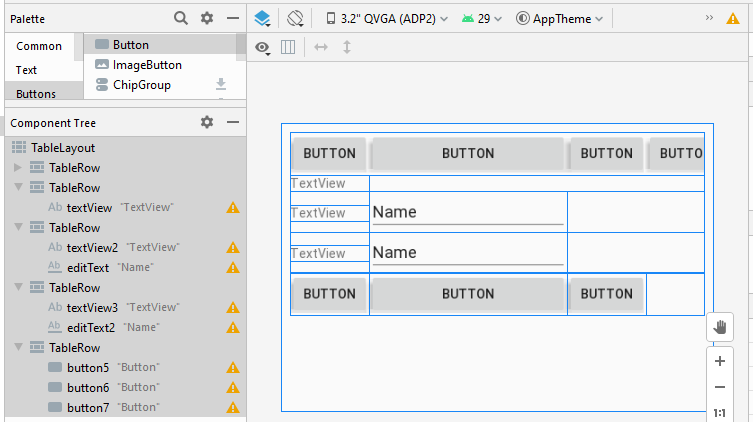
Étape 3: Ajoutez une autre View enfant à l'interface:
Étape 4: définir l'attribut android:layout_span pour quelques View enfants
Étape 5: Définissez android:layout_column pour le bouton "Login":
Étape 6: étirez (stretch) les colonnes avec l'index 1, 3:
- (TableLayout) android:stretchColumns = "1, 3"
Étape 7: définissez les attributs android:layout_gravity pour les boutons "Login" et "Forget Password":
Étape 8: Définissez le text, textSize, padding, gravity pour View enfant sur l'interface:
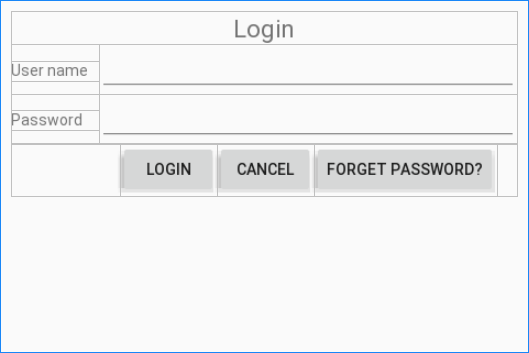
Étape 9: supprimez d'abord TableRow et la conception de l'interface est terminée.
layout_main.xml
<?xml version="1.0" encoding="utf-8"?>
<TableLayout xmlns:android="http://schemas.android.com/apk/res/android"
    xmlns:app="http://schemas.android.com/apk/res-auto"
    xmlns:tools="http://schemas.android.com/tools"
    android:layout_width="match_parent"
    android:layout_height="match_parent"
    android:padding="10dp"
    android:stretchColumns="1, 3"
    tools:context=".MainActivity">

    <TableRow
        android:layout_width="match_parent"
        android:layout_height="match_parent">

        <TextView
            android:id="@+id/textView"
            android:layout_width="wrap_content"
            android:layout_height="wrap_content"
            android:layout_span="4"
            android:gravity="center"
            android:text="Login"
            android:textSize="22sp" />
    </TableRow>

    <TableRow
        android:layout_width="match_parent"
        android:layout_height="match_parent">

        <TextView
            android:id="@+id/textView2"
            android:layout_width="wrap_content"
            android:layout_height="wrap_content"
            android:paddingRight="10dp"
            android:text="User name" />

        <EditText
            android:id="@+id/editText"
            android:layout_width="wrap_content"
            android:layout_height="wrap_content"
            android:layout_span="3"
            android:ems="10"
            android:inputType="textPersonName" />
    </TableRow>

    <TableRow
        android:layout_width="match_parent"
        android:layout_height="match_parent">

        <TextView
            android:id="@+id/textView3"
            android:layout_width="wrap_content"
            android:layout_height="wrap_content"
            android:paddingRight="10dp"
            android:text="Password" />

        <EditText
            android:id="@+id/editText2"
            android:layout_width="wrap_content"
            android:layout_height="wrap_content"
            android:layout_span="3"
            android:ems="10"
            android:inputType="textPassword" />
    </TableRow>

    <TableRow
        android:layout_width="match_parent"
        android:layout_height="match_parent">

        <Button
            android:id="@+id/button5"
            android:layout_width="wrap_content"
            android:layout_height="wrap_content"
            android:layout_column="1"
            android:layout_gravity="right"
            android:text="Login" />

        <Button
            android:id="@+id/button6"
            android:layout_width="wrap_content"
            android:layout_height="wrap_content"
            android:text="Cancel" />

        <Button
            android:id="@+id/button7"
            android:layout_width="wrap_content"
            android:layout_height="wrap_content"
            android:layout_gravity="left"
            android:text="Forget Password?" />
    </TableRow>
</TableLayout>
Tutoriels de programmation Android
- Configurer Android Emulator en Android Studio
- Le Tutoriel de Android ToggleButton
- Créer un File Finder Dialog simple dans Android
- Le Tutoriel de Android TimePickerDialog
- Le Tutoriel de Android DatePickerDialog
- De quoi avez-vous besoin pour démarrer avec Android?
- Installer Android Studio sur Windows
- Installer Intel® HAXM pour Android Studio
- Le Tutoriel de Android AsyncTask
- Le Tutoriel de Android AsyncTaskLoader
- Tutoriel Android pour débutant - Exemples de base
- Comment connaître le numéro de téléphone d'Android Emulator et le changer?
- Le Tutoriel de Android TextInputLayout
- Le Tutoriel de Android CardView
- Le Tutoriel de Android ViewPager2
- Obtenir un numéro de téléphone dans Android à l'aide de TelephonyManager
- Le Tutoriel de Android Phone Call
- Le Tutoriel de Android Wifi Scanning
- Le Tutoriel de programmation de jeux Android 2D pour débutant
- Le Tutoriel de Android DialogFragment
- Le Tutoriel de Android CharacterPickerDialog
- Le Tutoriel Android pour débutant - Hello Android
- Utiliser Android Device File Explorer
- Activer USB Debugging sur un appareil Android
- Le Tutoriel de Android UI Layouts
- Le Tutoriel de Android SMS
- Le Tutoriel de Android et SQLite Database
- Le Tutoriel de Google Maps Android API
- Le Tutoriel de texte pour parler dans Android
- Le Tutoriel de Android Space
- Le Tutoriel de Android Toast
- Créer un Android Toast personnalisé
- Le Tutoriel de Android SnackBar
- Le Tutoriel de Android TextView
- Le Tutoriel de Android TextClock
- Le Tutoriel de Android EditText
- Le Tutoriel de Android TextWatcher
- Formater le numéro de carte de crédit avec Android TextWatcher
- Le Tutoriel de Android Clipboard
- Créer un File Chooser simple dans Android
- Le Tutoriel de Android AutoCompleteTextView et MultiAutoCompleteTextView
- Le Tutoriel de Android ImageView
- Le Tutoriel de Android ImageSwitcher
- Le Tutoriel de Android ScrollView et HorizontalScrollView
- Le Tutoriel de Android WebView
- Le Tutoriel de Android SeekBar
- Le Tutoriel de Android Dialog
- Le Tutoriel de Android AlertDialog
- Tutoriel Android RatingBar
- Le Tutoriel de Android ProgressBar
- Le Tutoriel de Android Spinner
- Le Tutoriel de Android Button
- Le Tutoriel de Android Switch
- Le Tutoriel de Android ImageButton
- Le Tutoriel de Android FloatingActionButton
- Le Tutoriel de Android CheckBox
- Le Tutoriel de Android RadioGroup et RadioButton
- Le Tutoriel de Android Chip et ChipGroup
- Utilisation des Image assets et des Icon assets d'Android Studio
- Configuration de la Carte SD pour Android Emulator
- Exemple ChipGroup et Chip Entry
- Comment ajouter des bibliothèques externes à Android Project dans Android Studio?
- Comment désactiver les autorisations déjà accordées à l'application Android?
- Comment supprimer des applications de Android Emulator?
- Le Tutoriel de Android LinearLayout
- Le Tutoriel de Android TableLayout
- Le Tutoriel de Android FrameLayout
- Le Tutoriel de Android QuickContactBadge
- Le Tutoriel de Android StackView
- Le Tutoriel de Android Camera
- Le Tutoriel de Android MediaPlayer
- Le Tutoriel de Android VideoView
- Jouer des effets sonores dans Android avec SoundPool
- Le Tutoriel de Android Networking
- Analyser JSON dans Android
- Le Tutoriel de Android SharedPreferences
- Le Tutorial de stockage interne Android (Internal Storage)
- Le Tutoriel de Android External Storage
- Le Tutoriel de Android Intents
- Exemple d'une Android Intent explicite, appelant une autre Intent
- Exemple de Android Intent implicite, ouvrez une URL, envoyez un email
- Le Tutoriel de Android Service
- Le Tutoriel Android Notifications
- Le Tutoriel de Android DatePicker
- Le Tutoriel de Android TimePicker
- Le Tutoriel de Android Chronometer
- Le Tutoriel de Android OptionMenu
- Le Tutoriel de Android ContextMenu
- Le Tutoriel de Android PopupMenu
- Le Tutoriel de Android Fragment
- Le Tutoriel de Android ListView
- Android ListView avec Checkbox en utilisant ArrayAdapter
- Le Tutoriel de Android GridView
Show More