Le Tutoriel de Android LinearLayout
1. Android LinearLayout
LinearLayout est un ViewGroup qui organise les View enfant dans une seule direction, verticalement ou horizontalement. Vous pouvez spécifier son orientation en utilisant l'attribut: android:orientation.
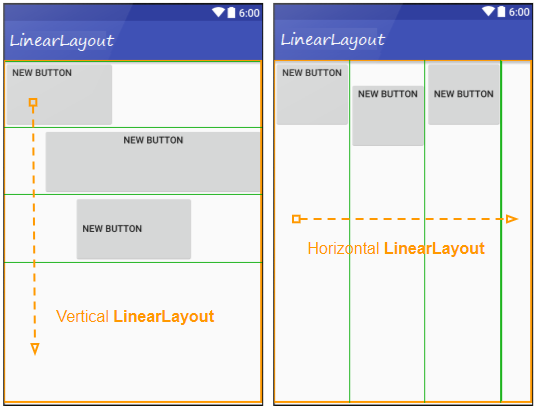
<!-- Horizontal LinearLayout (Default) -->
<LinearLayout
    ...
    android:orientation="horizontal">

   ...
</LinearLayout>


<!-- Vertical LinearLayout -->
<LinearLayout
    ...
    android:orientation="vertical">

   ...
</LinearLayout>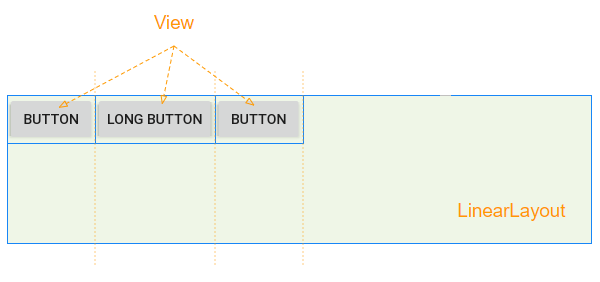
Par exemple: Utilisation de code Java pour créer LinearLayout et ajouter des View enfant à LinearLayout:
// linearLayout = new LinearLayout(MainActivity.this);
// linearLayout.setOrientation(LinearLayout.HORIZONTAL);

LinearLayout.LayoutParams layoutParams
        = new LinearLayout.LayoutParams(LinearLayout.LayoutParams.WRAP_CONTENT,
        LinearLayout.LayoutParams.WRAP_CONTENT, 0);

Button button1 = new Button(this);
button1.setText("Button");
linearLayout.addView(button1, layoutParams);

Button button2 = new Button(this);
button2.setText("Long Button");
button2.setLayoutParams(layoutParams);
linearLayout.addView(button2);
2. android:layout_weight
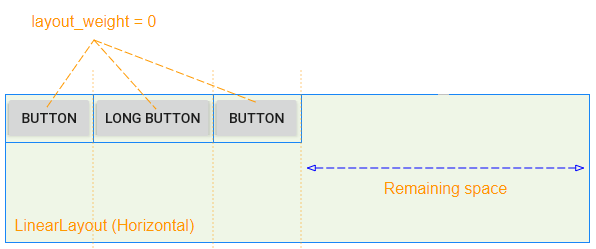
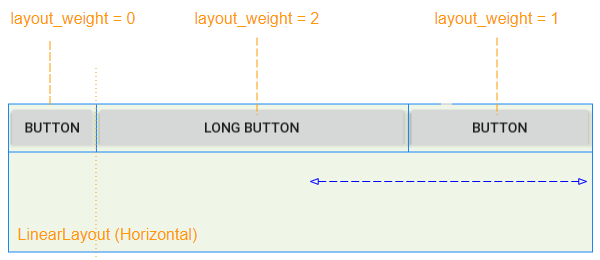
android: layout_weight est un attribut important utilisé pour les View enfant de LinearLayout, il spécifie combien d'espace de View enfant occupera dans la View parent (LinearLayout) (horizontalement ou verticalement). Une valeur layout_weight supérieure à zéro permet à View enfant de se développer pour remplir tout espace restant dans View parent. Les View enfant peuvent se voir attribuer une valeur layout_weight> 0, puis tout espace restant dans View parent sera affecté aux View enfant en fonction de leur ratio layout_weight.
Lorsque toutes les View enfants ont android: layout_weight = 0, vous verrez un espace vide dans View parent (LinearLayout):
View enfant a android: layout_weight> 0 occupera l'espace libre de View parent (LinearLayout):
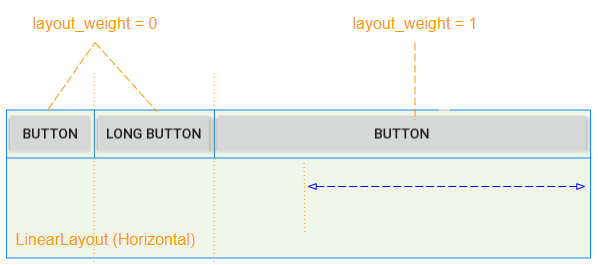
L'espace libre de la View parent (LinearLayout) sera alloué à View enfant en fonction de leur ratio layout_weight.
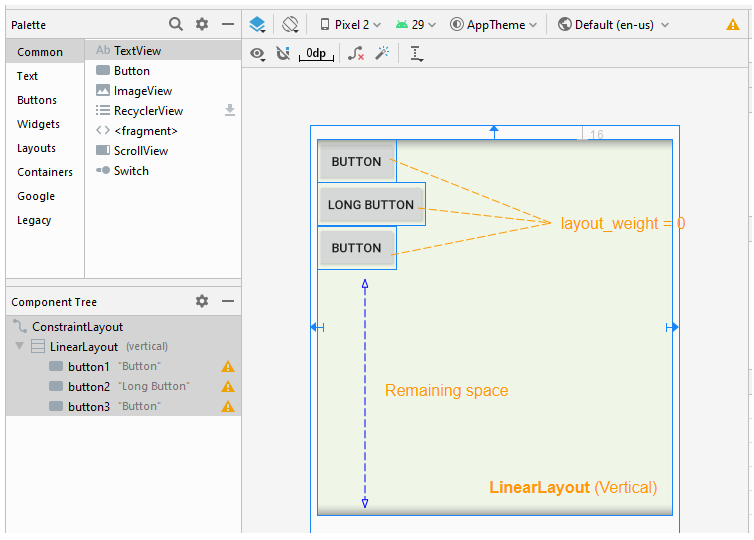
L'attribut android: layout_weight a la même signification dans un LinearLayout vertical:
3. android:layout_gravity
L'attribut android: layout_gravity est appliqué à View enfant pour spécifier la position relative de View enfant dans View parent (LinearLayout).
Constant in Java | Value | Description |
Gravity.LEFT | left | |
Gravity.CENTER_HORIZONTAL | center_horizontal | |
Gravity.RIGHT | right | |
Gravity.TOP | top | |
Gravity.CENTER_VERTICAL | center_vertical | |
Gravity.BOTTOM | bottom | |
Gravity.START | start | |
Gravity.END | end | |
Gravity.CENTER | center | |


4. android:padding
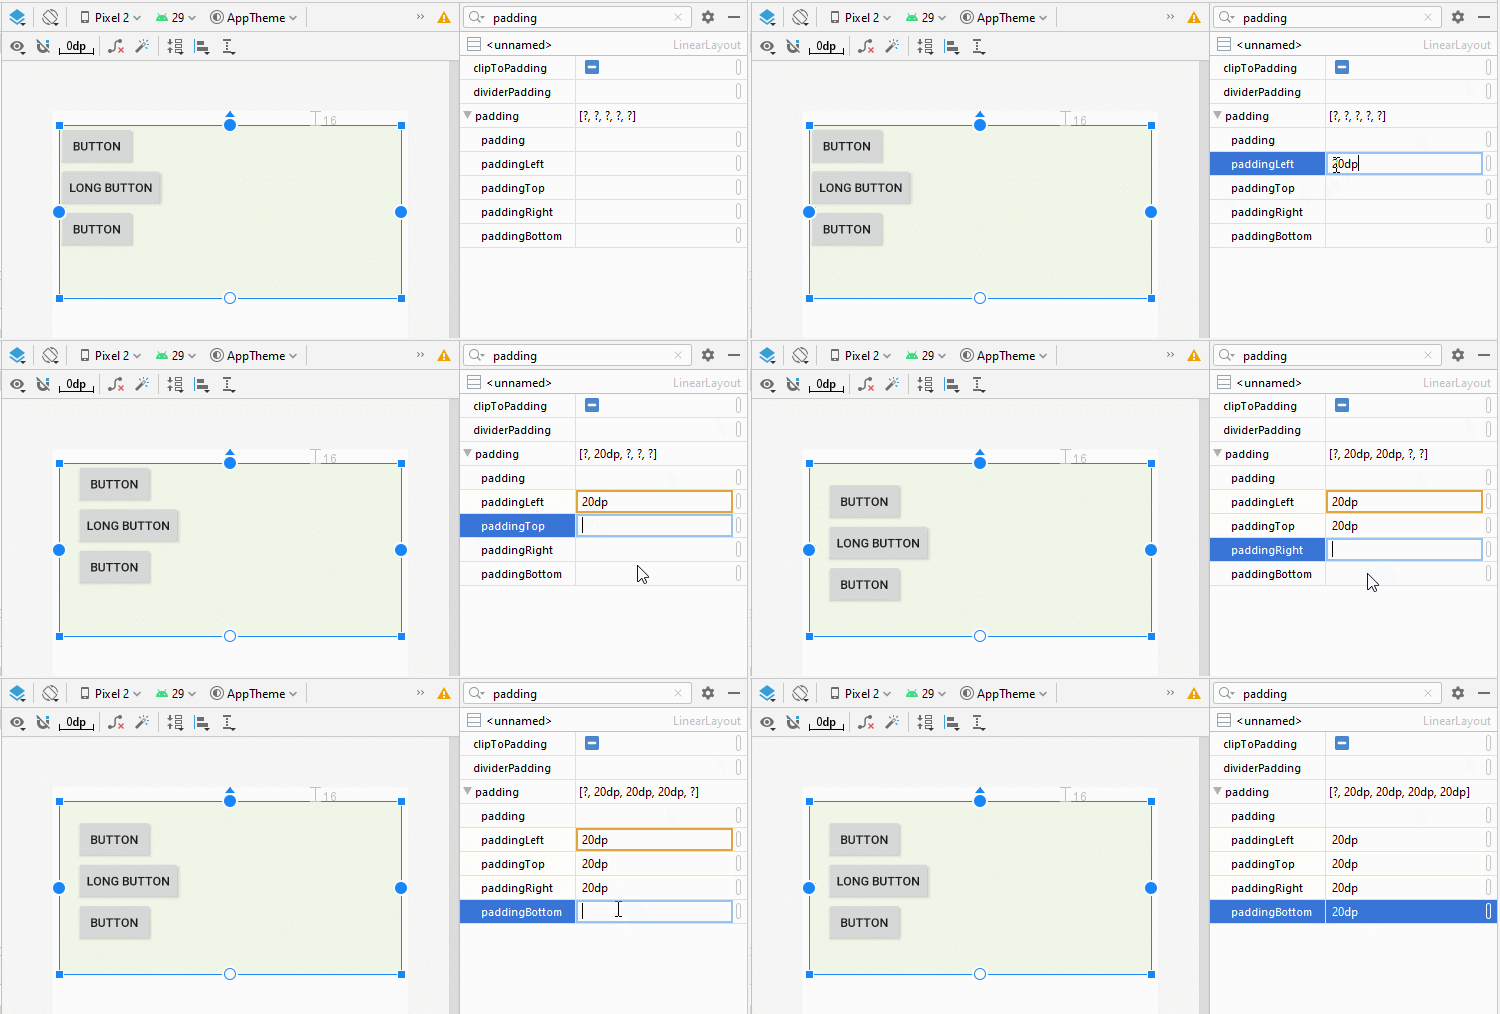
Padding est l'espace dans LinearLayout (à l'intérieur de la bordure) et entoure 4 côtés du contenu.

Vous pouvez définir un padding pour LinearLayout via les propriétés suivantes:
- android:padding
- android:paddingTop
- android:paddingRight
- android:paddingBottom
- android:paddingLeft
<LinearLayout
    ...
    android:orientation="horizontal"
    android:paddingTop="20dp"
    android:paddingRight="30dp"
    android:paddingBottom="10dp"
    android:paddingLeft="20dp">

    <Button
        android:id="@+id/button1"
        android:layout_width="wrap_content"
        android:layout_height="wrap_content"
        android:layout_weight="0"
        android:text="Button" />

</LinearLayout>
5. LinearLayout spacing
Parfois, lorsque vous souhaitez définir l'espace entre les View enfant de LinearLayout, vous pouvez procéder de plusieurs manières:
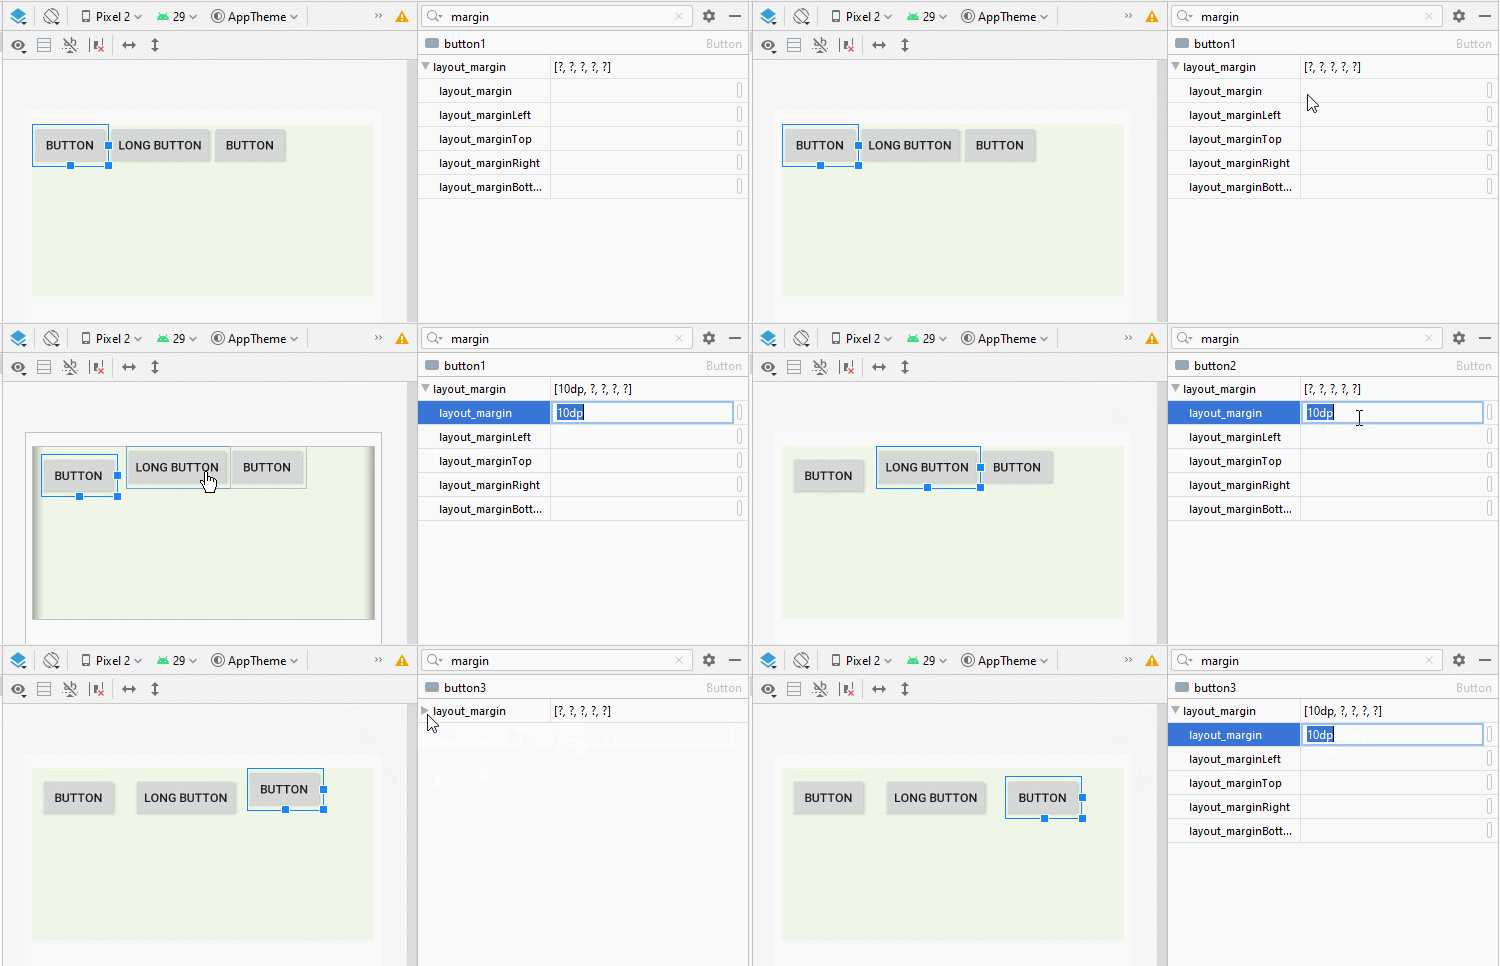
android:layout_margin
L'application de la propriété android: layout_margin à toutes les View enfants de LinearLayout aidera à définir la distance entre elles.
* layout_margin (Java code) *
// linearLayout = new LinearLayout(MainActivity.this);
// linearLayout.setOrientation(LinearLayout.HORIZONTAL);

LinearLayout.LayoutParams layoutParams
        = new LinearLayout.LayoutParams(LinearLayout.LayoutParams.WRAP_CONTENT,
                          LinearLayout.LayoutParams.WRAP_CONTENT, 0);
layoutParams.setMargins(30, 20, 30, 0);

Button button1 = new Button(this);
button1.setText("Button");
linearLayout.addView(button1, layoutParams);

Button button2 = new Button(this);
button2.setText("Long Button");
button2.setLayoutParams(layoutParams);
linearLayout.addView(button2);
Space View
Android 4.0+ (API Level 14+) prend en charge un nouveau type de View appelé Space, qui vous aide à ajouter un espace libre à l'interface. Vous pouvez utiliser Space pour séparer les View enfant dans LinearLayout.
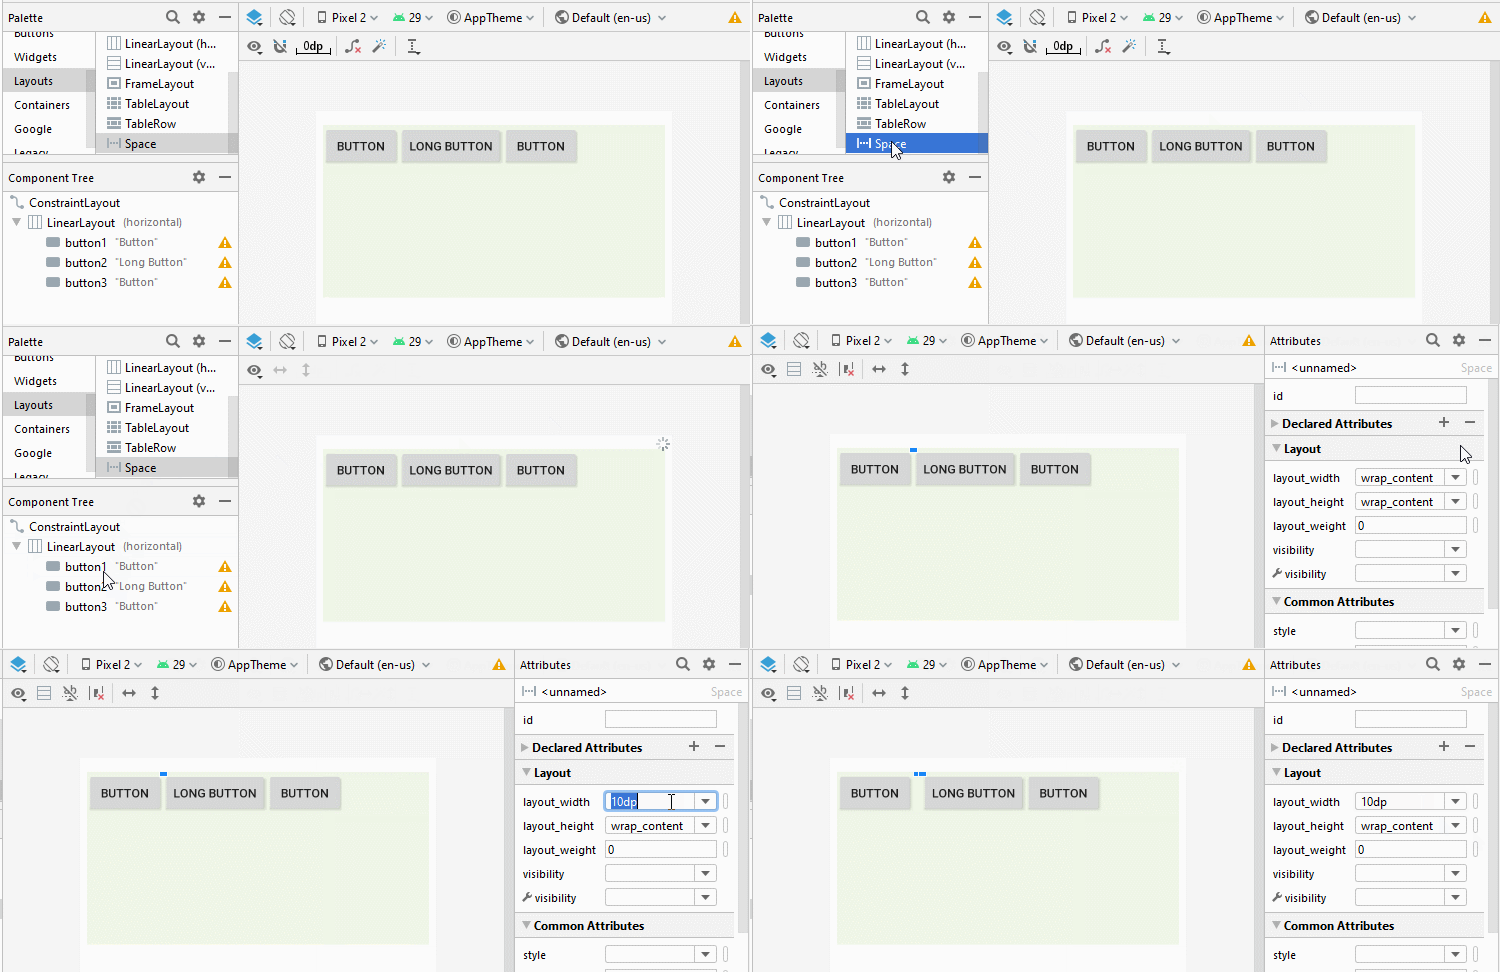
<LinearLayout
    ...
    android:layout_width="0dp"
    android:layout_height="200dp"
    android:background="#EFF6E7"
    android:orientation="horizontal">

    <Button
        android:id="@+id/button1"
        android:layout_width="wrap_content"
        android:layout_height="wrap_content"
        android:layout_weight="0"
        android:text="Button" />

    <Space
        android:layout_width="10dp"
        android:layout_height="wrap_content"
        android:layout_weight="0" />

    <Button
        android:id="@+id/button2"
        android:layout_width="wrap_content"
        android:layout_height="wrap_content"
        android:layout_weight="0"
        android:text="Long Button" />

    <Button
        android:id="@+id/button3"
        android:layout_width="wrap_content"
        android:layout_height="wrap_content"
        android:layout_weight="0"
        android:text="Button" />
</LinearLayout>
* Add Space (Java code) *
// linearLayout = new LinearLayout(MainActivity.this);
// linearLayout.setOrientation(LinearLayout.HORIZONTAL);

LinearLayout.LayoutParams layoutParams
        = new LinearLayout.LayoutParams(LinearLayout.LayoutParams.WRAP_CONTENT,
        LinearLayout.LayoutParams.WRAP_CONTENT, 0);

LinearLayout.LayoutParams layoutParams2
        = new LinearLayout.LayoutParams(15,
        LinearLayout.LayoutParams.WRAP_CONTENT, 0);

Button button1 = new Button(this);
button1.setText("Button");
linearLayout.addView(button1, layoutParams);

// Create a Space View.
Space space = new Space(this);
space.setLayoutParams(layoutParams2);
linearLayout.addView(space);

Button button2 = new Button(this);
button2.setText("Long Button");
button2.setLayoutParams(layoutParams);
linearLayout.addView(button2);
android:divider
Android 3.0+ (API Level 11+) vous permet d'ajouter un Divider (Diviseur) entre deux View enfant dans LinearLayout, vous pouvez même spécifier le style et la couleur du Divider.
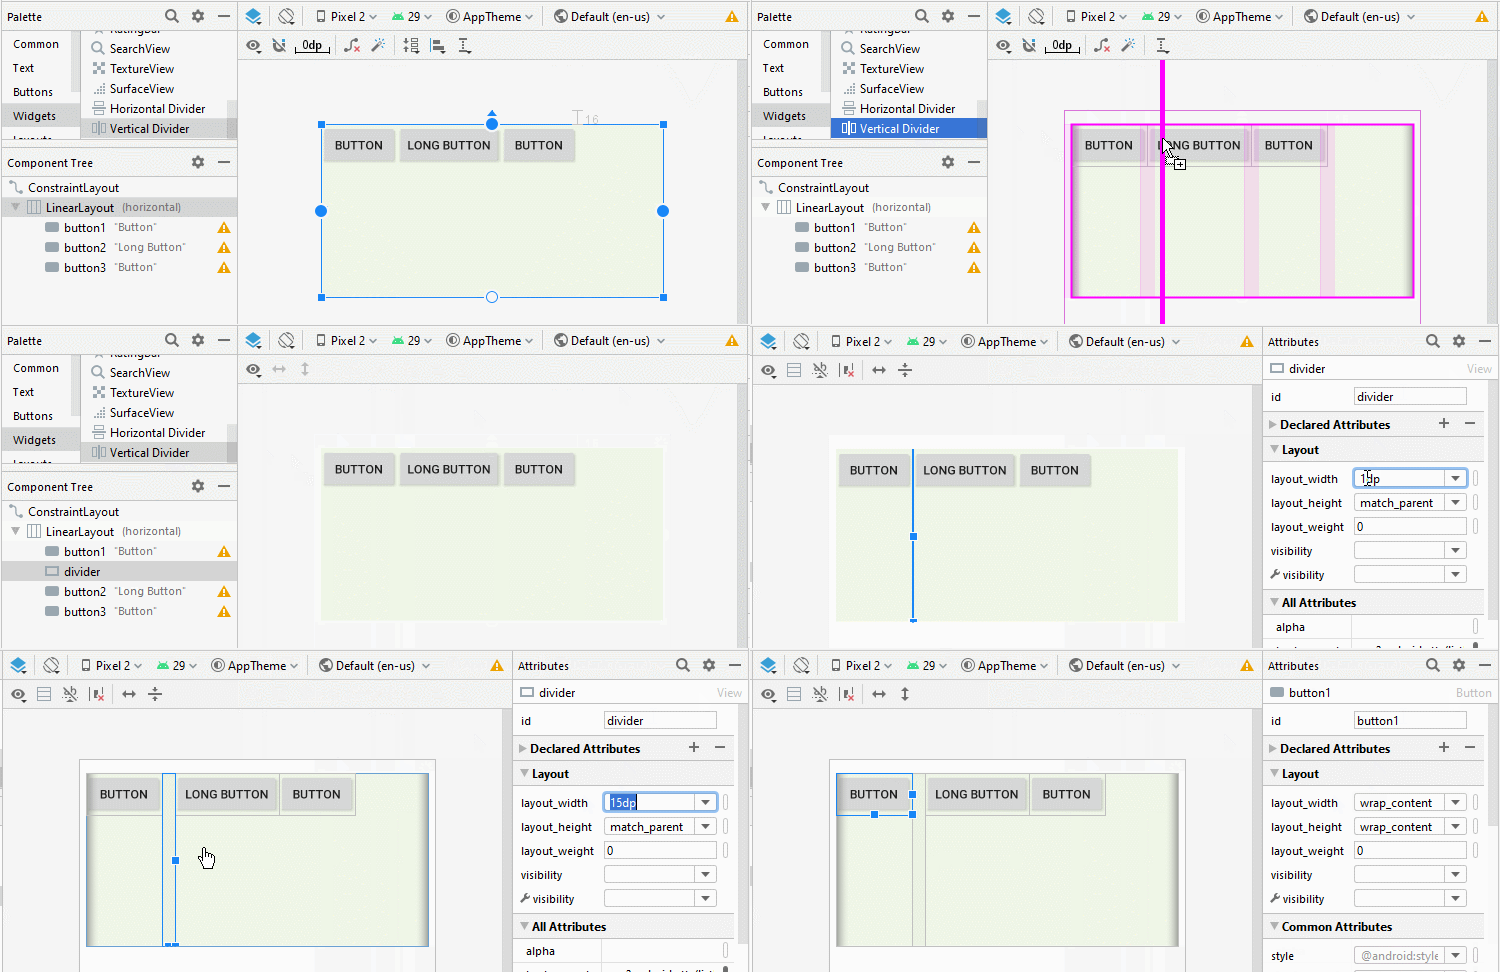
* Divider *
<LinearLayout
    ...
    android:orientation="horizontal">

    <Button
        android:id="@+id/button1"
        android:layout_width="wrap_content"
        android:layout_height="wrap_content"
        android:layout_weight="0"
        android:text="Button" />

     <!-- Divider -->
    <View
        android:id="@+id/divider"
        android:layout_width="15dp"
        android:layout_height="match_parent"
        android:layout_weight="0"
        android:background="?android:attr/listDivider" />

    <Button
        android:id="@+id/button2"
        android:layout_width="wrap_content"
        android:layout_height="wrap_content"
        android:layout_weight="0"
        android:text="Long Button" />

    <Button
        android:id="@+id/button3"
        android:layout_width="wrap_content"
        android:layout_height="wrap_content"
        android:layout_weight="0"
        android:text="Button" />
</LinearLayout>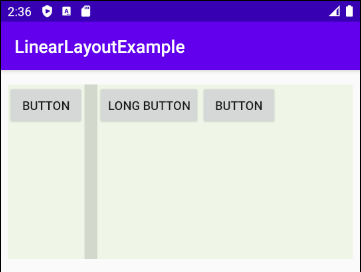
* Add Divider (Java code) *
// linearLayout = new LinearLayout(MainActivity.this);
// linearLayout.setOrientation(LinearLayout.HORIZONTAL);

LinearLayout.LayoutParams layoutParams
        = new LinearLayout.LayoutParams(LinearLayout.LayoutParams.WRAP_CONTENT,
        LinearLayout.LayoutParams.WRAP_CONTENT, 0);

LinearLayout.LayoutParams layoutParams2
        = new LinearLayout.LayoutParams(15,
        LinearLayout.LayoutParams.MATCH_PARENT, 0);

Button button1 = new Button(this);
button1.setText("Button");
linearLayout.addView(button1, layoutParams);

// Create a Divider.
View divider = new View(this);
// android:background="?android:attr/listDivider"
divider.setBackgroundResource(android.R.drawable.divider_horizontal_bright);
linearLayout.addView(divider, layoutParams2);

Button button2 = new Button(this);
button2.setText("Long Button");
button2.setLayoutParams(layoutParams);
linearLayout.addView(button2);
Voir l'article plus détaillé sur Divider, il vous aide à personnaliser Divider en fonction de votre application:
- Le Tutoriel de Android Divider
Tutoriels de programmation Android
- Configurer Android Emulator en Android Studio
- Le Tutoriel de Android ToggleButton
- Créer un File Finder Dialog simple dans Android
- Le Tutoriel de Android TimePickerDialog
- Le Tutoriel de Android DatePickerDialog
- De quoi avez-vous besoin pour démarrer avec Android?
- Installer Android Studio sur Windows
- Installer Intel® HAXM pour Android Studio
- Le Tutoriel de Android AsyncTask
- Le Tutoriel de Android AsyncTaskLoader
- Tutoriel Android pour débutant - Exemples de base
- Comment connaître le numéro de téléphone d'Android Emulator et le changer?
- Le Tutoriel de Android TextInputLayout
- Le Tutoriel de Android CardView
- Le Tutoriel de Android ViewPager2
- Obtenir un numéro de téléphone dans Android à l'aide de TelephonyManager
- Le Tutoriel de Android Phone Call
- Le Tutoriel de Android Wifi Scanning
- Le Tutoriel de programmation de jeux Android 2D pour débutant
- Le Tutoriel de Android DialogFragment
- Le Tutoriel de Android CharacterPickerDialog
- Le Tutoriel Android pour débutant - Hello Android
- Utiliser Android Device File Explorer
- Activer USB Debugging sur un appareil Android
- Le Tutoriel de Android UI Layouts
- Le Tutoriel de Android SMS
- Le Tutoriel de Android et SQLite Database
- Le Tutoriel de Google Maps Android API
- Le Tutoriel de texte pour parler dans Android
- Le Tutoriel de Android Space
- Le Tutoriel de Android Toast
- Créer un Android Toast personnalisé
- Le Tutoriel de Android SnackBar
- Le Tutoriel de Android TextView
- Le Tutoriel de Android TextClock
- Le Tutoriel de Android EditText
- Le Tutoriel de Android TextWatcher
- Formater le numéro de carte de crédit avec Android TextWatcher
- Le Tutoriel de Android Clipboard
- Créer un File Chooser simple dans Android
- Le Tutoriel de Android AutoCompleteTextView et MultiAutoCompleteTextView
- Le Tutoriel de Android ImageView
- Le Tutoriel de Android ImageSwitcher
- Le Tutoriel de Android ScrollView et HorizontalScrollView
- Le Tutoriel de Android WebView
- Le Tutoriel de Android SeekBar
- Le Tutoriel de Android Dialog
- Le Tutoriel de Android AlertDialog
- Tutoriel Android RatingBar
- Le Tutoriel de Android ProgressBar
- Le Tutoriel de Android Spinner
- Le Tutoriel de Android Button
- Le Tutoriel de Android Switch
- Le Tutoriel de Android ImageButton
- Le Tutoriel de Android FloatingActionButton
- Le Tutoriel de Android CheckBox
- Le Tutoriel de Android RadioGroup et RadioButton
- Le Tutoriel de Android Chip et ChipGroup
- Utilisation des Image assets et des Icon assets d'Android Studio
- Configuration de la Carte SD pour Android Emulator
- Exemple ChipGroup et Chip Entry
- Comment ajouter des bibliothèques externes à Android Project dans Android Studio?
- Comment désactiver les autorisations déjà accordées à l'application Android?
- Comment supprimer des applications de Android Emulator?
- Le Tutoriel de Android LinearLayout
- Le Tutoriel de Android TableLayout
- Le Tutoriel de Android FrameLayout
- Le Tutoriel de Android QuickContactBadge
- Le Tutoriel de Android StackView
- Le Tutoriel de Android Camera
- Le Tutoriel de Android MediaPlayer
- Le Tutoriel de Android VideoView
- Jouer des effets sonores dans Android avec SoundPool
- Le Tutoriel de Android Networking
- Analyser JSON dans Android
- Le Tutoriel de Android SharedPreferences
- Le Tutorial de stockage interne Android (Internal Storage)
- Le Tutoriel de Android External Storage
- Le Tutoriel de Android Intents
- Exemple d'une Android Intent explicite, appelant une autre Intent
- Exemple de Android Intent implicite, ouvrez une URL, envoyez un email
- Le Tutoriel de Android Service
- Le Tutoriel Android Notifications
- Le Tutoriel de Android DatePicker
- Le Tutoriel de Android TimePicker
- Le Tutoriel de Android Chronometer
- Le Tutoriel de Android OptionMenu
- Le Tutoriel de Android ContextMenu
- Le Tutoriel de Android PopupMenu
- Le Tutoriel de Android Fragment
- Le Tutoriel de Android ListView
- Android ListView avec Checkbox en utilisant ArrayAdapter
- Le Tutoriel de Android GridView
Show More