Le Tutoriel de Flutter Banner
1. Flutter Banner
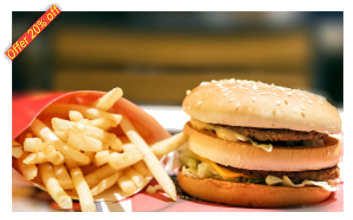
Dans Flutter, Banner est un message en diagonale (diagonal message) affiché à la surface et au coin d'un autre Widget. Banner est utilisé pour décorer et surligner le message relatif à ce Widget.
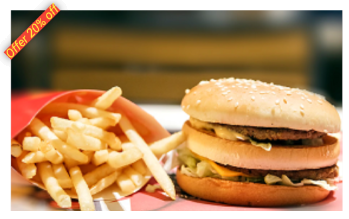
Banner Constructor:
Banner Constructor
const Banner(
    {Key key,
    Widget child,
    @required String message,
    TextDirection textDirection,
    @required BannerLocation location,
    TextDirection layoutDirection,
    Color color: _kColor,
    TextStyle textStyle: _kTextStyle}
)
2. Banner Example
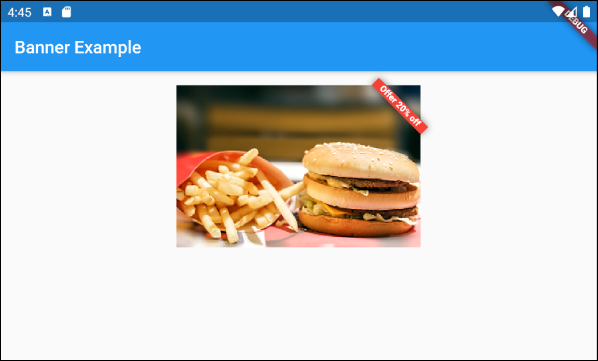
main.dart (ex1)
import 'package:flutter/material.dart';

void main() {
  runApp(MyApp());
}

class MyApp extends StatelessWidget {
  @override
  Widget build(BuildContext context) {
    return MaterialApp(
      title: 'o7planning',
      theme: ThemeData(
        primarySwatch: Colors.blue,
        visualDensity: VisualDensity.adaptivePlatformDensity,
      ),
      home: MyHomePage(),
    );
  }
}

class MyHomePage extends StatelessWidget {
  MyHomePage({Key key}) : super(key: key);

  @override
  Widget build(BuildContext context) {
    return Scaffold (
        appBar: AppBar(
          title: Text("Banner Example"),
        ),
        body: Container(
          padding: EdgeInsets.all(16),
          child: Align(
            alignment: Alignment.topCenter,
            child: Banner (
              message: 'Offer 20% off',
              location: BannerLocation.topEnd,
              color: Colors.red,
              child: Container(
                height: 186,
                width: 280,
                child: Image.network(
                  'https://raw.githubusercontent.com/o7planning/rs/master/flutter/fast_food.png',
                  fit: BoxFit.cover,
                ),
              ),
            ),
          ),
        )
    );
  }
}
3. child
La propriété child est utlisée pour définir le contenu en-dessous de "banner". Dans la plupart des cas, c'est un Widget contenant une image.
Widget child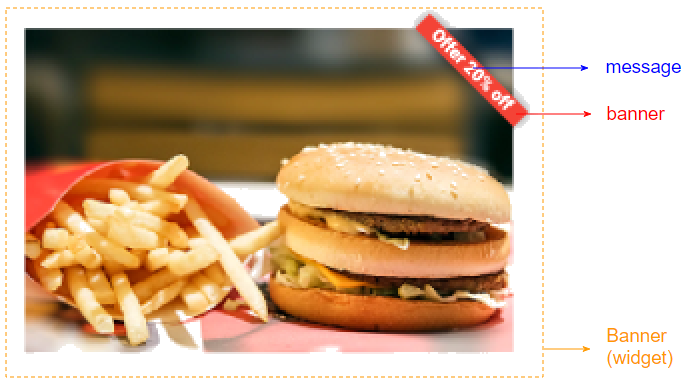
child peut être un mélange entre texte et images:
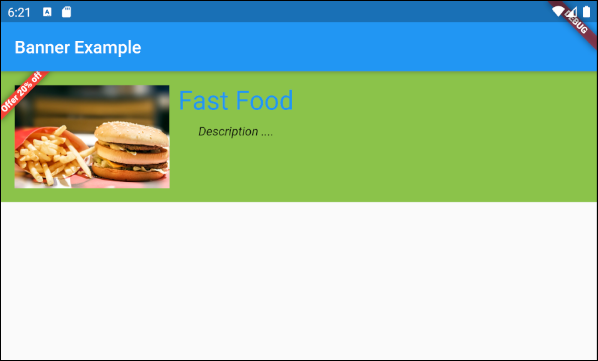
main.dart (child ex2)
import 'package:flutter/material.dart';

void main() {
  runApp(MyApp());
}

class MyApp extends StatelessWidget {
  @override
  Widget build(BuildContext context) {
    return MaterialApp(
      title: 'o7planning',
      theme: ThemeData(
        primarySwatch: Colors.blue,
        visualDensity: VisualDensity.adaptivePlatformDensity,
      ),
      home: MyHomePage(),
    );
  }
}

class MyHomePage extends StatelessWidget {
  MyHomePage({Key key}) : super(key: key);

  @override
  Widget build(BuildContext context) {
    return Scaffold (
        appBar: AppBar(
          title: Text("Banner Example"),
        ),
        body:  Banner (
          message: 'Offer 20% off',
          location: BannerLocation.topStart,
          color: Colors.red,
          child: Container(
            height: 150,
            width: double.infinity,
            color: Colors.lightGreen,
            child: Padding (
              padding: EdgeInsets.all(16),
              child: Row (
                children: [
                  Image.network (
                      "https://raw.githubusercontent.com/o7planning/rs/master/flutter/fast_food.png"
                  ),
                  SizedBox(width: 10),
                  Column (
                    children: [
                      Text("Fast Food",style: TextStyle(fontSize: 30, color: Colors.blue)),
                      SizedBox(height: 10),
                      Text("Description ....", style: TextStyle(fontStyle: FontStyle.italic))
                    ],
                  )
                ],
              ),
            ),
          ),
        )
    );
  }
}5. layoutDirection
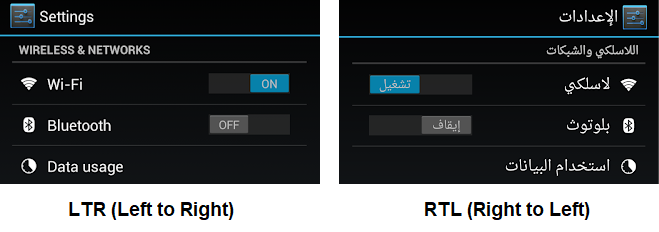
La propriété layoutDirection est utilisée pour spécifier la direction de la mise en page. Sa valeur par défaut est TextDirection.ltr (Left to Right).
TextDirection layoutDirection

// Enum values:
TextDirection.ltr    // Left to Right  (Default)
TextDirection.rtl    // Right to Left
Le concept Layout Direction (Direction de la mise en page) permet de créer des applications appropriées aux langues et cultures différentes. Précisément, en anglais, le texte est écrit de gauche à droite alors qu'en arabe, le texte est écrit de droite à gauche.
6. location
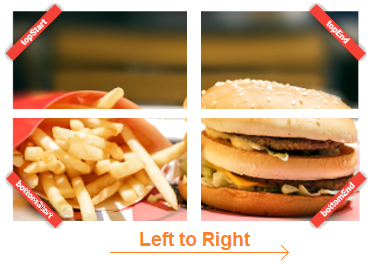
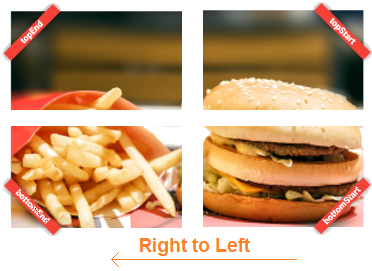
La propriété location est utilisée pour spécifier la position d'affichage de "banner". Elle peut recevoir l'une des quatre valeurs ci-dessous:
- BannerLocation.topStart
- BannerLocation.topEnd
- BannerLocation.bottomStart
- BannerLocation.bottomEnd
@required BannerLocation locationSi la direction de la mise en page (Layout Direction) est de Gauche à Droite:
- layoutDirection: TextDirection.ltr (Default)
Si la direction de la mise en page (Layout Direction) est de Droite à Gauche:
- layoutDirection: TextDirection.rtl
7. color
La propriété color est utilisée pour spécifier la couleur pour "banner".
Color color: _kColor
8. textStyle
La propriété textStyle est utilisée pour spécifier le style du texte affiché dans "banner".
TextStyle textStyle: _kTextStylePar exemple:
textStyle: TextStyle(fontSize: 20)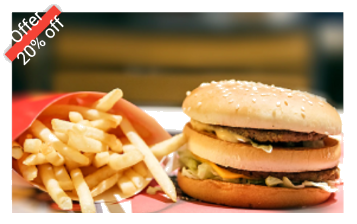
textStyle: TextStyle(
    fontSize: 14,
    fontStyle: FontStyle.italic,
    color: Colors.yellow
)
- Le Tutoriel de Flutter TextStyle
Tutoriels de programmation Flutter
- Le Tutoriel de Flutter Column
- Le Tutoriel de Flutter Stack
- Le Tutoriel de Flutter IndexedStack
- Le Tutoriel de Flutter Spacer
- Le Tutoriel de Flutter Expanded
- Le Tutoriel de Flutter SizedBox
- Le Tutoriel de Flutter Tween
- Installer Flutter SDK sur Windows
- Installer Flutter Plugin pour Android Studio
- Créez votre première application Flutter - Hello Flutter
- Le Tutoriel de Flutter Scaffold
- Le Tutoriel de Flutter AppBar
- Le Tutoriel de Flutter BottomAppBar
- Le Tutoriel de Flutter TextButton
- Le Tutoriel de Flutter ElevatedButton
- Le Tutoriel de Flutter EdgeInsetsGeometry
- Le Tutoriel de Flutter EdgeInsets
- Le Tutoriel de CircularProgressIndicator
- Le Tutoriel de Flutter LinearProgressIndicator
- Le Tutoriel de Flutter Center
- Le Tutoriel de Flutter Align
- Le Tutoriel de Flutter Row
- Le Tutoriel de Flutter SplashScreen
- Le Tutoriel de Flutter Alignment
- Le Tutoriel de Flutter Positioned
- Le Tutoriel de Flutter SimpleDialog
- Le Tutoriel de Flutter AlertDialog
- Navigation et Routing dans Flutter
- Le Tutoriel de Flutter TabBar
- Le Tutoriel de Flutter Banner
- Le Tutoriel de Flutter BottomNavigationBar
- Le Tutoriel de Flutter FancyBottomNavigation
- Le Tutoriel de Flutter Card
- Le Tutoriel de Flutter Border
- Le Tutoriel de Flutter ContinuousRectangleBorder
- Le Tutoriel de Flutter RoundedRectangleBorder
- Le Tutoriel de Flutter CircleBorder
- Le Tutoriel de Flutter StadiumBorder
- Le Tutoriel de Flutter Container
- Le Tutoriel de Flutter RotatedBox
- Le Tutoriel de Flutter CircleAvatar
- Le Tutoriel de Flutter IconButton
- Le Tutoriel de Flutter FlatButton
- Le Tutoriel de Flutter SnackBar
Show More
