Le Tutoriel de Flutter SimpleDialog
1. SimpleDialog
La classe SimpleDialog est utilisée pour créer une boîte de dialogue simple composée d'un titre et d'une liste des options dans laquelle l'utilisateur peut en sélectionner une. Chaque option est généralement une SimpleDialogOption.
Si vous voulez que la boîte de dialogue envoyée à l'utilisateur affiche un message, prenez en compte la classe AlertDialog.
SimpleDialog Constructor:
SimpleDialog Constructor
const SimpleDialog(
    {Key key,
    Widget title,
    EdgeInsetsGeometry titlePadding: const EdgeInsets.fromLTRB(24.0, 24.0, 24.0, 0.0),
    TextStyle titleTextStyle,
    List<Widget> children,
    EdgeInsetsGeometry contentPadding: const EdgeInsets.fromLTRB(0.0, 12.0, 0.0, 16.0),
    Color backgroundColor,
    double elevation,
    String semanticLabel,
    ShapeBorder shape}
)
2. Examples
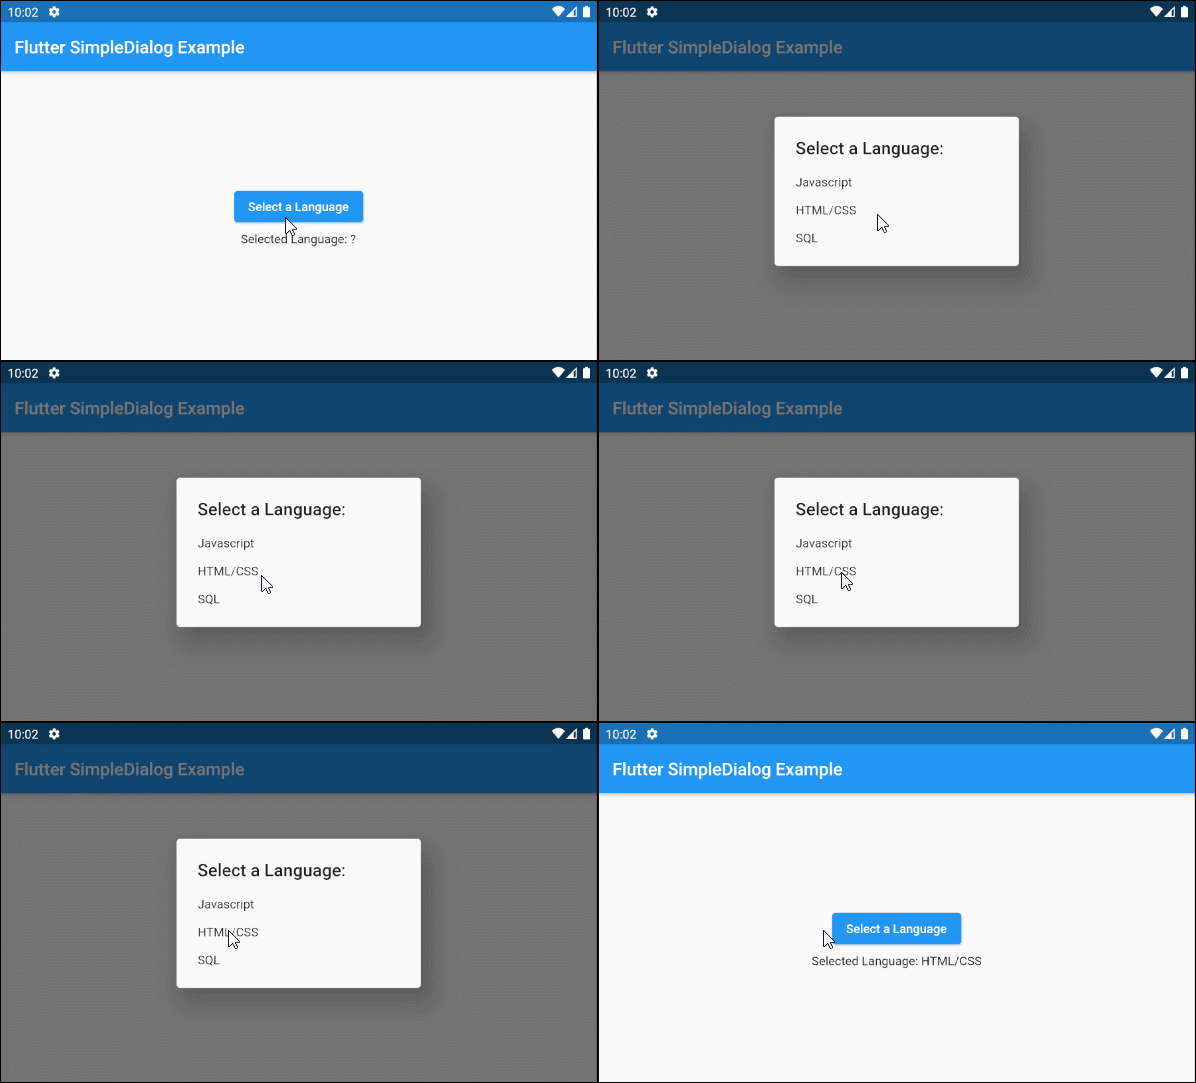
D'abord, on analyse un exemple simple mais complet sur SimpleDialog, qui vous aide à répondre aux questions basiques suivantes:
- Comment créer un SimpleDialog.
- Comment ajouter des listes des options à SimpleDialog.
- Comment retourner l'option de l'utilisateur.
- Comment gérer la valeur renvoyée.
main.dart (ex1)
import 'package:flutter/material.dart';

void main() {
  runApp(MyApp());
}

class MyApp extends StatelessWidget {
  @override
  Widget build(BuildContext context) {
    return MaterialApp(
      title: 'o7planning.org',
      debugShowCheckedModeBanner: false,
      theme: ThemeData(
        primarySwatch: Colors.blue,
        visualDensity: VisualDensity.adaptivePlatformDensity,
      ),
      home: MyHomePage(),
    );
  }
}

class MyHomePage extends StatefulWidget {
  MyHomePage({Key key}) : super(key: key);

  @override
  State<StatefulWidget> createState() {
    return MyHomePageState();
  }
}

class MyHomePageState extends State<MyHomePage> {
  ProgrammingLanguage selectedLanguage;

  @override
  Widget build(BuildContext context) {
    return Scaffold (
        appBar: AppBar(
            title: Text("Flutter SimpleDialog Example")
        ),
        body: Center (
            child: Column (
                mainAxisAlignment: MainAxisAlignment.center,
                crossAxisAlignment: CrossAxisAlignment.center,
                children: [
                  ElevatedButton (
                    child: Text("Select a Language"),
                    onPressed: () {
                      showMyAlertDialog(context);
                    },
                  ),
                  SizedBox(width:5, height:5),
                  Text("Selected Language: "
                      + (this.selectedLanguage == null ? '?': this.selectedLanguage.name))
                ]
            )
        )
    );
  }

  showMyAlertDialog(BuildContext context) {
    var javascript = ProgrammingLanguage("Javascript", 67.7);
    var htmlCss = ProgrammingLanguage("HTML/CSS", 63.1);
    var sql = ProgrammingLanguage("SQL", 57.4);

    // Create SimpleDialog
    SimpleDialog dialog = SimpleDialog(
      title: const Text('Select a Language:'),
      children: <Widget>[
        SimpleDialogOption(
            onPressed: () {
              // Close and return value
              Navigator.pop(context, javascript);
            },
            child: Text(javascript.name)
        ),
        SimpleDialogOption(
          onPressed: () {
            // Close and return value
            Navigator.pop(context, htmlCss);
          },
          child:  Text(htmlCss.name),
        ),
        SimpleDialogOption(
          onPressed: () {
            // Close and return value
            Navigator.pop(context, sql);
          },
          child:  Text(sql.name),
        )
      ],
    );

    // Call showDialog function to show dialog.
    Future<ProgrammingLanguage> futureValue = showDialog(
        context: context,
        builder: (BuildContext context) {
          return dialog;
        }
    );

    futureValue.then( (language) => {
      this.setState(() {
        this.selectedLanguage = language;
      })
    });
  }

}

class ProgrammingLanguage {
  String name;
  double percent;

  ProgrammingLanguage(this.name, this.percent) ;
}
3. title
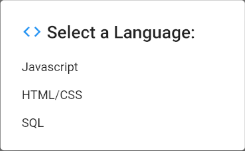
La propriété title est une option permettant de définir le titre pour SimpleDialog. Dans la plupart des cas, il s'agit d'un objet Text.
Widget titlePar exemple:
title (ex1)
void showMyAlertDialog(BuildContext context) {
  var javascript = ProgrammingLanguage("Javascript", 67.7);
  var htmlCss = ProgrammingLanguage("HTML/CSS", 63.1);
  var sql = ProgrammingLanguage("SQL", 57.4);

  // Create SimpleDialog
  SimpleDialog dialog = SimpleDialog(
    title:  Row (
       children: [
         Icon(Icons.code, color:Colors.blue),
         SizedBox(width:5, height:5),
         Text('Select a Language:'),
       ]
    ),
    children: <Widget>[
      SimpleDialogOption(
          onPressed: () {
            // Close and return value
            Navigator.pop(context, javascript);
          },
          child: Text(javascript.name)
      ),
      SimpleDialogOption(
        onPressed: () {
          // Close and return value
          Navigator.pop(context, htmlCss);
        },
        child:  Text(htmlCss.name),
      ),
      SimpleDialogOption(
        onPressed: () {
          // Close and return value
          Navigator.pop(context, sql);
        },
        child:  Text(sql.name),
      )
    ],
  );;

  // Call showDialog function to show dialog.
  Future<ProgrammingLanguage> futureValue = showDialog(
      context: context,
      builder: (BuildContext context) {
        return dialog;
      }
  );

  futureValue.then( (language) => {
    this.setState(() {
      this.selectedLanguage = language;
    })
  });
}
4. titlePadding
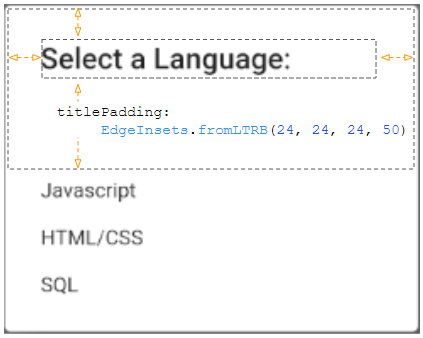
La propriété titlePadding est utilisée pour ajouter un remplissage (padding) autour du titre de SimpleDialog. Si le title est null, donc titlePadding ne sera pas utilisé.
Par défaut, titlePadding propose pixels en haut, à gauche et à droite du titre, et 0 pixel en bas du titre.
EdgeInsetsGeometry titlePadding: const EdgeInsets.fromLTRB(24.0, 24.0, 24.0, 0.0),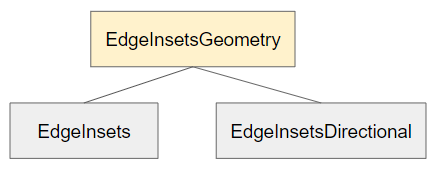
Par exemple:
titlePadding (ex1)
titlePadding: EdgeInsets.fromLTRB(24, 24, 24, 50)5. titleTextStyle
La propriété titleTextStyle est utilisée pour définir le style du texte dans la zone title.
TextStyle titleTextStyle- Le Tutoriel de Flutter TextStyle
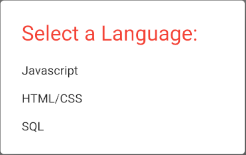
titleTextStyle (ex1)
titleTextStyle: TextStyle(
    color: Colors.red,
    fontSize: 24
)
6. children
La propriété children est une option qui détermine une liste des options de SimpleDialog. Précisément, il s'agit d'une liste de(s) SimpleDialogOption(s) placée dans une ListBody và celle-ci se trouve dans une SingleChildScrollView.
List<Widget> children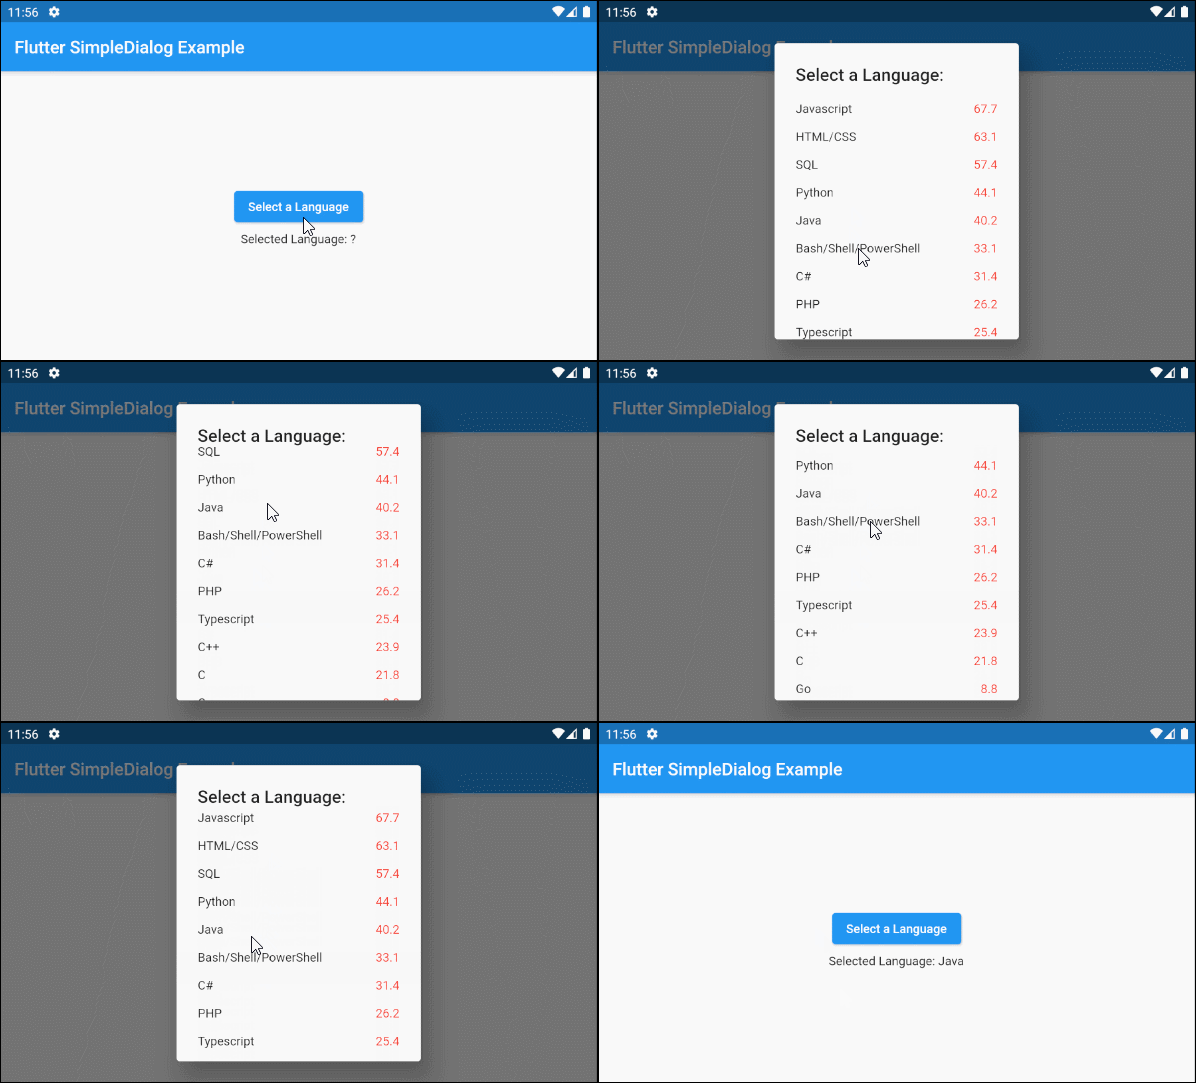
main.dart (children ex1)
import 'package:flutter/material.dart';

void main() {
  runApp(MyApp());
}

class MyApp extends StatelessWidget {
  @override
  Widget build(BuildContext context) {
    return MaterialApp(
      title: 'o7planning.org',
      debugShowCheckedModeBanner: false,
      theme: ThemeData(
        primarySwatch: Colors.blue,
        visualDensity: VisualDensity.adaptivePlatformDensity,
      ),
      home: MyHomePage(),
    );
  }
}

class MyHomePage extends StatefulWidget {
  MyHomePage({Key key}) : super(key: key);

  @override
  State<StatefulWidget> createState() {
    return MyHomePageState();
  }
}

class MyHomePageState extends State<MyHomePage> {
  ProgrammingLanguage selectedLanguage;

  @override
  Widget build(BuildContext context) {
    return Scaffold (
        appBar: AppBar(
            title: Text("Flutter SimpleDialog Example")
        ),
        body: Center (
            child: Column (
                mainAxisAlignment: MainAxisAlignment.center,
                crossAxisAlignment: CrossAxisAlignment.center,
                children: [
                  ElevatedButton (
                    child: Text("Select a Language"),
                    onPressed: () {
                      showMyAlertDialog(context);
                    },
                  ),
                  SizedBox(width:5, height:5),
                  Text("Selected Language: "
                      + (this.selectedLanguage == null ? '?': this.selectedLanguage.name))
                ]
            )
        )
    );
  }

  void showMyAlertDialog(BuildContext context) {
    var languages = [
      ProgrammingLanguage("Javascript", 67.7),
      ProgrammingLanguage("HTML/CSS", 63.1),
      ProgrammingLanguage("SQL", 57.4),
      ProgrammingLanguage("Python", 44.1),
      ProgrammingLanguage("Java", 40.2),
      ProgrammingLanguage("Bash/Shell/PowerShell", 33.1),
      ProgrammingLanguage("C#", 31.4),
      ProgrammingLanguage("PHP", 26.2),
      ProgrammingLanguage("Typescript", 25.4),
      ProgrammingLanguage("C++", 23.9),
      ProgrammingLanguage("C", 21.8),
      ProgrammingLanguage("Go", 8.8)
    ];

    // A List of SimpleDialogOption(s).
    var itemList = languages.map( (lang) => SimpleDialogOption(
        onPressed: () {
          // Close and return value
          Navigator.pop(context, lang);
        },
        child: Row (
            mainAxisAlignment: MainAxisAlignment.spaceBetween,
            children: [
              Text(lang.name),
              Text (
                  lang.percent.toString(),
                  style: TextStyle(color: Colors.red)
              )
            ]
        )
    )).toList();


    // Create SimpleDialog
    SimpleDialog dialog = SimpleDialog(
        title: Text('Select a Language:'),
        children: itemList
    );

    // Call showDialog function to show dialog.
    Future<ProgrammingLanguage> futureValue = showDialog(
        context: context,
        builder: (BuildContext context) {
          return dialog;
        }
    );

    futureValue.then( (language) => {
      this.setState(() {
        this.selectedLanguage = language;
      })
    });
  }

}

class ProgrammingLanguage {
  String name;
  double percent;

  ProgrammingLanguage(this.name, this.percent) ;
}- Le Tutoriel de Flutter SingleChildScrollView
7. contentPadding
La propriété contentPadding est utilisée pour ajouter un remplissage (padding) autour de la zone de contenu de SimpleDialog.
Par défaut, contentPadding propose 16 pixels en bas du contenu et 12 pixel en haut du contenu. Si title est null, le haut du remplissage (padding top) sera agrandi de 12 pixels.
EdgeInsetsGeometry contentPadding: const EdgeInsets.fromLTRB(0.0, 12.0, 0.0, 16.0)Par exemple:
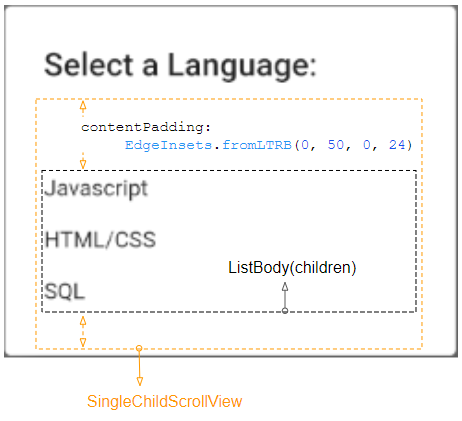
contentPadding (ex1)
contentPadding: EdgeInsets.fromLTRB(0, 50, 0, 24)8. backgroundColor
La propriété backgroundColor est utilisée pour définir la couleur d'arrière-plan de SimpleDialog.
Color backgroundColorPar exemple:
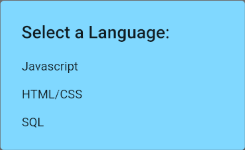
backgroundColor: Colors.lightBlueAccent[100]9. elevation
La propriété elevation définit l'axe Z de SimpleDialog. Sa valeur par défaut est 24.0 pixels.
double elevation10. semanticLabel
semanticLabel (étiquette sémantique) est un texte descriptif de SimpleDialog qui n'est pas affiché sur l'interface utilisateur. Lorsque l'utilisateur ouvre ou ferme SimpleDialog, le système lira cette description à l'utilisateur si le mode d'accessibilité (accessibility mode) est activé.
String semanticLabel11. shape
La propriété shape est utilisée pour définir la forme du contour de SimpleDialog. La valeur par défaut de shape est une RoundedRectangleBorder avec un rayon de 4.0 pixels aux quatre coins.
ShapeBorder shape- Le Tutoriel de Flutter ShapeBorder
RoundedRectangleBorder:
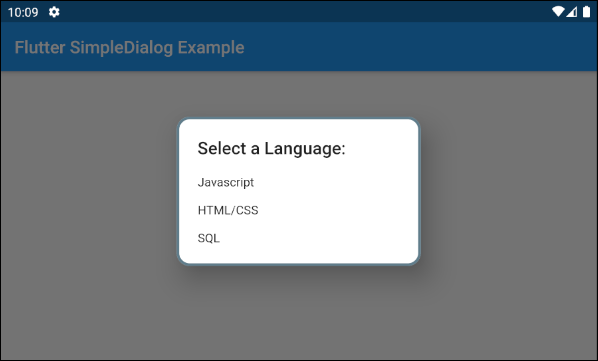
shape (ex1)
shape: RoundedRectangleBorder (
    side:  BorderSide(color: Colors.blueGrey, width: 3),
    borderRadius: BorderRadius.all(Radius.circular(15))
)
BeveledRectangleBorder:
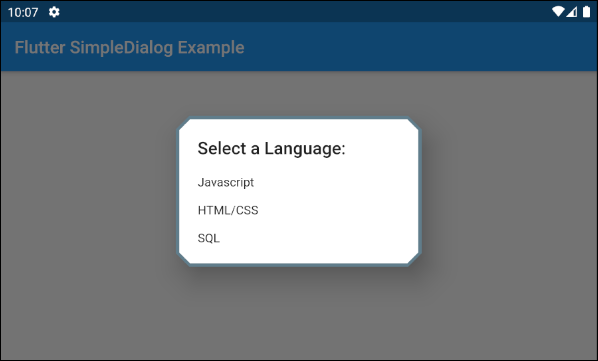
shape (ex2)
shape: BeveledRectangleBorder (
    side:  BorderSide(color: Colors.blueGrey, width: 2),
    borderRadius: BorderRadius.all(Radius.circular(15))
)
Tutoriels de programmation Flutter
- Le Tutoriel de Flutter Column
- Le Tutoriel de Flutter Stack
- Le Tutoriel de Flutter IndexedStack
- Le Tutoriel de Flutter Spacer
- Le Tutoriel de Flutter Expanded
- Le Tutoriel de Flutter SizedBox
- Le Tutoriel de Flutter Tween
- Installer Flutter SDK sur Windows
- Installer Flutter Plugin pour Android Studio
- Créez votre première application Flutter - Hello Flutter
- Le Tutoriel de Flutter Scaffold
- Le Tutoriel de Flutter AppBar
- Le Tutoriel de Flutter BottomAppBar
- Le Tutoriel de Flutter TextButton
- Le Tutoriel de Flutter ElevatedButton
- Le Tutoriel de Flutter EdgeInsetsGeometry
- Le Tutoriel de Flutter EdgeInsets
- Le Tutoriel de CircularProgressIndicator
- Le Tutoriel de Flutter LinearProgressIndicator
- Le Tutoriel de Flutter Center
- Le Tutoriel de Flutter Align
- Le Tutoriel de Flutter Row
- Le Tutoriel de Flutter SplashScreen
- Le Tutoriel de Flutter Alignment
- Le Tutoriel de Flutter Positioned
- Le Tutoriel de Flutter SimpleDialog
- Le Tutoriel de Flutter AlertDialog
- Navigation et Routing dans Flutter
- Le Tutoriel de Flutter TabBar
- Le Tutoriel de Flutter Banner
- Le Tutoriel de Flutter BottomNavigationBar
- Le Tutoriel de Flutter FancyBottomNavigation
- Le Tutoriel de Flutter Card
- Le Tutoriel de Flutter Border
- Le Tutoriel de Flutter ContinuousRectangleBorder
- Le Tutoriel de Flutter RoundedRectangleBorder
- Le Tutoriel de Flutter CircleBorder
- Le Tutoriel de Flutter StadiumBorder
- Le Tutoriel de Flutter Container
- Le Tutoriel de Flutter RotatedBox
- Le Tutoriel de Flutter CircleAvatar
- Le Tutoriel de Flutter IconButton
- Le Tutoriel de Flutter FlatButton
- Le Tutoriel de Flutter SnackBar
Show More