Le Tutoriel de JavaFX HTMLEditor
1. JavaFX HTMLEditor
JavaFX HTMLEditor est un éditeur de texte complet de fonctions de rich text editor. Sa mise en oeuvre est basée sur la fonctionnalité de l'édition de document de HTML5 et comprend les fonctions de l'édition suivantes :
- Mise en forme du texte en gras (blod), en italique (italic), en soulignage (underline), et le tiret
- Paramètres de paragraphe du texte (Paragraph) comme le format, le font et la taille
- Couleur de lettre et couleur de font
- Texte commencant en retrait (Text indent)
- Les listes à puces et les index (Bulleted and numbred lists)
- Alignement du texte (Text alignment)
- Barre horizontable supplémentaire (<hr> - horizontal rule )
- Copiage et Collage du texte
// Create HTMLEditor
HTMLEditor htmlEditor = new HTMLEditor();
htmlEditor.setPrefHeight(245);
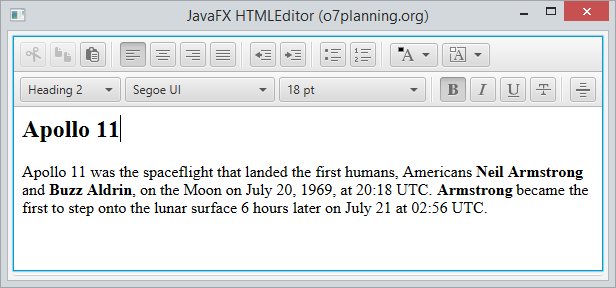
String INITIAL_TEXT = "<h2>Apollo 11</h2>" //
+ "Apollo 11 was the spaceflight that landed the first humans,"//
+ " Americans <a href='http://en.wikipedia.org/wiki/Neil_Armstrong'>Neil Armstrong</a>"
+ " and <a href='http://en.wikipedia.org/wiki/Buzz_Aldrin'>Buzz Aldrin</a>,"//
+ " on the Moon on July 20, 1969, at 20:18 UTC."//
+ " <b>Armstrong</b> became the first to step onto"//
+ " the lunar surface 6 hours later on July 21 at 02:56 UTC.";
// Set HTML
htmlEditor.setHtmlText(INITIAL_TEXT);
// Get HTML
String html = htmlEditor.getHtmlText();
2. L'exemple HTMLEditor
HTMLEditorDemo.java
package org.o7planning.javafx.htmleditor;
import javafx.application.Application;
import javafx.event.ActionEvent;
import javafx.event.EventHandler;
import javafx.geometry.Insets;
import javafx.scene.Scene;
import javafx.scene.control.Button;
import javafx.scene.control.TextArea;
import javafx.scene.layout.VBox;
import javafx.scene.web.HTMLEditor;
import javafx.stage.Stage;
public class HTMLEditorDemo extends Application {
@Override
public void start(Stage stage) {
HTMLEditor htmlEditor = new HTMLEditor();
htmlEditor.setPrefHeight(245);
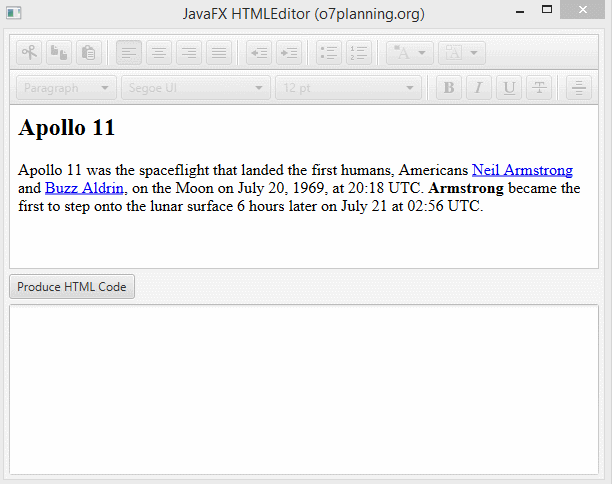
String INITIAL_TEXT = "<h2>Apollo 11</h2>" //
+ "Apollo 11 was the spaceflight that landed the first humans,"//
+ " Americans <a href='http://en.wikipedia.org/wiki/Neil_Armstrong'>Neil Armstrong</a>"
+ " and <a href='http://en.wikipedia.org/wiki/Buzz_Aldrin'>Buzz Aldrin</a>,"//
+ " on the Moon on July 20, 1969, at 20:18 UTC."//
+ " <b>Armstrong</b> became the first to step onto"//
+ " the lunar surface 6 hours later on July 21 at 02:56 UTC.";
htmlEditor.setHtmlText(INITIAL_TEXT);
Button showHTMLButton = new Button("Produce HTML Code");
TextArea textArea = new TextArea();
textArea.setWrapText(true);
//
showHTMLButton.setOnAction(new EventHandler<ActionEvent>() {
@Override
public void handle(ActionEvent event) {
textArea.setText(htmlEditor.getHtmlText());
}
});
VBox root = new VBox();
root.setPadding(new Insets(5));
root.setSpacing(5);
root.getChildren().addAll(htmlEditor, showHTMLButton, textArea);
Scene scene = new Scene(root, 600, 450);
stage.setTitle("JavaFX HTMLEditor (o7planning.org)");
stage.setScene(scene);
stage.show();
}
public static void main(String[] args) {
launch(args);
}
}3. HTMLEditor et WebView
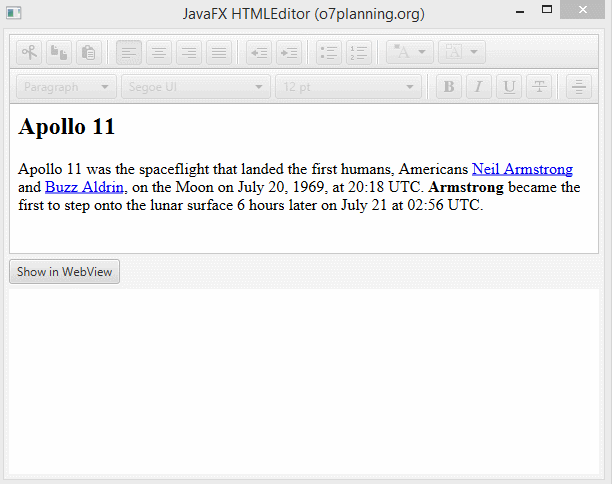
HTMLEditor est un éditeur HTML alors que WebView est un mini navigateur. Vous pouvez modifier le contenu HTML sur HTMLEditor et l'afficher sur WebView. Voyons l'exmemple ci-dessous :
Voir plus WebView:
HTMLEditorWebViewDemo.java
package org.o7planning.javafx.htmleditor;

import javafx.application.Application;
import javafx.event.ActionEvent;
import javafx.event.EventHandler;
import javafx.geometry.Insets;
import javafx.scene.Scene;
import javafx.scene.control.Button;
import javafx.scene.layout.VBox;
import javafx.scene.web.HTMLEditor;
import javafx.scene.web.WebEngine;
import javafx.scene.web.WebView;
import javafx.stage.Stage;

public class HTMLEditorWebViewDemo extends Application {

    @Override
    public void start(Stage stage) {
        // HTML Editor.
        HTMLEditor htmlEditor = new HTMLEditor();
        htmlEditor.setPrefHeight(245);
        htmlEditor.setMinHeight(220);
        String INITIAL_TEXT = "<h2>Apollo 11</h2>" //
                + "Apollo 11 was the spaceflight that landed the first humans,"//
                + " Americans <a href='http://en.wikipedia.org/wiki/Neil_Armstrong'>Neil Armstrong</a>"
                + " and <a href='http://en.wikipedia.org/wiki/Buzz_Aldrin'>Buzz Aldrin</a>,"//
                + " on the Moon on July 20, 1969, at 20:18 UTC."//
                + " <b>Armstrong</b> became the first to step onto"//
                + " the lunar surface 6 hours later on July 21 at 02:56 UTC.";

        htmlEditor.setHtmlText(INITIAL_TEXT);
        Button showHTMLButton = new Button("Show in WebView");

        // WebView
        WebView webView = new WebView();
        WebEngine webEngine = webView.getEngine();
        //
        showHTMLButton.setOnAction(new EventHandler<ActionEvent>() {
            @Override
            public void handle(ActionEvent event) {
                webEngine.loadContent(htmlEditor.getHtmlText(), "text/html");
            }
        });
        VBox root = new VBox();
        root.setPadding(new Insets(5));
        root.setSpacing(5);
        root.getChildren().addAll(htmlEditor, showHTMLButton, webView);
        Scene scene = new Scene(root, 600, 450);
        stage.setTitle("JavaFX HTMLEditor (o7planning.org)");
        stage.setScene(scene);
        stage.show();
    }
    public static void main(String[] args) {
        launch(args);
    }
}
Tutoriels de JavaFX
- Ouvrir une nouvelle fenêtre (Window) dans JavaFX
- Le Tutoriel de JavaFX ChoiceDialog
- Le Tutoriel de JavaFX Alert Dialog
- Le Tutoriel de JavaFX TextInputDialog
- Installer e(fx)clipse pour Eclipse (Outillage JavaFX)
- Installer JavaFX Scene Builder pour Eclipse
- Tutoriel JavaFX pour débutant - Hello JavaFX
- Le Tutoriel de JavaFX FlowPane Layout
- Le Tutoriel de JavaFX TilePane Layout
- Le Tutoriel de JavaFX HBox et VBox Layout
- Le Tutoriel de JavaFX BorderPane Layout
- Le Tutoriel de JavaFX AnchorPane Layout
- Le Tutoriel de JavaFX TitledPane
- Le Tutoriel de JavaFX Accordion
- Le Tutoriel de JavaFX ListView
- Le Tutoriel de JavaFX Group
- Le Tutoriel de JavaFX ComboBox
- Transformations dans JavaFX
- Les effets (effects) dans JavaFX
- Le Tutoriel de JavaFX GridPane Layout
- Le Tutoriel de JavaFX StackPane Layout
- Le Tutoriel de JavaFX ScrollPane
- Le Tutoriel de JavaFX WebView et WebEngine
- Le Tutoriel de JavaFX HTMLEditor
- Le Tutoriel de JavaFX TableView
- Le Tutoriel de JavaFX TreeView
- Le Tutoriel de JavaFX TreeTableView
- Le Tutoriel de JavaFX Menu
- Le Tutoriel de JavaFX ContextMenu
- Le Tutoriel de JavaFX Image et ImageView
- Le Tutoriel de JavaFX Label
- Le Tutoriel de JavaFX Hyperlink
- Le Tutoriel de JavaFX Button
- Le Tutoriel de JavaFX ToggleButton
- Le Tutoriel de JavaFX RadioButton
- Le Tutoriel de JavaFX MenuButton et SplitMenuButton
- Le Tutoriel de JavaFX TextField
- Le Tutoriel de JavaFX PasswordField
- Le Tutoriel de JavaFX TextArea
- Le Tutoriel de JavaFX Slider
- Le Tutoriel de JavaFX Spinner
- Le Tutoriel de JavaFX ProgressBar et ProgressIndicator
- Le Tutoriel de JavaFX ChoiceBox
- Le Tutoriel de JavaFX Tooltip
- Le Tutoriel de JavaFX DatePicker
- Le Tutoriel de JavaFX ColorPicker
- Le Tutoriel de JavaFX FileChooser et DirectoryChooser
- Le Tutoriel de JavaFX PieChart
- Le Tutoriel de JavaFX AreaChart et StackedAreaChart
- Le Tutoriel de JavaFX BarChart et StackedBarChart
- Le Tutoriel de JavaFX Line
- Le Tutoriel de JavaFX Rectangle et Ellipse
Show More