Le Tutoriel de JavaFX Tooltip
1. JavaFX Tooltip
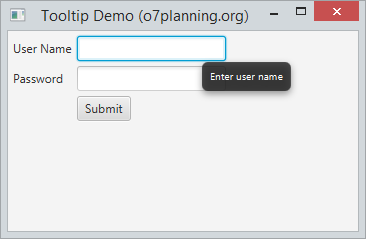
JavaFX Tooltip est un élément de l'interface utilisée pour afficher des informations supplémentaires pour une interface de composant (contrôle de l'interface utilisateur) lorsque vous déplacez la souris sur toute la surface du composant.
TextField field_userName= new TextField();

Tooltip tooltip_userName=new Tooltip("Enter user name");

// Set tooltip
field_userName.setTooltip(tooltip_userName);

// Or using Tooltip.install
Tooltip.install(field_userName, tooltip_userName);

// Uninstall tooltip
Tooltip.uninstall(field_userName, tooltip_userName);
2. Exemple de Tooltip
TooltipDemo.java
package org.o7planning.javafx.tooltip;

import javafx.application.Application;
import javafx.geometry.Insets;
import javafx.scene.Scene;
import javafx.scene.control.Button;
import javafx.scene.control.Label;
import javafx.scene.control.PasswordField;
import javafx.scene.control.TextField;
import javafx.scene.control.Tooltip;
import javafx.scene.layout.GridPane;
import javafx.stage.PopupWindow.AnchorLocation;
import javafx.stage.Stage;

public class TooltipDemo  extends Application {

   @Override
   public void start(Stage stage) {

       GridPane root= new GridPane();
       root.setHgap(5);
       root.setVgap(5);
       root.setPadding(new Insets(5));

       // User Name
       root.add(new Label("User Name"), 0, 0);
       TextField field_userName= new TextField();
       root.add(field_userName, 1, 0);

       Tooltip tooltip_userName=new Tooltip("Enter user name");
       field_userName.setTooltip(tooltip_userName);


       // Password
       root.add(new Label("Password"), 0, 1);
       PasswordField field_password= new PasswordField();

       Tooltip tooltip_password=new Tooltip("Enter Password");
       field_password.setTooltip(tooltip_password);

       root.add(field_password, 1, 1);


       // Create a Button
       Button button_login = new Button("Submit");
       Tooltip tooltip_login =new Tooltip("Login to Application");

       // Set Location to display tooltip.
       tooltip_login.setAnchorLocation(AnchorLocation.WINDOW_BOTTOM_LEFT);
       button_login.setTooltip(tooltip_login);


       root.add(button_login, 1, 2);


       Scene scene = new Scene(root, 350, 200);

       stage.setTitle("Tooltip Demo (o7planning.org)");
       stage.setScene(scene);
       stage.show();
   }

   public static void main(String[] args) {
       Application.launch(args);
   }

}
Exécutez l'exemple :
3. Affichage du contenu HTM sur Tooltip Affichage
TooltipHtmlDemo.java
package org.o7planning.javafx.tooltip;

import javafx.application.Application;
import javafx.geometry.Insets;
import javafx.scene.Scene;
import javafx.scene.control.Button;
import javafx.scene.control.ContentDisplay;
import javafx.scene.control.Tooltip;
import javafx.scene.layout.FlowPane;
import javafx.scene.web.WebEngine;
import javafx.scene.web.WebView;
import javafx.stage.Stage;


public class TooltipHtmlDemo extends Application {

   @Override
   public void start(Stage stage) {

       FlowPane root = new FlowPane();
       root.setHgap(5);
       root.setVgap(5);
       root.setPadding(new Insets(25));

       // Create a Button
       Button button = new Button("Button");

       // A browser.
       WebView  webView = new WebView();
       WebEngine webEngine = webView.getEngine();
       webEngine.loadContent
       (
            "<h3>Note:</h3> This is a Button"
       );

       Tooltip  tooltip = new Tooltip();
       tooltip.setPrefSize(200, 100);
       tooltip.setContentDisplay(ContentDisplay.GRAPHIC_ONLY);

       // Set tooltip content
       tooltip.setGraphic(webView);

       // Install tooltip for button (same as button.setTooltip)
       Tooltip.install(button, tooltip);

       root.getChildren().add(button);

       Scene scene = new Scene(root, 350, 200);

       stage.setTitle("Tooltip Html Demo (o7planning.org)");
       stage.setScene(scene);
       stage.show();
   }

   public static void main(String[] args) {
       Application.launch(args);
   }

}
Exécutez l'exemple :
4. Affichage đu contenu de Graphics sur Tooltip
Tooltip permet d'afficher graphique (Graphics) sur son contenu via la méthode tooltip.setGraphic().
// tooltip.setGraphic(Node):

tooltip.setGraphic(new Button("This is a button in tooltip"));
Exemple :
TooltipGraphicDemo.java
package org.o7planning.javafx.tooltip;

import javafx.application.Application;
import javafx.geometry.Insets;
import javafx.scene.Scene;
import javafx.scene.control.Button;
import javafx.scene.control.ContentDisplay;
import javafx.scene.control.Tooltip;
import javafx.scene.layout.FlowPane;
import javafx.stage.Stage;

public class TooltipGraphicDemo extends Application {

    @Override
    public void start(Stage stage) {

        FlowPane root = new FlowPane();
        root.setHgap(5);
        root.setVgap(5);
        root.setPadding(new Insets(25));

        // Create a Button
        Button button = new Button("Button");

        Tooltip tooltip = new Tooltip();
        tooltip.setPrefSize(200, 100);
        tooltip.setContentDisplay(ContentDisplay.GRAPHIC_ONLY);

        // Set tooltip content
        tooltip.setGraphic(new Button("Button in a Tooltip"));

        // Install tooltip for button (same as button.setTooltip)
        Tooltip.install(button, tooltip);

        root.getChildren().add(button);

        Scene scene = new Scene(root, 350, 200);

        stage.setTitle("Tooltip Graphic Demo (o7planning.org)");
        stage.setScene(scene);
        stage.show();
    }

    public static void main(String[] args) {
        Application.launch(args);
    }

}
Exécutez l'exemple :

Tutoriels de JavaFX
- Ouvrir une nouvelle fenêtre (Window) dans JavaFX
- Le Tutoriel de JavaFX ChoiceDialog
- Le Tutoriel de JavaFX Alert Dialog
- Le Tutoriel de JavaFX TextInputDialog
- Installer e(fx)clipse pour Eclipse (Outillage JavaFX)
- Installer JavaFX Scene Builder pour Eclipse
- Tutoriel JavaFX pour débutant - Hello JavaFX
- Le Tutoriel de JavaFX FlowPane Layout
- Le Tutoriel de JavaFX TilePane Layout
- Le Tutoriel de JavaFX HBox et VBox Layout
- Le Tutoriel de JavaFX BorderPane Layout
- Le Tutoriel de JavaFX AnchorPane Layout
- Le Tutoriel de JavaFX TitledPane
- Le Tutoriel de JavaFX Accordion
- Le Tutoriel de JavaFX ListView
- Le Tutoriel de JavaFX Group
- Le Tutoriel de JavaFX ComboBox
- Transformations dans JavaFX
- Les effets (effects) dans JavaFX
- Le Tutoriel de JavaFX GridPane Layout
- Le Tutoriel de JavaFX StackPane Layout
- Le Tutoriel de JavaFX ScrollPane
- Le Tutoriel de JavaFX WebView et WebEngine
- Le Tutoriel de JavaFX HTMLEditor
- Le Tutoriel de JavaFX TableView
- Le Tutoriel de JavaFX TreeView
- Le Tutoriel de JavaFX TreeTableView
- Le Tutoriel de JavaFX Menu
- Le Tutoriel de JavaFX ContextMenu
- Le Tutoriel de JavaFX Image et ImageView
- Le Tutoriel de JavaFX Label
- Le Tutoriel de JavaFX Hyperlink
- Le Tutoriel de JavaFX Button
- Le Tutoriel de JavaFX ToggleButton
- Le Tutoriel de JavaFX RadioButton
- Le Tutoriel de JavaFX MenuButton et SplitMenuButton
- Le Tutoriel de JavaFX TextField
- Le Tutoriel de JavaFX PasswordField
- Le Tutoriel de JavaFX TextArea
- Le Tutoriel de JavaFX Slider
- Le Tutoriel de JavaFX Spinner
- Le Tutoriel de JavaFX ProgressBar et ProgressIndicator
- Le Tutoriel de JavaFX ChoiceBox
- Le Tutoriel de JavaFX Tooltip
- Le Tutoriel de JavaFX DatePicker
- Le Tutoriel de JavaFX ColorPicker
- Le Tutoriel de JavaFX FileChooser et DirectoryChooser
- Le Tutoriel de JavaFX PieChart
- Le Tutoriel de JavaFX AreaChart et StackedAreaChart
- Le Tutoriel de JavaFX BarChart et StackedBarChart
- Le Tutoriel de JavaFX Line
- Le Tutoriel de JavaFX Rectangle et Ellipse
Show More