Le Tutoriel de CSS Float et Clear
1. CSS float
CSS {float: left | right | inline-start | inline-end} fait flotter (float) un élément à gauche ou à droite de l'élément qui le contient. Il permet aux contenus textuels et aux contenus inligne (inline content) de l'entourer.
Syntax
/* Keyword values */
float: left;
float: right;
float: none;
float: inline-start;
float: inline-end;

/* Global values */
float: inherit;
float: initial;
float: unset;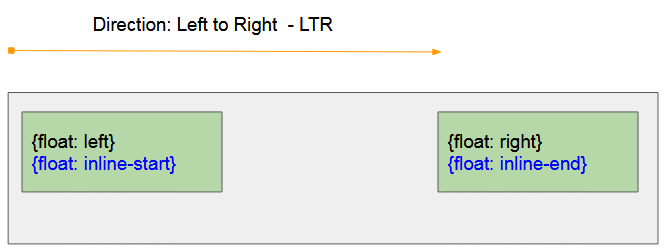

CSS {float: left}
Faites flotter (float) un élément sur le côté gauche de l'élément qui le contient.
CSS {float: right}
Faites flotter (float) un élément sur le côté droit de l'élément qui le contient.
CSS {float: inline-start}
- CSS {float: inline-start} fonctionne de la même façon que CSS {float: left} si l'élément père est de gauche à droite - direction LTR (Left to Right - LTR)
- CSS {float: inline-start} fonctionne de la même façon que CSS {float: right} si l'élément père est de droite à gauche - direction RTL (Right to Left - RTL)
CSS {float: inline-end}
- CSS {float: inline-end} fonctionne de la même façon que CSS {float: right} si l'élément père est de gauche à droite - direction LTR (Left to Right - LTR)
- CSS {float: inline-end} fonctionne de la même façon que CSS {float: left} si l'élément père est de droite à gauche - direction RTL (Right to Left - RTL)
CSS {float: none}
Rejeter le statut du flottant de l'élément.
L'exemple avec CSS {float: left | right} :
float-example.html
<!DOCTYPE html>
<html>
   <head>
      <title>CSS float</title>
      <meta charset="UTF-8"/>
      <style>
          .container {
            background-color: #eee;
            min-height: 135px;
            padding: 5px;
            text-align: left;
          }
          .container span {
            background-color: yellow;
          }
          #myElement {
            background-color: lightgreen;
            color: red;
            font-weight: bold;
            width: 180px;
            height: 50px;
            padding: 5px;
            margin: 5px;
          }
      </style>
      <script>
          function changeFloat(event)  {
             var floatValue = event.target.value;
             var myElement = document.getElementById("myElement");
             myElement.style.float = floatValue;
             myElement.innerHTML = "{float: "+ floatValue+"}";
          }
      </script>
   </head>
   <body>
       <h1>CSS float</h1>
       <input type="radio" name="my-radio" value="none" onclick="changeFloat(event)" checked/> None<br>
       <input type="radio" name="my-radio" value="left" onclick="changeFloat(event)"/> Left<br>
       <input type="radio" name="my-radio" value="right" onclick="changeFloat(event)"/> Right
       <hr/>
       <div class = "container">
             <div id = "myElement">
                {float: none} (Default)
             </div>
             Apollo 11 was the spaceflight that landed the first humans,
             Americans <span>Neil Armstrong</span> and <span>Buzz Aldrin</span>,
             on the Moon on July 20, 1969, at 20:18 UTC.
             <span>Armstrong</span> became the first to step onto the lunar
             surface 6 hours later on July 21 at 02:56 UTC.

             <span>Armstrong</span> spent about three and a half two
             and a half hours outside the spacecraft,
             <span>Aldrin</span> slightly less; and together they
             collected 47.5 pounds (21.5 kg) of lunar material
             for return to Earth. A third member of the mission,...
       </div>
   </body>
</html>
Si vous appliquez CSS {float: left | right | inline-start | inline-end} à un élément inligne (inline element), le navigateur transformera automatiquement cet élément en un élément de bloc (block element). Plus précisément CSS {display:inline} peut convertir en CSS {display:block}. Il peut également convertir d'autres valeurs CSS display.
{display:inline} | {display:block} |
{display:inline-block} | {display:block} |
{display:inline-table} | {display:table} |
{display:table-row} | {display:block} |
{display:table-row-group} | {display:block} |
{display:table-column} | {display:block} |
{display:table-column-group} | {display:block} |
{display:table-cell} | {display:block} |
{display:table-caption} | {display:block} |
{display:table-header-group} | {display:block} |
{display:table-footer-group} | {display:block} |
{display:inline-flex} | {display:flex} |
{display:inline-grid} | {display:grid} |
other | unchanged |
Ci-dessous un exemple, l'élément inligne <span> sera traité comme un élément de bloc lorsque vous appliquez CSS {float: left | right | inline-start | inline-end} pour lui.
float-example2.html
<!DOCTYPE html>
<html>
   <head>
      <title>CSS float</title>
      <meta charset="UTF-8"/>
      <style>
         .container {
           background-color: #eee;
           min-height: 135px;
           padding: 5px;
           text-align: left;
         }
         .container span {
           background-color: yellow;
         }
         #myElement {
           background-color: lightgreen;
           color: red;
           font-weight: bold;
           width: 180px;
           height: 50px;
           padding: 5px;
           margin: 5px;
         }
      </style>
      <script>
         function changeFloat(event)  {
            var floatValue = event.target.value;
            var myElement = document.getElementById("myElement");
            myElement.style.float = floatValue;
         }
      </script>
   </head>
   <body>
      <h1>CSS float with Inline Element</h1>
      <input type="radio" name="my-radio" value="none" onclick="changeFloat(event)" checked/> None<br>
      <input type="radio" name="my-radio" value="left" onclick="changeFloat(event)"/> Left<br>
      <input type="radio" name="my-radio" value="right" onclick="changeFloat(event)"/> Right
      <hr/>
      <div class = "container">
         <span id = "myElement">
           I am a Span Element.
           {width: 180px; height: 50px;}
         </span>

         Apollo 11 was the spaceflight that landed the first humans,
         Americans <span>Neil Armstrong</span> and <span>Buzz Aldrin</span>,
         on the Moon on July 20, 1969, at 20:18 UTC.
         <span>Armstrong</span> became the first to step onto the lunar
         surface 6 hours later on July 21 at 02:56 UTC.
         <span>Armstrong</span> spent about three and a half two
         and a half hours outside the spacecraft,
         <span>Aldrin</span> slightly less; and together they
         collected 47.5 pounds (21.5 kg) of lunar material
         for return to Earth. A third member of the mission,...
      </div>
   </body>
</html>
2. L'exemple avec CSS float
Lorsqu'un élément est flotté (floated), il sort des règles normales de mise en page d'un document. Il sera déplacé vers la gauche (ou vers la droite) jusqu'à ce qu'il touche le côté de l'élément parent, ou un autre élément flottant (floating element).
float-example3.html
<!DOCTYPE html>
<html>
   <head>
      <title>CSS float</title>
      <meta charset="UTF-8"/>
      <style>
         .container {
           background-color: #eee;
           min-height: 135px;
           padding: 5px;
         }
         .container span {
           background-color: yellow;
         }
         .float-left {
           background-color: lightgreen;
           float: left;
           width: 70px;
           height: 50px;
           padding: 5px;
           margin: 5px;
         }
         .float-right {
           background-color: lightblue;
           float: right;
           width: 100px;
           height: 70px;
           padding: 5px;
           margin: 5px;
         }
      </style>
   </head>
   <body>
      <h1>CSS float</h1>
      <div class = "container">
         Apollo 11 was the spaceflight that landed the first humans,
         Americans <span>Neil Armstrong</span> and <span>Buzz Aldrin</span>,
         on the Moon on July 20, 1969, at 20:18 UTC.
         <div class = "float-left">
              Float left
         </div>
         <div class = "float-right">
              Float right
         </div>
         <div class = "float-left">
              Float left
         </div>
         <span>Armstrong</span> became the first to step onto the lunar
         surface 6 hours later on July 21 at 02:56 UTC.
         <span>Armstrong</span> spent about three and a half two
         and a half hours outside the spacecraft,
         <span>Aldrin</span> slightly less; and together they
         collected 47.5 pounds (21.5 kg) of lunar material
         for return to Earth. A third member of the mission,...
      </div>
   </body>
</html>
Exemple d'image avec CSS float :
img-float-example.html
<!DOCTYPE html>
<html>
   <head>
      <title>CSS float Image</title>
      <meta charset="UTF-8"/>
      <style>
         .container {
           background-color: #eee;
           min-height: 135px;
           padding: 5px;
         }
         .img-left {
           float: left;
           margin: 5px;
         }
      </style>
   </head>
   <body>
      <h1>CSS float Image</h1>
      <div class = "container">
         Apollo 11 was the spaceflight that landed the first humans,
         Americans Neil Armstrong and Buzz Aldrin,
         on the Moon on July 20, 1969, at 20:18 UTC.
         <img src="../images/flower.png" class = "img-left"/>

         Armstrong became the first to step onto the lunar
         surface 6 hours later on July 21 at 02:56 UTC.
         Armstrong spent about three and a half two
         and a half hours outside the spacecraft,
         Aldrin slightly less; and together they
         collected 47.5 pounds (21.5 kg) of lunar material
         for return to Earth. A third member of the mission,...
      </div>
   </body>
</html>
3. CSS Clear
CSS {clear: left | right} est appliqué à un élément pour qu'un autre élément ne puisse pas flotter (float) à gauche ou à droite de lui. CSS clear ne fonctionne lorsqu'il y a des conditions suivantes :
- Dans le code, l'élément courant (<current-element>) doit être écrit après l'élément flottant (<floating-element>).
- L'élément courant doit être un élément flottant (floating element) ou un élément de bloc (block element).
<floating-element>
<current-element>
Remarque : Si CSS {clear: left | right} fonctionne, il va pousser l'élément courant jusqu'à la ligne suivante.
Syntax
/* Keyword values */
clear: none;
clear: left;
clear: right;
clear: both;
clear: inline-start;
clear: inline-end;

/* Global values */
clear: inherit;
clear: initial;
clear: unset;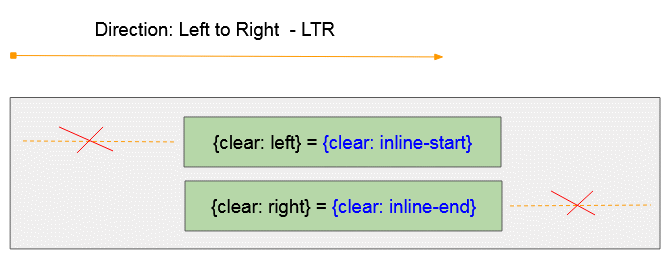

CSS {clear: inline-start}
- CSS {clear: inline-start} fonctionne comme CSS {clear: left} Si l'élément parent est de gauche à droite - direction LTR (Left to Right - LTR)
- CSS {clear: inline-start} fonctionne comme CSS {clear: right} Si l'élément parent est de droite à gauche - direction RTL (Right to Left - RTL)
CSS {clear: inline-end}
- CSS {float: clear-end} fonctionne comme CSS {clear: right} Si l'élément parent est de gauche à droite - direction LTR (Left to Right - LTR)
- CSS {clear: inline-end} fonctionne comme CSS {clear: left} Si l'élément parent est de droite à gauche - direction RTL (Right to Left - RTL)
CSS {clear: both}

CSS {clear: both} = {clear: left} + {clear: right}.
CSS {clear: none}
Supprime CSS Clear d'un élément
4. CSS Clear pour Elément flottant
CSS {clear: left | right} peut s'appliquer à un élément flottant (floating element) - {float: left | right | inline-start | inline-end | both},pour empêcher un élément de flotter à sa gauche ou à sa droite.
<floating-element>
<current-element>
Voici des exemples de situations possibles :
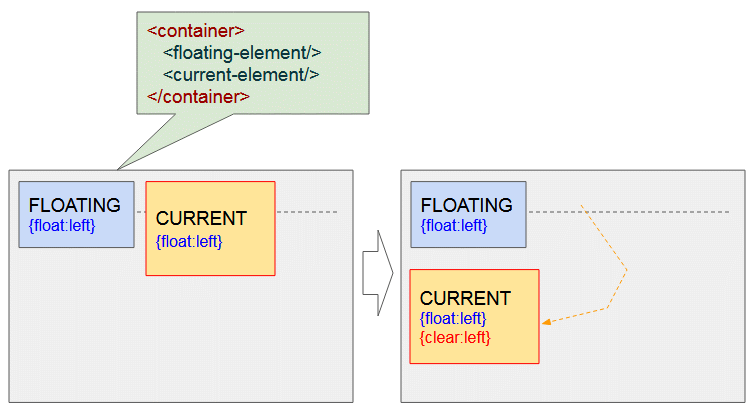
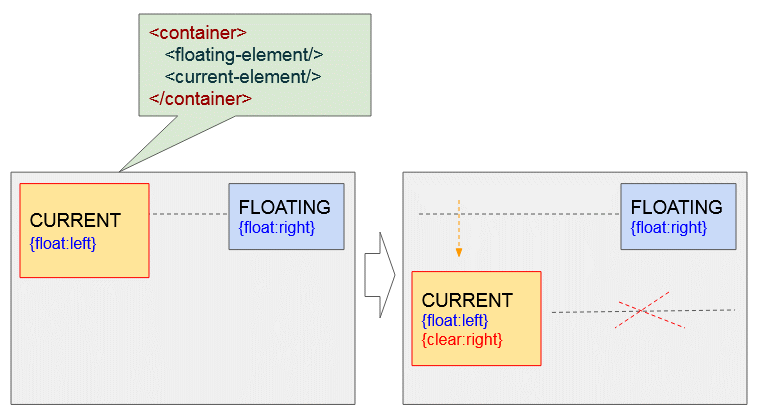
Les deux éléments sont float:left - {float:left}. Appliquer CSS {clear : left} au deuxième élément le poussera vers la ligne suivante pour s'assurer que le premier élément ne flotte plus à sa gauche.
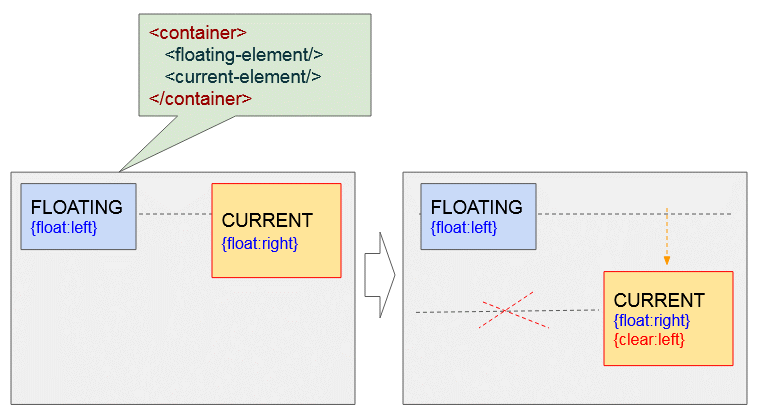
L'élément courant est float:right - {float:right}, et l'autre est float:left - {float:left}. Appliquer CSS {clear : left} à l'élément courant le poussera vers la ligne suivante pour s'assurer que l'autre élément ne flotte plus à sa gauche.
L'élément courant est float:left- {float:left}, et l'autre élément est float:right- {float:right}. Appliquer CSS {clear : right} à l'élément courant le poussera vers la ligne suivante pour s'assurer que l'autre élément ne flotte plus à sa droite.
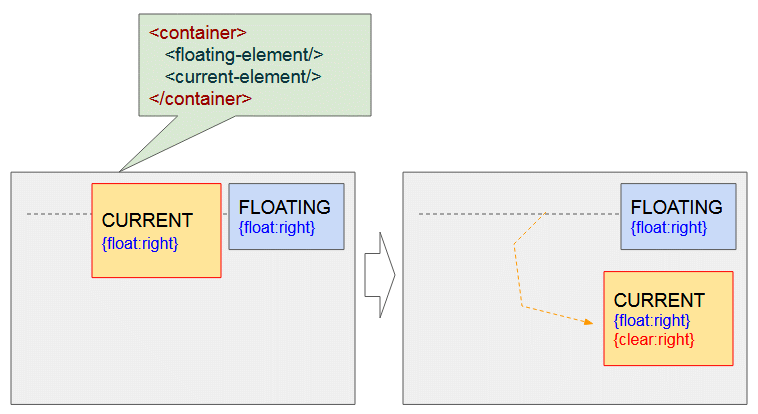
Les deux éléments sont float:right - {float:right}. Appliquer CSS {clear : right} à l'élément courant le poussera vers la ligne suivante pour s'assurer que l'autre élément ne flotte plus à sa droite.
Exemple :
clear-example1.html
<!DOCTYPE html>
<html>
   <head>
      <title>CSS Clear</title>
      <meta charset="UTF-8"/>
      <link rel="stylesheet" href="clear-example1.css" />
      <script src="clear-example1.js"> </script>
   </head>
   <body>
       <h1>CSS Clear</h1>
       <div class="option">
         #floating-element <br/><br/>
         <input type="radio" name="f-radio" value="left" onclick="changeFloat1(event)" checked/> float:left <br/>
         <input type="radio" name="f-radio" value="right" onclick="changeFloat1(event)"/> float:right
       </div>
       <div class="option">
         #current-element <br/><br/>
         <input type="radio" name="c1-radio" value="left" onclick="changeFloat2(event)" checked/> float:left <br/>
         <input type="radio" name="c1-radio" value="right" onclick="changeFloat2(event)"/> float:right
       </div>
       <div class="option">
         #current-element <br/><br/>
         <input type="radio" name="c2-radio" value="none" onclick="changeClear2(event)" checked/> clear:none <br/>
         <input type="radio" name="c2-radio" value="left" onclick="changeClear2(event)"/> clear:left <br/>
         <input type="radio" name="c2-radio" value="right" onclick="changeClear2(event)"/> clear:right
       </div>
       <hr/>
       <p style="color:blue;">
          CASE: #current-element is a Floating Element.
       </p>
       <div class = "container">
            <div id = "floating-element">
              FLOATING-ELEMENT <br/>
              {float: left}
            </div>
            <div id = "current-element">
              CURRENT-ELEMENT <br/>
              {float: left}
            </div>
       </div>
   </body>
</html>
clear-example1.css
.option {
  display: inline-block;
  width: 130px;
  margin-right: 5px;
  padding: 5px;
  border: 1px solid black;
}
.container {
  background-color: #eee;
  padding: 15px;
  height: 200px;
}
.container div {
   margin: 5px;
   padding:10px;
}
#current-element {
    float: left;
    width: 170px;
    height: 100px;
    background: yellow;
    border: 1px solid red;
}
#floating-element {
   float: left;
   width: 160px;
   height: 80px;
   background: lightgreen;
}
clear-example1.js
var floatValue1 = "left"; // FLOATING-LEMENT
var floatValue2 = "left"; // CURRENT-LEMENT
var clearValue2 = "none"; // CURRENT-LEMENT

function changeFloat1(event)  {
   floatValue1 = event.target.value;
   var myElement1 = document.getElementById("floating-element");
   myElement1.style.float = floatValue1;
   myElement1.innerHTML = "FLOATING-ELEMENT<br/>{float: "+ floatValue1+"}";
}
function changeFloat2(event)  {
   floatValue2 = event.target.value;
   var myElement2 = document.getElementById("current-element");
   myElement2.style.float = floatValue2;
   myElement2.innerHTML = "CURRENT-ELEMENT<br/>"
                         +"{float: "+ floatValue2+"}<br/>"
                         +"{clear: "+ clearValue2+"}";
}
function changeClear2(event)  {
   clearValue2 = event.target.value;
   var myElement2 = document.getElementById("current-element");
   myElement2.style.clear = clearValue2;
   myElement2.innerHTML = "CURRENT-ELEMENT<br/>"
                         +"{float: "+ floatValue2+"}<br/>"
                         +"{clear: "+ clearValue2+"}";
}
5. CSS Clear pour Elément de bloc
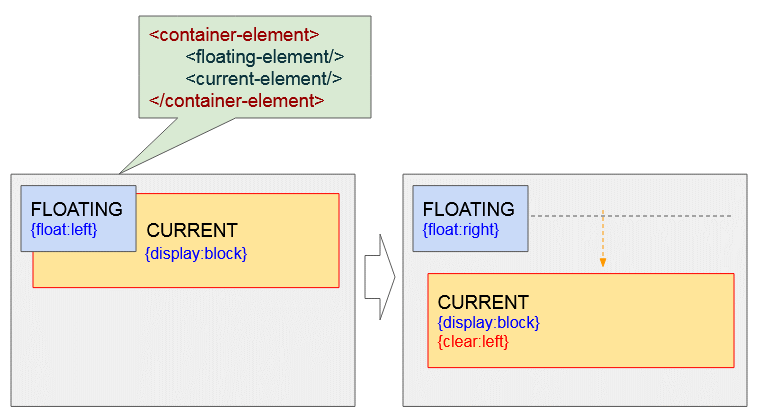
CSS {clear: left | right} peut appliquer à un élément bloc(block element) - {display:block}, pour empêcher un élément de flotter à sa gauche ou à sa droite.
Remarque : En code, l'élément de bloc utilisant CSS {clear : left | right} doit être écrit après l'élément flottant (Floating element).
<floating-element>
<current-element>
Si l'élément courant (#current-élément courant) est un élément bloc. Voici des exemples de situations possibles :

clear-example2.html
<!DOCTYPE html>
<html>
   <head>
      <title>CSS Clear</title>
      <meta charset="UTF-8"/>
      <link rel="stylesheet" href="clear-example2.css" />
      <script src="clear-example2.js"> </script>
   </head>
   <body>
       <h1>CSS Clear</h1>
       <div class="option">
         #floating-element <br/><br/>
         <input type="radio" name="f-radio" value="left" onclick="changeFloat1(event)" checked/> float:left <br/>
         <input type="radio" name="f-radio" value="right" onclick="changeFloat1(event)"/> float:right
       </div>
       <div class="option">
         #current-element <br/><br/>
         <input type="radio" name="c2-radio" value="none" onclick="changeClear2(event)" checked/> clear:none <br/>
         <input type="radio" name="c2-radio" value="left" onclick="changeClear2(event)"/> clear:left <br/>
         <input type="radio" name="c2-radio" value="right" onclick="changeClear2(event)"/> clear:right
       </div>
       <hr/>
       <p style="color:blue;">
          CASE: #current-element is a Block Element.
       </p>
       <div class = "container">
            <div id = "floating-element">
              FLOATING-ELEMENT <br/>
              {float: left}
            </div>
            <div id = "current-element">
              CURRENT-ELEMENT
            </div>
       </div>
   </body>
</html>
clear-example2.css
.option {
  display: inline-block;
  width: 130px;
  margin-right: 5px;
  padding: 5px;
  border: 1px solid black;
}
.container {
  background-color: #eee;
  padding: 15px;
  height: 200px;
}
.container div {
   margin: 5px;
   padding:10px;
}
#current-element {
    height: 120px;
    margin: 10px;
    background: yellow;
    border: 1px solid red;
}
#floating-element {
   float: left;
   width: 160px;
   height: 80px;
   background: lightgreen;
}
clear-example2.js
var floatValue1 = "left"; // FLOATING-LEMENT
var clearValue2 = "none"; // CURRENT-LEMENT

function changeFloat1(event)  {
   floatValue1 = event.target.value;
   var myElement1 = document.getElementById("floating-element");
   myElement1.style.float = floatValue1;
   myElement1.innerHTML = "FLOATING-ELEMENT<br/>{float: "+ floatValue1+"}";
}
function changeClear2(event)  {
   clearValue2 = event.target.value;
   var myElement2 = document.getElementById("current-element");
   myElement2.style.clear = clearValue2;
   myElement2.innerHTML = "CURRENT-ELEMENT<br/>"
                         +"{clear: "+ clearValue2+"}";
}
Les éléments flottants (floating element) ne participent pas parfois à l'augmentation de la hauteur de l'élément parent, vous verrez donc une situation comme l'illustration suivante :
Ajouter un élément de bloc avec CSS {clear:both} comme dernier élément enfant de l'élément parent, l'élément parent sera d'une hauteur suffisante pour contenir tous les éléments enfants.
<div class = "container">
    <div id = "floating-element1">
      ...
    </div>
    <div id = "floating-element2">
      ...
    </div>
    <div style="clear:both;"></div>
</div>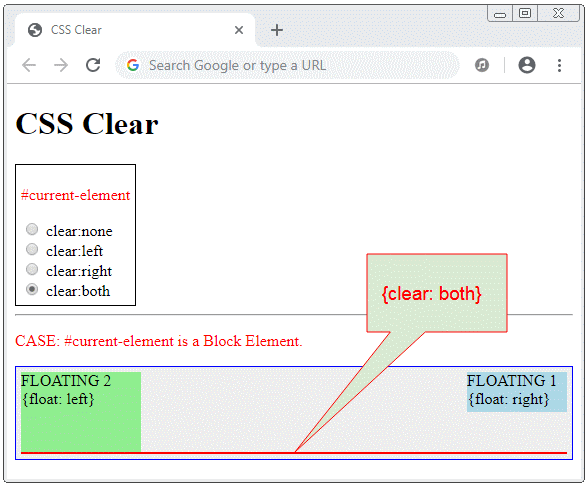
clear-example3.html
<!DOCTYPE html>
<html>
<head>
<title>CSS Clear</title>
<meta charset="UTF-8"/>
<link rel="stylesheet" href="clear-example3.css" />
<script src="clear-example3.js"> </script>
</head>
<body>
<h1>CSS Clear</h1>
<div class="option">
<p style="color:red">#current-element</p>
<input type="radio" name="c2-radio" value="none" onclick="changeClear(event)" checked/> clear:none <br/>
<input type="radio" name="c2-radio" value="left" onclick="changeClear(event)"/> clear:left <br/>
<input type="radio" name="c2-radio" value="right" onclick="changeClear(event)"/> clear:right <br/>
<input type="radio" name="c2-radio" value="both" onclick="changeClear(event)"/> clear:both
</div>
<hr/>
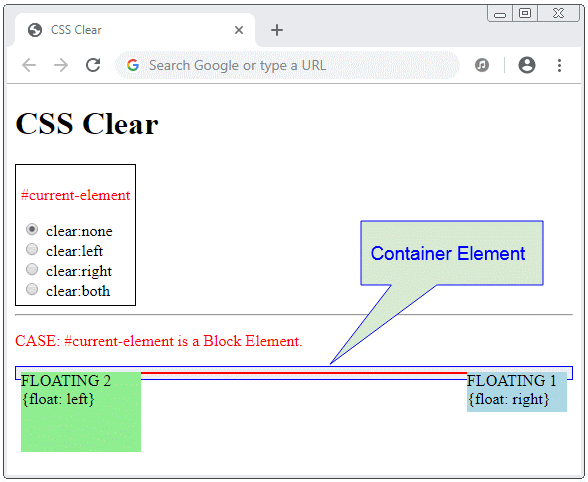
<p style="color:red;">
CASE: #current-element is a Block Element.
</p>
<div class = "container">
<div id = "floating-element1">
FLOATING 1 <br/>
{float: right}
</div>
<div id = "floating-element2">
FLOATING 2 <br/>
{float: left}
</div>
<div id= "current-element">
</div>
</div>
</body>
</html>clear-example3.css
.option {
  display: inline-block;
  margin-right: 5px;
  padding: 5px;
  border: 1px solid black;
}
.container {
  background-color: #eee;
  padding: 5px;
  border: 1px solid blue;
}
#floating-element1 {
   float: right;
   width: 100px;
   height: 40px;
   background: lightblue;
}
#floating-element2 {
   float: left;
   width: 120px;
   height: 80px;
   background: lightgreen;
}
#current-element {
   border: 1px solid red;
}
clear-example3.js
// Change CSS Clear for #current-element.
function changeClear(event)  {
   var clearValue = event.target.value;
   var myElement = document.getElementById("current-element");
   myElement.style.clear = clearValue;
}
Remarque : CSS {clear: left | right} ne fonctionnera pas si vous l'appliquez à un élément en ligne (inline) ou à un bloc inligne (inline-block).
Exemple, CSS clear kne fonctionne pas lorsque vous l'appliquez à un élément inligne (Inline element) :
clear-not-work-example1.html
<!DOCTYPE html>
<html>
   <head>
      <title>CSS Clear</title>
      <meta charset="UTF-8"/>
      <link rel="stylesheet" href="clear-not-work-example1.css" />
   </head>
   <body>
       <h3>CSS Clear does not work with Inline and Inline-block elements</h3>
       <div class = "container">
            <div id = "floating-element">
              FLOATING <br/>
              {float: left}
            </div>
            <div id = "current-element">
              (Inline Element) - {clear: left} -
              Apollo 11 was the spaceflight that landed the first humans,
              Americans Neil Armstrong and Buzz Aldrin,
              on the Moon on July 20, 1969, at 20:18 UTC.
              Armstrong became the first to step onto the lunar
              surface 6 hours later on July 21 at 02:56 UTC.

              Armstrong spent about three and a half two
              and a half hours outside the spacecraft,
              Aldrin slightly less; and together they
              collected 47.5 pounds (21.5 kg) of lunar material
              for return to Earth. A third member of the mission,...
            </div>
       </div>
   </body>
</html>
clear-not-work-example1.css
.container {
  background-color: #eee;
  padding: 15px;
  height: 200px;
}
#floating-element {
   float: left;
   width: 150px;
   height: 80px;
   background: lightgreen;
   padding:5px;
   margin: 5px;
}
#current-element {
   border: 1px solid lightblue;
   padding: 5px;
   display: inline;
   clear: left; /** Not work with Inline, Inline-Block Element */
}
Exemple, CSS clear ne fonctionne pas lorsque vous l'appliquez à l'élément inline-block (Inline-block element) :
clear-not-work-example2.html
<!DOCTYPE html>
<html>
   <head>
      <title>CSS Clear</title>
      <meta charset="UTF-8"/>
      <link rel="stylesheet" href="clear-not-work-example2.css" />
   </head>
   <body>
       <h3>CSS Clear does not work with Inline and Inline-block elements</h3>
       <div class = "container">
            <div id = "floating-element">
              FLOATING <br/>
              {float: left}
            </div>
            <div id = "current-element">
              (Inline-Block Element)  - {clear: left} -
              Apollo 11 was the spaceflight that landed the first humans,
              Americans Neil Armstrong and Buzz Aldrin,
              on the Moon on July 20, 1969, at 20:18 UTC.
              Armstrong became the first to step onto the lunar
              surface 6 hours later on July 21 at 02:56 UTC.
            </div>
       </div>
   </body>
</html>
clear-not-work-example2.css
.container {
  background-color: #eee;
  padding: 15px;
  height: 200px;
}
#floating-element {
   float: left;
   width: 140px;
   height: 80px;
   background: lightgreen;
   padding:5px;
   margin: 5px;
}
#current-element {
   border: 1px solid lightblue;
   padding: 5px;
   width: 200px;
   display: inline-block;
   clear: left; /** Not work with Inline, Inline-Block Element */
}
Tutoriels CSS
- Unités en CSS
- Le Tutoriel de CSS Selectors de base
- Le Tutoriel de CSS Attribute Selector
- Le Tutoriel de CSS combinator Selectors
- Le Tutoriel de CSS Backgrounds
- Le Tutoriel de CSS Opacity
- Le Tutoriel de CSS Padding
- Le Tutoriel de CSS Margins
- Le Tutoriel de CSS Borders
- Le Tutoriel de CSS Outline
- Le Tutoriel de CSS box-sizing
- Le Tutoriel de CSS max-width et min-width
- Les mots-clés min-content, max-content, fit-content, stretch en CSS
- Le Tutoriel de CSS Links
- Le Tutoriel de CSS Fonts
- Comprendre les Generic Font Family Names en CSS
- Le Tutoriel de CSS @font-face
- Le Tutoriel de CSS Align
- Le Tutoriel de CSS Cursors
- Le Tutoriel de CSS Overflow
- Le Tutoriel de CSS Lists
- Le Tutoriel de CSS Tables
- Le Tutoriel de visibility
- Le Tutoriel de CSS Display
- Le Tutoriel de CSS Grid Layout
- Le Tutoriel de CSS Float et Clear
- Le Tutoriel de CSS Position
- Le Tutoriel de CSS line-height
- Le Tutoriel de CSS text-align
- Le Tutoriel de CSS text-decoration
Show More