Le Tutoriel de CSS Display
1. Aperçu de CSS display
CSS display est utilisé dans les cas suivant :
1 - CSS {display: none}
CSS {display:none} permet de masquer un élément et de libérer l'espace qu'il occupe.
2 - CSS {display: block | inline | inline-block}
Utiliser CSS display avec une des valeurs block, inline, inline-block pour que l'élément soit traité comme un élément de bloc (Block element), un élément en ligne (inline element) ou un élément de bloc en ligne (inline-block element).
3 - CSS {display: grid | flex | ... }
Utiliser CSS display avec différentes valeurs (grid, inline-grid, flex,...) pour définir la mise en page (Layout) des enfants de l'élément courant. Par exemple, CSS {display:grid | inline-grid} divisant la surface de l'élément courant en une grille (grid), composée de plusieurs lignes (row) et colonnes (column), ses enfants seront disposés sur ces cellules de grille.
2. CSS {display: none}
CSS {display:none} permet de masquer un élément et de libérer l'espace qu'il occupe. Pour réafficher cet élément, utilisez CSS {display:block | inline | inline-block} ou supprimez CSS display.
display-none-example.html
<!DOCTYPE html>
<html>
   <head>
      <title>CSS {display:none}</title>
      <meta charset="UTF-8"/>
      <script>
          function showHideImage(event)  {
             var myImage = document.getElementById("myImage");
             var displayValue = myImage.style.display;
             if(!displayValue) {
                 myImage.style.display = "none";
             } else {
                 // Remove CSS display.
                 myImage.style.display = null;
                 // OR Set to: block|inline|inline-block.
             }
          }
      </script>
   </head>
   <body>
       <h2>CSS {display:none}</h2>
       <button onClick="showHideImage(event)">Show/Hide Image</button>
       <div style="padding:5px; margin-top:10px; background:#eee;">
           <img src="../images/flower.png" id= "myImage"/>
           Apollo 11 was the spaceflight that landed the first humans,
           Americans Neil Armstrong and Buzz Aldrin,
           on the Moon on July 20, 1969, at 20:18 UTC.
           Armstrong became the first to step onto the lunar
           surface 6 hours later on July 21 at 02:56 UTC.
       </div>
   </body>
</html>
CSS {visibility:hidden} rend un élément invisible, mais ne libère pas l'espace qu'il occupe.
3. CSS {display:block}
Utilisez CSS {display:block} pour qu'un élément soit traité comme un élément de niveau bloc (Block-level element).
- Certains éléments par défaut sont un élément de bloc, par exemple <div>, <hr>, ...
- D'autres éléments sont par défaut des éléments Inline (Inline element), par exemple <span>, vous pouvez utiliser CSS {display:block} pour qu'ils en fassent un élément de bloc.
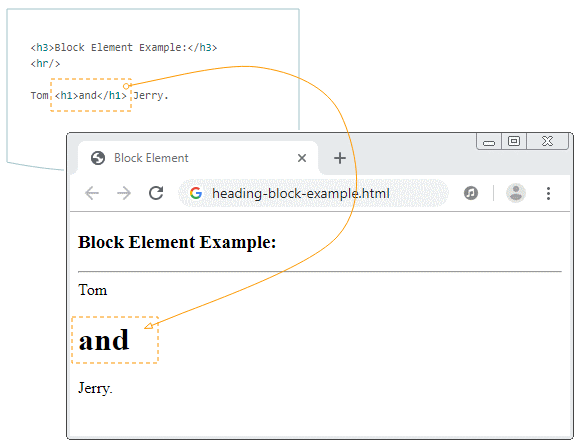
Un élément de bloc est toujours affiché sous forme de rectangle. Le navigateur ajoute automatiquement des sauts de ligne (line break) à l'avant et à l'arrière de cet élément.

Exemple : Appliquez CSS {display:block} à l'élément <span> pour qu'ils en fassent un élément de bloc :
display-block-example.html
<!DOCTYPE html>
<html>
   <head>
      <title>CSS {display:block}</title>
      <meta charset="UTF-8"/>
      <script>
          function setDisplayBlock()  {
             var mySpan = document.getElementById("mySpan");
             mySpan.style.display = "block";
          }
          // Use default display.
          function removeDisplay()  {
             var mySpan = document.getElementById("mySpan");
             mySpan.style.display = null;
          }
      </script>
   </head>
   <body>
       <h2>CSS {display:block}</h2>
       <button onClick="setDisplayBlock()">Set {display:block}</button>
       <button onClick="removeDisplay()">Remove display property</button>
       <div style="padding:5px; margin-top:10px; background:#eee;">
           <img src="../images/flower.png" id= "myImage"/>

           <span id="mySpan" style="background:yellow">Apollo 11</span> was the
           spaceflight that landed the first humans,
           Americans Neil Armstrong and Buzz Aldrin,
           on the Moon on July 20, 1969, at 20:18 UTC.
           Armstrong became the first to step onto the lunar
           surface 6 hours later on July 21 at 02:56 UTC.
       </div>
   </body>
</html>
4. CSS {display: inline}
Utilisez CSS {display:inline} pour qu'un élément soit traité comme un élément Inline (Inline element).
- Certains éléments sont par défaut des éléments en ligne, par exemple, <span>, <strong>, ...
- D'autres éléments sont par défaut des éléments de bloc, par exemple, <div>, vous pouvez utiliser CSS {display:inline} pour les transformer en éléments Inligne.
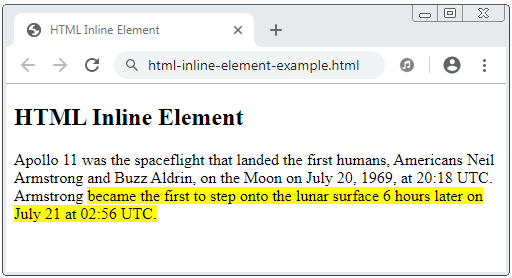
Un élément Inligne, dans de nombreux cas, n'est pas un rectangle. Il peut se trouver sur plusieurs lignes (line).
Apollo 11 was the spaceflight that landed the first humans,
Americans Neil Armstrong and Buzz Aldrin,
on the Moon on July 20, 1969, at 20:18 UTC.

Armstrong
<span style="background:yellow;">
  became the first to step onto the lunar
   surface 6 hours later on July 21 at 02:56 UTC.
</span>
Exemple, appliquez CSS {display:inline} à un élément <div> pourqu'il puisse transformer à un élément Inligne.
display-inline-example.html
<!DOCTYPE html>
<html>
   <head>
      <title>CSS {display:inline}</title>
      <meta charset="UTF-8"/>
      <script>
          function setDisplayInline()  {
             var myDiv = document.getElementById("myDiv");
             myDiv.style.display = "inline";
          }
          // Use default display.
          function removeDisplay()  {
             var myDiv = document.getElementById("myDiv");
             myDiv.style.display = null;
          }
      </script>
   </head>
   <body>
       <h2>CSS {display:inline}</h2>
       <button onClick="setDisplayInline()">Set {display:inline}</button>
       <button onClick="removeDisplay()">Remove display property</button>
       <div style="padding:5px; margin-top:10px; background:#eee;">
           <img src="../images/flower.png" />
           <div id="myDiv" style="background:yellow">
             Apollo 11 was the spaceflight that landed the first humans,
             Americans Neil Armstrong and Buzz Aldrin,
             on the Moon on July 20, 1969, at 20:18 UTC.
           </div>
           Armstrong became the first to step onto the lunar
           surface 6 hours later on July 21 at 02:56 UTC.
       </div>
   </body>
</html>
5. CSS {display: inline-block}
Utilisez CSS {display:inline-block} pour l'élément pour qu'il soit traité comme un élément Inline-block.
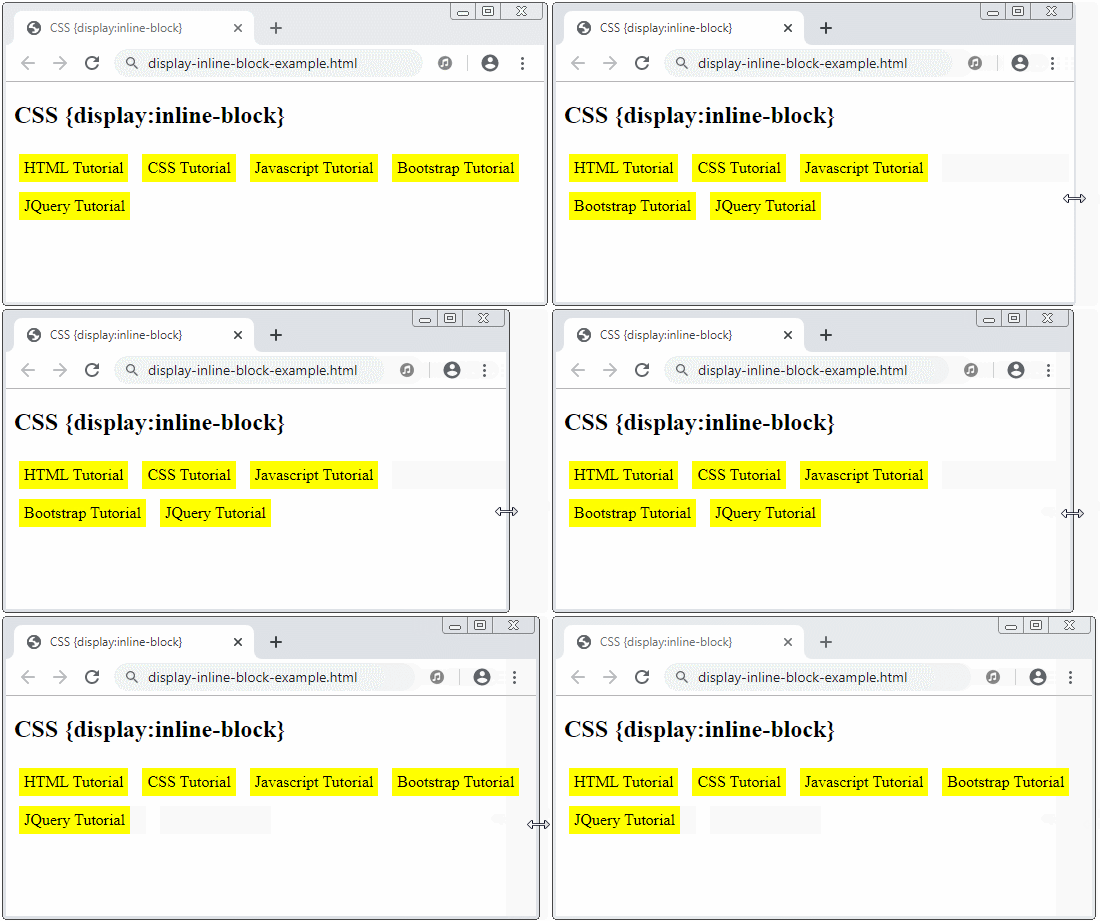
"Elément de bloc Inligne" (Inline-block element) est un rectangle. Le navigateur n'ajoutera pas automatiquement des sauts de ligne (line break) devant et derrière cet élément, ce qui permet de bloquer des éléments en ligne sur la même ligne (Line).

display-inline-block-example.html
<!DOCTYPE html>
<html>
   <head>
      <title>CSS {display:inline-block}</title>
      <meta charset="UTF-8"/>
      <style>
          div {
            background: yellow;
            padding: 5px;
            margin: 5px;
          }
      </style>
   </head>
   <body>
       <h2>CSS {display:inline-block}</h2>
       <div style="display:inline-block">
           HTML Tutorial
       </div>
       <div style="display:inline-block">
           CSS Tutorial
       </div>
       <div style="display:inline-block">
           Javascript Tutorial
       </div>
       <div style="display:inline-block">
           Bootstrap Tutorial
       </div>
       <div style="display:inline-block">
           JQuery Tutorial
       </div>
   </body>
</html>
6. CSS {display: grid | inline-grid}
CSS {display:grid | inline-grid} est appliqué à un élément pour diviser sa surface en une grille (grid), composée de lignes (row) et de colonnes (column). Ses éléments enfants seront disposés sur des cellules de grille. Il est plus facile de concevoir des pages au lieu d'utiliser des techniques de positionnement d'éléments ou de CSS float.

Tutoriels CSS
- Unités en CSS
- Le Tutoriel de CSS Selectors de base
- Le Tutoriel de CSS Attribute Selector
- Le Tutoriel de CSS combinator Selectors
- Le Tutoriel de CSS Backgrounds
- Le Tutoriel de CSS Opacity
- Le Tutoriel de CSS Padding
- Le Tutoriel de CSS Margins
- Le Tutoriel de CSS Borders
- Le Tutoriel de CSS Outline
- Le Tutoriel de CSS box-sizing
- Le Tutoriel de CSS max-width et min-width
- Les mots-clés min-content, max-content, fit-content, stretch en CSS
- Le Tutoriel de CSS Links
- Le Tutoriel de CSS Fonts
- Comprendre les Generic Font Family Names en CSS
- Le Tutoriel de CSS @font-face
- Le Tutoriel de CSS Align
- Le Tutoriel de CSS Cursors
- Le Tutoriel de CSS Overflow
- Le Tutoriel de CSS Lists
- Le Tutoriel de CSS Tables
- Le Tutoriel de visibility
- Le Tutoriel de CSS Display
- Le Tutoriel de CSS Grid Layout
- Le Tutoriel de CSS Float et Clear
- Le Tutoriel de CSS Position
- Le Tutoriel de CSS line-height
- Le Tutoriel de CSS text-align
- Le Tutoriel de CSS text-decoration
Show More