Programmation orientée aspect Java avec AspectJ (AOP)
2. Les demandes avant de commencer
Vous devez installer l'outil de dévelopement AspectJ dans Eclipse, vous pouvez voir des instructions à:
3. Les classes ont participé dans l'exemple
Dans ce document, j'utilise quelques classes qui participent dans plusieurs exemples d'illustration de l' AspectJ.
- Box
- FigureElement
- Group
- Line
- Point
- ShapeFigureElement
- SlotfulPoint
La source de ces classes sont venues de:
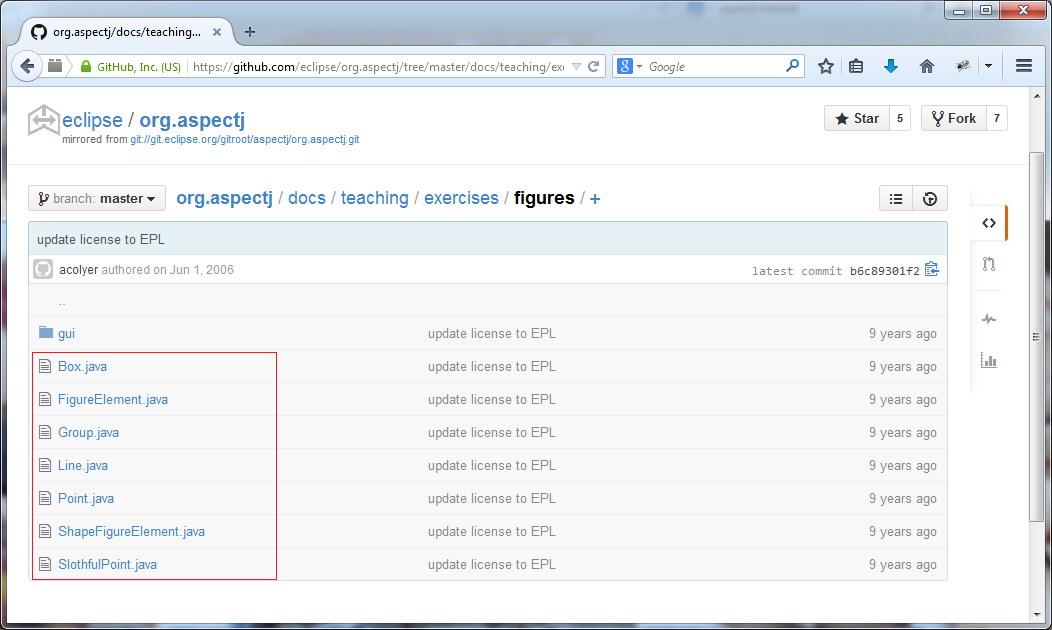
Box.java
package figures;

import java.awt.Rectangle;
import java.awt.Shape;

public class Box extends ShapeFigureElement {
  private Point _p0;
  private Point _p1;
  private Point _p2;
  private Point _p3;

  public Box(int x0, int y0, int width, int height) {
      _p0 = new Point(x0, y0);
      _p1 = new Point(x0 + width, y0);
      _p2 = new Point(x0 + width, y0 + height);
      _p3 = new Point(x0, y0 + height);
  }

  public Point getP0() {
      return _p0;
  }

  public Point getP1() {
      return _p1;
  }

  public Point getP2() {
      return _p2;
  }

  public Point getP3() {
      return _p3;
  }

  @Override
  public void move(int dx, int dy) {
      _p0.move(dx, dy);
      _p1.move(dx, dy);
      _p2.move(dx, dy);
      _p3.move(dx, dy);
  }

  public void checkBoxness() {
      if ((_p0.getX() == _p3.getX()) && (_p1.getX() == _p2.getX())
              && (_p0.getY() == _p1.getY()) && (_p2.getY() == _p3.getY()))
          return;
      throw new IllegalStateException("This is not a square.");
  }

  @Override
  public String toString() {
      return "Box(" + _p0 + ", " + _p1 + ", " + _p2 + ", " + _p3 + ")";
  }

  @Override
  public Shape getShape() {
      return new Rectangle(getP1().getX(), getP1().getY(), getP3().getX()
              - getP1().getX(), getP3().getY() - getP1().getY());
  }
}
FigureElement.java
package figures;

import java.awt.*;
import java.awt.geom.*;

public interface FigureElement {
  public static final Rectangle MAX_BOUNDS = new Rectangle(0, 0, 500, 500);

  public abstract void move(int dx, int dy);

  public abstract Rectangle getBounds();

  public abstract boolean contains(Point2D p);

  public abstract void paint(Graphics2D g2);
}
Group.java
package figures;

import java.awt.Graphics2D;
import java.awt.Rectangle;
import java.awt.geom.Point2D;
import java.util.ArrayList;
import java.util.Collection;
import java.util.Iterator;

public class Group implements FigureElement {
  private Collection _members;
  private String _identifier;

  public Group(FigureElement first) {
      this._members = new ArrayList();
      add(first);
  }

  public void add(FigureElement fe) {
      _members.add(fe);
  }

  public Iterator members() {
      return _members.iterator();
  }

  public void move(int dx, int dy) {
      for (Iterator i = _members.iterator(); i.hasNext();) {
          FigureElement fe = (FigureElement) i.next();
          fe.move(dx, dy);
      }
  }

  public void setIdentifier(String identifier) {
      _identifier = identifier;
  }

  @Override
  public String toString() {
      if (_identifier != null) {
          return _identifier;
      }
      StringBuffer buf = new StringBuffer("Group(");
      for (Iterator i = _members.iterator(); i.hasNext();) {
          buf.append(i.next().toString());
          if (i.hasNext()) {
              buf.append(", ");
          }
      }
      buf.append(")");
      return buf.toString();
  }

  public Rectangle getBounds() {
      Rectangle previous = null;
      for (Iterator i = _members.iterator(); i.hasNext();) {
          FigureElement fe = (FigureElement) i.next();
          Rectangle rect = fe.getBounds();
          if (previous != null) {
              previous = previous.union(rect);
          } else {
              previous = rect;
          }
      }
      return previous;
  }

  public boolean contains(Point2D p) {
      for (Iterator i = _members.iterator(); i.hasNext();) {
          FigureElement fe = (FigureElement) i.next();
          if (fe.contains(p))
              return true;
      }
      return false;
  }

  public void paint(Graphics2D g2) {
      for (Iterator i = _members.iterator(); i.hasNext();) {
          FigureElement fe = (FigureElement) i.next();
          fe.paint(g2);
      }
  }

  public int size() {
      return _members.size();
  }
}
Line.java
package figures;

import java.awt.*;
import java.awt.geom.*;

public class Line extends ShapeFigureElement {
  private Point _p1;
  private Point _p2;

  public Line(Point p1, Point p2) {
      _p1 = p1;
      _p2 = p2;
  }

  public Point getP1() {
      return _p1;
  }

  public Point getP2() {
      return _p2;
  }

  @Override
  public void move(int dx, int dy) {
      _p1.move(dx, dy);
      _p2.move(dx, dy);
  }

  @Override
  public String toString() {
      return "Line(" + _p1 + ", " + _p2 + ")";
  }

  /**
   * Used to determine if this line {@link contains(Point2D)} a point.
   */
  final static int THRESHHOLD = 5;

  /**
   * Returns <code>true</code> if the point segment distance is less than
   * {@link THRESHHOLD}.
   */
  @Override
  public boolean contains(Point2D p) {
      return getLine2D().ptLineDist(p) < THRESHHOLD;
  }

  private Line2D getLine2D() {
      return new Line2D.Float((float) getP1().getX(), (float) getP1().getY(),
              (float) getP2().getX(), (float) getP2().getY());
  }

  public Shape getShape() {
      return getLine2D();
  }
}
Point.java
package figures;

import java.awt.*;
import java.awt.geom.*;

public class Point extends ShapeFigureElement {
  private int _x;
  private int _y;

  public Point(int x, int y) {
      _x = x;
      _y = y;
  }

  public int getX() {
      return _x;
  }

  public int getY() {
      return _y;
  }

  public void setX(int x) {
      _x = x;
  }

  public void setY(int y) {
      _y = y;
  }

  @Override
  public void move(int dx, int dy) {
      _x += dx;
      _y += dy;
  }

  @Override
  public String toString() {
      return "Point(" + _x + ", " + _y + ")";
  }

  /** The height of displayed {@link Point}s. */
  private final static int HEIGHT = 10;
  /** The width of displayed {@link Point}s. -- same as {@link HEIGHT}. */
  private final static int WIDTH = Point.HEIGHT;

  @Override
  public Shape getShape() {
      return new Ellipse2D.Float((float) getX() - Point.WIDTH / 2,
              (float) getY() - Point.HEIGHT / 2, (float) Point.HEIGHT,
              (float) Point.WIDTH);
  }
}
ShapeFigureElement.java
package figures;

import java.awt.*;
import java.awt.geom.*;

public abstract class ShapeFigureElement implements FigureElement {
  @Override
  public abstract void move(int dx, int dy);

  public abstract Shape getShape();

  @Override
  public Rectangle getBounds() {
      return getShape().getBounds();
  }

  @Override
  public boolean contains(Point2D p) {
      return getShape().contains(p);
  }

  public Color getLineColor() {
      return Color.black;
  }

  public Color getFillColor() {
      return Color.red;
  }

  @Override
  public final void paint(Graphics2D g2) {
      Shape shape = getShape();
      g2.setPaint(getFillColor());
      g2.fill(shape);
      g2.setPaint(getLineColor());
      g2.draw(shape);
  }
}
SlothfulPoint.java
package figures;

import java.awt.*;
import java.awt.geom.*;

/**
* This class makes mistakes to be caught by invariant checkers.
*/
public class SlothfulPoint extends ShapeFigureElement {
  private int _x;
  private int _y;

  public SlothfulPoint(int x, int y) {
  }

  public int getX() {
      return _x;
  }

  public int getY() {
      return _y;
  }

  public void setX(int x) {
  }

  public void setY(int y) {
  }

  @Override
  public void move(int dx, int dy) {
      System.out.println("Slothful moving");
  }

  @Override
  public String toString() {
      return "SlothfulPoint";
  }

  @Override
  public Shape getShape() {
      return new Ellipse2D.Float((float) _x, (float) _y, 1.0f, 1.0f);
  }
}
4. Créer le projet AspectJ
D'abord, créez le projet ordinaire qui est nommé AspectJTutorial.
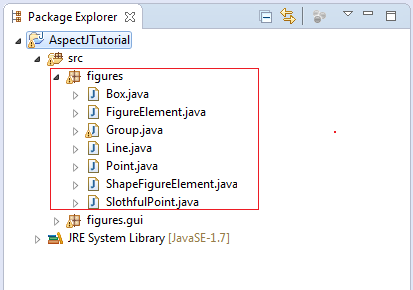
Cliquez sur le bouton droit du Projet, sélectionnez Configure/Convert to AspectJ Project.

Convertissez avec succès:
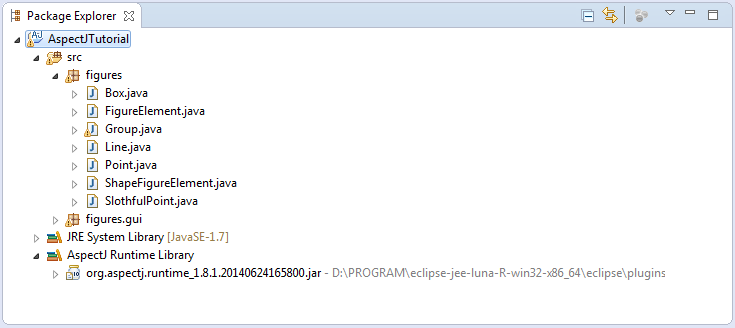
5. Le premier exemple avec AspectJ
D'abord, nous prennons un exemple avant de commencer avec des notions:
Créez la classe HelloAspectJDemo:
HelloAspectJDemo.java
package org.o7planning.tutorial.aspectj.helloaspectj;

public class HelloAspectJDemo {

  public static void sayHello() {
      System.out.println("Hello");
  }

  public static void greeting()  {

      String name = new String("John");

      sayHello();

      System.out.print(name);
  }


  public static void main(String[] args) {

      sayHello();

      System.out.println("--------");

      sayHello();

      System.out.println("--------");

      greeting();


  }

}
Telle une classe susmentionnée n'est imperceptible mais le problème se pose est que vous voulez au programme faire quelquechoses soit avant ou après la méthode sayHello() est appelée, par exemple imprimant la notification sur l'écran. Traditionnelement, vous pouvez insérer une ligne de l'imprimer le code sur l'écran dès avant d'appeler la méthode sayHello().
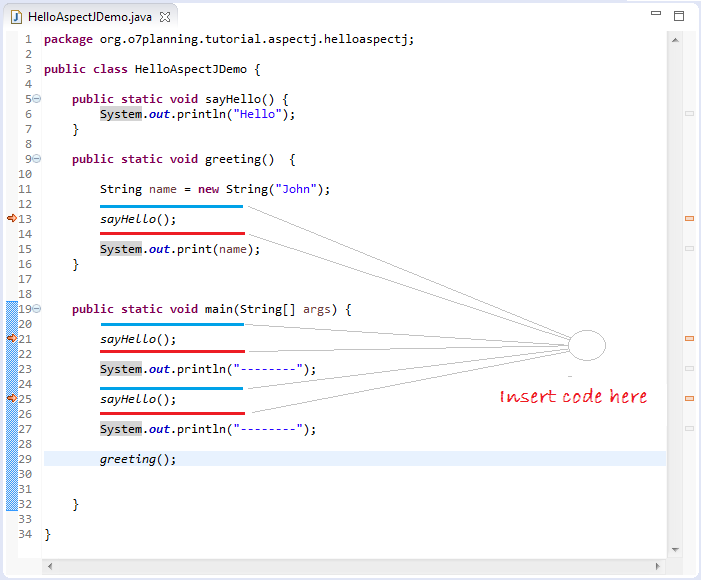
AspectJ est un genre de la programmation orientée aspect (aspect programming). Elle propose de fournir une autre solution pour résoudre ce problème. Évidemment que l' AspectJ peut en faire plus. Rappelons qu c'est seulement un exemple HelloWorld.
- File/New/Other..
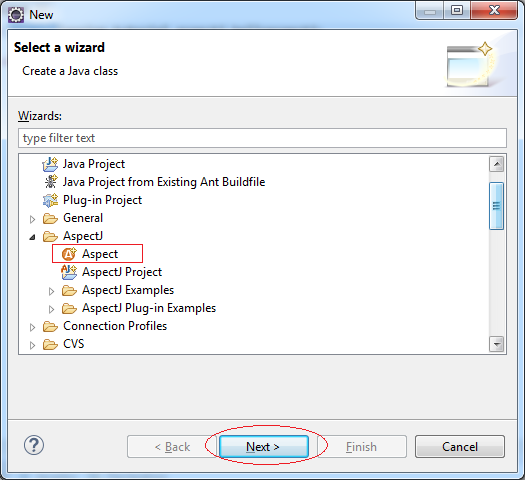
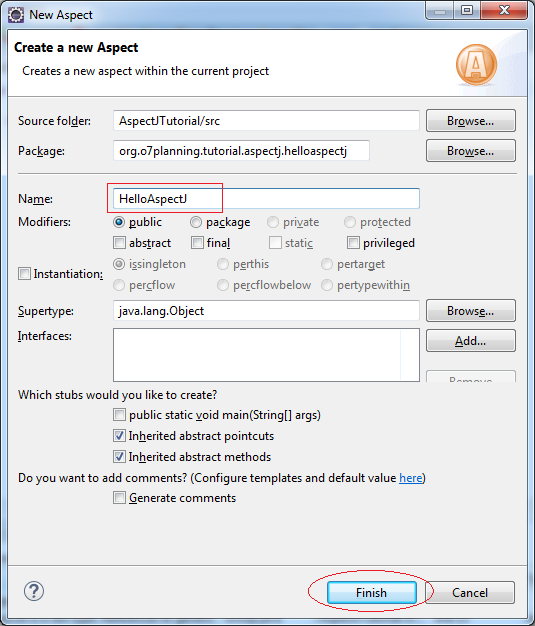
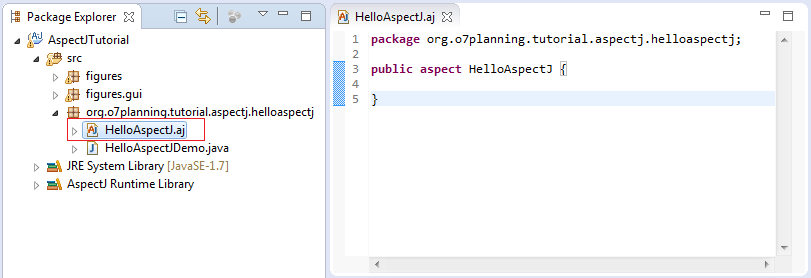
Un fichier nommé: HelloAspectJ.aj est créé, dont sa structure est quasiment similaire que celle d'une classe.
Les versions précédentes de AspectJ utilisent Annotation afin de description. Les versions récentes utilisent le fichier *.aj. Dans ce document, je fais un saute de l'utilisation de l' Annotation parce qu'il n'est pas très clair comme l'utilisation du fichier *.aj. De plus, le fichier *.aj est similaire d'une classe, eclipse va vous notifier vos erreurs de syntaxe.
Éditez le code de HelloAspectJ.aj:
HelloAspectJ.aj
package org.o7planning.tutorial.aspectj.helloaspectj;

public aspect HelloAspectJ {

    // Define a Pointcut is
    // collection of JoinPoint call sayHello of class HelloAspectJDemo.
    pointcut callSayHello(): call(* HelloAspectJDemo.sayHello());

    before() : callSayHello() {
        System.out.println("Before call sayHello");
    }

    after() : callSayHello()  {
        System.out.println("After call sayHello");
    }


}
AspectJ a quelques différences par rapport à une classe typique dans laquelle elle ajoute beaucoup des mot clefs. Et la queue du fichier est *.aj, elle n'est pas *.java. Quelque mot clefs de l' AspectJ:
- aspect pointcut privileged call execution
- initialization preinitialization handler get set
- staticinitialization target args within withincode
- cflow cflowbelow annotation before after around
- proceed throwing returning adviceexecution declare
- parents warning error soft precedence thisJoinPoint
- thisJoinPointStaticPart thisEnclosingJoinPointStaticPart
- issingleton perthis pertarget percflow percflowbelow
- pertypewithin lock unlock thisAspectInstance
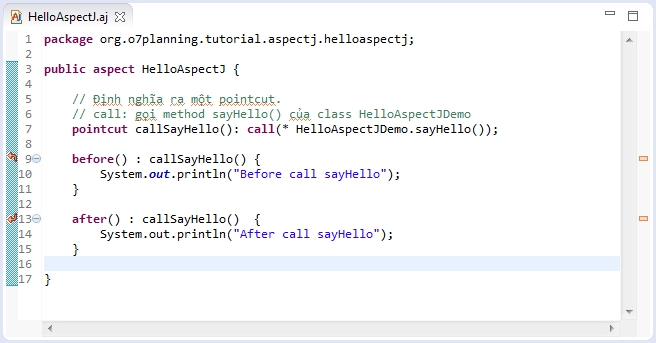
Retournons l'exemple de HelloWorld. Maintenant nous allons exécuter la classe HelloAspectJDemo. Et le résultat renvoyant est:
Before call sayHello
Hello
After call sayHello
--------
Before call sayHello
Hello
After call sayHello
--------
Before call sayHello
Hello
After call sayHello
John
AspectJ est tellement fort. Par exempl, dans l'exemple supérieur, si vous corriger le code sur HelloAspectJ.aj un peu, il peut bien faire travailler toutes classes appelant la méthode sayHello().
// Define a pointcut is a Collection of JoinPoint
// call sayHello() of HelloAspectJDemo
pointcut callSayHello(): call(* HelloAspectJDemo.sayHello());


// Change to:
// This means that everywhere (class, AspectJ) called sayHello()
pointcut callSayHello(): call(* *.sayHello());
6. Les concepts de base d' AspectJ
Dans AspectJ vous devez distinguer quelques notions:
- Advice
- Pointcut
- JoinPoint
JoinPoint
JoinPoint (Le point de jonction) est un point bien défini dans le déroulement du programme.
- Nous voulons exécuter quelques code (“advice”) chaque fois un point de jonction est atteint.
- Nous ne voulons pas encombrer le code par l'indicateur clair disant que “C'est un point de jonction”
- C'est- à- dire n'écrire pas le code dans lesdites locations.
- AspectJ fournit une syntaxe qui indique des points de jonction JoinPoint "de l'extérieur" le code actuel.
- Les remarquer et exécuter un code de l'extérieur.
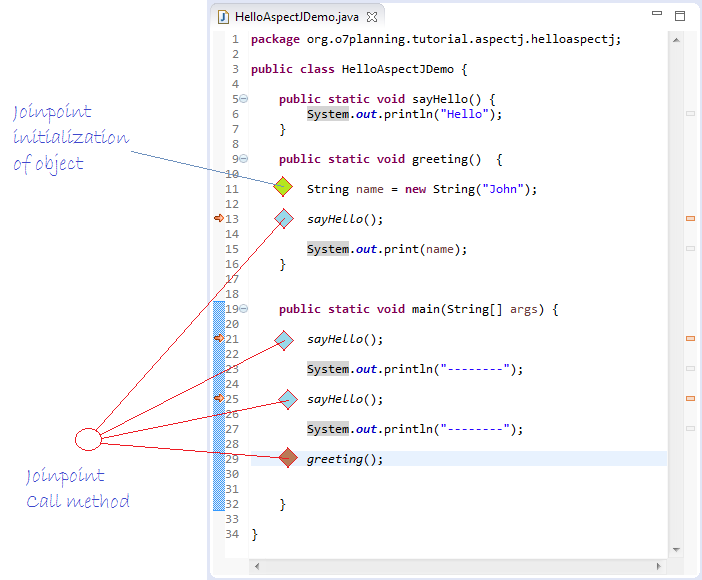
JoinPoint est un point dans le déroulement de programme "Où quelque chose se passe", peut-être c'est:
- Quand une méthode est appelée
- Quand une exception est jetée
- Quand une variable est accédée (accessed)
- Quand un objet est instancié
- Quand un objet est référé.
Donc JoinPoint est divers, la location où il est créé est considéré comme un JoinPoint.
De retour de l'exemple HelloWorld nous allons préciser quelques JoinPoint:
PointCut
Les définitions de Pointcut comprennent d'un franc- gauche et un franc droit, séparé par un côlon
- Le côté gauche contient le nom de pointcut et les paramètres de pointcut (par exemple, des données sont disponibles dès que des événement se déroulent)
- Le côté droit contient Pointcut
Exemple:
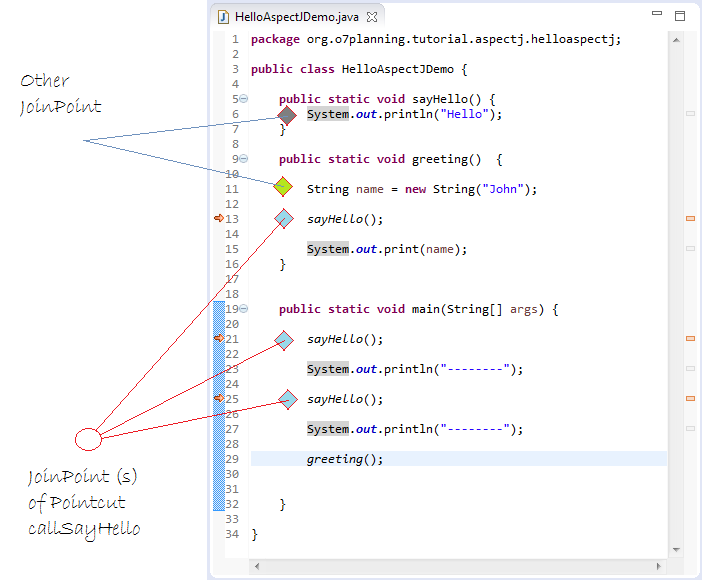
pointcut callSayHello(): call(* HelloAspectJDemo.sayHello());- Le nom de ce point de jonction est callSayHello
- Le point de jonctionn'a pas de paramètre
- Le point de jonction en soi est call(* HelloAspectJDemo.sayHello())
- Le point de jonction réfère n'importe quand la méthode HelloAspectJDemo.sayHello () est appelée.
Advice
De retour de l'exemple HelloWorld, nous avons 2 codes (advice)
- before()
- after()
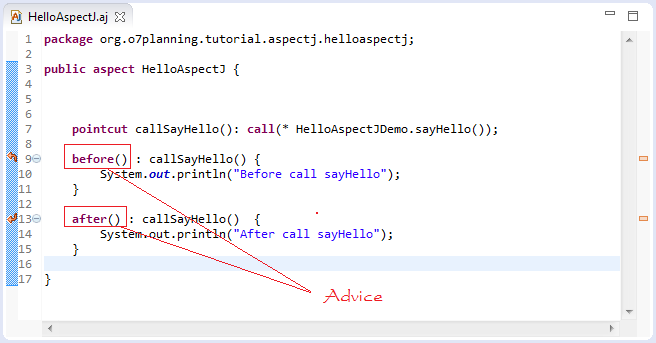
Advice (Greffon) définit le comportemant traversal. C'est un bloc de code définissant le comportement d'un aspect. Ce bloc de code est destiné à être exécuté au niveau d’un point de coupe avant, après ou autour du point de jonction.
AspectJ soutient 3 types d' Advice. Le type du greffon (Advice) détermine comment il interagit avec des JoinPoint (point de jonction), il est donc définit. Donc, AspectJ divise d’un point de coupe avant (before), après (after) ou autour (around) du point de jonction.
Lorsque "before Advice" ne pose aucun problème, avec "after Advice" il y a 3 interprétations suivantes: Après l'exécution d'un JoinPoint termine normalement, après il jète un exception, ou après qu'il fait un des deux. AspectJ permet après le greffon (advice) de toute sorte de situation.
Pour plus de facilité de comprendre, nous voyons quelques exemples avec Advice:
HelloAspectJ2.aj
package org.o7planning.tutorial.aspectj.helloaspectj;

public aspect HelloAspectJ2 {

    pointcut callSayHello(): call(* HelloAspectJDemo.sayHello());

    // Advice "after returning".
    after() returning (Object retObj): callSayHello() {
        System.out.println("Returned normally with " + retObj);
    }

    // Advice "after throwing".
    after() throwing (Exception e): callSayHello() {
        System.out.println("Threw an exception: " + e);
    }

    // Advice "after returning" + "after throwing".
    after() : callSayHello()  {
        System.out.println("Returned or threw an Exception");
    }
}
Le type greffon "after returning" ne s'intéresse pas à la valeur renvoyant de méthode, donc nous pouvons l'écrire.
// Advice "after returning".
// care about the returning value of method
after() returning (Object retObj): callSayHello() {
  System.out.println("Returned normally with " + retObj);
}

// Advice "after returning" not care about the returning value of method
after() returning(): callSayHello() {
  System.out.println("Returned normally");
}

// or
// Advice "after returning" not care about the returning value of method
after() returning : callSayHello() {
  System.out.println("Returned normally");
}
7. Les exemples d' AspectJ de base
Avant de déplacer aux détails sophistiqués, nous voyons des exemple basiques et des règles dans AspectJ. Comprendre ces règles est une condition préalable afin de comprendre AspectJ.
Les règles pour class, method, * et..
Dans AspectJ si vous voulez référer une classe, une méthode en déclarant le point de jonction, vous devez écrire le nom complet qualifié. Par exemple:
- figures.Point
- figures.Point.setX(int)
Au cas où la classe et AspectJ sont dans le même package, vous pouvez écrire brièvement. Par exemple:
- Point
- Point.setX(int)
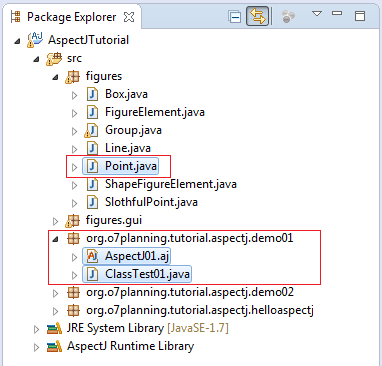
Veuillez observer une illustration après, AspectJ01.aj et la classe Point se trouvent dans 2 packages différents.
AspectJ01.aj
package org.o7planning.tutorial.aspectj.demo01;

public aspect AspectJ01 {

    // Class Point and AspectJ is not the same package
    // so must specify the package (Required).
    // This pointcut definition of JoinPoints
    // only within the class ClassTest01
    // This ClassTest01 and AspectJ same package,
    // so can be ignored package in within(..).
    pointcut callSetX()  : call(void  figures.Point.setX(int)) && within (ClassTest01) ;

    // Advice
    before() : callSetX()  {
        System.out.println("Before call Point.setX(int)");
    }
}
ClassTest01.java
package org.o7planning.tutorial.aspectj.demo01;

import figures.Point;

public class ClassTest01 {

  public static void main(String[] args) {

      Point point = new Point(10, 200);

      System.out.println("---- (1) ----");

      point.setX(20);

      System.out.println("---- (2) ----");

      point.setY(100);

      System.out.println("---- (3) ----");
  }

}
Les résultats de l'exécution la classe ClassTest01:
---- (1) ----
Before call Point.setX(int)
---- (2) ----
---- (3) ----
Donc, il y a quelques remarques ici:
// 'within' used to limit the scope of the pointcut
// in the case below:
// Only Containing join point inside class ClassTest01.
within (ClassTest01)

// If you using import
import figures.Point;
.....
// Then Can write shorter code:
pointcut callSetX()  : call(void  Point.setX(int)) && within (ClassTest01) ;
L'astérisque * dans AspectJ
// Collection of JoinPoints call Point.setX(int), any package name,
// and method return  void
pointcut callSetX()  : call(void  *.Point.setX(int)) ;

// Collection of JoinPoints call Point.setX(int), any package name,
// and method return any
pointcut callSetX()  : call(* *.Point.setX(int)) ;


// Collection of JoinPoints call public static method setX(int) of class with package name is 'sample'
// and class name have suffix Point,
// and setX(int) return int
pointcut callSetX()  : call(public static int sample.*Point.setX(int)) ;


// Using (..) to describe the method has 0 or more parameters.
pointcut callSetX()  : call(public static int sample.*Point.setX(..)) ;
Target & args
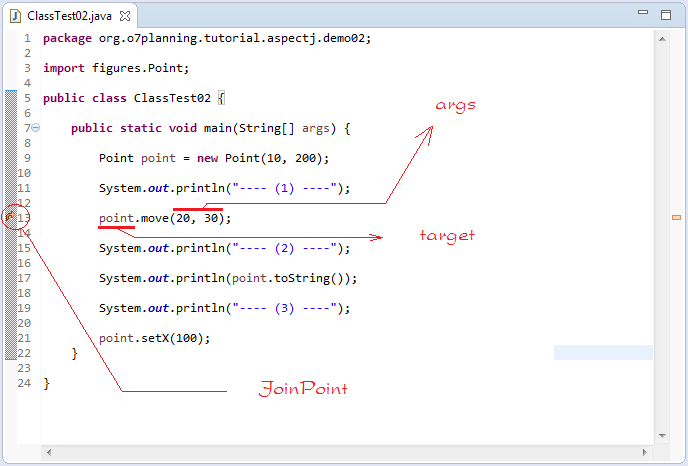
target: est l'objet de java dont la méthode est appelée (ou l'objet dont le domaine est accédé).
args: des arguments
Observez l'exemple:
args: des arguments
Observez l'exemple:
AspectJ02.aj
package org.o7planning.tutorial.aspectj.demo02;

// Ready import Point class.
import figures.Point;

public aspect AspectJ02 {


    // Using target: define object on which the method is called
    // Using args: define args on the method is called
    // Using within: to restrict JoinPoint within ClassTest02
    pointcut callMove(Point point, int dx, int dy)
                       : call(*  figures.Point.move(int,int))
                               && args(dx,dy) && target(point) && within(ClassTest02)  ;

    before(Point point, int dx, int dy) : callMove(point,  dx, dy )  {
        System.out.println("Before call move(" + dx + "," + dy + ")");
        System.out.println(point.toString());
    }
}
ClassTest02.java
package org.o7planning.tutorial.aspectj.demo02;

import figures.Point;

public class ClassTest02 {

  public static void main(String[] args) {

      Point point = new Point(10, 200);

      System.out.println("---- (1) ----");

      point.move(20, 30);

      System.out.println("---- (2) ----");

      System.out.println(point.toString());

      System.out.println("---- (3) ----");

      point.setX(100);
  }

}
Les résultats de l'exécution de l'exemple:
---- (1) ----
Before call move(20,30)
Point(10, 200)
---- (2) ----
Point(30,230)
---- (3) ----
L'opérateur && ||
AspectJ03.aj
package org.o7planning.tutorial.aspectj.demo03;


// Note: Must import FigureElement & Point
import figures.FigureElement;
import figures.Point;

public aspect AspectJ03 {

  // pointcut: Include move actions
   pointcut moveAction() :  (
           call(void FigureElement.move(int,int)) ||
           call(void Point.setX(int))              ||
           call(void Point.setY(int))
           )
           && within (ClassTest03);

   before() : moveAction()  {
       System.out.println("before move");
   }

}
ClassTest03.java
package org.o7planning.tutorial.aspectj.demo03;

import figures.FigureElement;
import figures.Line;
import figures.Point;

public class ClassTest03 {
  public static void main(String[] args) {

      Point point = new Point(10, 200);

      System.out.println("---- (1) ----");

      point.setX(20 );

      System.out.println("---- (2) ----");

      FigureElement line= new Line(new Point(1,1), new Point(10,10));

      line.move(10, 10);

      System.out.println("---- (3) ----");
  }
}
Le résultat de l'exécution de l'exemple
---- (1) ----
before move
---- (2) ----
before move
---- (3) ----
Le champ dans AspectJ
FieldInAspectJ.aj
package org.o7planning.tutorial.aspectj.demo04;

import java.io.PrintStream;

public aspect FieldInAspectJ {

 // Field in AspectJ.
 PrintStream logStream = System.err;

 pointcut move() : call(* figures.Point.move(int,int)) && within(FieldInAspectJTest);

 before(): move() {
     logStream.println("Before Point move");
 }
}
FieldInAspectJTest.java
package org.o7planning.tutorial.aspectj.demo04;

import figures.Point;

public class FieldInAspectJTest {

  public static void main(String[] args) {

      Point point = new Point(10, 200);

      System.err.println("---- (1) ----");

      point.setX(20);

      System.err.println("---- (2) ----");

      point.move(10, 10);

      System.err.println("---- (3) ----");
  }
}
Results of running the example
---- (1) ----
---- (2) ----
Before Point move
---- (3) ----
Les déclaration inter- types (Inter-type declarations)
PointObserving.aj
package org.o7planning.tutorial.aspectj.demo05;

import java.util.ArrayList;
import java.util.List;

import figures.Point;

public aspect PointObserving {

   // Class Point have no field: observers
   // However, it can declare here.
   // observers: Store the change point position.
   private List<Point> Point.observers = new ArrayList<Point>();

   pointcut moveAction(Point point) : call(void Point.move(int,int) )
                                  && target(point)
                                  && within(PointObservingTest);

   after(Point point) : moveAction(point)  {
       System.out.println("Point moved");
       // add new position
       point.observers.add(point);

       // Print the location of the point went through.
       System.out.println(" - "+point.observers);
   }

   public static void addObserver(Point p) {
       // p.observers.add(s);
   }

   public static void removeObserver(Point p) {
       // p.observers.remove(s);
   }
}
PointObservingTest.java
package org.o7planning.tutorial.aspectj.demo05;

import figures.Point;

public class PointObservingTest {

   public static void main(String[] args) {

       Point point1 = new Point(100, 100);

       // First move
       point1.move(10, 10);

       // Second move
       point1.move(10, 10);

       System.out.println("----------------------");

       Point point2 = new Point(200, 200);

       // First move
       point2.move(15, 10);

       // Second move
       point2.move(15, 10);

       // Third Move
       point2.move(25, 10);
   }
}
Results of running the example:
Point moved
 - [Point(110, 110)]
Point moved
  - [Point(120, 120), Point(120, 120)]
----------------------
Point moved
 - [Point(215, 210)]
Point moved
  - [Point(230, 220), Point(230, 220)]
Point moved
  - [Point(255, 230), Point(255, 230), Point(255, 230)]
Tracking
Method tracking:
Nous allons définir un Aspect qui définit un pointcut sur chaque exécution de méthode, ainsi que des Advice à exécuter lorsqu'ils s'affichent lorsque le code est exécuté.
SimpleTracing.aj
package org.o7planning.tutorial.aspectj.demo06;

import org.aspectj.lang.Signature;

public aspect SimpleTracing {


    // Collection of JoinPoint call any method
    // And within SimpleTracingTest
    pointcut tracedCall() : call (* *(..))
                    //  && !within(SimpleTracing)
                    && within(SimpleTracingTest)
                    ;

    before() : tracedCall()  {
        Signature sig = thisJoinPointStaticPart.getSignature();
        String line = ""
                + thisJoinPointStaticPart.getSourceLocation().getLine();

        String sourceName = thisJoinPointStaticPart.getSourceLocation()
                .getWithinType().getCanonicalName();
        //
        System.out.println("Call from " + sourceName + " line " + line + "\n   to "
                + sig.getDeclaringTypeName() + "." + sig.getName() +"\n");
    }

}
SimpleTracingTest.java
package org.o7planning.tutorial.aspectj.demo06;

import figures.Point;

public class SimpleTracingTest {

  private static void testMethod1() {
      Point point = new Point(100, 100);
      point.setX(100);
  }

  private static void testMethod2() {

      String text = "This is text";

      String s = text.substring(2);

      System.out.println(s);
  }

  public static void main(String[] args) {

      testMethod1();

      testMethod2();
  }

}
Results of running the example:
Call from org.o7planning.tutorial.aspectj.demo06.SimpleTracingTest line 23
  to org.o7planning.tutorial.aspectj.demo06.SimpleTracingTest.testMethod1

Call from org.o7planning.tutorial.aspectj.demo06.SimpleTracingTest line 9
  to figures.Point.setX

Call from org.o7planning.tutorial.aspectj.demo06.SimpleTracingTest line 25
  to org.o7planning.tutorial.aspectj.demo06.SimpleTracingTest.testMethod2

Call from org.o7planning.tutorial.aspectj.demo06.SimpleTracingTest line 16
  to java.lang.String.substring

Call from org.o7planning.tutorial.aspectj.demo06.SimpleTracingTest line 18
  to java.io.PrintStream.println

is is text
Cflow
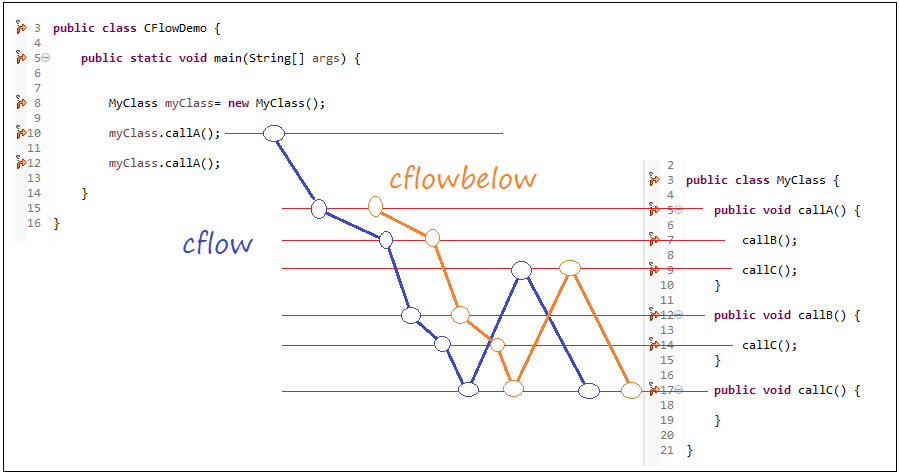
Le flot de contrôle (control flow) est un flot de l'exécution de programme à l'intérieur du point de jonction (JointPoint) précis. Précisément, cflow() et cflowbelow() sont créés en vue de prendre des autres points de jonction comme des arguments et nous permettre de définir le flot de contrôle basés sur les points de coupe- Ces points de coupes capturent tous les points de jonction dans le flot de contrôle de chaque point de jonction précis.
cflow() capture tous les points de jonction(join point) comme l'appel, l'exécution, fixer et prendre le champ, des erreurs dans le flot de contrôle du point de jonction précis comme l'argument avec lui même.
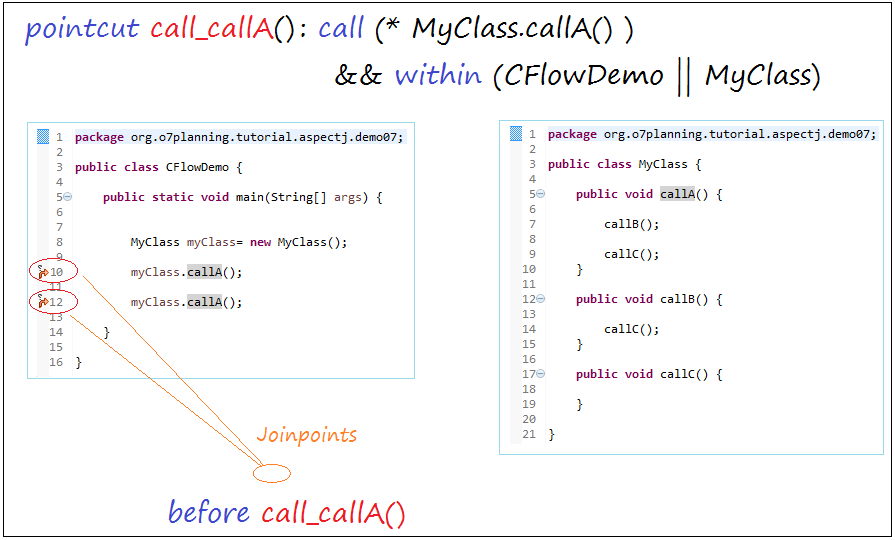
L'illustration dessous contient le point de jonction qui appelle la méthode MyClass.callA().
Utilisez cflow(..):
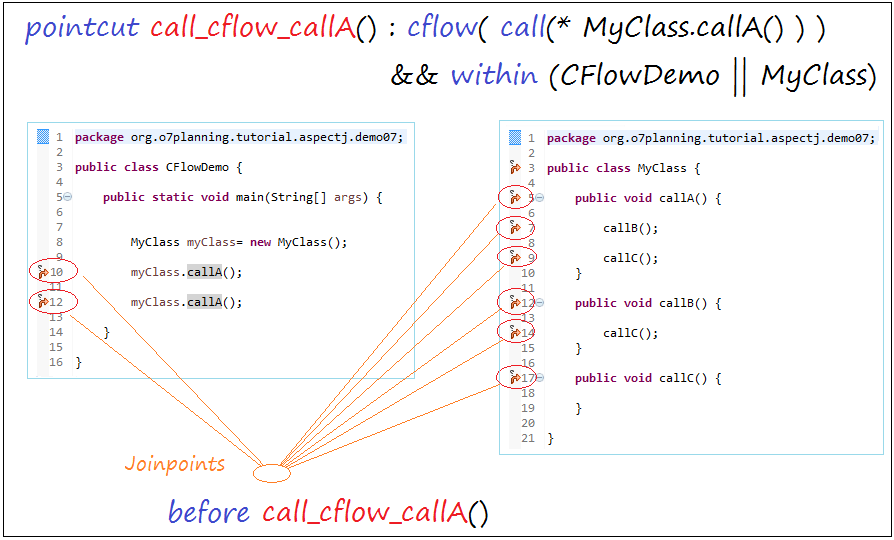
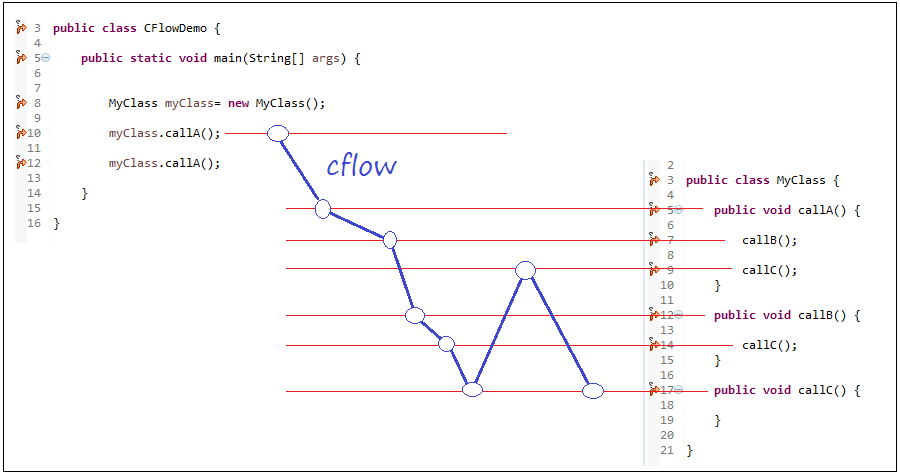
Observez l'exemple concret:
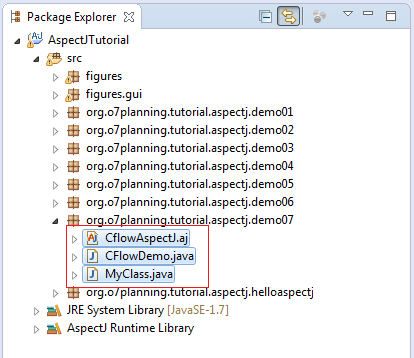
CflowAspectJ.aj
package org.o7planning.tutorial.aspectj.demo07;

public aspect CflowAspectJ {

   pointcut call_cflow_callA() :  cflow( call( * MyClass.callA() ) )  && within(CFlowDemo || MyClass);

   before() : call_cflow_callA()  {
       System.out.println(
               "Join Point at: " + thisJoinPointStaticPart.getSourceLocation().getWithinType().getCanonicalName()
                       + " --> " + thisJoinPointStaticPart.getSourceLocation().getLine());
   }

}
MyClass.java
package org.o7planning.tutorial.aspectj.demo07;

public class MyClass {

   public void callA() {

       callB();

       callC();
   }

   public void callB() {

       callC();
   }

   public void callC() {

   }

}
CFlowDemo.java
package org.o7planning.tutorial.aspectj.demo07;

public class CFlowDemo {

   public static void main(String[] args) {


       MyClass myClass= new MyClass();

       myClass.callA();

       myClass.callA();

   }

}
Les résultats de l'exécution la classe CFlowDemo:
Join Point at: org.o7planning.tutorial.aspectj.demo07.CFlowDemo --> 10
Join Point at: org.o7planning.tutorial.aspectj.demo07.MyClass --> 5
Join Point at: org.o7planning.tutorial.aspectj.demo07.MyClass --> 7
Join Point at: org.o7planning.tutorial.aspectj.demo07.MyClass --> 12
Join Point at: org.o7planning.tutorial.aspectj.demo07.MyClass --> 14
Join Point at: org.o7planning.tutorial.aspectj.demo07.MyClass --> 17
Join Point at: org.o7planning.tutorial.aspectj.demo07.MyClass --> 9
Join Point at: org.o7planning.tutorial.aspectj.demo07.MyClass --> 17
Join Point at: org.o7planning.tutorial.aspectj.demo07.CFlowDemo --> 12
Join Point at: org.o7planning.tutorial.aspectj.demo07.MyClass --> 5
Join Point at: org.o7planning.tutorial.aspectj.demo07.MyClass --> 7
Join Point at: org.o7planning.tutorial.aspectj.demo07.MyClass --> 12
Join Point at: org.o7planning.tutorial.aspectj.demo07.MyClass --> 14
Join Point at: org.o7planning.tutorial.aspectj.demo07.MyClass --> 17
Join Point at: org.o7planning.tutorial.aspectj.demo07.MyClass --> 9
Join Point at: org.o7planning.tutorial.aspectj.demo07.MyClass --> 17
Cflowbelow
Le flot de contrôle (control flow) est un flot de l'exécution de programme à l'intérieur du point de jonction (JointPoint) précis. Précisément, cflow() et cflowbelow() sont créés en vue de prendre des autres points de jonction comme des arguments et nous permettre de définir le flot de contrôle basés sur les points de coupe- Ces points de coupes capturent tous les points de jonction dans le flot de contrôle de chaque point de jonction précis.
cflowbelow() se comporte même que cflow, mais il ne capture pas le point de jonction précis dans son argument mais il capte tous les points qui restent.
Vous pouvew voir plus dan la section flow().
Java Basic
- Personnaliser le compilateur Java pour traiter votre annotation (Annotation Processing Tool)
- Programmation Java pour l'équipe utilisant Eclipse et SVN
- Le Tutoriel de Java WeakReference
- Le Tutoriel de Java PhantomReference
- Tutoriel sur la compression et la décompression Java
- Configuration d'Eclipse pour utiliser le JDK au lieu de JRE
- Méthodes Java String.format() et printf()
- Syntaxe et nouvelles fonctionnalités de Java 8
- Expression régulière en Java
- Tutoriel de programmation Java multithreading
- Bibliothèques de pilotes JDBC pour différents types de bases de données en Java
- Tutoriel Java JDBC
- Obtenir des valeurs de colonne automatiquement incrémentées lors de l'insertion d'un enregistrement à l'aide de JDBC
- Le Tutoriel de Java Stream
- Le Tutoriel de Java Functional Interface
- Introduction à Raspberry Pi
- Le Tutoriel de Java Predicate
- Classe abstraite et interface en Java
- Modificateurs d'accès en Java
- Le Tutoriel de Java Enum
- Le Tutoriel de Java Annotation
- Comparer et trier en Java
- Le Tutoriel de Java String, StringBuffer et StringBuilder
- Tutoriel de gestion des exceptions Java
- Le Tutoriel de Java Generics
- Manipulation de fichiers et de répertoires en Java
- Le Tutoriel de Java BiPredicate
- Le Tutoriel de Java Consumer
- Le Tutoriel de Java BiConsumer
- Qu'est-ce qui est nécessaire pour commencer avec Java?
- L'histoire de Java et la différence entre Oracle JDK et OpenJDK
- Installer Java sur Windows
- Installer Java sur Ubuntu
- Installer OpenJDK sur Ubuntu
- Installer Eclipse
- Installer Eclipse sur Ubuntu
- Le Tutoriel Java pour débutant
- Histoire des bits et des bytes en informatique
- Types de données dans Java
- Opérations sur les bits
- Le Tutoriel de instruction Java If else
- Le Tutoriel de instruction Java Switch
- Les Boucles en Java
- Les Tableaux (Array) en Java
- JDK Javadoc au format CHM
- Héritage et polymorphisme en Java
- Le Tutoriel de Java Function
- Le Tutoriel de Java BiFunction
- Exemple de Java encoding et decoding utilisant Apache Base64
- Le Tutoriel de Java Reflection
- Invocation de méthode à distance en Java
- Le Tutoriel de Java Socket
- Quelle plate-forme devez-vous choisir pour développer des applications de bureau Java?
- Le Tutoriel de Java Commons IO
- Le Tutoriel de Java Commons Email
- Le Tutoriel de Java Commons Logging
- Comprendre Java System.identityHashCode, Object.hashCode et Object.equals
- Le Tutoriel de Java SoftReference
- Le Tutoriel de Java Supplier
- Programmation orientée aspect Java avec AspectJ (AOP)
Show More
- Tutoriels de programmation Java Servlet/JSP
- Tutoriels de Java Collections Framework
- Tutoriels Java API pour HTML & XML
- Tutoriels Java IO
- Tutoriels Java Date Time
- Tutoriels Spring Boot
- Tutoriels Maven
- Tutoriels Gradle
- Tutoriels Java Web Service
- Tutoriels de programmation Java SWT
- Tutoriels de JavaFX
- Tutoriels Java Oracle ADF
- Tutoriels Struts2
- Tutoriels Spring Cloud