Exemple simple avec React et Redux côté client
1. Objectifs de l'exemple
Dans la leçon, je vais vous donner des instruction de la création d'une petite application avec React & Redux, à l'aide de laquelle la bibliothèque Redux aide à gérer l'état de l'application. Toute cette application est exécutée côté client (Client Side).
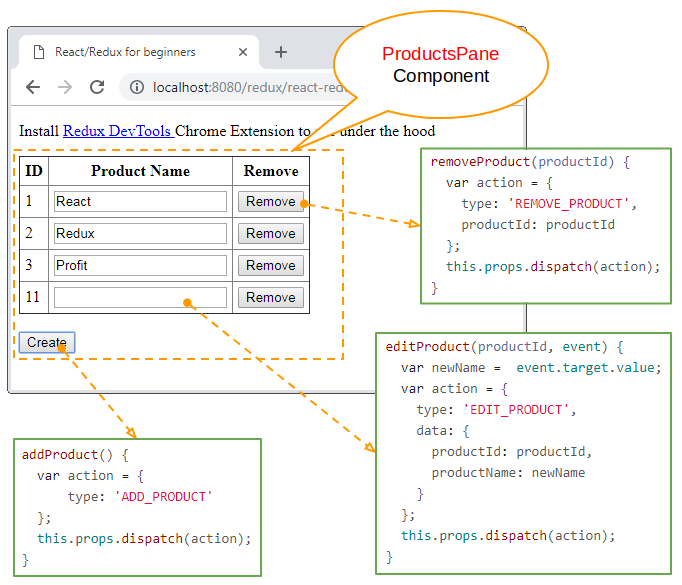
Ci-dessous, l'image de démonstration de l'application :

Les bibliothèques utilisées dans cette application :
Libraries
<!--
   NOTE: Check other version at: https://cdnjs.com
   -->
<!-- React Libraries -->
<script src="https://cdnjs.cloudflare.com/ajax/libs/react/16.4.2/umd/react.production.min.js"></script>
<script src="https://cdnjs.cloudflare.com/ajax/libs/react-dom/16.4.2/umd/react-dom.production.min.js"></script>

<!-- Redux & React-Redux Libraries -->
<script src="https://cdnjs.cloudflare.com/ajax/libs/redux/4.0.0/redux.min.js"></script>
<script src="https://cdnjs.cloudflare.com/ajax/libs/react-redux/5.0.7/react-redux.min.js"></script>

<!-- Babel Library -->
<script src="https://cdnjs.cloudflare.com/ajax/libs/babel-standalone/6.26.0/babel.min.js"></script>
L'architecture de Redux:
Vous pouvez voir ma publication sur "Introduction de Redux" dans le lien ci-dessous afin de comprendre mieux de Redux et son architecture ainsi que la différence entre Flux et Redux.

2. Code d'application
Créez deux fichiers react-redux-example.html & react-redux-example.jsx :
react-redux-example.html
<!DOCTYPE html>
<html>
   <head>
      <meta charset="UTF-8">
      <title>React/Redux for beginners</title>
      <!--
         NOTE: Check other version at: https://cdnjs.com
      -->
      <!-- React Libraries -->
      <script src="https://cdnjs.cloudflare.com/ajax/libs/react/16.4.2/umd/react.production.min.js"></script>
      <script src="https://cdnjs.cloudflare.com/ajax/libs/react-dom/16.4.2/umd/react-dom.production.min.js"></script>

      <!-- Redux & React-Redux Libraries -->
      <script src="https://cdnjs.cloudflare.com/ajax/libs/redux/4.0.0/redux.min.js"></script>
      <script src="https://cdnjs.cloudflare.com/ajax/libs/react-redux/5.0.7/react-redux.min.js"></script>

      <!-- Babel Library -->
      <script src="https://cdnjs.cloudflare.com/ajax/libs/babel-standalone/6.26.0/babel.min.js"></script>

      <style>
        table {
          border-collapse: collapse;
        }
        table td, th {
          padding: 5px;
        }
      </style>
   </head>
   <body>

     <p>Install
       <a target="_blank"
         href="https://chrome.google.com/webstore/detail/redux-devtools/lmhkpmbekcpmknklioeibfkpmmfibljd/related?hl=en">
         Redux DevTools
       </a>
       Chrome Extension to see under the hood
     </p>

      <div id="app">
         Loading...
      </div>

      <script type="text/babel" src="react-redux-example.jsx"></script>

   </body>
</html>
react-redux-example.jsx
// REACT COMPONENT
// Generally you would spilt this up into logical components
// and pass props around correctly etc but we are keeping it as simply as possible
class ProductsPane extends React.Component {
  constructor (props, context) {
    super(props, context);
  }

  // EVENT HANDLERS
  // They are responsible for calling `dispatch` which will send events to redux
  addProduct = () => {
    var action = {
        type: 'ADD_PRODUCT'
    };
    this.props.dispatch(action);
  }

  removeProduct  = (productId) =>  {
    var action = {
      type: 'REMOVE_PRODUCT',
      productId: productId
    };
    this.props.dispatch(action);
  }

  editProduct = (productId, event) =>   {
    var newName =  event.target.value;
    var action = {
      type: 'EDIT_PRODUCT',
      data: {
        productId: productId,
        productName: newName
      }
    };
    this.props.dispatch(action);
  }


  render () {
    const products = this.props.products;

    // Example product: { productId : 4 , productName :'Profit' }
    var trList = products.map( (product, index) => {
      return (<tr key={product.productId}>
        <td>{product.productId}</td>
        <td><input type="text" onChange={this.editProduct.bind(null, product.productId)} value={product.productName} /></td>
        <td>
          <button onClick={this.removeProduct.bind(null, product.productId)}>
             Remove
          </button>
        </td>
      </tr>);
    });


    return (<div>
      <table border="1">
        <thead>
           <th>ID</th>
           <th>Product Name</th>
           <th>Remove</th>
        </thead>
        <tbody>
          {trList}
        </tbody>
      </table>
      <br/>
      <button onClick={this.addProduct}>
          Create
      </button>
    </div>);
  }
}

var nextProductId = 10;

// MAP STATE TO PROPS
// Probably the most important method of the demo which handles the React/Redux integration.
// When state changes, this method is called, which then you can use to customly
// map the state into props that your React component can use
// MAP: state.productList <==> props.products
const mapStateToProps = (state) => {
  return {
    products: state.productList
  }
}

// Example product: { productId : 4 , productName :'Profit' }
const getIndexByProductId = (products, productId)  => {
    for(var i = 0; i < products.length; i++) {
       var product = products[i];
       if(product.productId === productId) {
         return i;
       }
    }
    return -1;
};


// REDUCERS
// Reducers listen for actions that are dispatched and react depending on your logic
// All state in Redux is immutable(never changes) so we always have to return a new
// state object.
// We are going to copy the current state and return a new one based off the action creators above
const appReducer = (state = {productList: []}, action) => {

  // Clone Array.
  let products = state.productList.slice();
  // This is quite a common way of deciding which event to process
  // Note: ALL events will be coming through this reducer
  console.log('Actions', action); // Open your console to see what actions look like

  // Even better, install Redux DevTools and your mind will be blown
  switch (action.type) {
    case 'ADD_PRODUCT':
      nextProductId++;
      var product = {productId : nextProductId, productName: "" };
      products.push(product);
      break;
    case 'REMOVE_PRODUCT':
      var idx = getIndexByProductId(products, action.productId);
      if(idx != -1)  {
        products.splice(idx, 1); // Removes element at `idx`
      }
      break;
    case 'EDIT_PRODUCT':
      var idx = getIndexByProductId(products, action.data.productId);
      if(idx != -1)  {
          products[idx].productName = action.data.productName;
      }
      break;
  }
  // As above, we have to return a new state object each time (Redux store is immutable)
  // It makes sure we know our data can only be modified in one visible way
  // Also lets us time travel through our application state!
  const newState = {
    productList: products
  }
  console.log('Current State', newState);
  return newState;
}

// REDUX STORE
// Create store initializes our Redux store and only has to be called once
// The first argument is our `appReducer` defined above, it is almost like a listener
// The second is just our initial state which is just a Javascript object
// The third is usually where enhancers/middleware goes
// In this example it just loads Redux DevTools so everyone can play around
let store = Redux.createStore(appReducer, {
  productList: [
    { productId : 1 , productName :'React' },
    { productId : 2 , productName :'Redux' },
    { productId : 3 , productName :'Profit' }
  ]
}, window.devToolsExtension ? window.devToolsExtension() : undefined);

// We want to use Redux connect to attach our mapStateToProps to our ProductsPane (React Component)
const MyApp = ReactRedux.connect (
  mapStateToProps
)(ProductsPane);

// Render
ReactDOM.render(
  <ReactRedux.Provider store={store}>
    <MyApp />
  </ReactRedux.Provider>,
  document.getElementById('app')
);


if (window.devToolsExtension) {
  window.devToolsExtension.open();
}
Exécutez le fichier react-redux-example.html sur HTTP Server :
3. Expliquer le code d'application
OK, dans cette application, nous utilisons React et Redux. Dans lesquels Redux est une bibliothèque de Javascript qui permet de gérer l'état de l'application. L'illustration ci-dessous montre l'architecture de Redux.

Lorsque l'utilisateur interagit avec l'interface de l'application (par exemple, en cliquant sur le bouton), une méthode du Component est appelée à s'exécuter. Dans cette méthode, un objet action est créé. Il s'agit d'un objet pur contenant les informations relatives aux événements et statuts à mettre à jour. Enfin, envoyez cet objet à STORE en appelant this.props.dispatch (action).
REDUCER: (Modificateur) une fonction Javascript, et vous devez écrire le code de cette fonction pour renvoyer un nouvel état à l'application. Il a deux paramètres :
- Paramètre 1: L'état initial de l'application.
- Paramètre 2: L'objet action est envoyé dans l'étape précédante.
Dans Redux, STORE est unique et il stocke l'état de l'application et comprend des Reducer et des Middleware. Vous pouvez créer un STORE en utilisant la méthode Redux.createStore(..).
// createStore method:
Redux.createStore(reducer, [preloadedState], [enhancer])

// @see API docs: https://redux.js.org/api/createstore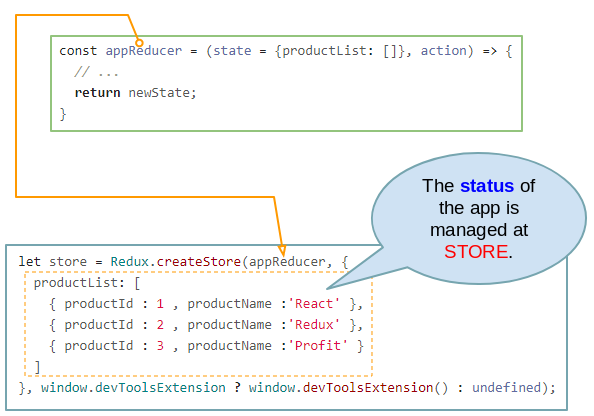
Après que action est gérée sur STORE, un nouvel état est renvoyé au VIEW PROVIDER.
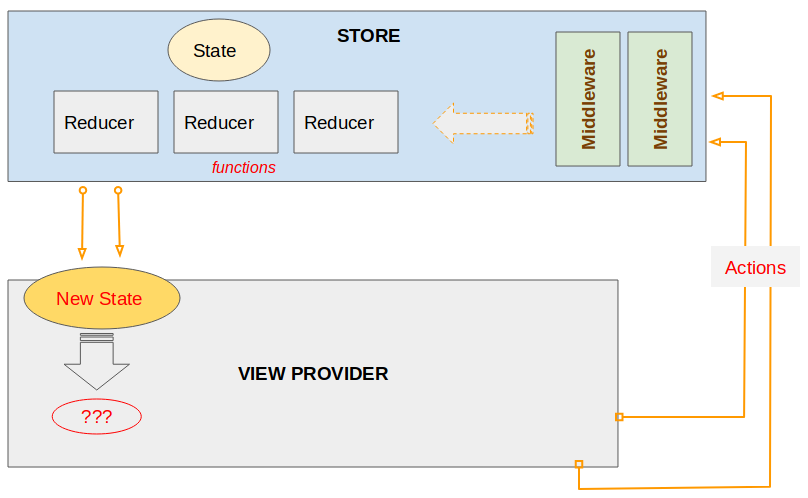
Le nouvel état est mis à jour pour Component :


Tutoriels de programmation ReactJS
- Le Tutoriel de ReactJS props et state
- Le Tutoriel de ReactJS Event
- Le Tutoriel de ReactJS Component API
- Méthodes dans le cycle de vie ReactJS Component
- Le Tutoriel de ReactJS Refs
- Le Tutoriel de ReactJS Lists et Keys
- Le Tutoriel de ReactJS Form
- Comprendre ReactJS Router avec exemple côté client
- Introduction à Redux
- Exemple simple avec React et Redux côté client
- Le Tutoriel de React-Transition-Group API
- Démarrage rapide avec ReactJS dans l'environnement NodeJS
- Comprendre le ReactJS-Router avec un exemple basique (NodeJS)
- Exemple React-Transition-Group Transition (NodeJS)
- Exemple React-Transition-Group CSSTransition (NodeJS)
- Introduction à ReactJS
- Installation du plugin React pour l'éditeur Atom
- Créer un HTTPServer simple avec NodeJS
- Démarrage rapide avec ReactJS - Hello ReactJS
Show More