Constructeurs dans TypeScript
1. Qu'est-ce qu'un constructeur ?
Le constructeur est une méthode spéciale de la classe, utilisée pour créer des objets et initialiser les valeurs des champs (field).
Pour mieux comprendre, on va analyser la situation suivante :
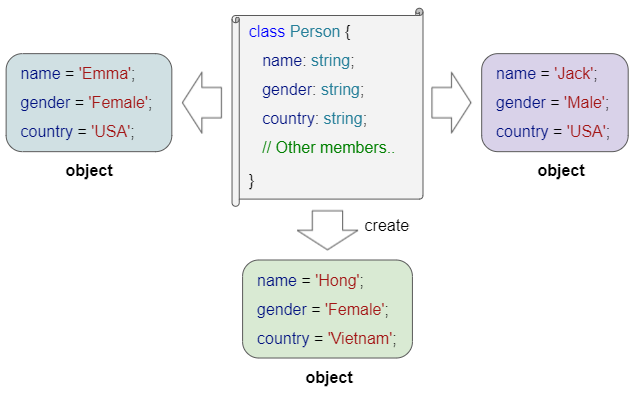
La classe Person est considérée comme un modèle permettant de créer des personnes spécifiques, qui comprend les informations suivantes : nom, sexe et pays. Ces informations sont également appelées des champs (field).
Les caractéristiques du Constructor :
- Constructor est une méthode spéciale de la classe. Le mot-clef constructor est également le nom de cette méthode spéciale.
- Chaque classe ne dispose que d'un seul constructor.
- Dans le corps (body) du constructeur, vous devez affecter des valeurs à tous les champs (field) de la classe. Il n'est peut-être pas nécessaire d'attribuer des valeurs aux champs facultatifs.
- Si tous les champs (fields) de la classe sont facultatifs et que vous ne définissez aucun constructeur pour une classe, TypeScript supposera automatiquement que la classe a un constructeur par défaut sans paramètres ni contenu dans le corps.
Le langage TypeScript est conçu pour être strict et sûr, ce qui nécessite que tous les champs de la classe soient définis sur une valeur non-null. Si un champ autorise une valeur null, vous devez l'indiquer explicitement dans la conception de la classe.
2. Constructor
Dans la plupart des cas, voici la syntaxe courante pour définir un constructeur :
class Class_Name  {
   field_1 : data_type_f1;
   field_2 : data_type_f2;
   field_N : data_type_fN;

   constructor(arg_1 : data_type_a1, arg_2 : data_type_a2, arg_M : data_type_aM)  {
      // Codes..
   }
}
Dans l'exemple ci-dessous, la classe Person dispose de 3 champs, aucun d'entre eux n'est facultatif. Par conséquent, dans le corps du constructeur, vous devez affecter des valeurs non null à tous ces champs.
constructor_ex1.ts
class Person {
    name: string;
    gender: string;
    country: string;

    constructor(n: string, g: string, c: string) {
        this.name = n;
        this.gender = g;
        this.country = c;
    }
    // A Method
    selfIntroduce(): void {
        console.log(`Hi, My name is ${this.name}, from ${this.country}`);
    }
}
function constructor_ex1_test() {
    var tom: Person = new Person("Tom", "Male", "USA");

    tom.selfIntroduce();
    console.log(`tom.name = ${tom.name}`);
}
constructor_ex1_test(); // Call the function.
Output:
Hi, My name is Tom, from USA
tom.name = Tom
Par exemple :
constructor_ex2.ts
interface IDimension {
    width: number;
    height: number;
}
class Rectangle {
    width: number;
    height: number;
    color: string;

    constructor(dimension: IDimension, color: string) {
        this.width = dimension.width;
        this.height = dimension.height;
        this.color = color;
    }
    // A Method
    getArea(): number {
        return this.width * this.height;
    }
}
function constructor_ex2_test() {
    var dim: IDimension = { width: 10, height: 20 };
    var rec: Rectangle = new Rectangle(dim, "blue");

    console.log(`rec.getArea() = ${rec.getArea()}`);
    console.log(`rec.color = ${rec.color}`);
}
constructor_ex2_test(); // Call the function3. Optional parameters
L'utilisation de paramètres facultatifs dans un constructeur vous permet d'utiliser ce constructeur de différentes manières. Remarque : Les paramètres facultatifs doivent être les derniers dans la liste des paramètres.
constructor(arg1 : data_type1, arg2 data_type2, arg3?: data_type3, arg4?: data_type4) {
   // code..
}
Par exemple :
constructor_optional_args_ex1_test.ts
class Circle {
    radius: number;
    color: string;

    constructor(radius: number, color?: string) {
        this.radius = radius;
        this.color = color ?? "blue"; // Default value
    }
}
function constructor_optional_args_ex1_test() {
    var circle1 = new Circle(100);
    var circle2 = new Circle(100, "red");

    console.log(`circle1.color = ${circle1.color}`); // blue
    console.log(`circle2.color = ${circle2.color}`); // red
}
constructor_optional_args_ex1_test(); // Call the function.
Output:
circle1.color = blue
circle2.color = red
4. Default Parameter values
L'utilisation de paramètres avec des valeurs par défaut dans un constructeur vous permet d'utiliser ce constructeur de différentes manières. Remarque : Ces paramètres doivent être les derniers dans la liste des paramètres.
constructor(arg1 : data_type1, arg2 : data_type2,
             arg3 : data_type3 = defaultValue3,
             arg4 : data_type4 = defaultValue4) {
   // code..
}
Par exemple :
constructor_default_args_ex1.ts
class Square {
    width: number;
    color: string;
    shadows: boolean;

    constructor(width: number, color: string = "blue", shadows: boolean = true) {
        this.width = width;
        this.color = color;
        this.shadows = shadows;
    }
}
function constructor_default_args_ex1_test() {
    var square1 = new Square(100);
    var square2 = new Square(100, "red");
    var square3 = new Square(100, "red", false);

    console.log(`square1.color = ${square1.color}`); // blue
    console.log(`square1.shadows = ${square1.shadows}`); // true

    console.log(`square2.color = ${square2.color}`); // red
    console.log(`square2.shadows = ${square2.shadows}`); // true

    console.log(`square3.color = ${square3.color}`); // red
    console.log(`square3.shadows = ${square3.shadows}`); // false
}
constructor_default_args_ex1_test(); // Call the function.
Output:
square1.color = blue
square1.shadows = true
square2.color = red
square2.shadows = true
square3.color = red
square3.shadows = false
5. Parameter with Union Types
Les paramètres dans TypeScrpit peuvent être déclarés avec le type de données union (union data type). C'est aussi une technique pour vous d'utiliser un constructeur de différentes manières.
constructor(arg1 : data_type1,
             arg2 : data_type21 | data_type22 | data_type23,
             arg3 : data_type3,
             arg4 : data_type4) {
   // code..
}
Par exemple :
constructor_union_type_args_ex1.ts
class Employee {
    name: string;
    hireDate: Date;
    department: string;

    constructor(name: string, hireDate: Date | string, department: string) {
        this.name = name;
        this.department = department;
        if(hireDate instanceof Date)  {
            this.hireDate = hireDate;
        } else {
            this.hireDate = new Date(hireDate);
        }
    }
}
function constructor_union_type_args_ex1_test() {
    var tom = new Employee("Tom", new Date("1995-05-01"), "IT");
    var jerry = new Employee("Jerry", "2001-05-01", "Operations");

    console.log(`tom.hireDate = ${tom.hireDate}`);
    console.log(`jerry.hireDate = ${jerry.hireDate}`);
}
constructor_union_type_args_ex1_test(); // Call the function.
Output:
tom.hireDate = Mon May 01 1995 06:00:00 GMT+0600 (GMT+06:00)
jerry.hireDate = Tue May 01 2001 06:00:00 GMT+0600 (GMT+06:00)6. Constructor Overloading
Comme mentionné ci-dessus, TypeScript n'autorise qu'un seul constructeur dans une classe. La Constructor Overloading est une technique pour "contourner la loi" ci-dessus, ce qui signifie que vous n'avez toujours qu'un seul constructeur dans une classe mais que vous pouvez l'utiliser avec de nombreux types de paramètres différents.
Dans TypeScript, Constructor Overloading est différente de celle de C++, Java ou C#. L'idée principale pour surcharger le constructeur est de créer un constructeur commun qui vérifie quel type de paramètres ont été passés pour créer un objet, et ensuite faire une logique pour le cas approprié. Il est utile d'ajouter les définitions des constructeurs pour aider les autres programmeurs à savoir comment utiliser la classe de manière appropriée.
La syntaxe :
constructor(arg_11 : data_type_11, arg_1N : data_type_1N); // Definition 1
constructor(arg_21 : data_type_21, arg_22 : data_type_22, arg_2M : data_type_2M); // Definition 2
constructor(... args : any[]) {
   // Constructor body.
}- TypeScript any data type
En règle générale, il existe de nombreuses façons de définir un constructeur surchargé. La syntaxe ci-dessus est recommandée, ce qui vous aide à éviter le message d'erreur comme ci-dessous du compilateur :
This overload signature is not compatible with its implementation signature.Constructor overloading example 1:
constructor_overload_ex1.js
interface IDimension3D {
    width: number;
    height: number;
    depth: number;
}
class Box {
    width: number;
    height: number;
    depth: number;
    color: string;

    constructor(dimension: IDimension3D, color?: string); // definition 1
    constructor(width: number, height: number, depth: number, color?: string); // definition 2
    constructor(...args: any[]) {
        if (args.length == 1 || args.length == 2) {  // Use definition 1
            this.width = args[0].width;
            this.height = args[0].height;
            this.depth = args[0].depth;
            this.color = args.length == 1? "blue" : args[1];
        } else if (args.length == 3 || args.length == 4) { // Use definition 2
            this.width = args[0];
            this.height = args[1];
            this.depth = args[2];
            this.color = args.length == 3? "blue" : args[3];
        } else {
            this.width = this.height = this.depth = 0;
            this.color = "blue";
        }
    }
}
function constructor_overload_ex1_test() {
    var dim: IDimension3D = { width: 10, height: 20, depth: 30};
    var box1: Box = new Box(dim);
    var box2: Box = new Box(dim, "red");
    var box3: Box = new Box(100, 200, 300);
    var box4: Box = new Box(100, 200, 300, "green");

    console.log(`box1.width = ${box1.width}, box1.color = ${box1.color}`); // 10 , blue
    console.log(`box2.width = ${box2.width}, box2.color = ${box2.color}`); // 10 , red
    console.log(`box3.width = ${box3.width}, box3.color = ${box3.color}`); // 100 , blue
    console.log(`box4.width = ${box4.width}, box4.color = ${box4.color}`); // 100 , green
}
constructor_overload_ex1_test(); // Call the function.
Output:
box1.width = 10, box1.color = blue
box2.width = 10, box2.color = red
box3.width = 100, box3.color = blue
box4.width = 100, box4.color = green
Constructor overloading example 2:
constructor_overload_ex2.ts
interface IPoint {
    x: number;
    y: number;
}
class Line {
    x1: number; y1: number; x2: number; y2: number;
    color: string;

    constructor(point: IPoint, color?: string); // definition 1
    constructor(point1: IPoint, point2: IPoint, color?: string); // definition 2
    constructor(...args: any[]) {
        if (args.length == 1) { // Use definition 1
            this.x1 = this.y1 = 0;
            this.x2 = args[0].x;
            this.y2 = args[0].y;
            this.color = "blue";
        } else if (args.length == 2) {
            if (typeof args[1] == "string") { // Use definition 1
                this.x1 = this.y1 = 0;
                this.x2 = args[0].x;
                this.y2 = args[0].y;
                this.color = args[1]
            } else { // Use definition 2
                this.x1 = args[0].x;
                this.y1 = args[0].y;
                this.x2 = args[1].x;
                this.y2 = args[1].y;
                this.color = "blue";
            }
        } else if (args.length >= 2) { // Use definition 3
            this.x1 = args[0].x;
            this.y1 = args[0].y;
            this.x2 = args[1].x;
            this.y2 = args[1].y;
            this.color = args[2];
        } else {
            this.x1 = this.y1 = this.x2 = this.y2 = 0;
            this.color = "blue";
        }
    }
}
function constructor_overload_ex2_test() {
    var point1: IPoint = { x: 10, y: 20 };
    var point2: IPoint = { x: 10, y: 20 };
    var line1: Line = new Line(point1, point2);
    var line2: Line = new Line(point2, "green");

    console.log(`line1.color = ${line1.color}`); // blue
    console.log(`line2.color = ${line2.color}`); // green
}
constructor_overload_ex2_test(); // Call the function.7. Static factory method
Parfois, l'utilisation de la technique de « surcharge du constructeur » comme mentionné ci-dessus risque de rendre le processus d'utilisation plus complexe et confus. Il est nécessaire d'envisager des méthodes d'usine statiques comme une alternative efficace. Outre le constructeur, vous pouvez créer une ou plusieurs méthodes de fabrique statiques.
static_factory_method_ex1.ts
interface IDimension3D {
    width: number;
    height: number;
    depth: number;
}
class Box3D {
    width: number;
    height: number;
    depth: number;
    color: string;

    constructor(width: number, height: number, depth: number, color: string) {
        this.width = width;
        this.height = height;
        this.depth = depth;
        this.color = color;
    }
    // Static factory method (To create Box3D object)
    static fromDimension3D(dimension: IDimension3D, color: string): Box3D {
        return new Box3D(dimension.width, dimension.height, dimension.depth, color);
    }
}
function static_factory_method_ex1_test() {
    var box1: Box3D = new Box3D(100, 200, 300, "red");

    var dim: IDimension3D = { width: 10, height: 20, depth: 30 };
    var box2: Box3D = Box3D.fromDimension3D(dim, "green"); // Call static method.

    console.log(`box1.width = ${box1.width}, box1.color = ${box1.color}`); // 100 , red
    console.log(`box2.width = ${box2.width}, box2.color = ${box2.color}`); // 10 , green
}
static_factory_method_ex1_test(); // Call the function.
Output:
box1.width = 100, box1.color = red
box2.width = 10, box2.color = green
Tutoriels de programmation TypeScript
- Exécutez votre premier exemple TypeScript en Visual Studio Code
- Espaces (Namespaces) de noms dans TypeScript
- Module dans TypeScript
- Opérateur typeof dans TypeScript
- Les Boucles en TypeScript
- Installer TypeScript sur Windows
- Fonctions dans TypeScript
- Le Tutoriel de TypeScript Tuples
- Interfaces dans TypeScript
- Tableaux dans TypeScript
- Opérateur instanceof dans TypeScript
- Méthodes dans TypeScript
- Fermetures dans TypeScript
- Constructeurs dans TypeScript
- Propriétés dans TypeScript
- Analyser JSON dans TypeScript
- Analyser JSON dans TypeScript avec la bibliothèque json2typescript
- Qu'est-ce que Transpiler?
Show More