Le Tutoriel de Spring Boot, JPA et Spring Transaction
1. Objectifs de cette publication
Ce document est basé sur :
- Spring Boot 2.x
- Eclipse 4.7 (Oxygen)
Dans cette publication, je vais vous donner des instructions de création un projet Spring Boot et de travail avec une base de données (Oracle, MySQL, SQL Server, Postgres,..) à l'aide de JPA & Spring Transaction. Les questions discutées dans ce poste sont :
- Déclarer les bibliothèques nécessaires afin d'être capable à une base de données.
- Configurer Spring Boot afin d'être capable de se connecter à une base de données.
- Manipuler avec une base de données à l'aide de EntityManager de JPA.
- Utiliser Spring Transaction et expliquer la principe d'opération de Spring Transaction.
2. Préparer une base de données
MySQL
-- Create table
create table BANK_ACCOUNT
(
  ID        BIGINT not null,
  FULL_NAME VARCHAR(128) not null,
  BALANCE   DOUBLE not null
) ;
--
alter table BANK_ACCOUNT
  add constraint BANK_ACCOUNT_PK primary key (ID);


Insert into Bank_Account(ID, Full_Name, Balance) values (1, 'Tom', 1000);
Insert into Bank_Account(ID, Full_Name, Balance) values (2, 'Jerry', 2000);
Insert into Bank_Account(ID, Full_Name, Balance) values (3, 'Donald', 3000);

commit;
SQL Server
-- Create table
create table BANK_ACCOUNT
(
  ID        BIGINT not null,
  FULL_NAME VARCHAR(128) not null,
  BALANCE   DOUBLE PRECISION not null
) ;
--
alter table BANK_ACCOUNT
  add constraint BANK_ACCOUNT_PK primary key (ID);


Insert into Bank_Account(ID, Full_Name, Balance) values (1, 'Tom', 1000);
Insert into Bank_Account(ID, Full_Name, Balance) values (2, 'Jerry', 2000);
Insert into Bank_Account(ID, Full_Name, Balance) values (3, 'Donald', 3000);
Oracle
-- Create table
create table BANK_ACCOUNT
(
  ID        NUMBER(19) not null,
  FULL_NAME VARCHAR2(128) not null,
  BALANCE   NUMBER not null
) ;
--
alter table BANK_ACCOUNT
  add constraint BANK_ACCOUNT_PK primary key (ID);


Insert into Bank_Account(ID, Full_Name, Balance) values (1, 'Tom', 1000);
Insert into Bank_Account(ID, Full_Name, Balance) values (2, 'Jerry', 2000);
Insert into Bank_Account(ID, Full_Name, Balance) values (3, 'Donald', 3000);

commit;
PostGres
Create table Bank_Account (
   ID Bigint not null,
   Full_Name Varchar(128) not null,
   Balance real not null,
   CONSTRAINT Bank_Account_pk PRIMARY KEY (ID)
);

Insert into Bank_Account(ID, Full_Name, Balance) values (1, 'Tom', 1000);
Insert into Bank_Account(ID, Full_Name, Balance) values (2, 'Jerry', 2000);
Insert into Bank_Account(ID, Full_Name, Balance) values (3, 'Donald', 3000);
3. Créer un projet Spring Boot
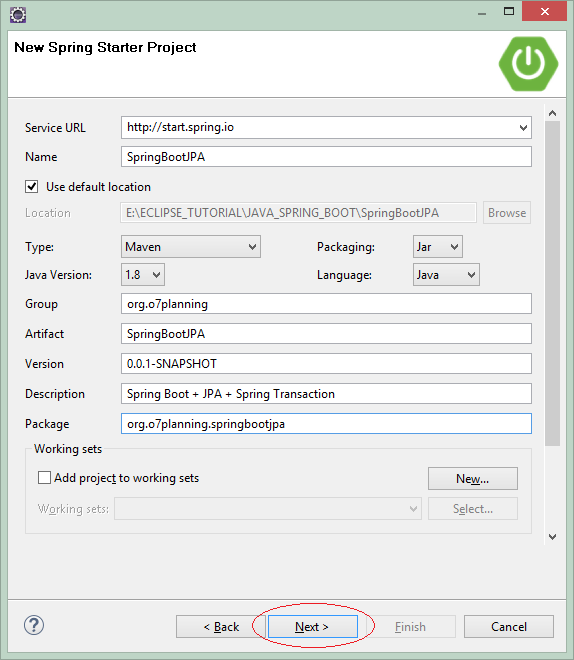
Sur Eclipse créez un projet Spring Boot.
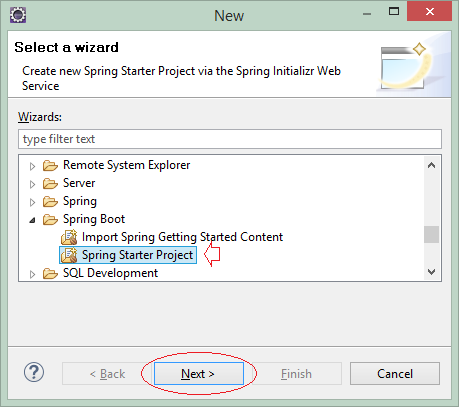
Saisissez :
- Name: SpringBootJPA
- Group: org.o7planning
- Artifact: SpringBootJPA
- Description: Spring Boot + JPA + Spring Transaction
- Package: org.o7planning.springbootjpa
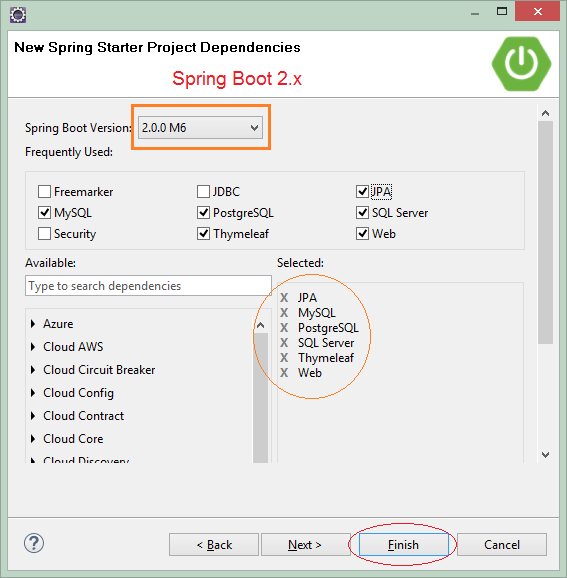
Sélectionnez les technologies et les bibliothèques qui seront utilisées :
- JPA
- MySQL
- PostgrsSQL
- SQL Server
- Web
- Thymeleaf
4. Configurer pom.xml
Si vous travaillez avec la base de données Oracle, vous devez déclarer les bibliothèques comme ci-dessous sur pom.xml:
* Oracle *
<dependencies>
    .....

     <dependency>
        <groupId>com.oracle</groupId>
        <artifactId>ojdbc6</artifactId>
        <version>11.2.0.3</version>
    </dependency>

    .....
</dependencies>

<repositories>
        ....

    <!-- Repository for ORACLE JDBC Driver -->
    <repository>
        <id>codelds</id>
        <url>https://code.lds.org/nexus/content/groups/main-repo</url>
    </repository>

    .....
</repositories>
Si vous vous connectez à la base de données SQL Service, vous pouvez utiliser une des deux bibliothèques JTDS ou Mssql-Jdbc:
* SQL Server *
<dependencies>
       .....

    <dependency>
        <groupId>com.microsoft.sqlserver</groupId>
        <artifactId>mssql-jdbc</artifactId>
        <scope>runtime</scope>
    </dependency>

    <dependency>
        <groupId>net.sourceforge.jtds</groupId>
        <artifactId>jtds</artifactId>
        <scope>runtime</scope>
    </dependency>

     .....
</dependencies>
Le contenu complet du fichier pom.xml:
pom.xml
<?xml version="1.0" encoding="UTF-8"?>
<project xmlns="http://maven.apache.org/POM/4.0.0"
    xmlns:xsi="http://www.w3.org/2001/XMLSchema-instance"
    xsi:schemaLocation="http://maven.apache.org/POM/4.0.0
              http://maven.apache.org/xsd/maven-4.0.0.xsd">

    <modelVersion>4.0.0</modelVersion>

    <groupId>org.o7planning</groupId>
    <artifactId>SpringBootJPA</artifactId>
    <version>0.0.1-SNAPSHOT</version>
    <packaging>jar</packaging>

    <name>SpringBootJPA</name>
    <description>Spring Boot + JPA + Spring Transaction</description>

    <parent>
        <groupId>org.springframework.boot</groupId>
        <artifactId>spring-boot-starter-parent</artifactId>
        <version>2.0.0.RELEASE</version>
        <relativePath /> <!-- lookup parent from repository -->
    </parent>

    <properties>
        <project.build.sourceEncoding>UTF-8</project.build.sourceEncoding>
        <project.reporting.outputEncoding>UTF-8</project.reporting.outputEncoding>
        <java.version>1.8</java.version>
    </properties>

    <dependencies>
        <dependency>
            <groupId>org.springframework.boot</groupId>
            <artifactId>spring-boot-starter-data-jpa</artifactId>
        </dependency>
        <dependency>
            <groupId>org.springframework.boot</groupId>
            <artifactId>spring-boot-starter-web</artifactId>
        </dependency>
        <dependency>
            <groupId>org.springframework.boot</groupId>
            <artifactId>spring-boot-starter-thymeleaf</artifactId>
        </dependency>
        <dependency>
            <groupId>mysql</groupId>
            <artifactId>mysql-connector-java</artifactId>
            <scope>runtime</scope>
        </dependency>
        <dependency>
            <groupId>org.postgresql</groupId>
            <artifactId>postgresql</artifactId>
            <scope>42.1.4</scope>
        </dependency>

        <dependency>
            <groupId>com.microsoft.sqlserver</groupId>
            <artifactId>mssql-jdbc</artifactId>
            <scope>runtime</scope>
        </dependency>

        <dependency>
            <groupId>net.sourceforge.jtds</groupId>
            <artifactId>jtds</artifactId>
            <scope>runtime</scope>
        </dependency>

        <dependency>
            <groupId>com.oracle</groupId>
            <artifactId>ojdbc6</artifactId>
            <version>11.2.0.3</version>
        </dependency>

        <!-- https://mvnrepository.com/artifact/org.threeten/threetenbp -->
        <dependency>
            <groupId>org.threeten</groupId>
            <artifactId>threetenbp</artifactId>
            <version>1.3.6</version>
        </dependency>


        <dependency>
            <groupId>org.springframework.boot</groupId>
            <artifactId>spring-boot-starter-test</artifactId>
            <scope>test</scope>
        </dependency>
    </dependencies>

    <repositories>

        <!-- Repository for ORACLE JDBC Driver -->
        <repository>
            <id>codelds</id>
            <url>https://code.lds.org/nexus/content/groups/main-repo</url>
        </repository>

    </repositories>

    <build>
        <plugins>
            <plugin>
                <groupId>org.springframework.boot</groupId>
                <artifactId>spring-boot-maven-plugin</artifactId>
            </plugin>
        </plugins>
    </build>

</project>
5. Configurer la source de données
Pour que Spring puisse se connecter à la base de données, vous devriez configurer des paramètres nécessaires dans le fichier application.properties.
application.properties (MySQL)
# ===============================
# DATABASE
# ===============================

spring.datasource.driver-class-name=com.mysql.jdbc.Driver
spring.datasource.url=jdbc:mysql://localhost:3306/mydatabase
spring.datasource.username=root
spring.datasource.password=12345

# ===============================
# JPA / HIBERNATE
# ===============================

spring.jpa.show-sql=true
spring.jpa.hibernate.ddl-auto=none
spring.jpa.properties.hibernate.dialect=org.hibernate.dialect.MySQL5Dialect
application.properites (Sql Server + Mssql-Jdbc)
# ===============================
# DATABASE
# ===============================

spring.datasource.driver-class-name=com.microsoft.sqlserver.jdbc.SQLServerDriver
spring.datasource.url=jdbc:sqlserver://tran-vmware-pc\\SQLEXPRESS:1433;databaseName=bank
spring.datasource.username=sa
spring.datasource.password=12345


# ===============================
# JPA / HIBERNATE
# ===============================

spring.jpa.show-sql=true
spring.jpa.hibernate.ddl-auto=none
spring.jpa.properties.hibernate.dialect=org.hibernate.dialect.SQLServer2012Dialect
application.properites (Sql Server + JTDS)
# ===============================
# DATABASE
# ===============================

spring.datasource.driver-class-name=net.sourceforge.jtds.jdbc.Driver
spring.datasource.url=jdbc:jtds:sqlserver://tran-vmware-pc:1433/bank;instance=SQLEXPRESS
spring.datasource.username=sa
spring.datasource.password=12345


# ===============================
# JPA / HIBERNATE
# ===============================

spring.jpa.show-sql=true
spring.jpa.hibernate.ddl-auto=none
spring.jpa.properties.hibernate.dialect=org.hibernate.dialect.SQLServer2012Dialect
application.properties (Oracle)
# ===============================
# DATABASE
# ===============================

spring.datasource.driver-class-name=oracle.jdbc.driver.OracleDriver

spring.datasource.url=jdbc:oracle:thin:@localhost:1521:db12c
spring.datasource.username=Test
spring.datasource.password=test001


# ===============================
# JPA / HIBERNATE
# ===============================

spring.jpa.show-sql=true
spring.jpa.hibernate.ddl-auto=none
spring.jpa.properties.hibernate.dialect=org.hibernate.dialect.Oracle10gDialect
application.properties (PostGres)
# ===============================
# DATABASE CONNECTION
# ===============================

spring.datasource.driver-class-name=org.postgresql.Driver
spring.datasource.url=jdbc:postgresql://tran-vmware-pc:5432/bank
spring.datasource.username=postgres
spring.datasource.password=12345

# ===============================
# JPA / HIBERNATE
# ===============================

spring.jpa.show-sql=true
spring.jpa.hibernate.ddl-auto=none
spring.jpa.properties.hibernate.dialect=org.hibernate.dialect.PostgreSQLDialect


# Fix Postgres JPA Error:
# Method org.postgresql.jdbc.PgConnection.createClob() is not yet implemented.
spring.jpa.properties.hibernate.temp.use_jdbc_metadata_defaults= false
6. Entity, Model, Form, DAO
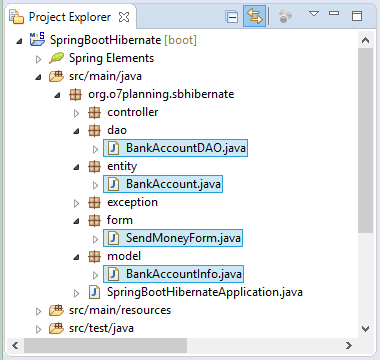
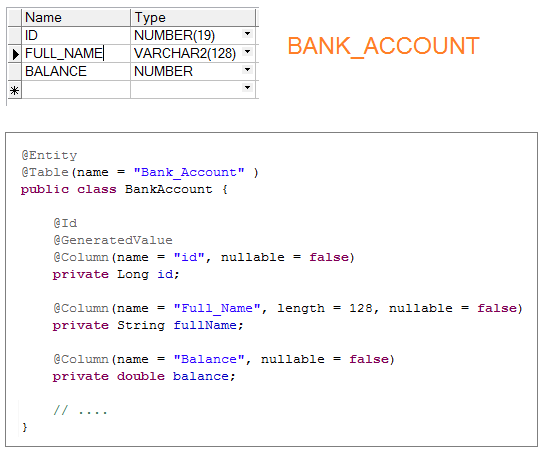
Dans JPA (Ou Hibernate), Entity est une classe représentative (correspondant à) un tableau d'une base de données. Les champs (field) de cette classe répondra aux colonnes du tableau.
Nous allons créer une classe BankAccount qui représente le tableau BANK_ACCOUNT dans la base de données. Les JPA Annotation seront utilisées pour annoter les champs (field) dans le but de décrire le reflet (mapping) entre des champs et les colonnes de tableau. Ces reflet est 1-1, chaque champ correspond à une colonne dans le tableau.
Nous allons créer une classe BankAccount qui représente le tableau BANK_ACCOUNT dans la base de données. Les JPA Annotation seront utilisées pour annoter les champs (field) dans le but de décrire le reflet (mapping) entre des champs et les colonnes de tableau. Ces reflet est 1-1, chaque champ correspond à une colonne dans le tableau.
BankAccount.java
package org.o7planning.springbootjpa.entity;

import javax.persistence.Column;
import javax.persistence.Entity;
import javax.persistence.GeneratedValue;
import javax.persistence.Id;
import javax.persistence.Table;

@Entity
@Table(name = "Bank_Account" )
public class BankAccount {

    @Id
    @GeneratedValue
    @Column(name = "id", nullable = false)
    private Long id;

    @Column(name = "Full_Name", length = 128, nullable = false)
    private String fullName;

    @Column(name = "Balance", nullable = false)
    private double balance;

    public Long getId() {
        return id;
    }

    public void setId(Long id) {
        this.id = id;
    }

    public String getFullName() {
        return fullName;
    }

    public void setFullName(String fullName) {
        this.fullName = fullName;
    }

    public double getBalance() {
        return balance;
    }

    public void setBalance(double balance) {
        this.balance = balance;
    }
}
Alors qu'une classe Entity représente aux données d'un enregistrement (record) d'un tableau, une classe Model représente aux données d'un enregistrement d'une instruction de requête (jointes à partir d'une ou de plusieurs tables). Vous utilisez la classe Model si vous vous intéressez à certaines colonnes d'une ou de plusieurs tables.
BankAccountInfo.java
package org.o7planning.springbootjpa.model;

public class BankAccountInfo {

   private Long id;
   private String fullName;
   private double balance;

   public BankAccountInfo() {

   }

   // Used in JPA query.
   public BankAccountInfo(Long id, String fullName, double balance) {
      this.id = id;
      this.fullName = fullName;
      this.balance = balance;
   }

   public Long getId() {
      return id;
   }

   public void setId(Long id) {
      this.id = id;
   }

   public String getFullName() {
      return fullName;
   }

   public void setFullName(String fullName) {
      this.fullName = fullName;
   }

   public double getBalance() {
      return balance;
   }

   public void setBalance(double balance) {
      this.balance = balance;
   }
}
Afin de travailler avec le JPA traditionnel, tout d'abord vous devez créer d'un objet EntityManager. Avec Spring Boot, tout devient vraiement facile. Il est automatiquement configuré à créer EntityManager et à le gérer comme un Spring BEAN. Dans votre application, vous pouvez utiliser l'objet EntityManager où vous voulez.
BankAccountDAO.java
package org.o7planning.springbootjpa.dao;

import java.util.List;

import javax.persistence.EntityManager;
import javax.persistence.Query;

import org.o7planning.springbootjpa.entity.BankAccount;
import org.o7planning.springbootjpa.exception.BankTransactionException;
import org.o7planning.springbootjpa.model.BankAccountInfo;
import org.springframework.beans.factory.annotation.Autowired;
import org.springframework.stereotype.Repository;
import org.springframework.transaction.annotation.Propagation;
import org.springframework.transaction.annotation.Transactional;

@Repository
public class BankAccountDAO {

	@Autowired
	private EntityManager entityManager;


	public BankAccountDAO() {
	}

	public BankAccount findById(Long id) {
		return this.entityManager.find(BankAccount.class, id);
	}

	public List<BankAccountInfo> listBankAccountInfo() {
		String sql = "Select new " + BankAccountInfo.class.getName() //
				+ "(e.id,e.fullName,e.balance) " //
				+ " from " + BankAccount.class.getName() + " e ";
		Query query = entityManager.createQuery(sql, BankAccountInfo.class);
		return query.getResultList();
	}

	// MANDATORY: Transaction must be created before.
	@Transactional(propagation = Propagation.MANDATORY )
	public void addAmount(Long id, double amount) throws BankTransactionException {
		BankAccount account = this.findById(id);
		if (account == null) {
			throw new BankTransactionException("Account not found " + id);
		}
		double newBalance = account.getBalance() + amount;
		if (account.getBalance() + amount < 0) {
			throw new BankTransactionException(
					"The money in the account '" + id + "' is not enough (" + account.getBalance() + ")");
		}
		account.setBalance(newBalance);
	}

	// Do not catch BankTransactionException in this method.
	@Transactional(propagation = Propagation.REQUIRES_NEW,
			            rollbackFor = BankTransactionException.class)
	public void sendMoney(Long fromAccountId, Long toAccountId, double amount) throws BankTransactionException {

		addAmount(toAccountId, amount);
		addAmount(fromAccountId, -amount);
	}

}
BankTransactionException.java
package org.o7planning.springbootjpa.exception;

public class BankTransactionException extends Exception {

    private static final long serialVersionUID = -3128681006635769411L;

    public BankTransactionException(String message) {
        super(message);
    }

}
SendMoneyForm.java
package org.o7planning.springbootjpa.form;

public class SendMoneyForm {

    private Long fromAccountId;
    private Long toAccountId;
    private Double amount;

    public SendMoneyForm() {

    }

    public SendMoneyForm(Long fromAccountId, Long toAccountId, Double amount) {
        this.fromAccountId = fromAccountId;
        this.toAccountId = toAccountId;
        this.amount = amount;
    }

    public Long getFromAccountId() {
        return fromAccountId;
    }

    public void setFromAccountId(Long fromAccountId) {
        this.fromAccountId = fromAccountId;
    }

    public Long getToAccountId() {
        return toAccountId;
    }

    public void setToAccountId(Long toAccountId) {
        this.toAccountId = toAccountId;
    }

    public Double getAmount() {
        return amount;
    }

    public void setAmount(Double amount) {
        this.amount = amount;
    }
}
Expliquer du mécanisme d'opération de Spring Transaction:

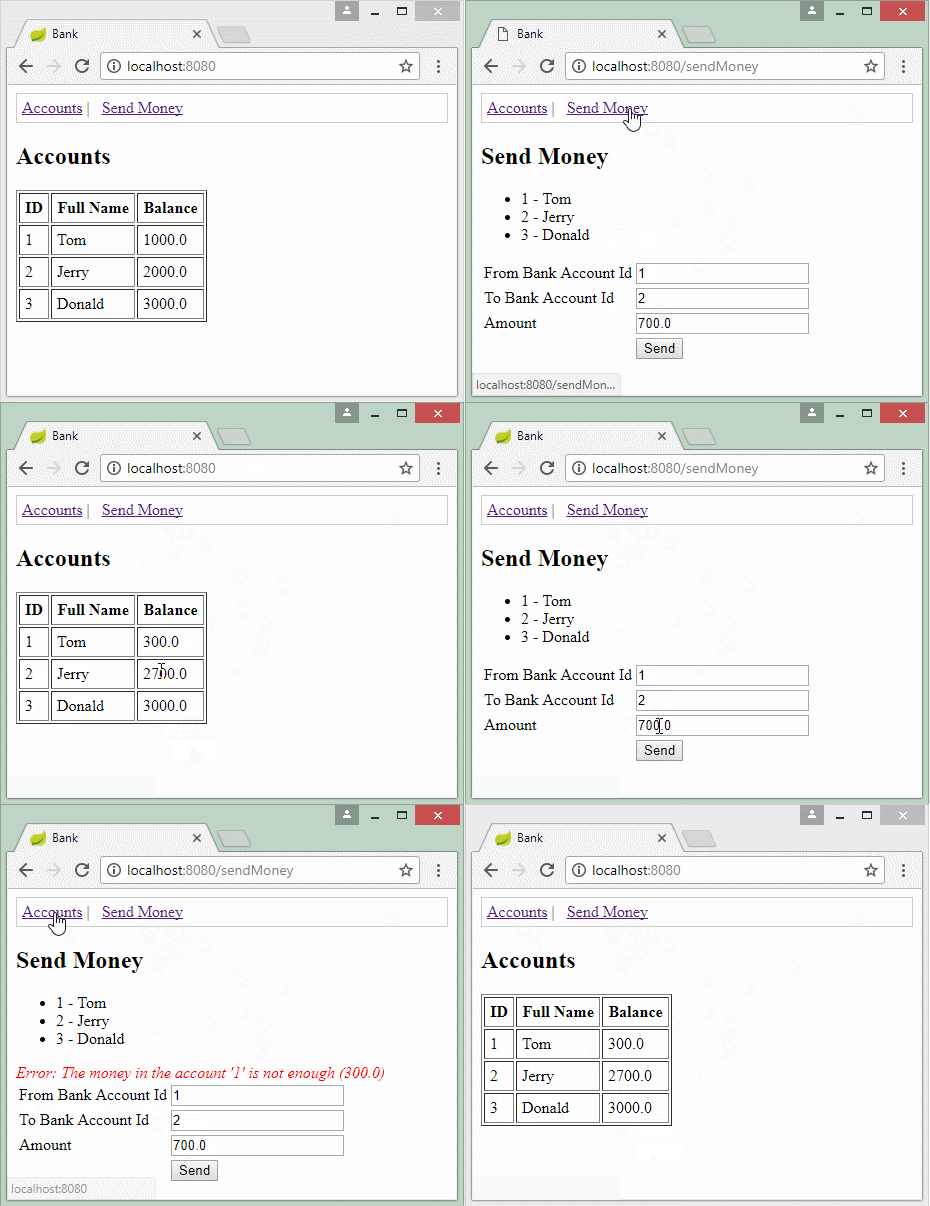
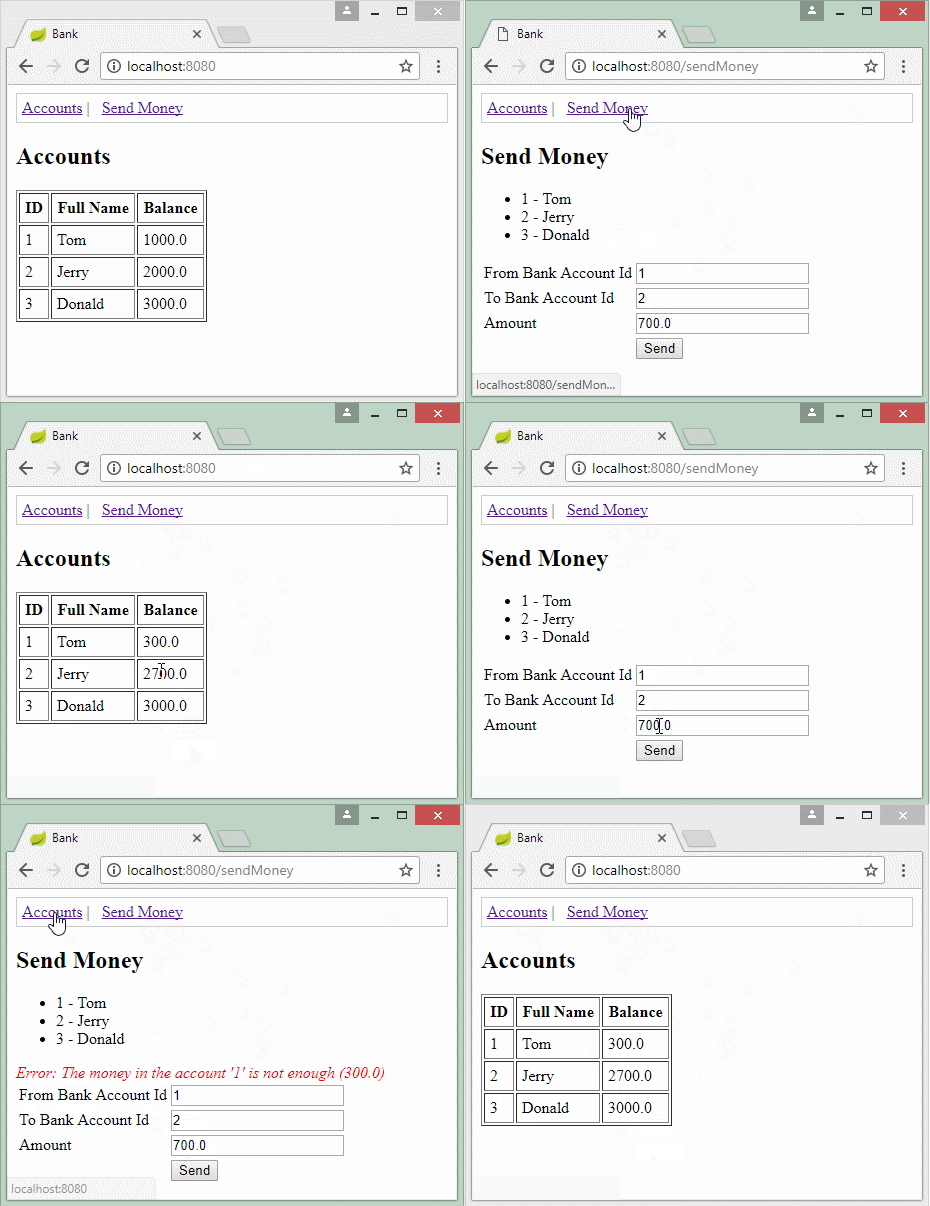
Dans cet exemple, je stimule une transaction bancaire. Un compte A envoie à un compte B une somme de 700$. Donc, ces deux actions seront créées dans la base de données :
- Ajoutez 700$ au compte B.
- Soumettez 700$ du compte A.
Si la première action réussit (l'ajout de 700 $ au compte B), mais que la deuxième action échoue pour certaine raison, la banque subira un dommage.
Par conséquent, il doit gérer la transaction (Transaction) pour s'assurer que si une action échoue, les données restaurent l'état d'origine (avant la transaction). La transaction est considérée comme réussie lorsque toutes les actions sont réussies.
Par conséquent, il doit gérer la transaction (Transaction) pour s'assurer que si une action échoue, les données restaurent l'état d'origine (avant la transaction). La transaction est considérée comme réussie lorsque toutes les actions sont réussies.
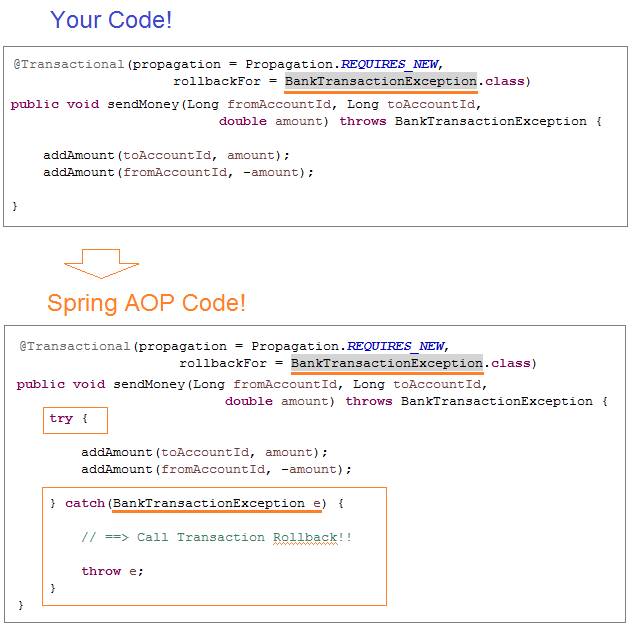
Utilisez @Transactional(rollbackFor = BankTransactionException.class) à annoter (annotate) sur une méthode afin de dire à "Spring Transaction" qu "Appliquons l'AOP à cette méthode".
@Transactional(propagation = Propagation.REQUIRES_NEW,
                         rollbackFor = BankTransactionException.class)
public void sendMoney(Long fromAccountId, Long toAccountId,
                       double amount) throws BankTransactionException {

    addAmount(toAccountId, amount);
    addAmount(fromAccountId, -amount);
}
Spring Transaction applique Spring AOP à votre méthode, ce qui est comme le changement le code de la méthode, l'ajout l'extrait du code pour attraper les exception et l'appel Rollback lorsque l'excption se produit, puis relancer (rethrow) l'exception hors de la méthode. Tous sont les mêmes que l'illustration ci-dessous :
7. Controller
MainController.java
package org.o7planning.springbootjpa.controller;

import java.util.List;

import org.o7planning.springbootjpa.dao.BankAccountDAO;
import org.o7planning.springbootjpa.exception.BankTransactionException;
import org.o7planning.springbootjpa.form.SendMoneyForm;
import org.o7planning.springbootjpa.model.BankAccountInfo;
import org.springframework.beans.factory.annotation.Autowired;
import org.springframework.stereotype.Controller;
import org.springframework.ui.Model;
import org.springframework.web.bind.annotation.RequestMapping;
import org.springframework.web.bind.annotation.RequestMethod;

@Controller
public class MainController {

    @Autowired
    private BankAccountDAO bankAccountDAO;

    @RequestMapping(value = "/", method = RequestMethod.GET)
    public String showBankAccounts(Model model) {
        List<BankAccountInfo> list = bankAccountDAO.listBankAccountInfo();

        model.addAttribute("accountInfos", list);

        return "accountsPage";
    }

    @RequestMapping(value = "/sendMoney", method = RequestMethod.GET)
    public String viewSendMoneyPage(Model model) {

        SendMoneyForm form = new SendMoneyForm(1L, 2L, 700d);

        model.addAttribute("sendMoneyForm", form);

        return "sendMoneyPage";
    }


    @RequestMapping(value = "/sendMoney", method = RequestMethod.POST)
    public String processSendMoney(Model model, SendMoneyForm sendMoneyForm) {

        System.out.println("Send Money: " + sendMoneyForm.getAmount());

        try {
            bankAccountDAO.sendMoney(sendMoneyForm.getFromAccountId(), //
                    sendMoneyForm.getToAccountId(), //
                    sendMoneyForm.getAmount());
        } catch (BankTransactionException e) {
            model.addAttribute("errorMessage", "Error: " + e.getMessage());
            return "/sendMoneyPage";
        }
        return "redirect:/";
    }

}
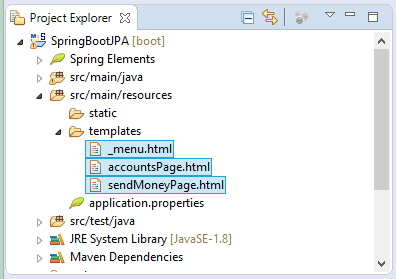
8. Thymeleaf Template
_menu.html
<div xmlns:th="http://www.thymeleaf.org"
style="border: 1px solid #ccc;padding:5px;margin-bottom:20px;">
<a th:href="@{/}">Accounts</a>
|
<a th:href="@{/sendMoney}">Send Money</a>
</div>accountsPage.html
<!DOCTYPE HTML>
<html xmlns:th="http://www.thymeleaf.org">
<head>
<title>Bank</title>

<style>
th, td {
    padding: 5px;
}
</style>

</head>

<body>
    <!-- Include _menu.html -->
    <th:block th:include="/_menu"></th:block>

    <h2>Accounts</h2>

    <table border="1">
        <tr>
            <th>ID</th>
            <th>Full Name</th>
            <th>Balance</th>
        </tr>
        <tr th:each="accountInfo : ${accountInfos}">
            <td th:utext="${accountInfo.id}">..</td>
            <td th:utext="${accountInfo.fullName}">..</td>
            <td th:utext="${accountInfo.balance}">..</td>
        </tr>

    </table>
</body>
</html>
sendMoneyPage.html
<!DOCTYPE HTML>
<html xmlns:th="http://www.thymeleaf.org">
<head>
<title>Bank</title>
</head>
<body>
<!-- Include _menu.html -->
<th:block th:include="/_menu"></th:block>
<h2>Send Money</h2>
<ul>
<li>1 - Tom</li>
<li>2 - Jerry</li>
<li>3 - Donald</li>
</ul>
<div th:if="${errorMessage!=null}"
style="color:red;font-style:italic" th:utext="${errorMessage}">..</div>
<form th:action="@{/sendMoney}" th:object="${sendMoneyForm}" method="POST">
<table>
<tr>
<td>From Bank Account Id</td>
<td><input type="text" th:field="*{fromAccountId}"/></td>
</tr>
<tr>
<td>To Bank Account Id</td>
<td><input type="text" th:field="*{toAccountId}"/></td>
</tr>
<tr>
<td>Amount</td>
<td><input type="text" th:field="*{amount}" /></td>
</tr>
<tr>
<td> </td>
<td><input type="submit" value="Send"/></td>
</tr>
</table>
</form>
</body>
</html>Tutoriels Spring Boot
- Installer Spring Tool Suite pour Eclipse
- Le Tutoriel de Spring pour débutant
- Le Tutoriel de Spring Boot pour débutant
- Propriétés communes de Spring Boot
- Le Tutoriel de Spring Boot et Thymeleaf
- Le Tutoriel de Spring Boot et FreeMarker
- Le Tutoriel de Spring Boot et Groovy
- Le Tutoriel de Spring Boot et Mustache
- Le Tutoriel de Spring Boot et JSP
- Le Tutoriel de Spring Boot, Apache Tiles, JSP
- Utiliser Logging dans Spring Boot
- Surveillance des applications avec Spring Boot Actuator
- Créer une application Web multilingue avec Spring Boot
- Utiliser plusieurs ViewResolvers dans Spring Boot
- Utiliser Twitter Bootstrap dans Spring Boot
- Le Tutoriel de Spring Boot Interceptor
- Le Tutoriel de Spring Boot, Spring JDBC et Spring Transaction
- Le Tutoriel de Spring JDBC
- Le Tutoriel de Spring Boot, JPA et Spring Transaction
- Le Tutoriel de Spring Boot et Spring Data JPA
- Le Tutoriel de Spring Boot, Hibernate et Spring Transaction
- Intégration de Spring Spring, JPA et H2 Database
- Le Tutoriel de Spring Boot et MongoDB
- Utiliser plusieurs DataSources avec Spring Boot et JPA
- Utiliser plusieurs DataSources avec Spring Boot et RoutingDataSource
- Créer une application de connexion avec Spring Boot, Spring Security, Spring JDBC
- Créer une application de connexion avec Spring Boot, Spring Security, JPA
- Créer une application d'enregistrement d'utilisateur avec Spring Boot, Spring Form Validation
- Exemple de OAuth2 Social Login dans Spring Boot
- Exécuter des tâches planifiées en arrière-plan dans Spring
- Exemple CRUD Restful WebService avec Spring Boot
- Exemple Spring Boot Restful Client avec RestTemplate
- Exemple CRUD avec Spring Boot, REST et AngularJS
- Sécurité Spring RESTful Service utilisant Basic Authentication
- Sécuriser Spring Boot RESTful Service en utilisant Auth0 JWT
- Exemple Upload file avec Spring Boot
- Le exemple de Download file avec Spring Boot
- Le exemple de Upload file avec Spring Boot et jQuery Ajax
- Le exemple de Upload file avec Spring Boot et AngularJS
- Créer une application Web Panier avec Spring Boot, Hibernate
- Le Tutoriel de Spring Email
- Créer une application Chat simple avec Spring Boot et Websocket
- Déployer le application Spring Boot sur Tomcat Server
- Déployer le application Spring Boot sur Oracle WebLogic Server
- Installer un certificat SSL gratuit Let's Encrypt pour Spring Boot
- Configurer Spring Boot pour rediriger HTTP vers HTTPS
Show More
