Le Tutoriel de Java SWT RowLayout
1. SWT RowLayout
RowLayout détermine la taille et la position des enfants d'un Composite en les plaçant soit en lignes horizontales, soit en colonnes verticales dans Composite parent.
RowLayout horizontal:
RowLayout horizontal permet de mettre les composants enfants sur une ligne, et il peut envelopper (wrap) ces composants enfants dans la ligne ci-dessous si la ligne actuelle n'a pas assez d'espace.
// Create horizontal RowLayout

RowLayout rowLayout = new RowLayout();

// Or
RowLayout rowLayout = new RowLayout(SWT.HORIZONTAL);
RowLayout vertical:
RowLayout vertical arrange les composants enfants sur une même colonne, et il poussera ces composants enfants à la colonne suivante si la colonne actuelle n'est pas assez d'espace.
// Create Vertical RowLayout

RowLayout rowLayout = new RowLayout(SWT.VERTICAL);
En outre, la hauteur et la largeur de chaque contrôle dans un RowLayout peuvent être spécifiées en définissant un objet RowData dans le contrôle à l'aide de setLayoutData().
RowData rowData= new RowData();

rowData.height=80;
rowData.width=110;

button2.setLayoutData(rowData);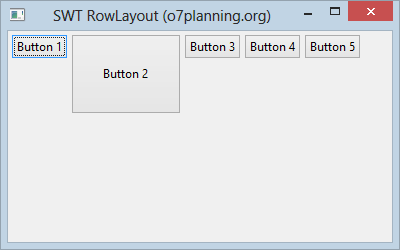
2. Les propriétés de RowLayout
RowLayout rowLayout = new RowLayout();
rowLayout.wrap = false;
rowLayout.pack = false;
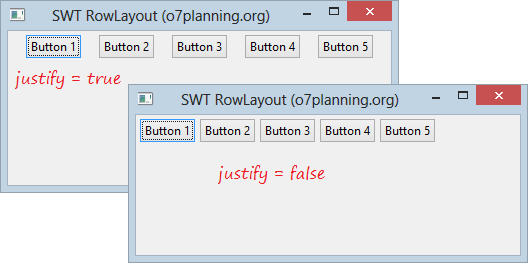
rowLayout.justify = true;
rowLayout.type = SWT.VERTICAL;
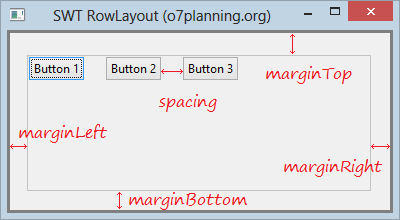
rowLayout.marginLeft = 5;
rowLayout.marginTop = 5;
rowLayout.marginRight = 5;
rowLayout.marginBottom = 5;
rowLayout.spacing = 0;
parent.setLayout(rowLayout);La propriété wrap de RowLayout spécifie si un contrôle sera enroulé sur la ligne suivante s'il n'y a pas assez d'espace sur la ligne en cours.
- rowLayout.wrap = false;
- rowLayout.justify = true;
- margin & spacing
3. Exemple avec RowLayout
HorizontalRowLayoutDemo.java
package org.o7planning.swt.rowlayout;

import org.eclipse.swt.SWT;
import org.eclipse.swt.layout.RowData;
import org.eclipse.swt.layout.RowLayout;
import org.eclipse.swt.widgets.Button;
import org.eclipse.swt.widgets.Display;
import org.eclipse.swt.widgets.Shell;

public class HorizontalRowLayoutDemo {

   public static void main(String[] args) {

       Display display = new Display();
       Shell shell = new Shell(display);
       shell.setText("SWT RowLayout (o7planning.org)");

       //  Create a Horizontal RowLayout.
       RowLayout rowLayout = new RowLayout(SWT.HORIZONTAL);
       rowLayout.marginLeft = 10;
       rowLayout.marginTop = 15;
       rowLayout.marginRight = 15;
       rowLayout.marginBottom = 25;
       rowLayout.spacing = 5;

       shell.setLayout(rowLayout);

       // Button 1
       Button button1 = new Button(shell, SWT.NONE);
       button1.setText("Button 1");

       // Button 2
       Button button2 = new Button(shell, SWT.NONE);
       button2.setText("Button 2");

       RowData rowData = new RowData();
       rowData.height = 70;
       rowData.width = 90;
       button2.setLayoutData(rowData);

       // Button 3
       Button button3 = new Button(shell, SWT.NONE);
       button3.setText("Button 3");

       // Button 4
       Button button4 = new Button(shell, SWT.NONE);
       button4.setText("Button 4");

       // Button 5
       Button button5 = new Button(shell, SWT.NONE);
       button5.setText("Button 5");

       shell.setSize(400, 250);
       shell.open();
       while (!shell.isDisposed()) {
           if (!display.readAndDispatch())
               display.sleep();
       }
       display.dispose();
   }

}
L'exécution de l'exemple:
Tutoriels de programmation Java SWT
- Le Tutoriel de Java SWT FillLayout
- Le Tutoriel de Java SWT RowLayout
- Le Tutorial de Java SWT SashForm
- Le Tutoriel de Java SWT Label
- Le Tutoriel de Java SWT Button
- Le Tutoriel de Java SWT Toggle Button
- Le Tutoriel de Java SWT Radio Button
- Le Tutoriel de Java SWT Text
- Le Tutoriel de Java SWT Password Field
- Le Tutoriel de Java SWT Link
- Programmation de l'application Java Desktop à l'aide de SWT
- Le Tutoriel de Java SWT Combo
- Le Tutoriel de Java SWT Spinner
- Le Tutoriel de Java SWT Slider
- Le Tutoriel de Java SWT Scale
- Le Tutoriel de Java SWT ProgressBar
- Le Tutoriel de Java SWT TabFolder et CTabFolder
- Le Tutoriel de Java SWT List
Show More