Le Tutoriel de Java SWT FillLayout
1. FillLayout
FillLayout est la classe de mise en page (layout) la plus simple. Elle met des contrôles (controls) sur une seule ligne ou une seule colonne afin de les forcer à avoir la même taille.
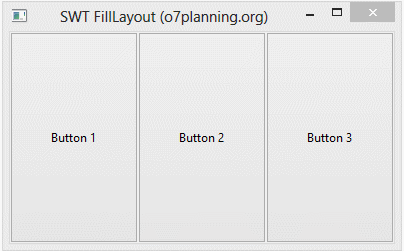
FillLayout horizontal :
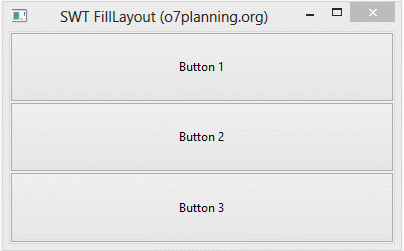
FillLayout vertical :
//  Create a Horizontal FillLayout.
FillLayout fillLayout= new FillLayout(SWT.HORIZONTAL);

// Set Layout for component
component.setLayout(fillLayout);

// Create a Vertical FillLayout.
FillLayout fillLayout= new FillLayout(SWT.VERTICAL);

// Set Layout for component
component.setLayout(fillLayout);
margin & spacing
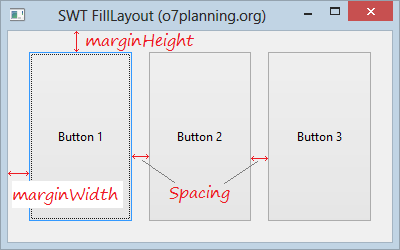
FillLayout fillLayout= new FillLayout(SWT.HORIZONTAL);
fillLayout.marginHeight= 20;
fillLayout.marginWidth= 20;
fillLayout.spacing=15;
2. Exemple de FillLayout
L'exemple de FillLayout horizontal :

HorizontalFillLayoutDemo.java
package org.o7planning.swt.filllayout;

import org.eclipse.swt.SWT;
import org.eclipse.swt.layout.FillLayout;
import org.eclipse.swt.widgets.Button;
import org.eclipse.swt.widgets.Display;
import org.eclipse.swt.widgets.Shell;

public class HorizontalFillLayoutDemo {

  public static void main(String[] args) {
      Display display = new Display();
      Shell shell = new Shell(display);
      shell.setText("SWT FillLayout (o7planning.org)");

      //  Create a Horizontal FillLayout.
      FillLayout fillLayout= new FillLayout(SWT.HORIZONTAL);
      shell.setLayout(fillLayout);

      Button button1=  new Button(shell, SWT.NONE);
      button1.setText("Button 1");

      Button button2=  new Button(shell, SWT.NONE);
      button2.setText("Button 2");

      Button button3=  new Button(shell, SWT.NONE);
      button3.setText("Button 3");

      shell.setSize(400, 250);
      shell.open();
      while (!shell.isDisposed()) {
          if (!display.readAndDispatch())
              display.sleep();
      }
      display.dispose();
  }
}
L'exemple de FillLayout horizotal avec la marge et la distance (margin et spacing) :

HorizontalFillLayoutDemo2.java
package org.o7planning.swt.filllayout;

import org.eclipse.swt.SWT;
import org.eclipse.swt.layout.FillLayout;
import org.eclipse.swt.widgets.Button;
import org.eclipse.swt.widgets.Display;
import org.eclipse.swt.widgets.Shell;

public class HorizontalFillLayoutDemo2 {

    public static void main(String[] args) {
        Display display = new Display();
        Shell shell = new Shell(display);
        shell.setText("SWT FillLayout (o7planning.org)");

        FillLayout fillLayout= new FillLayout(SWT.HORIZONTAL);
        fillLayout.marginHeight= 20;
        fillLayout.marginWidth= 20;
        fillLayout.spacing=15;
        shell.setLayout(fillLayout);
        Button button1=  new Button(shell, SWT.NONE);
        button1.setText("Button 1");

        Button button2=  new Button(shell, SWT.NONE);
        button2.setText("Button 2");

        Button button3=  new Button(shell, SWT.NONE);
        button3.setText("Button 3");

        shell.setSize(400, 250);
        shell.open();
        while (!shell.isDisposed()) {
            if (!display.readAndDispatch())
                display.sleep();
        }
        display.dispose();
    }
}
Tutoriels de programmation Java SWT
- Le Tutoriel de Java SWT FillLayout
- Le Tutoriel de Java SWT RowLayout
- Le Tutorial de Java SWT SashForm
- Le Tutoriel de Java SWT Label
- Le Tutoriel de Java SWT Button
- Le Tutoriel de Java SWT Toggle Button
- Le Tutoriel de Java SWT Radio Button
- Le Tutoriel de Java SWT Text
- Le Tutoriel de Java SWT Password Field
- Le Tutoriel de Java SWT Link
- Programmation de l'application Java Desktop à l'aide de SWT
- Le Tutoriel de Java SWT Combo
- Le Tutoriel de Java SWT Spinner
- Le Tutoriel de Java SWT Slider
- Le Tutoriel de Java SWT Scale
- Le Tutoriel de Java SWT ProgressBar
- Le Tutoriel de Java SWT TabFolder et CTabFolder
- Le Tutoriel de Java SWT List
Show More