Tutoriel de programmation multithread C#
1. Le concept du multithreading
Multithreading est un concept important dans les langages de programmation et C# aussi, ce qui est créé le flux du programme en cours d'exécution parallèlement les uns aux autres. Pour dire plus simplement, voyez un exemple suivant :
HelloThread.cs
using System;
using System.Collections.Generic;
using System.Linq;
using System.Text;
using System.Threading.Tasks;
using System.Threading;
namespace MultithreadingTutorial
{
class HelloThread
{
public static void Main(string[] args)
{
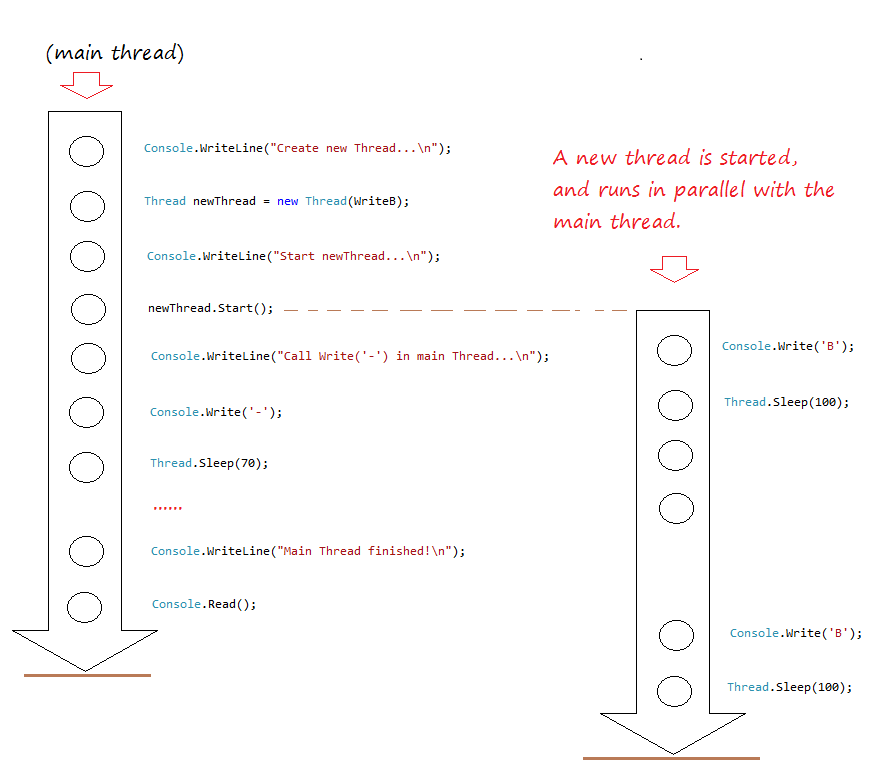
Console.WriteLine("Create new Thread...\n");
// Crée un Thread enfant, qui s'exécute en parallèle avec le Thread principal.
Thread newThread = new Thread(WriteB);
Console.WriteLine("Start newThread...\n");
// Activer l'exécution newThread.
newThread.Start();
Console.WriteLine("Call Write('-') in main Thread...\n");
// Dans le thread principal, imprimez le caractère '-'
for (int i = 0; i < 50; i++)
{
Console.Write('-');
// Dormez (sleep) 70 millisecondes.
Thread.Sleep(70);
}
Console.WriteLine("Main Thread finished!\n");
Console.Read();
}
public static void WriteB()
{
// Imprimez le caractère "B" 100 fois
//
for (int i = 0; i < 100; i++)
{
Console.Write('B');
// Dormez 100 millisecondes
Thread.Sleep(100);
}
}
}
}Et vous exécutez cette classe :
Le principe de fonctionnement du flux (Thread) a uniquement expliqué dans l'illustration ci-dessous :
2. Passer des paramètres au Thread
Avec les étapes ci-dessus, vous vous êtes habitués avec l'exemple HelloThread. Vous avez créé un objet enveloppé (wrap) une méthode statique pour exécuter cette méthode en parallèle au flux (Thread) père.
La méthode statique peut devenir un paramètre transmis au constructeur de la classe Thread si la méthode n'a pas de paramètre, ou avoir un seul paramètre de type object.
// Une méthode statique, sans paramètre.
//
public static void LetGo()
{
// ...
}
// Une méthode statique, n'a qu'un seul type de paramètre objet.
public static void GetGo(object value)
{
// ...
}L'exemple suivant, je vais créer un Thread qui enveloppe une méthode statique avec un paramètre (object type). Exécutez thread et tranmettez la valeur au paramètre.
MyWork.cs
using System;
using System.Collections.Generic;
using System.Linq;
using System.Text;
using System.Threading.Tasks;
using System.Threading;

namespace MultithreadingTutorial
{
    class MyWork
    {
        public static void DoWork(object ch)
        {
            for (int i = 0; i < 100; i++)
            {
                Console.Write(ch);
                // Domez (sleep) 50 milliseconds.
                Thread.Sleep(50);
            }
        }
    }
}
ThreadParamDemo.cs
using System;
using System.Collections.Generic;
using System.Linq;
using System.Text;
using System.Threading.Tasks;
using System.Threading;

namespace MultithreadingTutorial
{
    class ThreadParamDemo
    {
        public static void Main(string[] args)
        {
            Console.WriteLine("Create new thread.. \n");

            // Créez un objet Thread pour envelopper (wrap) la méthode statique MyWork.DoWork
            Thread workThread = new Thread(MyWork.DoWork);
            Console.WriteLine("Start workThread...\n");

            // Exécutez workThread,
            // et transmettre le paramètre à la méthode MyWork.DoWork.
            workThread.Start("*");

            for (int i = 0; i < 20; i++)
            {
                Console.Write(".");
                // Dormez 30 milliseconds.
                Thread.Sleep(30);
            }
            Console.WriteLine("MainThread ends");
            Console.Read();
        }
    }
}
Exécutez la classe ThreadParamDemo :
3. Thread utilise une méthode non statique
Vous pouvez également créer un flux (Thread) en utilisant des méthodes non statiques. Voyez l'exemple :
Worker.cs
using System;
using System.Collections.Generic;
using System.Linq;
using System.Text;
using System.Threading.Tasks;
using System.Threading;
namespace MultithreadingTutorial
{
    class Worker
    {
        private string name;
        private int loop;
        public Worker(string name, int loop)
        {
            this.name = name;
            this.loop = loop;
        }
        public void DoWork(object value)
        {
            for (int i = 0; i < loop; i++)
            {
                Console.WriteLine(name + " working " + value);
                Thread.Sleep(50);
            }
        }
    }
}
WorkerTest.cs
using System;
using System.Collections.Generic;
using System.Linq;
using System.Text;
using System.Threading.Tasks;
using System.Threading;

namespace MultithreadingTutorial
{
    class WorkerTest
    {
        public static void Main(string[] args)
        {
            Worker w1 = new Worker("Tom",10);

            // Create a Thread object.
            Thread workerThread1 = new Thread(w1.DoWork);

            // Pass parameter to DoWork method.
            workerThread1.Start("A");

            Worker w2 = new Worker("Jerry",15);

            // Create a Thread object.
            Thread workerThread2 = new Thread(w2.DoWork);

            // Pass parameter to DoWork method.
            workerThread2.Start("B");
            Console.Read();
        }
    }
}
Exécutez l'exemple :
Tom working A
Jerry working B
Jerry working B
Tom working A
Tom working A
Jerry working B
Tom working A
Jerry working B
Tom working A
Jerry working B
Tom working A
Jerry working B
Tom working A
Jerry working B
Jerry working B
Tom working A
Tom working A
Jerry working B
Jerry working B
Tom working A
Jerry working B
Jerry working B
Jerry working B
Jerry working B
Jerry working B
4. ThreadStart Delegate
ThreadStart une classe déléguée (Delegate), il est initié par envelopant une méthode. Et il est transmis en tant que paramètre pour initialiser l'objet Thread.
Avec .Net <2.0, pour démarrer (start) à un flux (Thread), vous devez créer ThreadStart, il est un délégué.
À partir de la version 2.0 du .NET Framework, ce n'est pas nécessaire de créer un objet accrédité (ThreadStart) explicitement. Vous devez simplememt spécifier le nom de la méthode dans le constructeur du Thread.
Programmer.cs
using System;
using System.Collections.Generic;
using System.Linq;
using System.Text;
using System.Threading.Tasks;
using System.Threading;

namespace MultithreadingTutorial
{
    class Programmer
    {
        private string name;
        public Programmer(string name)
        {
            this.name= name;
        }
        // C'est une méthode non statique, pas de paramètres.
        public void DoCode()
        {
            for (int i = 0; i < 5; i++)
            {
                Console.WriteLine(name + " coding ... ");
                Thread.Sleep(50);
            }
        }
    }
}
ThreadStartDemo.cs
using System;
using System.Collections.Generic;
using System.Linq;
using System.Text;
using System.Threading.Tasks;
using System.Threading;


namespace MultithreadingTutorial
{
    class ThreadStartDemo
    {
        public static void Main(string[] args)
        {
            // Créez un objet ThreadStart qui enveloppe une méthode statique.
            // (il peut seulement envelopper les méthodes sans paramètres)
            // (Il est qu'un objet qui est autorisé à exécuter la méthode).
            ThreadStart threadStart1 = new ThreadStart(DoWork);

            // Créez un thread enveloppant (wrap) threadStart1.
            Thread workThread = new Thread(threadStart1);

            // Appelez start thread
            workThread.Start();

            // Créez un objet  Programmer.
            Programmer tran = new Programmer("Tran");

            // Vous pouvez également créer un objet ThreadStart qui enveloppe une méthode non statique.
            // (ThreadStart ne peut que couvrir les méthodes sans paramètres)
            ThreadStart threadStart2 = new ThreadStart(tran.DoCode);

            // Créez  Thread qui enveloppe  threadStart2.
            Thread progThread = new Thread(threadStart2);
            progThread.Start();

            Console.WriteLine("Main thread ends");
            Console.Read();
        }
        public static void DoWork()
        {
            for (int i = 0; i < 10; i++)
            {
                Console.Write("*");
                Thread.Sleep(100);
            }
        }
    }
}
Exécutez l'exemple :
Main thread ends
*Tran coding ...
Tran coding ...
Tran coding ...
*Tran coding ...
*Tran coding ...
*******
5. Thread avec un code anonyme
Au-dessus, vous avez créé Thread en utilisant une méthode spécifique. Vous pouvez créer un thread pour exécuter un extrait de code.
//
// Utilisez delegate () pour créer une méthode anonyme.
delegate()
{
// ...
}Exemple :
ThreadUsingSnippetCode.cs
using System;
using System.Collections.Generic;
using System.Linq;
using System.Text;
using System.Threading.Tasks;
using System.Threading;

namespace MultithreadingTutorial
{
    class ThreadUsingSnippetCode
    {
        public static void Main(string[] args)
        {
            Console.WriteLine("Create thread 1");
            // Créez un thread pour exécuter un extrait de code.
            Thread newThread1 = new Thread(
                delegate()
                {
                    for (int i = 0; i < 10; i++)
                    {
                        Console.WriteLine("Code in delegate() " + i);
                        Thread.Sleep(50);
                    }
                }
            );
            Console.WriteLine("Start newThread1");
            // Start thread.
            newThread1.Start();
            Console.WriteLine("Create thread 2");

            // Créez un thread pour exécuter un extrait de code.
            Thread newThread2 = new Thread(
                delegate(object value)
                {
                    for (int i = 0; i < 10; i++)
                    {
                        Console.WriteLine("Code in delegate(object) " + i + " - " + value);
                        Thread.Sleep(100);
                    }
                }
            );
            Console.WriteLine("Start newThread2");

            // Démarrez thread 2.
            // Transmettez la valeur à delegate().
            newThread2.Start("!!!");
            Console.WriteLine("Main thread ends");
            Console.Read();
        }
    }
}
Exécutez l'exemple :
Create thread 1
Start newThread1
Create thread 2
Start newThread2
Main thread ends
Code in delegate() 0
Code in delegate(object) 0 - !!!
Code in delegate() 1
Code in delegate() 2
Code in delegate(object) 1 - !!!
Code in delegate() 3
Code in delegate(object) 2 - !!!
Code in delegate() 4
Code in delegate() 5
Code in delegate(object) 3 - !!!
Code in delegate() 6
Code in delegate() 7
Code in delegate(object) 4 - !!!
Code in delegate() 8
Code in delegate() 9
Code in delegate(object) 5 - !!!
Code in delegate(object) 6 - !!!
Code in delegate(object) 7 - !!!
Code in delegate(object) 8 - !!!
Code in delegate(object) 9 - !!!
6. Nomer le Thread
Dans la programmation multithread, vous pouvez nommer au flux (thread), il est vraiment utile en cas de débogage (debugging), pour savoir le code qui est exécuté dans le thread.
Dans un thread, vous pouvez appeler Thread.CurrentThread.Name pour récupérer le nom du flux est exécuté à ce moment-là.
Voyez l'exemple d'illustration :
Dans un thread, vous pouvez appeler Thread.CurrentThread.Name pour récupérer le nom du flux est exécuté à ce moment-là.
Voyez l'exemple d'illustration :
NamingThreadDemo.cs
using System;
using System.Collections.Generic;
using System.Linq;
using System.Text;
using System.Threading.Tasks;
using System.Threading;

namespace MultithreadingTutorial
{
    class NamingThreadDemo
    {
        public static void Main(string[] args)
        {
            // Nommez le thread actuel
            // (En tant que thread principal).
            Thread.CurrentThread.Name = "Main";
            Console.WriteLine("Code of "+ Thread.CurrentThread.Name);
            Console.WriteLine("Create new thread");

            // Créez un  thread.
            Thread letgoThread = new Thread(LetGo);

            // Nommez ce thread.
            letgoThread.Name = "Let's Go";
            letgoThread.Start();

            for (int i = 0; i < 5; i++)
            {
                Console.WriteLine("Code of " + Thread.CurrentThread.Name);
                Thread.Sleep(30);
            }
            Console.Read();
        }
        public static void LetGo()
        {
            for (int i = 0; i < 10; i++)
            {
                Console.WriteLine("Code of " + Thread.CurrentThread.Name);
                Thread.Sleep(50);
            }
        }
    }
}
Exécutez l'exemple :
Code of Main
Create new thread
Code of Main
Code of Let's Go
Code of Main
Code of Let's Go
Code of Main
Code of Main
Code of Main
Code of Let's Go
Code of Let's Go
Code of Let's Go
Code of Let's Go
Code of Let's Go
Code of Let's Go
Code of Let's Go
Code of Let's Go
7. Priorité entre Threads
Dans C# il y a 5 niveaux de priorité d'un flux, ils sont définis dans enum ThreadPriority.
** ThreadPriority enum **
enum ThreadPriority {
Lowest,
BelowNormal,
Normal,
AboveNormal,
Highest
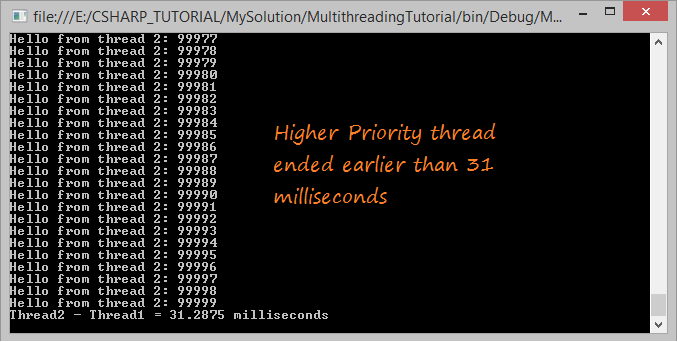
}Habituellement avec des ordinateurs de haute vitesse, si le thread n'effectue que peu de travail, il est très difficile de détecter la différence entre les threads de haute priorité et les threads de faible priorité.
L'exemple ci-dessous a deux flux, chacun imprime le texte de 100k lignes (un nombre assez grand de voir la différence).
L'exemple ci-dessous a deux flux, chacun imprime le texte de 100k lignes (un nombre assez grand de voir la différence).
ThreadPriorityDemo.cs
using System;
using System.Collections.Generic;
using System.Linq;
using System.Text;
using System.Threading.Tasks;
using System.Threading;
namespace MultithreadingTutorial
{
class ThreadPriorityDemo
{
private static DateTime endsDateTime1;
private static DateTime endsDateTime2;
public static void Main(string[] args)
{
endsDateTime1 = DateTime.Now;
endsDateTime2 = DateTime.Now;
Thread thread1 = new Thread(Hello1);
// Définissez la priorité la plus élevée pour thread1
thread1.Priority = ThreadPriority.Highest;
Thread thread2 = new Thread(Hello2);
// Définissez la priorité la plus basse pour thread2.
thread2.Priority = ThreadPriority.Lowest;
thread2.Start(); thread1.Start();
Console.Read();
}
public static void Hello1()
{
for (int i = 0; i < 100000; i++)
{
Console.WriteLine("Hello from thread 1: "+ i);
}
// Le temps de thread1 se termine.
endsDateTime1 = DateTime.Now;
PrintInterval();
}
public static void Hello2()
{
for (int i = 0; i < 100000; i++)
{
Console.WriteLine("Hello from thread 2: "+ i);
}
// Le temps de thread2 se termine.
endsDateTime2 = DateTime.Now;
PrintInterval();
}
private static void PrintInterval()
{
//
// Intervalle (Millisecondes)
TimeSpan interval = endsDateTime2 - endsDateTime1;
Console.WriteLine("Thread2 - Thread1 = " + interval.TotalMilliseconds + " milliseconds");
}
}
}Exécutez l'exemple :
8. Utilisation de Join()
Thread.Join() est une méthode notifiant que s'il vous plaît attendez que ce thread soit terminé avant que le thread parent continue à s'exécuter.
ThreadJoinDemo.cs
using System;
using System.Collections.Generic;
using System.Linq;
using System.Text;
using System.Threading.Tasks;
using System.Threading;


namespace MultithreadingTutorial
{
    class ThreadJoinDemo
    {
        public static void Main(string[] args)
        {
            Console.WriteLine("Create new thread");
            Thread letgoThread = new Thread(LetGo);

            // Commencer Thread (start thread).
            letgoThread.Start();

            // Dites au thread principal (voici main principal)
            // Attendez que letgoThread finisse, puis continuez à fonctionner.
            letgoThread.Join();

            // Cette ligne de code doit attendre letgoThread terminé, puis exécutez.
            Console.WriteLine("Main thread ends");
            Console.Read();
        }
        public static void LetGo()
        {
            for (int i = 0; i < 15; i++)
            {
                Console.WriteLine("Let's Go " + i);
            }
        }
    }
}
Exécutez l'exemple :
Create new thread
Let's Go 0
Let's Go 1
Let's Go 2
Let's Go 3
Let's Go 4
Let's Go 5
Let's Go 6
Let's Go 7
Let's Go 8
Let's Go 9
Let's Go 10
Let's Go 11
Let's Go 12
Let's Go 13
Let's Go 14
Main thread ends
9. Utilisation de Yield()
En théorie, le "Yield" signifie donner, abandonner, se rendre. Un flux de Yield indique le système d'exploitation qu'il est disponible à laisser l'autre thread arranger sa place. Cela montre qu'il ne fait pas quelque chose de trop important. Notez qu'il est simplement une suggestion et il garantit qu'il n'est pas efficace à tous.
Donc la méthode deYield() est utilisée lorsque vous vous trouvez que ce thread qui est libre, il n'a rien d'important à faire, il demande au système d'exploitation temporaire de donner la priorité à d'autres flux.
L'exemple ci-dessous, il y a deux flux, chaque flux imprime sur un ligne de texte 100k fois (le nombre assez grand pour voir la différence). Un flux est à la plus haute priorité et un autre flux est à la priorité la plus basse. Calculez l'intervalle de temps de deux flux.
ThreadYieldDemo.cs
using System;
using System.Collections.Generic;
using System.Linq;
using System.Text;
using System.Threading.Tasks;
using System.Threading;

namespace MultithreadingTutorial
{
    class ThreadYieldDemo
    {

        private static DateTime importantEndTime;
        private static DateTime unImportantEndTime;

        public static void Main(string[] args)
        {
            importantEndTime = DateTime.Now;
            unImportantEndTime = DateTime.Now;

            Console.WriteLine("Create thread 1");

            Thread importantThread = new Thread(ImportantWork);

            // Définissez la priorité la plus haute pour ce flux.
            importantThread.Priority = ThreadPriority.Highest;

            Console.WriteLine("Create thread 2");

            Thread unImportantThread = new Thread(UnImportantWork);

            // Définissez la priorité la plus basse pour ce thread..
            unImportantThread.Priority = ThreadPriority.Lowest;

            // Start threads.
            unImportantThread.Start();
            importantThread.Start();


            Console.Read();

        }

        // Un travail important qui nécessite une haute priorité.
        public static void ImportantWork()
        {
            for (int i = 0; i < 100000; i++)
            {
                Console.WriteLine("\n Important work " + i);

                // Annoncez le système d'exploitation
                // ce flux donne la priorité à d'autres flux.
                Thread.Yield();
            }
            // L'heure de fin de ce flux.
            importantEndTime = DateTime.Now;
            PrintTime();
        }

        public static void UnImportantWork()
        {
            for (int i = 0; i < 100000; i++)
            {
                Console.WriteLine("\n  -- UnImportant work " + i);
            }
            // L'heure de fin de ce thread.
            unImportantEndTime = DateTime.Now;
            PrintTime();
        }

        private static void PrintTime()
        {
            // Intervalle (Millisecondes)
            TimeSpan interval = unImportantEndTime - importantEndTime;

            Console.WriteLine("UnImportant Thread - Important Thread = " + interval.TotalMilliseconds +" milliseconds");
        }

    }

}
Exécutez une classe dans le cas où il n'y a aucun Thread.Yield() :

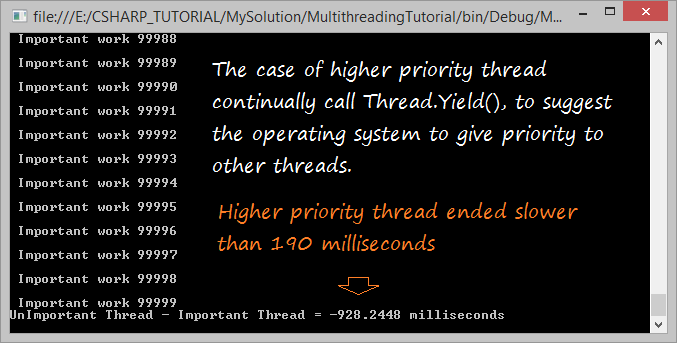
Exécutez la classe au-dessus dans le cas le flux a la plus haute priorité pour appeler continuellement Thread.Yield() afin de demander le système temporaire de donner sa priorité à l'autre flux.
Tutoriels de programmation C#
- Héritage et polymorphisme en C#
- De quoi avez-vous besoin pour démarrer avec C#?
- Apprenez rapidement à développer en C# pour débutant
- Installer Visual Studio 2013 sur Windows
- Classe abstraite et interface dans C#
- Installer Visual Studio 2015 sur Windows
- Compression et décompression dans C#
- Tutoriel de programmation multithread C#
- Tutoriel C# Delegate et Event
- Installer AnkhSVN sur Windows
- Programmation C# pour l'équipe utilisant Visual Studio et SVN
- Installer .Net Framework
- Modificateur d'accès (Access Modifier) en C#
- Le Tutoriel de C# String et de StringBuilder
- Le Tutoriel de C# Properties
- Le Tutoriel de C# Enum
- Le Tutoriel de C# Structure
- Le Tutoriel de C# Generics
- Tutoriel sur la gestion des exceptions C#
- Le Tutoriel de C# Date Time
- Manipulation de fichiers et de répertoires dans C#
- Tutoriel C# Stream - flux binaire en C#
- Le Tutoriel d'expressions régulières C#
- Se Connecter à la base de données SQL Server dans C#
- Travailler avec la base de données SQL Server dans C#
- Connectez-vous à la base de données MySQL dans C#
- Travailler avec la base de données MySQL dans C#
- Connectez-vous à la base de données Oracle dans CSharp sans Oracle Client
- Utilisation d'une base de données Oracle en utilisant C#
Show More