Comprendre Spring Cloud Config Client avec un exemple
1. L'objectif de la leçon
OK, nous sommes dans la serial de instructions de la programmation d'une application distribuée en utilisant Spring Cloud. Une application de gestion de Taxi. Dans la leçon précédente, je vous ai montré comment créer une application Config-Server, qui gère les informations de configuration pour d'autres services (applications).
Voir la leçon précédente :
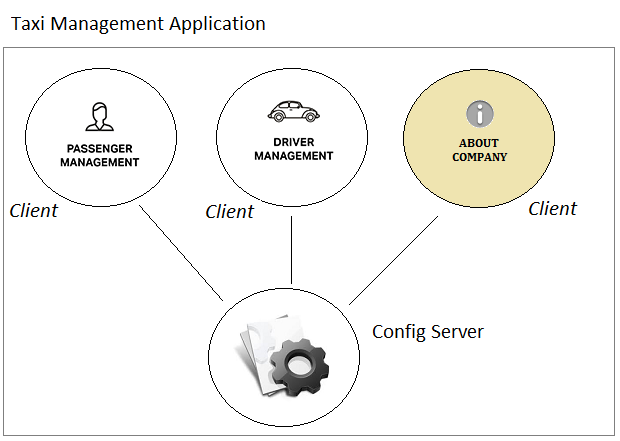
Dans cette leçon, nous allons créer une application "About Company". Il est indépendant des applications "Passenger Management" (Gestion des clients) et "Diver Management" (Gestion des conducteurs). Pour une grande compagnie de Taxi, par exemple, Uber, le nombre d'utilisateurs visitant leur site web est considérable, c'est une bonne idée d'avoir une application pour présenter l'entreprise séparément des autres fonctions.
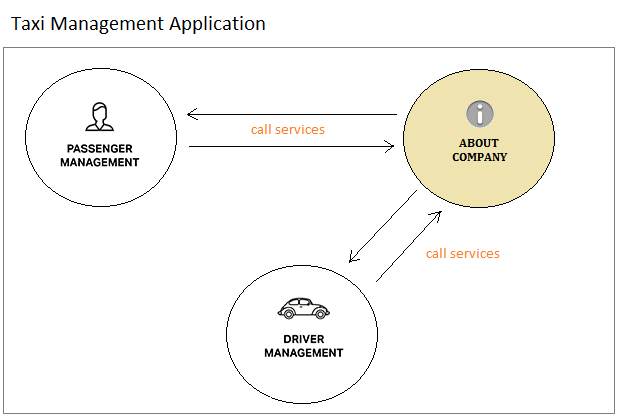
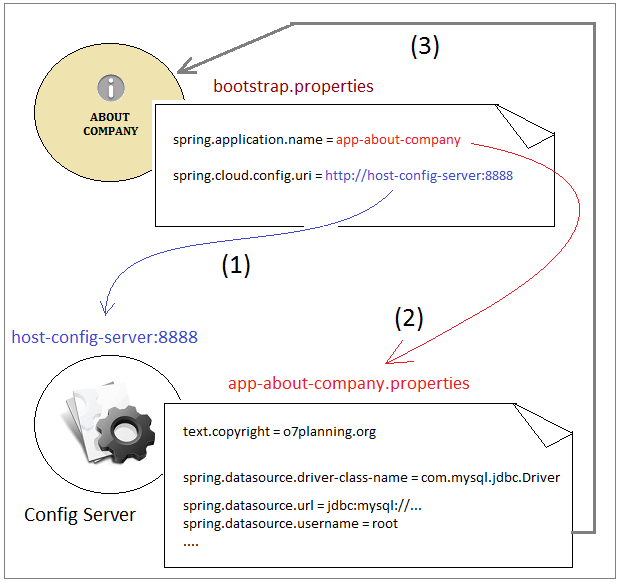
L'application "About Company" utilisera une base de données indépendante. Les informations de configuration de la base de données seront gérées sur Config-Server. Dans l'architecture Microservice, cette application n'est pas simplement un site d'introduction de la société; il peut être un service qui fournit de l'information pour d'autres applications, par exemple, la fourniture d'information sur la ligne directe, les courriels de rétroaction, etc. Bref, cela fait partie du système de Microservice.
Remarque : L'objectif principal de cette leçon est de discuter et de mettre en pratique un exemple de "Comment une application peut-elle gérer les informations de configuration sur un Config-Server".
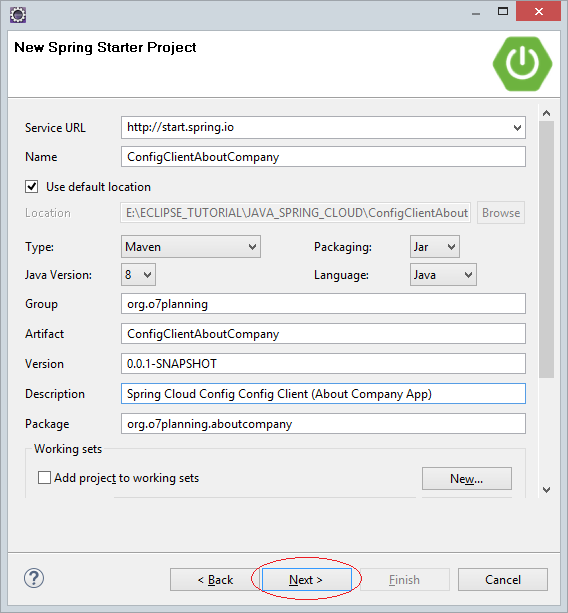
2. Créer un projet Spring Boot
- Name: ConfigClientAboutCompany
- Group: org.o7planning
- Artifact: ConfigClientAboutCompany
- Description: Spring Cloud Config Client (About Company App)
- Package: org.o7planning.aboutcompany
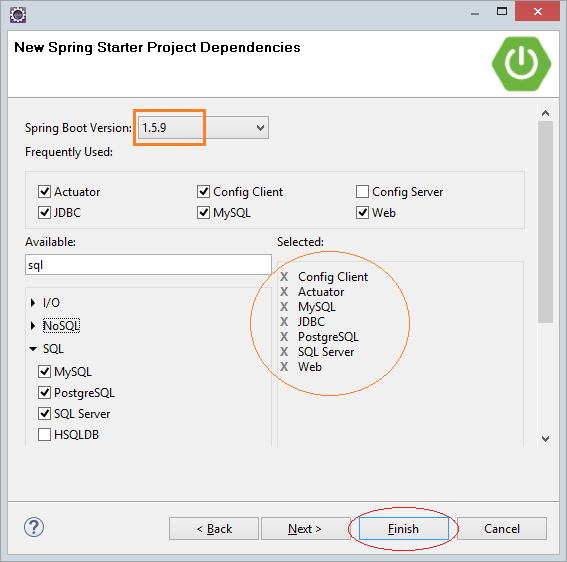

JDBC Driver (MySQL, PostGres,..)
<dependency>
   <groupId>mysql</groupId>
   <artifactId>mysql-connector-java</artifactId>
   <scope>runtime</scope>
</dependency>

<dependency>
   <groupId>org.postgresql</groupId>
   <artifactId>postgresql</artifactId>
   <scope>runtime</scope>
</dependency>

<!-- SQL Server - Mssql-Jdbc driver -->
<dependency>
   <groupId>com.microsoft.sqlserver</groupId>
   <artifactId>mssql-jdbc</artifactId>
   <scope>runtime</scope>
</dependency>

<!-- Oracle Driver -->
<dependency>
   <groupId>com.oracle</groupId>
   <artifactId>ojdbc6</artifactId>
   <version>11.2.0.3</version>
</dependency>
pom.xml
<?xml version="1.0" encoding="UTF-8"?>
<project xmlns="http://maven.apache.org/POM/4.0.0"
   xmlns:xsi="http://www.w3.org/2001/XMLSchema-instance"
   xsi:schemaLocation="http://maven.apache.org/POM/4.0.0
   http://maven.apache.org/xsd/maven-4.0.0.xsd">
   <modelVersion>4.0.0</modelVersion>
   <groupId>org.o7planning</groupId>
   <artifactId>ConfigClientAboutCompany</artifactId>
   <version>0.0.1-SNAPSHOT</version>
   <packaging>jar</packaging>
   <name>ConfigClientAboutCompany</name>
   <description>Spring Cloud Config Config Client (About Company App)</description>
   <parent>
      <groupId>org.springframework.boot</groupId>
      <artifactId>spring-boot-starter-parent</artifactId>
      <version>1.5.9.RELEASE</version>
      <relativePath/>
      <!-- lookup parent from repository -->
   </parent>
   <properties>
      <project.build.sourceEncoding>UTF-8</project.build.sourceEncoding>
      <project.reporting.outputEncoding>UTF-8</project.reporting.outputEncoding>
      <java.version>1.8</java.version>
      <spring-cloud.version>Edgware.RELEASE</spring-cloud.version>
   </properties>
   <dependencies>
      <dependency>
         <groupId>org.springframework.boot</groupId>
         <artifactId>spring-boot-starter-actuator</artifactId>
      </dependency>
      <dependency>
         <groupId>org.springframework.cloud</groupId>
         <artifactId>spring-cloud-starter-config</artifactId>
      </dependency>
      <dependency>
         <groupId>org.springframework.boot</groupId>
         <artifactId>spring-boot-starter-jdbc</artifactId>
      </dependency>
      <dependency>
         <groupId>org.springframework.boot</groupId>
         <artifactId>spring-boot-starter-web</artifactId>
      </dependency>
      <dependency>
         <groupId>mysql</groupId>
         <artifactId>mysql-connector-java</artifactId>
         <scope>runtime</scope>
      </dependency>
      <dependency>
         <groupId>org.postgresql</groupId>
         <artifactId>postgresql</artifactId>
         <scope>runtime</scope>
      </dependency>
      <!-- SQL Server - Mssql-Jdbc driver -->
      <dependency>
         <groupId>com.microsoft.sqlserver</groupId>
         <artifactId>mssql-jdbc</artifactId>
         <scope>runtime</scope>
      </dependency>
      <!-- Oracle Driver -->
      <dependency>
         <groupId>com.oracle</groupId>
         <artifactId>ojdbc6</artifactId>
         <version>11.2.0.3</version>
      </dependency>
      <dependency>
         <groupId>mysql</groupId>
         <artifactId>mysql-connector-java</artifactId>
         <scope>runtime</scope>
      </dependency>
      <dependency>
         <groupId>org.postgresql</groupId>
         <artifactId>postgresql</artifactId>
         <scope>runtime</scope>
      </dependency>
      <dependency>
         <groupId>com.microsoft.sqlserver</groupId>
         <artifactId>mssql-jdbc</artifactId>
         <scope>runtime</scope>
      </dependency>
      <dependency>
         <groupId>org.springframework.boot</groupId>
         <artifactId>spring-boot-starter-test</artifactId>
         <scope>test</scope>
      </dependency>
   </dependencies>
   <dependencyManagement>
      <dependencies>
         <dependency>
            <groupId>org.springframework.cloud</groupId>
            <artifactId>spring-cloud-dependencies</artifactId>
            <version>${spring-cloud.version}</version>
            <type>pom</type>
            <scope>import</scope>
         </dependency>
      </dependencies>
   </dependencyManagement>
   <repositories>
      <!-- Repository for ORACLE JDBC Driver -->
      <repository>
         <id>codelds</id>
         <url>https://code.lds.org/nexus/content/groups/main-repo</url>
      </repository>
   </repositories>
   <build>
      <plugins>
         <plugin>
            <groupId>org.springframework.boot</groupId>
            <artifactId>spring-boot-maven-plugin</artifactId>
         </plugin>
      </plugins>
   </build>
</project>
ConfigClientAboutCompanyApplication.java
package org.o7planning.aboutcompany;

import org.springframework.boot.SpringApplication;
import org.springframework.boot.autoconfigure.SpringBootApplication;

@SpringBootApplication
public class ConfigClientAboutCompanyApplication {

    public static void main(String[] args) {
        SpringApplication.run(ConfigClientAboutCompanyApplication.class, args);
    }

}
3. Configurer Spring Cloud Config Client
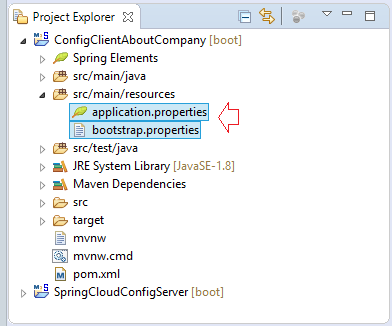
Cette application a besoin de lire ses configurations stockées sur le Config-Server; par conséquent, vous devez lui indiquer les informations sur le Config-Server. Cette information est configurée dans le fichier bootstrap.properties (ou bootstrap.yml). Ce fichier est utilisé très tôt par l'application lors du démarrage de l'application.
Il y a une légère différence dans le format du fichier * .properties et du fichier * .yml, et vous pouvez en apprendre dans les instructions ci-dessous :
- properties vs yml
bootstrap.properties
# Read file on Config-Server:
# app-about-company.properties or app-about-company.yml
spring.application.name=app-about-company

# This is the default:
spring.cloud.config.uri=http://localhost:8888
management.security.enabled=false
Configurez pourque cette application exécute sur le port 7777 :
application.properties
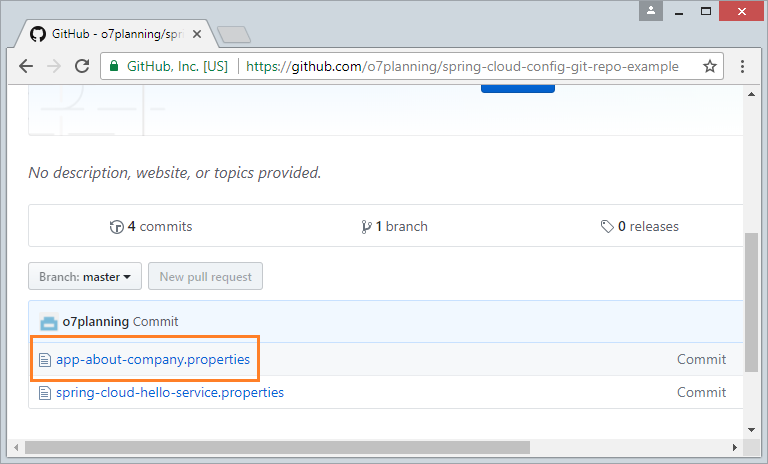
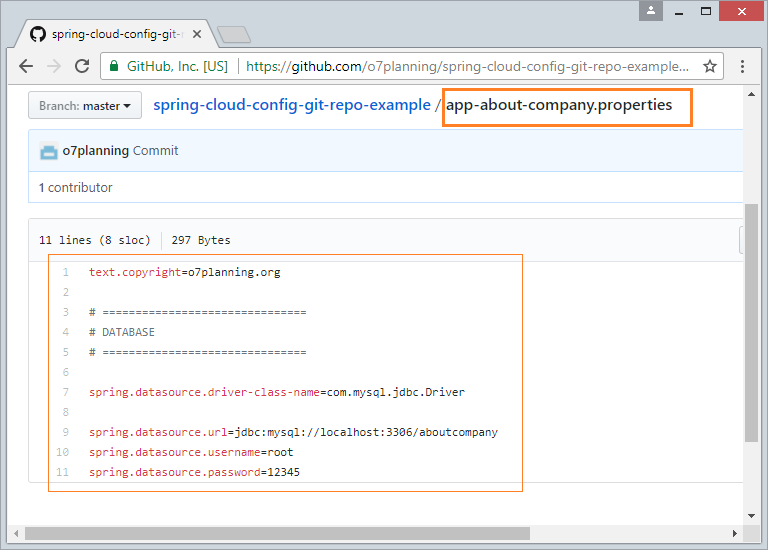
server.port=7777Le fichier de configuration de cette application (Voir plus sur GitHub):
4. Controller
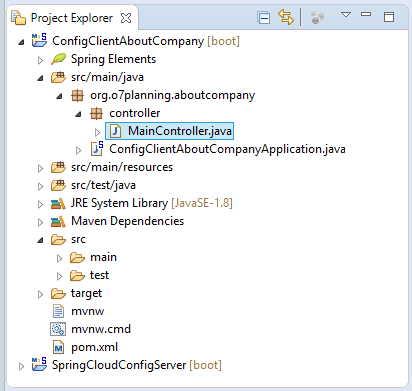
MainController.java
package org.o7planning.aboutcompany.controller;

import javax.sql.DataSource;

import org.springframework.beans.factory.annotation.Autowired;
import org.springframework.beans.factory.annotation.Value;
import org.springframework.cloud.context.config.annotation.RefreshScope;
import org.springframework.web.bind.annotation.RequestMapping;
import org.springframework.web.bind.annotation.ResponseBody;
import org.springframework.web.bind.annotation.RestController;

@RefreshScope
@RestController
public class MainController {

    // https://github.com/o7planning/spring-cloud-config-git-repo-example
    // See: app-about-company.properties
    @Value("${text.copyright: Default Copyright}")
    private String copyright;

    @Value("${spring.datasource.driver-class-name}")
    private String driverClassName;

    @Value("${spring.datasource.url}")
    private String url;

    @Value("${spring.datasource.username}")
    private String userName;

    @Value("${spring.datasource.password}")
    private String password;

    @Autowired
    private DataSource dataSource;

    @RequestMapping("/showConfig")
    @ResponseBody
    public String showConfig() {
        String configInfo = "Copy Right: " + copyright //
                + "<br/>spring.datasource.driver-class-name=" + driverClassName //
                + "<br/>spring.datasource.url=" + url //
                + "<br/>spring.datasource.username=" + userName //
                + "<br/>spring.datasource.password=" + password;

        return configInfo;
    }

    @RequestMapping("/pingDataSource")
    @ResponseBody
    public String pingDataSource() {
        try {
            return this.dataSource.toString();
        } catch (Exception e) {
            e.printStackTrace();
            return "Error: " + e.getMessage();
        }
    }

}
@RefreshScope:
N'importe quel Spring Bean qui est annoté (annotate) par @RefreshScope sera rafraîchit à l'heure d'exécution (runtime). Et tous les composants qui les utilisent obtiendront une nouvelle instance lors de l'appel de méthode suivant, entièrement initialisé et injecté avec toutes les dépendances.
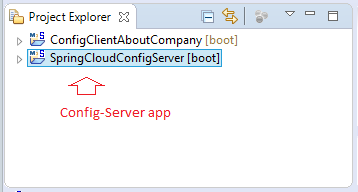
5. Exécuter l'application
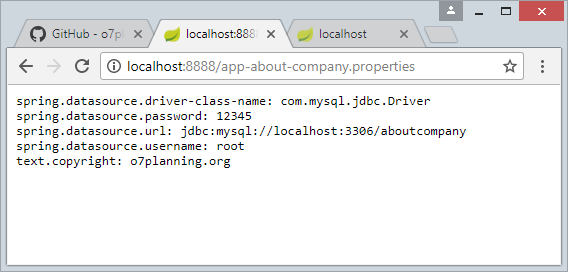
Tout d'abord vous devez exécuter l'application Config-Server. Cette application exécutera sur le port 8888.
Testez cette application par URL ci-dessous :
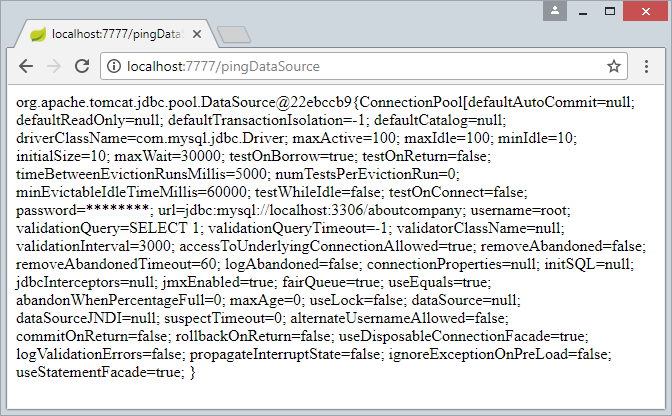
Puis, vous exécutez l'application ConfigClientAboutCompany, celle-ci exécute sur le port 7777 :
Testez - la avec le lien ci-dessous :

Tutoriels Spring Cloud
- Qu'est-ce que le cloud computing?
- Introduction à Netflix et à sa technologie de cloud computing
- Introduction à Spring Cloud
- Comprendre Spring Cloud Config Server avec un exemple
- Comprendre Spring Cloud Config Client avec un exemple
- Comprendre Spring Cloud Eureka Server avec un exemple
- Comprendre Spring Cloud Discovery Eureka Client avec exemple
- Comprendre l'équilibrage de charge dans Spring Cloud avec Ribbon et exemple
Show More