Le Tutoriel de CKEditor

2. Qu'est ce que CKEditor?
CKEditor est un éditeur de texte HTML prêt à l'emploi conçu pour simplifier la création de contenu Web. C'est un éditeur WYSIWYG qui apporte directement des fonctionnalités de traitement de texte directement sur vos pages Web.
CKEditor est une application source ouverte, ce qui signifie qu'il peut être modifié de la manière souhaitée. Il bénéficie d'une communauté active qui évolue constamment avec l'application avec des add-ons gratuits et un processus de développement transparent (transparent development process).
3. Download CKEditor
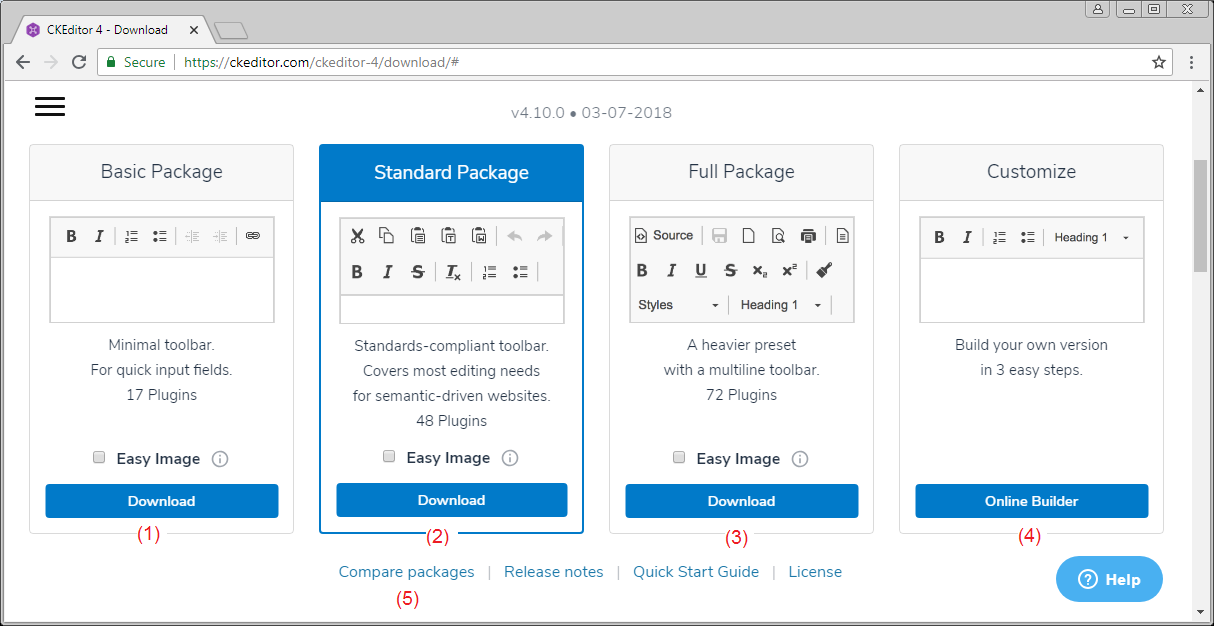
- Basic Package:
- Il s'agit du progiciel de base, qui comprend les fonctions de base de CKEditor, et est un progiciel compact.
- Standard Package:
- Il s'agit d'un progiciel standard, qui contient environ 48 plugins.
- Full Package:
- Voici le progiciel complet, avec tous les plugins de CKEditor. Et c'est le progiciel complet.
- Customize CKEditor Package:
- Il s'agit d'un progiciel personnalisé, vous pouvez choisir de télécharger le plugin nécessaire.
Vous pouvez cliquer sur le lien (5) pour voir plus de différences entre les progiciels.
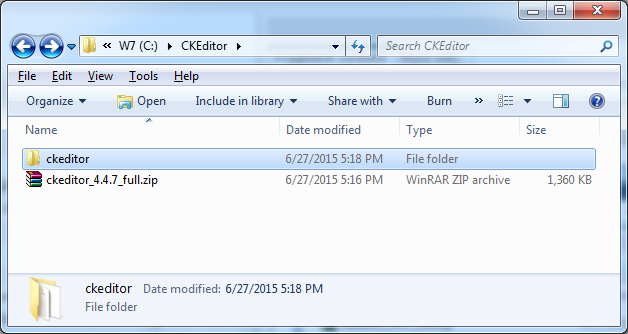
Ici, je téléchargerai le progiciel complet:
Résultat de téléchargement:
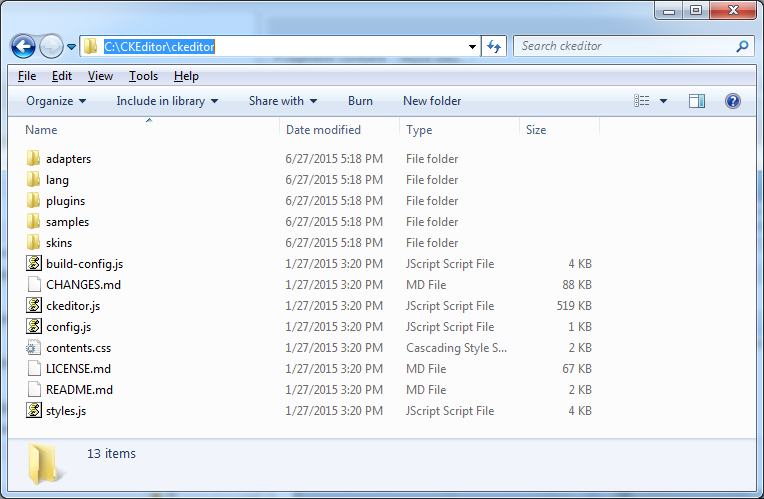
Décompressez:
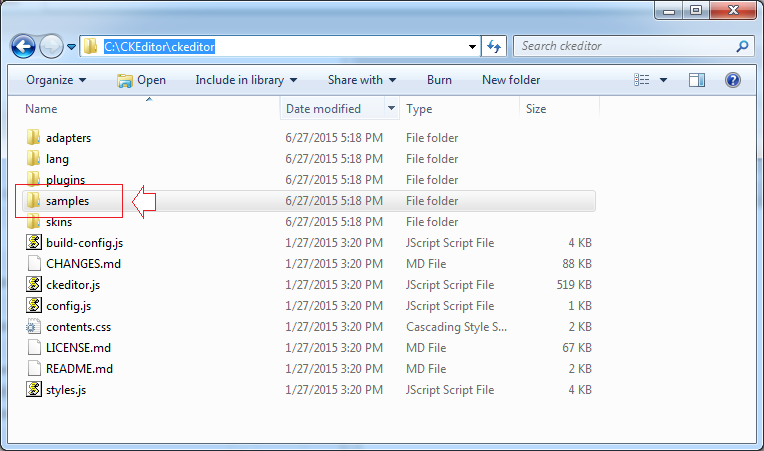
Vous pouvez voir les exemples de CKEditor dans le dossier samples:
4. Des exemples de base
Tous les exemples dans ce document sont sur le répertoire des samples de CKEditor que vous avez téléchargé. Mais j'essaie de vous faciliter l'accès plus facilement.
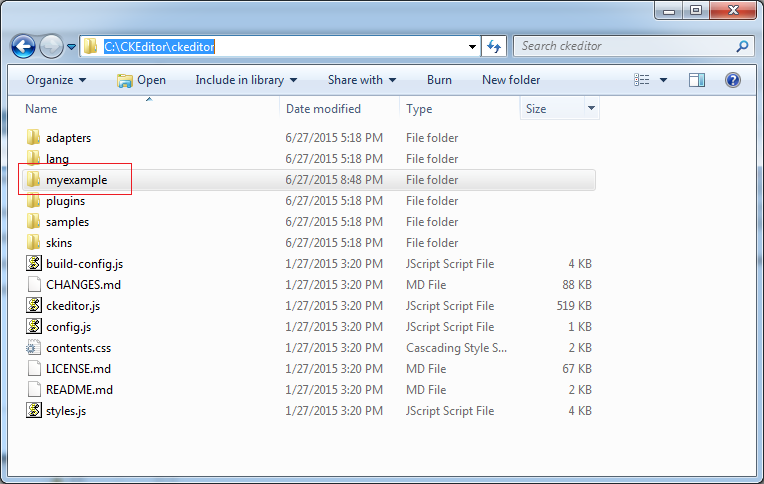
Créez le dossier myexamples, les exemples dans ce documênt vont être placés dans ce dossier.
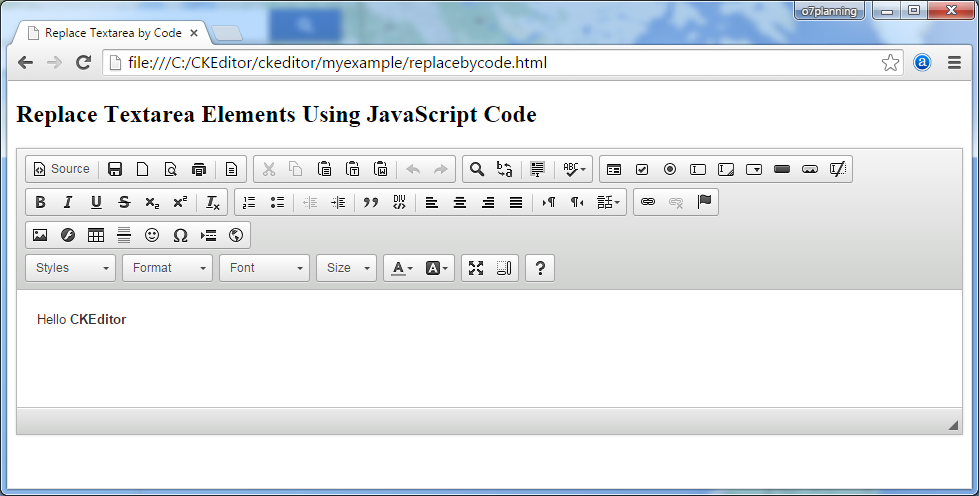
Remplacer les éléments Textarea qui utilisent le code JavaScript
L'exemple simple utilise CKEditor.replace(..) pour remplacer <textarea> par CKEditor.
replacebycode.html
<!DOCTYPE html>
<html>
<head>
    <meta charset="utf-8">
    <title>Replace Textarea by Code</title>

    <!-- (1) : Declaration for CKEditor library -->
    <script src="../ckeditor.js"></script>

</head>
<body>
    <h2>Replace Textarea Elements Using JavaScript Code</h2>

    <form action="" method="post">

        <!-- (2): textarea will replace by CKEditor -->
        <textarea id="editor1" name="editor1" cols="80" rows="10">
            <p>Hello <strong>CKEditor</strong></p>
        </textarea>

         <!-- (3): Javascript code to replace textarea with id='editor1' by CKEditor -->
        <script>

            CKEDITOR.replace( 'editor1' );

        </script>

    </form>
</body>
</html>
Essayer l'exemple:
Les résultats de l'exécution de l'exemple:
Remplacer des éléments textarea par la classe name
Avec des <textarea> ayant l'attribut name, et class ="ckeditor" sera être automatiquement remplacée par CKEditor.
<texarea name = "editor1" class="ckeditor"> </texarea>


<textarea name = "editor2" class="ckeditor"> Text </textarea>
replacebyclass.html
<!DOCTYPE html>
<html>
<head>
   <meta charset="utf-8">
   <title>Replace Textareas by Class Name</title>

   <script src="../ckeditor.js"></script>

</head>
<body>

   <h1>Replace Textarea Elements by Class Name</h1>

   <form action="" method="post">

       <textarea class="ckeditor" name="editor1" cols="80" rows="10">

           <p>Hello <strong>CKEditor</strong></p>

       </textarea>

    </form>

</body>
</html>
Exécutez l'exemple:
Créer des éditeurs CKEditor avec jQuery
Exemple: Créez CKEditor en utilisant JQuery.
jquery.html
<!DOCTYPE html>
<html>
<head>
<meta charset="utf-8">
<title>jQuery Adapter — CKEditor Sample</title>
<script src="http://code.jquery.com/jquery-1.11.0.min.js"></script>
<script src="../ckeditor.js"></script>
<script src="../adapters/jquery.js"></script>
<script>
$( document ).ready( function() {
$( '#editor1' ).ckeditor();
} );
function setValue() {
$( '#editor1' ).val( $( 'input#val' ).val() );
}
</script>
</head>
<body>
<h1 class="samples">Create Editors with jQuery</h1>
<form action="" method="post">
<textarea id="editor1" name="editor1" cols="80" rows="10">
<p>Hello <strong>CKEditor</strong></p>
</textarea>
<input type="text" id="val" value="I'm using jQuery val()!" size="30">
<input onclick="setValue();" type="button" value="Set value">
</form>
</body>
</html>
Exécutez l'exemple:
5. Personnalisation de base
Modifier la couleur d'arrière-plan de l'interface
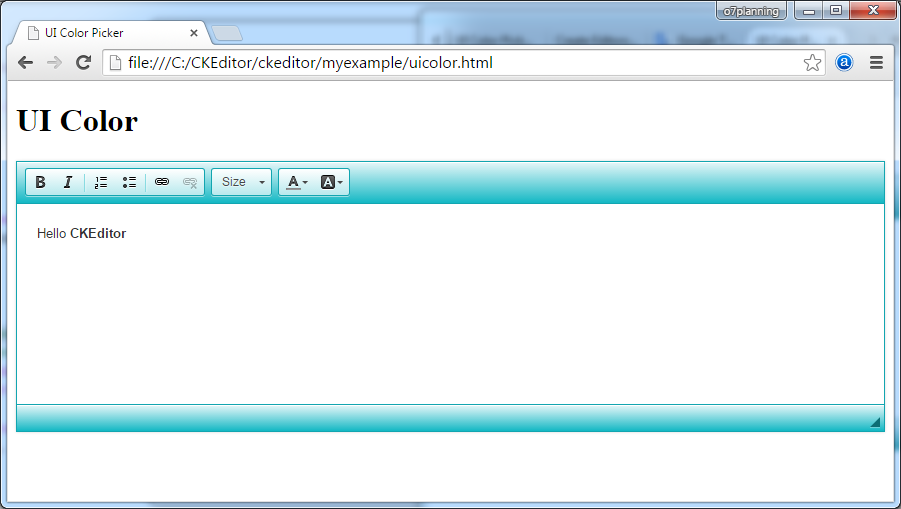
CKEDITOR.replace( 'textarea_id', {
    uiColor: '#14B8C4'
});
uicolor.html
<!DOCTYPE html>
<html>
<head>
   <meta charset="utf-8">
   <title>UI Color Picker</title>

   <script src="../ckeditor.js"></script>

</head>
<body>
   <h1>UI Color</h1>

   <textarea id="editor1" name="editor1" cols="80" rows="10">
       <p>Hello <strong>CKEditor</strong></p>
   </textarea>

   <script>

       // Replace the <textarea id="editor1"> with an CKEditor
       // instance, using default configurations.
       CKEDITOR.replace( 'editor1', {
           uiColor: '#14B8C4',
           toolbar: [
               [ 'Bold', 'Italic', '-', 'NumberedList', 'BulletedList', '-', 'Link', 'Unlink' ],
               [ 'FontSize', 'TextColor', 'BGColor' ]
           ]
       });

   </script>
</body>
</html>
Try it:
Voir plus:
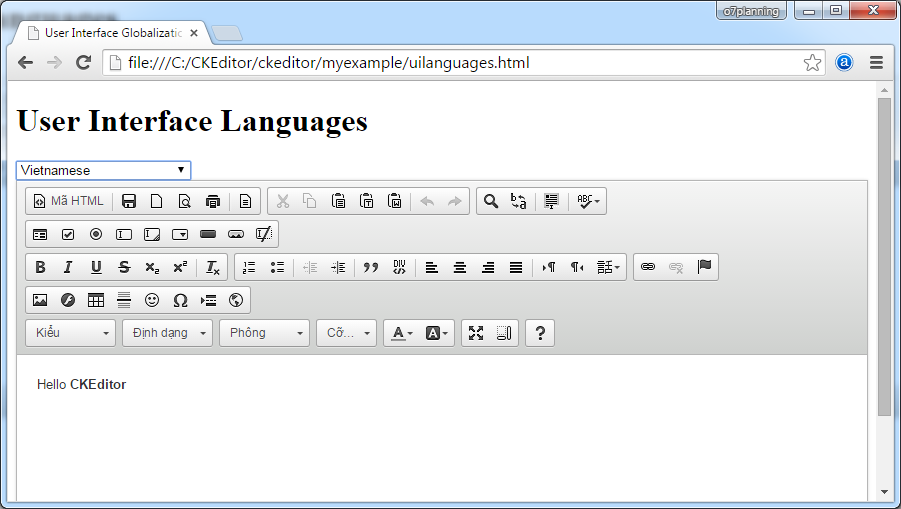
Chager la langue
uilanguages.html
<!DOCTYPE html>
<html>
 <head>
    <meta charset="utf-8">
    <title>User Interface Globalization</title>

    <script src="../ckeditor.js"></script>

 </head>
 <body>

    <h1>User Interface Languages</h1>
    <form action="" method="post">

       <select onchange="createEditor( this.value );" id="languages">
          <option value="en-gb">English (United Kingdom)</option>
          <option value="vi">Vietnamese</option>
          <option value="zh-cn">Chinese Simplified</option>
          <option value="zh">Chinese Traditional</option>
       </select>

       <textarea id="editor1" name="editor1"  cols="80" rows="10">
             <p>Hello <strong>CKEditor</strong></p>
       </textarea>

       <script>
          var editor;

          function createEditor( languageCode ) {
              if ( editor )
                  editor.destroy();

              // Replace the <textarea id="editor1"> with an CKEditor
              // instance, using default configurations.
              editor = CKEDITOR.replace( 'editor1', {
                  language: languageCode,

                  on: {
                      instanceReady: function() {
                          // Wait for the editor to be ready to set
                          // the language combo.
                          var languages = document.getElementById( 'languages' );
                          languages.value = this.langCode;
                          languages.disabled = false;
                      }
                  }
              });
          }

          // At page startup, load the default language:
          createEditor( '' );

       </script>

    </form>
 </body>
</html>
Remarque: La liste des codes de langue et des noms de langue que vous pouvez voir dans:
- <CKEditor_Home>/samples/assets/uilanguages/languages.js
Exécutez l'exemple:
6. Édition en ligne (Inline Editing)
Création massive d'éditeurs en ligne
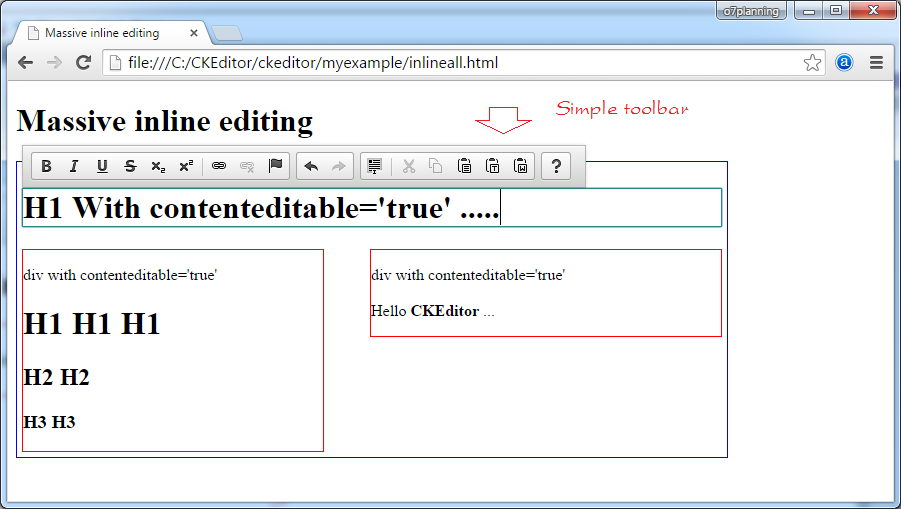
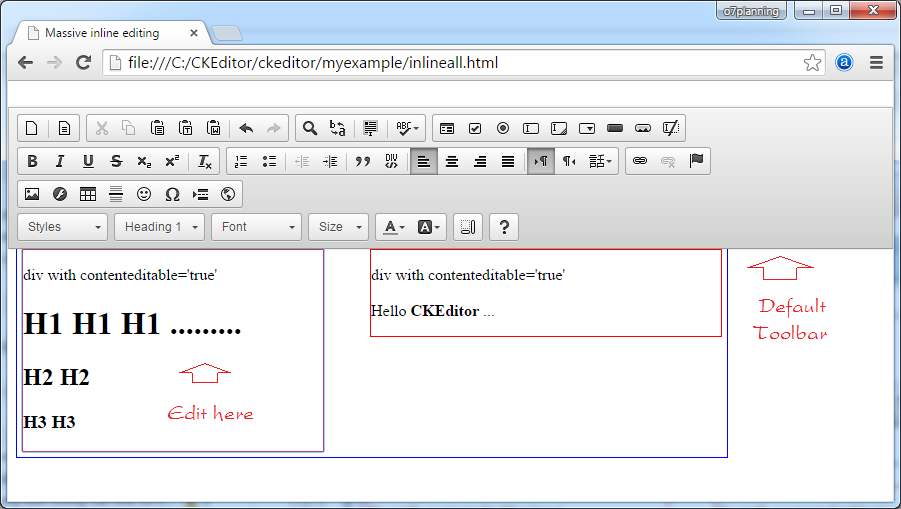
Cette page exemple démontre la fonctionnalité d'édition en ligne (inline editing) - Les instances de CKEditor seront créées automatiquement à partir d'éléments (element) de page avec contenteditable = 'true':
Vous pouvez modifier le contenu à l'intérieur de l'élément HTML qui a l'attrobut contenteditable='true'. Et la barre d'outils CKEditor s'affiche lorsque vous modifiez.
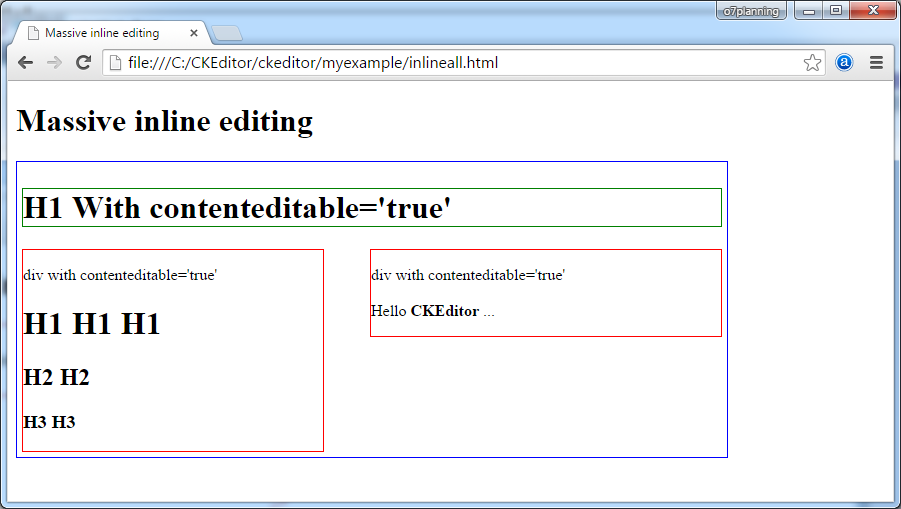
- Si h1, h2, h3 ou l'étiquette a id = taglist, et contient contenteditable = 'true', La barre d'outils s'affiche simplement (Supprimé des plugin colorbutton, find, flash, fonts,... )
- À l'inverse, la barre d'outils est affichée par défaut.
Voici sont des images de l'exécution de l'exemple:
inlineall.html
<!DOCTYPE html>
<html>
  <head>
     <meta charset="utf-8">
     <title>Massive inline editing</title>
     <script src="../ckeditor.js"></script>

     <script>

        // The "instanceCreated" event is fired for every editor instance created.
        CKEDITOR.on( 'instanceCreated', function( event ) {
            var editor = event.editor,
                element = editor.element;

            // Customize editors for headers and tag list.
            // If element (h1, h2, h3 or id='taglist') and contenteditable="true"
            // These editors don't need features like smileys, templates, iframes etc.

            if ( element.is( 'h1', 'h2', 'h3' ) || element.getAttribute( 'id' ) == 'taglist' ) {
                // Customize the editor configurations on "configLoaded" event,
                // which is fired after the configuration file loading and
                // execution. This makes it possible to change the
                // configurations before the editor initialization takes place.

                editor.on( 'configLoaded', function() {

                    // Remove unnecessary plugins to make the editor simpler.
                    editor.config.removePlugins = 'colorbutton,find,flash,font,' +
                        'forms,iframe,image,newpage,removeformat,' +
                        'smiley,specialchar,stylescombo,templates';

                    // Rearrange the layout of the toolbar.
                    editor.config.toolbarGroups = [
                        { name: 'editing',        groups: [ 'basicstyles', 'links' ] },
                        { name: 'undo' },
                        { name: 'clipboard',    groups: [ 'selection', 'clipboard' ] },
                        { name: 'about' }
                    ];
                });
            }
        });

     </script>
  </head>
  <body>
     <h1>Massive inline editing</h1>

     <div id="container" style="border: 1px solid blue;width: 700px; display:inline-block;padding:5px;">

          <h1 contenteditable="true" style="border:1px solid green;">
              H1 With contenteditable='true'
          </h1>

          <div style="border: 1px solid red; float: left;width: 300px;" contenteditable="true">
             div with contenteditable='true'
             <h1>H1 H1 H1</h1>
             <h2>H2 H2</h2>
             <h3>H3 H3</h3>
          </div>

          <div style="border: 1px solid red; float: right;width: 350px;" contenteditable="true">
             div with contenteditable='true' <br><br>
             Hello <b>CKEditor</b> ...
          </div>

      </div>

  </body>
</html>
Exécutez de l'exemple:
Convertir l'élément en un éditeur en ligne par code
inlinebycode.html
<!DOCTYPE html>
<html>
<head>
<meta charset="utf-8">
<title>Inline Editing by Code — CKEditor Sample</title>
<script src="../ckeditor.js"></script>
<style>
#editable
{
padding: 10px;
float: left;
}
</style>
</head>
<body>
<h1>Inline Editing by Code</h1>
<div id="editable" contenteditable="true" style="border:1px solid red;">
<p>Hello <strong>CKEditor</strong></p>
</div>
<script>
// We need to turn off the automatic editor creation first.
CKEDITOR.disableAutoInline = true;
var editor = CKEDITOR.inline( 'editable' );
</script>
</body>
</html>Remplacer textarea par l'éditeur en ligne
inlinetextarea.html
<!DOCTYPE html>
<html>
   <head>
      <meta charset="utf-8">
      <title>Replace Textarea with Inline Editor</title>

      <script src="../ckeditor.js"></script>

      <style>
         /* Style the CKEditor element to look like a textfield */
         .cke_textarea_inline
         {
         padding: 10px;
         height: 200px;
         overflow: auto;
         border: 1px solid gray;
         -webkit-appearance: textfield;
         }
      </style>

   </head>
   <body>
      <h1>Replace Textarea with Inline Editor</h1>


      <textarea name="article-body" style="height: 200px">
               <p>Hello <strong>CKEditor</strong></p>
      </textarea>

      <script>
         CKEDITOR.inline( 'article-body' );
      </script>

   </body>
</html>
Éditeur en ligne avec jQuery
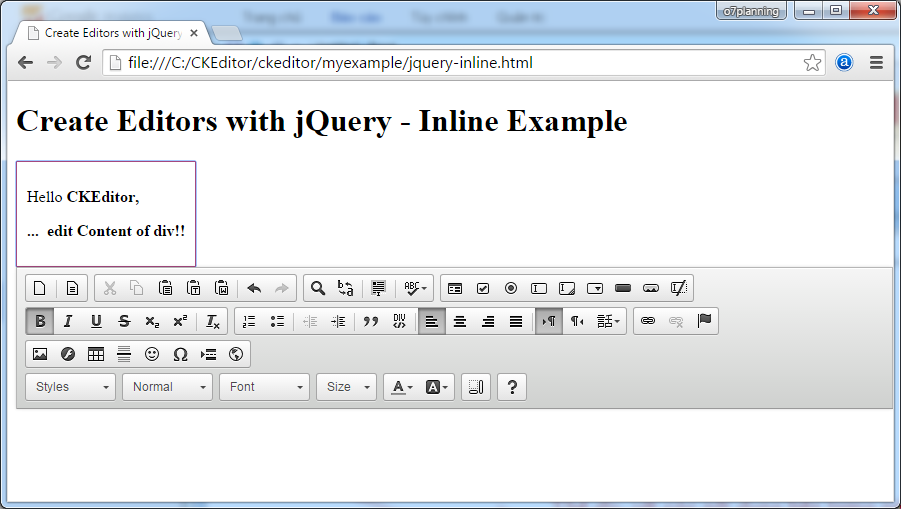
jquery-inline.html
<!DOCTYPE html>
<html>
<head>
  <meta charset="utf-8">
  <title>Create Editors with jQuery - Inline Example</title>
  <script src="http://code.jquery.com/jquery-1.11.0.min.js"></script>

  <script src="../ckeditor.js"></script>
  <script src="../adapters/jquery.js"></script>

  <style>

      #editable
      {
          padding: 10px;
          float: left;
      }

  </style>

  <script>

      CKEDITOR.disableAutoInline = true;

      $( document ).ready( function() {
          $( '#editable' ).ckeditor(); // Use CKEDITOR.inline().
      } );

  </script>
</head>
<body>

  <h1>Create Editors with jQuery - Inline Example</h1>

  <form action="" method="post">

      <div id="editable" contenteditable="true" style="border: 1px solid red;">
          <p>Hello <strong>CKEditor</strong></p>
      </div>

  </form>


</body>
</html>
7. La configuration du CKEditor
Vous pouvez configurer CKEditor au moment de l'exécution. Vous avez deux façons de configurer CKEditor
- La configuration statique:
- Elle prendra effet pour tous les CKEditor, ceux qui ne spécifient pas la configuration.
- La configuration d'un CKEditor spécifique:
- Elle est uniquement efficace pour CKEditor être configuré.
La configuration statique
La configuration statique:
- Elle prendra effet pour tous les CKEditor, ceux qui ne spécifient pas la configuration.
Considérez par exemple une configuration statistique:
// Configuring the toolbar, displays a few buttons.
CKEDITOR.config.toolbar = [  ['Font','FontSize'], ['Bold','Italic']  ];

// Configuring UI Color.
CKEDITOR.config.uiColor = '#9AB8F3';

CKEDITOR.config.width = '500px';
CKEDITOR.config.height = '70px';
config-static.html
<!DOCTYPE html>
<html>
<head>
    <meta charset="utf-8">
    <title>Config CKEditor - Static config</title>
    <script src="../ckeditor.js"></script>


    <script>
        // Cấu hình lại toolbar, hiển thị một vài Button.
        CKEDITOR.config.toolbar = [  ['Font','FontSize'], ['Bold','Italic']  ];

        // Cấu hình lại màu nền giao diện.
        CKEDITOR.config.uiColor = '#9AB8F3';
        CKEDITOR.config.resize_enabled = false;
        CKEDITOR.config.width = '500px';
        CKEDITOR.config.height = '70px';
    </script>
</head>
<body>
    <h3>CKEditor Static config</h3>

    <p>CKEditor 1</p>
    <textarea class="ckeditor" name="editor1" >
         <p>This is CKEditor 1</p>
    </textarea>

    <p>CKEditor 2</p>
    <textarea class="ckeditor" name="editor2" >
         <p>This is CKEditor 2</p>
    </textarea>

</body>
</html>
Exécutez de l'exemple:
Voir plus sur la configuration Toolbar
Configurer CKEditor précisé
Avec chaque CKEditor' dans une page, vous pouvez configurer différemment pour eux. Par exemple, une page avec 2 CKEditor différents avecToolbar différents dans le numéro de Button.
config-instance.html
<!DOCTYPE html>
<html>
<head>
    <meta charset="utf-8">
    <title>Config CKEditor - instance config</title>
    <script src="../ckeditor.js"></script>


    <script>

        // Background color
        CKEDITOR.config.uiColor = '#FFE6E6';

        // Do not allow resizing
        CKEDITOR.config.resize_enabled = false;

    </script>
</head>
<body>
    <h3>CKEditor instance config</h3>

    <p>CKEditor 1</p>
    <textarea id="editor1" name="editor1">
         <p>This is CKEditor 1</p>
    </textarea>

    <p>CKEditor 2</p>
    <textarea id="editor2" name="editor2">
         <p>This is CKEditor 2</p>
    </textarea>

    <script>
       CKEDITOR.replace( 'editor1' , {
          toolbar: [  ['Font','FontSize'], ['Bold','Italic']  ],
          width: '300px',
          height: '80px',
          resize_enabled : true
       } );

       CKEDITOR.replace( 'editor2' , {
          toolbar: [  ['Font'], ['Bold' ]  ],
          width: '500px',
          height: '100px'
       } );
    </script>

</body>
</html>
Exécutez de l'exemple:
Les attributs de la configuration
Vous pouvez trouver la liste des attributs de configuration à l'adresse suivante:
8. Les configurations de Toolbar
Il existe plusieurs approches pour la configuration de Toolbar CKEditor à choisir:
- L'utilisation du Configurateur Toolbar (Toolbar Configurator)
- ...
- La configuration "Item by Item"
- config.toolbar
- La configurations du groupe Toolbar (Toolbar Groups)
- config.toolbarGroups
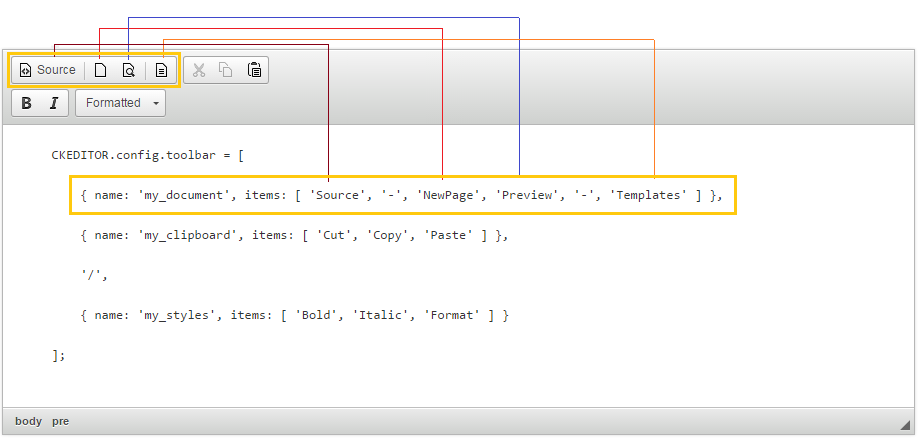
La configuration Toolbar "Item by Item"
Vous pouvez configurer Toolbar par type "Item by Item", cela signifie que vous déclarez les groupes, chaque groupe contient des Button.
Voici un extrait de code avec la configuration de Toolbar.
// Declaring groups, each group with the buttons.

CKEDITOR.config.toolbar = [

   { name: 'my_document', items: [ 'Source', '-', 'NewPage', 'Preview', '-', 'Templates' ] },

   { name: 'my_clipboard', items: [ 'Cut', 'Copy', 'Paste' ] },

   '/',

   { name: 'my_styles', items: [ 'Bold', 'Italic', 'Format' ] }

];
Vous ne devez plus déclarer le nom du groupe.
CKEDITOR.config.toolbar = [

   [ 'Source', '-', 'NewPage', 'Preview', '-', 'Templates' ],

   [ 'Cut', 'Copy', 'Paste' ] ,

   '/',

   [ 'Bold', 'Italic', 'Format' ]

];
toolbar-itembyitem.html
<!DOCTYPE html>
<html>
<head>
    <meta charset="utf-8">
    <title>CKEditor Toolbar Configuration - Item by Item</title>
    <script src="../ckeditor.js"></script>


    <script>

    CKEDITOR.config.toolbar = [

        { name: 'my_document', items: [ 'Source', '-', 'NewPage', 'Preview', '-', 'Templates' ] },

        { name: 'my_clipboard', items: [ 'Cut', 'Copy', 'Paste' ] },

        '/',

        { name: 'my_styles', items: [ 'Bold', 'Italic', 'Format' ] }

    ];

    CKEDITOR.config.height = '300px';

    </script>
</head>
<body>

<h3>CKEditor Toolbar Configuration - Item by Item</h3>


<textarea class="ckeditor" name="editor1">
    <pre>
    CKEDITOR.config.toolbar = [

        { name: 'my_document', items: [ 'Source', '-', 'NewPage', 'Preview', '-', 'Templates' ] },

        { name: 'my_clipboard', items: [ 'Cut', 'Copy', 'Paste' ] },

        '/',

        { name: 'my_styles', items: [ 'Bold', 'Italic', 'Format' ] }

    ];
    </pre>
</textarea>

</body>
</html>
Exécutez de l'exemple:
La configuration des groupes Toolbar (Toolbar Groups)
Les avantages de la configuration du groupe:
L'avantage le plus important de la configuration du groupe de Toolbar (Toolbar Groups Configuration) sur la configuration "Item by item" est: l'automatisation.
Il est maintenant possible pour les développeurs de plugins de définir dans quel groupe de Toolbar leurs plugins doivent ajouter des boutons.
Il est maintenant possible pour les développeurs de plugins de définir dans quel groupe de Toolbar leurs plugins doivent ajouter des boutons.
Bien que n'étant pas obligatoire, il est recommandé de configurer tous les groupes et sous-groupes (y compris ceux que vous n'utilisez pas), parce qu'à tout moment dans le future, un nouveau plugin sera installé, son bouton apparaîtra automatiquement dans la barre d'outils sans autre configuration exigences.
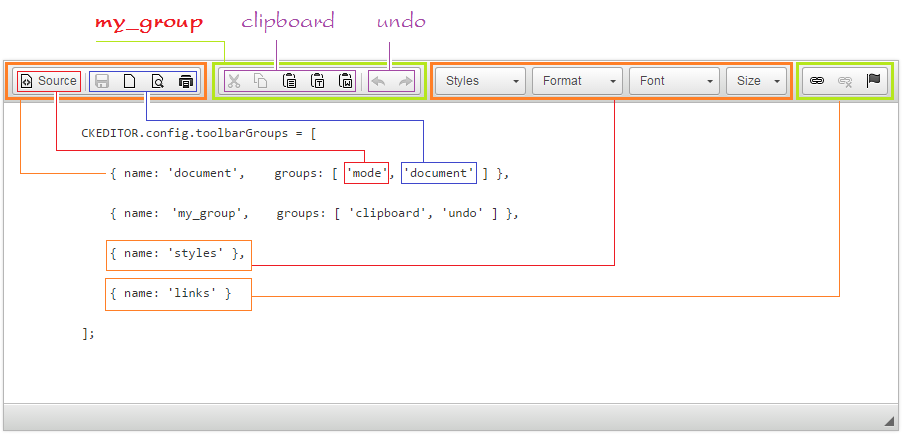
Exemple:
// Ckeditor has built the basic group called "mode", "document", "clipboard", "undo", "styles", "links" .....
// You can define your group with any name, and contain the basic group of CKEditor.
// Your group can namesake with available group of Ckeditor .
// Your group may not need to list the sub-group, then by default it will contain one sub-group has the same name as your group.

CKEDITOR.config.toolbarGroups = [

   { name: 'document',    groups: [ 'mode', 'document' ] },

   { name: 'my_group',   groups: [ 'clipboard', 'undo' ] },

   { name: 'styles' },

   { name: 'links' }

];
Les avantage de la configuration Toolbar Groups est lorsque vous changez la bibliothèque CKEditor dans une version plus récente si, dans un certain group de la nouvelle version, vous ajoutez un nouveau bouton, il sera automatiquement affiché dansToolbar, vous n'avez pas besoin de modifier le code de votre page
Vous pouvez utiliser "/" dans la configuration Toolbar pour sauter de ligne.
CKEDITOR.config.toolbarGroups = [

   { name: 'document',    groups: [ 'mode', 'document' ] },

   { name: 'my_clipboard',   groups: [ 'clipboard', 'undo' ] },

   '/',

   { name: 'styles' },

   { name: 'links' }
];
toolbar-group.html
<!DOCTYPE html>
<html>
<head>
    <meta charset="utf-8">
    <title>CKEditor Toolbar Groups Configuration</title>
    <script src="../ckeditor.js"></script>


    <script>

        CKEDITOR.config.toolbarGroups = [

            { name: 'document',    groups: [ 'mode', 'document' ] },

            { name: 'my_clipboard',   groups: [ 'clipboard', 'undo' ] },
            '/',
            { name: 'styles' },

            { name: 'links' }
        ];

        CKEDITOR.config.height = '300px';

    </script>
</head>
<body>

    <h3>CKEditor Toolbar Groups Configuration</h3>


    <textarea class="ckeditor" name="editor1">
        <pre>
        CKEDITOR.config.toolbarGroups = [

            { name: 'document',    groups: [ 'mode', 'document' ] },

            { name: 'my_group',   groups: [ 'clipboard', 'undo' ] },

            { name: 'styles' },

            { name: 'links' }

        ];
        </pre>
    </textarea>

</body>
</html>
Exécutez de l'exemple:
La liste du groupe et d'Item disponible sur CKEditor
C'est la définition des groupes dans CKEditor 3.x:
{ name: 'document', items : [ 'Source','-','Save','NewPage','DocProps','Preview','Print','-','Templates' ] },

{ name: 'clipboard', items : [ 'Cut','Copy','Paste','PasteText','PasteFromWord','-','Undo','Redo' ] },

{ name: 'editing', items : [ 'Find','Replace','-','SelectAll','-','SpellChecker', 'Scayt' ] },

{ name: 'forms', items : [ 'Form', 'Checkbox', 'Radio', 'TextField', 'Textarea', 'Select', 'Button', 'ImageButton', 'HiddenField' ] },

{ name: 'basicstyles', items : [ 'Bold','Italic','Underline','Strike','Subscript','Superscript','-','RemoveFormat' ] },

{ name: 'paragraph', items : [ 'NumberedList','BulletedList','-','Outdent','Indent','-','Blockquote','CreateDiv',
                               '-','JustifyLeft','JustifyCenter','JustifyRight','JustifyBlock','-','BidiLtr','BidiRtl' ] },

{ name: 'links', items : [ 'Link','Unlink','Anchor' ] },

{ name: 'insert', items : [ 'Image','Flash','Table','HorizontalRule','Smiley','SpecialChar','PageBreak','Iframe' ] },

{ name: 'styles', items : [ 'Styles','Format','Font','FontSize' ] },

{ name: 'colors', items : [ 'TextColor','BGColor' ] },

{ name: 'tools', items : [ 'Maximize', 'ShowBlocks','-','About' ] }